Teufel RADIO ONE Manual
- Technical description and user manual (29 pages) ,
- Quick start manual (25 pages) ,
- Technical description and user manual (32 pages)
Advertisement
- 1 What's in the carton
- 2 Product overview
- 3 Setting Up the Speaker
- 4 Using the Speaker
- 5 Listening to FM radio
- 6 Listening to DAB+ RADIO
- 7 Bluetooth Mode
- 8 Setting and Using the Alarms
- 9 Using the AUX IN connector
- 10 Using the Menu button
- 11 Care And Cleaning
- 12 Troubleshooting
- 13 Technical Data
- 14 For Your Safety
- 15 Safety notes
- 16 Documents / Resources
What's in the carton
Carefully unpack the carton and confirm that the following parts are included:

Check that all items have been delivered and that nothing is damaged. If the delivery is incomplete or exhibits transport damages, please contact our service team. Do not in any case operate the device if it is damaged.
 After taking out the speaker, please remove the transparent protection film, including the protection film covering the rubber feet.
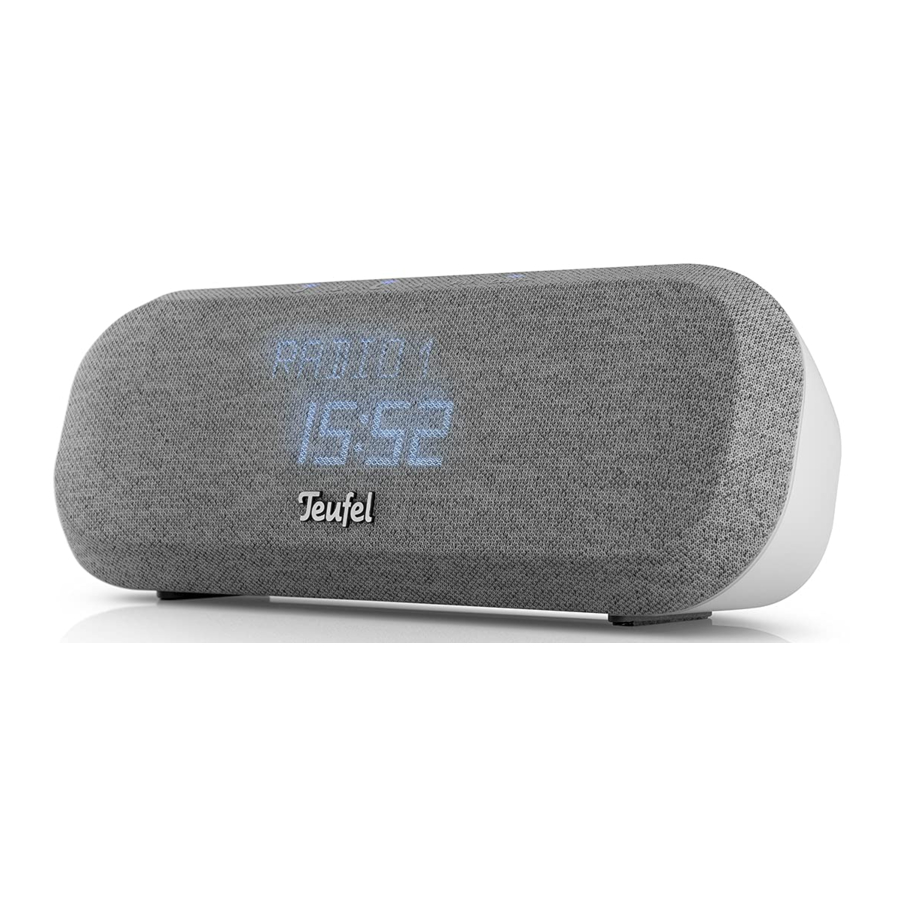
Product overview
Controls And Connections

- Menu
- Previous
- Next
- Volume Wheel
- Volume change
- Navigation (if menu open)
- Center Press: Power Play/Pause, Mute Select Snooze
- Favorite 1
- Favorite 2
- Favorite 3
- Alarm 1
- Alarm 2
- Sleep-timer
- Bluetooth
- FM Radio
- DAB+ Radio

- USB port (for smartphone charging 5 V/1 A)
- AUX port
- Slot for Kensington MicroSaver (lock reinforced with metal plate on the inside of the housing).
- DC power connector
For optimal DAB+/FM reception, please remove the antenna cable from the holder and straightening out on the bottom side of your RADIO ONE.

Setting Up the Speaker
Placing the speaker
- To enjoy maximum audio performance:
- Place the speaker within two feet of a wall, and avoid placing directly in a corner.
- Place the speaker on a flat, stable surface.
There are 2pcs additional rubber feet in package as spare use.

- Do not place the speaker on a metal surface. It could interfere with FM/DAB+ reception.
- Do not place the speaker on a heat-sensitive surface. Like all electrical equipment, it generates some heat.
- Do not use the speaker in a damp location or any other place where moisture can get inside.
Connecting to power
- Insert the small end of the power cord into the DC POWER connector.
- Plug the power cord into the DC (mains) power outlet.
Setting the clock
- The antenna needs to be extended at the first use.
- After plugging in the speaker, press on the center of the volume wheel for power on and complete the initial setup.
- At the initial setup, the time format needs to be selected (24h or 12h).
- Afterwards the speaker automatically goes to DAB+ source, scans for available stations and updates the time.
- Time and date can be set manually in the menu item "CLOCK".
For more information, see Section "Setting and Using the Alarms".
Using the Speaker
Volume Wheel
The Speaker has a Volume Wheel on the top panel. Rotate to adjust the volume or navigate (if menu open). Press to power on, play/pause/mute, snooze a sounding alarm or select item when menu is open.

- Hold for 2 seconds to turn off the device.
- Snooze can be activated by pressing and by turning the wheel.
Reading the display
The VA LCD Display on the front can show time and information text.

Powering on or off the speaker
After plugging in the speaker, press the center of the volume wheel to turn on the speaker. The LCD Display shows "TEUFEL" and the last source you were listening to is active.
NOTICE
The speaker automatically shuts itself off to standby after 10 minutes without audio signal and user operation. You can press on the volume wheel (power on) or by selecting the speaker from a BT device that was already connected before to wake the speaker.
Controlling the volume
Rotate clockwise or counterclockwise to increase or decrease volume. VOLUME - 0 (Mute) to 32 (loud) appears on the display to indicate the level.
Setting the Sleep timer
Press Sleeptimer button  to set the speaker to shut off after a selected period of time. The status LED above the button fades in and stays on until timing is reached. After the timing is reached, the music fades out, status LED for sleep timer fades out and the speaker goes into standby (sleep timer happens once and is deactivated after event). To cancel the sleep timer, press the button again to deactivate it. Also, you can press the button for 2 seconds to change default time (15min/30min/45min/60min/ 90min).
Setting the display brightness
The brightness of the display can be configured independently for the switched-on state and for standby mode. This enables optimum adaptation to different lighting conditions and energy savings in standby mode.
Adjusting the brightness
The brightness settings can be achieved as follows:
- Switched on state:
- Press theMENU (
![]() ) button.
) button. - Use the navigation wheel to navigate toDIMMING.
- Open the settings by pressing the center of the navigation wheel.
- Select "SPKR. ON" to set the brightness of Radio One when it is switched on.
- Scroll through the available options (AUTO, LOW, MID, HIGH) and confirm your selection by pressing the navigation wheel again.
- Press theMENU (
- Standby mode:
- Press the "Menu" (
![]() ) button.
) button. - Use the navigation wheel to navigate toDIMMING.
- Open the settings by pressing the center of the navigation wheel.
- SelectSTANDBY to set the brightness of Radio One in standby mode.
- Scroll through the available options (AUTO, LOW, MID, HIGH, OFF) and confirm your selection by pressing the navigation wheel again.
- Press the "Menu" (
Selecting the appropriate brightness level
- AUTO (automatic adjustment to the ambient light)
- LOW (low brightness for dark environments)
- MID (medium brightness for normal lighting conditions)
- HIGH (high brightness for bright environments)
- OFF (display switched off, only available in standby mode) In AUTO mode, the light sensor automatically adjusts the display brightness to the ambient light. This optimizes readability and reduces energy consumption at the same time.
NOTE
If the brightness does not work as desired, check that automatic mode is activated and that the light sensor is not covered.
Listening to FM radio
Press FM button to change source to FM and start playing last active FM radio station. The LCD Display shows RDS-PS. Press the button for 2 seconds to open FM Display Menu. You can select information to be shown in the display text line, such as Station Name, Frequency, Broadcast Text, Signal Strength, Date etc. You can switch between options with volume wheel and confirms with select.
Tuning to an FM station
When you press Previous or Next button to tune to a radio station, the frequency appears in the center of the display while you are tuning.
![]() Press Previous to decrease frequency in 0.05 MHZ steps and device stops scanning automatically when a station is found.
Press Previous to decrease frequency in 0.05 MHZ steps and device stops scanning automatically when a station is found. ![]() Press Next to increase frequency in 0.05 MHZ steps and device stops scanning automatically when a station is found.
Press Next to increase frequency in 0.05 MHZ steps and device stops scanning automatically when a station is found.
NOTICE
Press and hold the button to fast increase FM frequency, release button to stay at the closest FM station found and play content.
NOTICE
If FM reception is weak, make sure the FM antenna is straightened out as much as possible to improve the FM reception.
If the FM reception is weak, it is also an option to switch to Mono. This can be done when going to the menu while FM source is active and selecting the first item FM MODE. Switching back to Stereo works the same way, it can be also selected later again in the menu item FM MODE.

Storing FM radio station Favorites
You can store up to 3 FM radio stations for quick recall using the Favorite buttons. Storing a favorite replaces any station previously stored to that favorite number.
- Tune to the station you want to save as a Favorite.
- Press and hold one of the 3 Favorite buttons for 2 seconds to save the currently played radio station. The LCD Display shows "STORED 1" for 2 sec to confirm.
- Press one of the Favorite buttons to quickly tune to a previously stored FM station.
NOTICE
Favorite buttons can be used for each source individually.
Listening to DAB+ RADIO
The speaker can receive Band III digital radio broadcasts (DAB and DAB+ formats only).
Press DAB+ button to change source to DAB+ and start playing last active DAB+ radio station. The display shows the station name. Press the button for 2 seconds to open DAB+ Display Menu. You can select information to be shown in the display text line, such as Station Name, Broadcast Text, Signal Strength, Date etc. You can switch between options with volume wheel and confirms with select.
Tuning to an DAB+ station
Press Previous or Next button to go to previous or next DAB+ station.
![]() Press and hold the button to search fast backwards for DAB+ stations, release button to stay at the closest DAB+ station found and play content.
Press and hold the button to search fast backwards for DAB+ stations, release button to stay at the closest DAB+ station found and play content.
![]() Press and hold the button to search fast forward for DAB+ stations, release button to stay at the closest DAB+ station found and play content.
Press and hold the button to search fast forward for DAB+ stations, release button to stay at the closest DAB+ station found and play content.
- To scan for available DAB+ radio stations, please go to the menu while DAB+ source is active and select the first menu item DABSCAN.
Storing DAB+ radio station Favorites
You can store up to 3 DAB+ radio stations for quick recall using the Favorite buttons. Storing a favorite replaces any station previously stored to that favorite number.
- Tune to the station you want to save as a Favorite.
- Press and hold one of the 3 Favorite buttons for 2 seconds to save the currently played radio station. The LCD Display shows "STORED 1" for 2 sec to confirm.
- Press one of the Favorite buttons to quickly tune to a previously stored DAB+ station.
NOTICE
Favorite buttons can be used for each source individually.
Bluetooth® Mode
Via Bluetooth®, you can wirelessly connect a compatible external player with the RADIO ONE. The audio output of your external player is then played by the RADIO ONE.
The Bluetooth® wireless transmission system has a range of approximately 30 metres that is limited by walls and furnishings. If the connection is cut off, the RADIO ONE will attempt to re-establish a connection until you select another source.
NOTICE
- Only use the Bluetooth® function in locations where wireless radio transmission is allowed.
- Please keep in mind that the Bluetooth® Behavior may differ depending on the external player's operating system.
Bluetooth® options
Depending on the device type, your external player/smartphone may also have a menu for Bluetooth® Options such as media playback. Here you can activate and deactivate the desired options. You can find more information about the Bluetooth® options in the user manual for your external player/ smartphone.
Pairing and connecting
To play the audio of your external player on your RADIO ONE via Bluetooth®, connect the devices with each other. The technical term for this is "pairing".
- Turn on the
![]() Bluetooth® function on your external player (e.g. smartphone).
Bluetooth® function on your external player (e.g. smartphone). - Use the
![]() button to select the "Bluetooth®" source on the RADIO ONE. The LCD Display shows "BT".
button to select the "Bluetooth®" source on the RADIO ONE. The LCD Display shows "BT". - In case device list is empty, the speaker goes into BT pairing mode, the LCD Display shows "PAIRING" and Pairing Sound Icon is played. Press the Bluetooth button for 2 seconds to start pairing with a new device.
- Let your external player/your smartphone scan for Bluetooth® devices. You will find more information about this in the user manual of your external player. After the search run, the "RADIO ONE" should also be present in the list of detected devices.
- Select "RADIO ONE" from the list of detected devices. Pairing is thus complete, the LCD Display will show "OK" and your RADIO ONE will now function as a Bluetooth® playback device. The RADIO ONE will now play back all sounds that would otherwise be played by your external player/ smartphone.
 Bluetooth® function on your external player (e.g. smartphone).
NOTICE
Time out after 2min if not successful pairing, the LCD Display shows "NOT CONNECTED". You can reconnect from smartphone or start pairing again on speaker.
Interruption of the connection
If your external player moves out of the range of your RADIO ONE, the Bluetooth® connection will be interrupted. If you are back within range within 120 seconds, the connection will be re-established automatically.
Playback
The volume setting of the external player affects the volume of the RADIO ONE.
- Use the
![]() button to select Bluetooth® as the source.
button to select Bluetooth® as the source. - Turn on the Bluetooth® function on your source device.
- Start playback on your source device.
You can control playback on your source device.
- If your source device is a smartphone, the Bluetooth® connection will be interrupted in the event of an incoming call and you can make phone calls as usual. After finishing your phone call, the sounds will once again be diverted and played back by your RADIO ONE.
Terminating the connection
To terminate the Bluetooth® connection,
- Deactivate the Bluetooth® function on your external player/ smartphone.
- Select another source on the RADIO ONE.
- The list of known Bluetooth devices on the Radio One can be deleted via the menu: Menu > Reset > BT List.
Setting and Using the Alarms
The system has two alarms, Alarm 1 and Alarm 2. Each alarm can be set for:
- Frequency
- Volume
- Wake-up sound source: 4 Custom Teufel alarm sound, DAB+, FM and Bluetooth
Using the Alarm buttons, you can setup and operate each alarm.
Setting the alarms
You can choose the settings for each alarm by activating the Alarm Setup mode and displaying the settings for each alarm. To setup Alarm 1 or 2:
- Press the
![]() or
or ![]() for 2 seconds to open the alarm menu, the LCD Display shows "ALARM 1" or "ALARM 2". Now the Hours start flashing, you can turn volume wheel to enter alarm hour and confirms with select, and then Minutes start flashing, you can turn volume wheel to enter alarm minutes and confirms with select.
for 2 seconds to open the alarm menu, the LCD Display shows "ALARM 1" or "ALARM 2". Now the Hours start flashing, you can turn volume wheel to enter alarm hour and confirms with select, and then Minutes start flashing, you can turn volume wheel to enter alarm minutes and confirms with select.
NOTICE
You can also go back with previous button in case hours were not entered correctly. - Set up the alarm frequency, options include DAILY, WEEKDAY, WEEKEND, ONCE (if once is selected, you can set date DD.MM. YYYY) and OFF. You can move up and down with the volume wheel, go back with previous button and confirms with select.
- Pick the alarm sound, options include 4 Teufel alarm sounds, DAB+, FM and Bluetooth.
- Sets volume for alarm with volume wheel, the LCD Display shows current volume level (e.g. VOL 8) and confirms with select. You will see "SAVED" when the process complete.
Now you have set the alarm, the LED above the alarm fades in and stays on.
 or
or  for 2 seconds to open the alarm menu, the LCD Display shows "ALARM 1" or "ALARM 2". Now the Hours start flashing, you can turn volume wheel to enter alarm hour and confirms with select, and then Minutes start flashing, you can turn volume wheel to enter alarm minutes and confirms with select.
Incoming Alarms
When the alarm time is reached, the alarm sound volume starts very low and increases softly to the level set by you.
- LED above the alarm button repeats flashing (is not fast)
- Display shows "ALARM 1" or "ALARM 2"
- If the alarm sound comes from sources FM/DAB+/BT, the source LED is turned on accordingly
- Custom Teufel Alarm sounds are looped
- Pressing the matching alarm button to cancel the alarm (alarm button 1 only cancels alarm 1
![]() etc)
etc) - All buttons except matching alarm button and volume wheel are deactivated during the alarm event
- Pressing in the center of the volume wheel or turning the wheel will snooze the alarm
- The timing for snooze can be changed via the menu button: Menu > Snooze. Options are 5min, 8min, 10min and 15min.
NOTICE
If you do not react to the alarm, the alarm will be canceled automatically after 20min. The Radio One will return to the state it was in before the alarm arrived. The alarms can be activated and deactivated with a short press on the alarm button. When deactivating the alarm, the display shows OFF and the LED above the button fades out. When activating the alarm, the display shows the alarm time and frequency and the LED above the button fades in. This can also be used to check the alarm time for the next day.
Using the AUX IN connector
When using a Smartphones, MP3-Player or other audio source, you can enhance your listening experience by playing the audio device through the RADIO ONE.
Connecting an audio device to the system requires one of the following cables:

Using the Menu button
Press the menu button  to open the menu. The list of items depends on the source, when DAB or FM are active source, you will see corresponding menu items. When you reaches the last menu item RESET and continues turning the navigation wheel clockwise, the speaker goes to the first menu item again.
Use the menu options to customize system operation.
| Menu | Options | Description |
| Info | Check the relevant information. | |
| FM mode | Stereo, Mono | Switch between Stereo and Mono setting (only for FM source). |
| DAB Scan | Scan for DAB radio stations. | |
| Source | AUX, BT, FM, DAB+ | Determines the source. |
| Snooze | 5 MIN, 8 MIN, 10 MIN, 15 MIN | Determines the snooze time duration. |
| CLOCK | 12-HOUR or 24-HOUR and DD.MM.YYYY or YYYY.MM.DD (Support Automatic Update, Update from DAB, Update from FM, No Update) | Sets the clock display for 12-hour (AM/PM) or 24-hour time, and the date format. Update the clock to system time, FM time or DAB time. |
| DIMMING (ON, STANDBY) | AUTO, LOW, MID, HIGH, OFF | Sets the display brightness level. |
| RESET | BT LIST, FULL | Clear the BT list or restores the system to factory settings. |
Changing a system setting
- Press Menu button to show menu, the LCD Display shows first menu item.
- Rotate Volume Wheel clockwise or counterclockwise to navigate down or up in Menu, the LCD Display shows next or previous menu item.
- Press Volume Wheel to select the menu item (or to enter sub menu).
- Press Menu to exit the menu or wait 30 seconds for the setup menu to exit automatically.
Care And Cleaning
NOTICE
External influences may damage or destroy the device.
- If the speaker is to be left unattended for a prolonged period of time (e.g. during a vacation) or if a thunderstorm is forecast, pull the mains plug out of the socket. Otherwise, sudden overvoltage could cause the speaker to become defective.
- If possible, only use plain water without any additives. In case of stubborn marks, a mild soap solution may be used.
- Do not use caustic cleaning products, white spirit, thinners, petrol or similar under any circumstances. Such cleaning agents may damage the delicate surface of the housing.
- Ideally, you should remove dust or small amounts of dirt with a dry, smooth leather cloth.
- Use a damp cloth to rub off stubborn dirt. Make sure that no liquid penetrates the housing.
- Then immediately wipe the damp surfaces off with a soft cloth without applying pressure.
Troubleshooting
The following advice should help you to solve problems. If this does not help, you will find useful information in the detailed FAQs on our website.
Otherwise, please contact our hotline. Take note of the warranty instructions.
| Problem | Possible cause | Solution |
No function | No power supply. | Check the function of the socket with another device. |
| The small plug of the mains adapter has slipped out. | Check the connection of the mains adapter. | |
The device doesn't emit any sound | The wrong source has been selected. | Select the right source. |
| The device is set to "mute" or "0". | Increase the volume. | |
| The volume of the external player has been set too low. | Carefully increase the volume of the external player. | |
No sound with Bluetooth® | No Bluetooth® connection. | Establish a connection. |
| RADIO ONE has not been selected as the output device. | On the external player, select "RADIO ONE" as the Bluetooth® output device. | |
| Bluetooth® connection impaired by another radio system (e.g. cordless telephone, Wi-Fi). | Set up the RADIO ONE and/ or external player in another location. Move to another room to test. | |
Playback is noisy | Generally speaking, the RADIO ONE is a very low-noise system. The speaker system with very high resolution in the high range area can expose the poor quality of a signal source (e.g. from MP3 files). | Ensure that the source is sending a clear signal to the RADIO ONE. |
FM reception is weak | Forget to straightening out the FM antenna. | Straightening out the FM antenna as much as possible. |
Technical Data
RADIO ONE
| Dimensions (W x H x D): | 240 x 90 x 68 mm |
| Weight (gross): | 755 g (Main unit) 152 g (Adpater) |
Mains adapter
| Manufacturer's name and address: | ShenZhen Rongweixin Technology Co., Ltd No.8, Tianyang 3rd Road, Dongfang Community, SongGang Street, Baoan District, Shenzhen, Guangdong, China |
| Model Identifier: | R361-1 203000E |
| Input Voltage and Input AC frequency: | 100 - 240 V~ 50/60 Hz, 1.5 A |
| Output voltage / current: | 12 VDC / 3 A |
| Output power: | 36.0 W |
| Average active efficiency: | 88.2% |
| Efficiency at low load (10%): | 87.8% |
| No-load power consumption: | 0.03 W |
You can find further technical data on our website. Technical changes reserved!
For Your Safety
Proper Use
The speaker is designed for the playback of music and speech from an external player and use as an alarm clock and FM/DAB/ DAB+ radio. Only use the speaker as described in this user manual. Any other use will be deemed as not in accordance with the instructions and may lead to damage of property or even persons. The manufacturer accepts no liability for damage caused by improper use. The speaker is intended for private use.

Before operating the product for the first time, please read the safety notes and user manual carefully. Only in this way, can you ensure that all functions are used in a safe and reliable manner. Store the user manual in a safe place and also be sure to pass it on to any subsequent owner.
Safety notes
This chapter contains general safety notes which you should always observe to protect yourself and third parties. Also observe the warning notes in each chapter of this user manual.
Explanation of terms
You can find the following signal terms in this user manual:
This signal term indicates a low risk, which, if not avoided, may result in minor or moderate injury.
NOTICE
This signal term warns you of potential damage.
This symbol advises of useful additional information.
Touching live parts can result in severe injury or death.
- When connecting the mains adapter, make sure that the correct voltage is present. You can find more information about this on the rating plate.
- Check the device regularly for damage. Immediately disconnect the mains plug and do not operate the device if its housing, mains adapter or mains cord is defective or exhibits other visible damages.
- This device is disconnected from the grid by pulling the mains plug. Thus, make sure that the mains plug is always easily accessible.
- If the device emits smoke, smells burnt or produces unusual sounds, immediately disconnect it from the mains and do not operate it further.
- Never open the device housing. Repairs may only be carried out by an authorized specialist workshop. Only parts that match the original specifications may be used.
- Only use the accessory products specified by the manufacturer.
- Only use the device indoors.
- Do not operate the device in wet rooms and protect it from dripping and splashing water. Make sure that no vases or other liquid-filled objects are located on or near the device in order to prevent liquid from penetrating the housing. If water or other debris ends up penetrating the housing, immediately pull the mains plug. Then send the device to our service address.
- Never modify the device. Unauthorized modifications may affect the safety and functionality.
- Never touch the mains plug with wet hands.
An unsuitable setup location may result in injury and damage.
- Never use the device in vehicles, in unstable locations, on wobbly tripods or furniture, on insufficiently dimensioned brackets etc. The speakers could tip or fall down and cause injury to persons or be damaged itself.
- Arrange the device so that it cannot be knocked over accidentally and make sure that the cables do not pose a trip hazard.
- Do not place the device and the mains adapter near heat sources (e.g. heaters, ovens, other heat generating equipment such as amplifiers etc.).
- Do not use the device in environments where there is a risk of explosion.
- Only use the wireless function (Bluetooth) in locations where wireless radio transmission is allowed.
- The isolation pads can produce discolouration on sensitive surfaces.
- On parquet, varnished wood and similar surfaces, you should stick felt gliders to the rubber feet of the device or put a blanket under it. This will prevent discolouration of the floor over the long term
Children can become trapped in the plastic wrapping when playing and suffocate.
- Do not allow children to play with the device or the plastic wrapping. There is a danger of suffocation.
- Never allow children to operate electrical equipment unsupervised.
Extended listening at high volumes may lead to hearing loss.
- To avoid damage to health, avoid extended listening at high volumes.
- When the volume is set high, always keep a certain distance from the device and never place your ear directly on the speaker.
- If your speaker is set to full volume, it may produce very high sound pressure. This may have psychological consequences and also cause physical injury. Children and pets are particularly at risk. Set your signal source device volume to a low setting before turning on the power.
Improper use may lead to damage or fire.
- Do not place open flames such as burning candles or similar on the device.
- Ensure sufficient ventilation.
- Do not place the device in direct sunlight.
- Only use the device indoors.
- Do not operate the device in wet rooms and protect it from dripping and splashing water. Make sure that no vases or other liquid-filled objects are located on or near the device in order to prevent liquid from penetrating the housing.
Documents / ResourcesDownload manual
Here you can download full pdf version of manual, it may contain additional safety instructions, warranty information, FCC rules, etc.
Advertisement


Need help?
Do you have a question about the RADIO ONE and is the answer not in the manual?
Questions and answers