cecotec READY WARM 1800 THERMAL / 1800 THERMAL BLACK Manual
- Instruction manual (28 pages) ,
- Manual (19 pages) ,
- Instruction manual (88 pages)
- Also fits for
- Ready warm 1800 thermal black
- 05332
- 05894
Advertisement
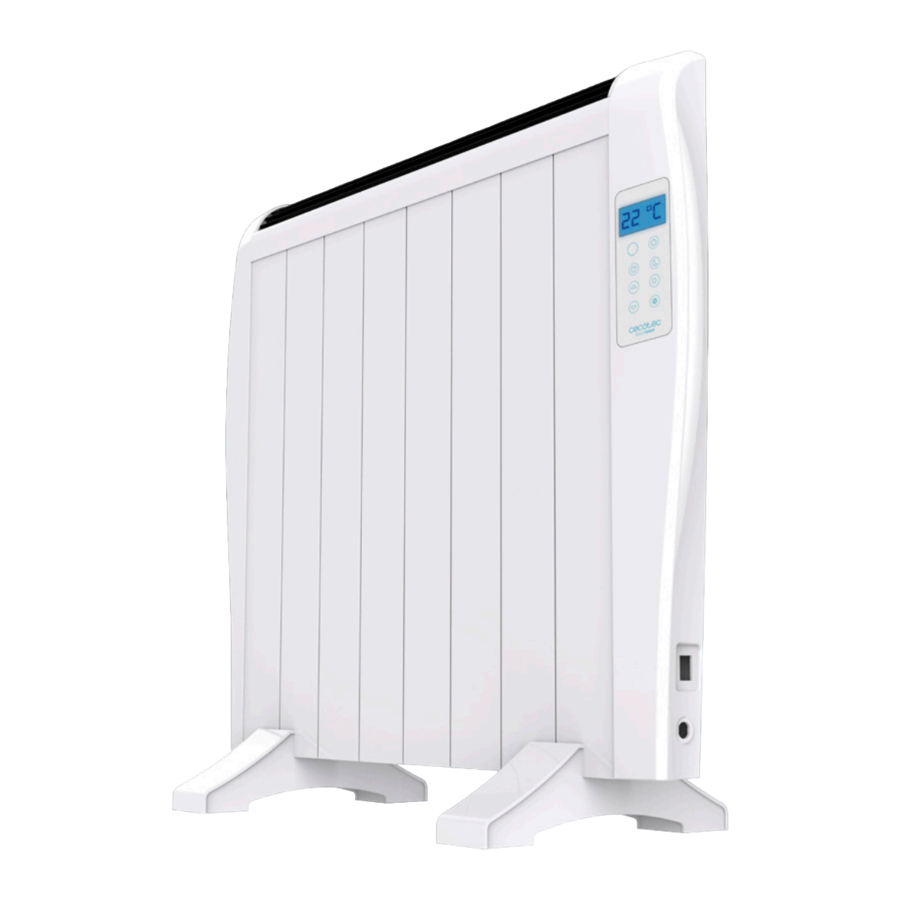
PARTS AND COMPONENTS
Fig. 1

- Control panel
- Power switch
- Feet
- Temperature sensor
- Wall bracket
- Wall bracket accessory
- Remote control
- ON/OFF
- Display
- Scheduling
- Increase
- Decrease
- Day mode
- Sleep mode
- Anti-frost mode
- Lock
- Mode
- From Monday to Sunday
- Power indicator
- Timer
- Hour display
BEFORE USE
- Take the product out of the box and remove all packaging materials.
- Make sure all parts and components are included and in good conditions. If any sign of visible damage is observed, contact immediately with our official Technical Support Service.
PRODUCT ASSEMBLY
Floor assembly
Place the stand on the bottom part of the device, each one on one side, and screw them. Make sure they are properly fixed.
Wall assembly
- Before installing it, make sure the appliance is placed at a minimum safety distance of 20 cm from any obstacle (walls, shelves, floor...).
- Drill 2 holes on the wall with 140 mm between them.
- Attach the wall supports (5) to the wall using the studs and screws provided.
- Make sure the smaller-diameter side of the supports is hung from the wall.
- Screw the wall support accessory (6) onto the 2 holes on the back-bottom part of the device. Make sure the side with just 1 hole is against the wall.
- Hang the appliance from the support.
- Once hung on the wall, mark the free hole of the wall support accessory (6).
- Remove the appliance from the wall, drill a hole where the mark is and introduce the corresponding stud.
- Finally, hang the appliance on the brackets and screw the mounting plate to the wall. Fig. 2
![]()

OPERATION
Automatic lock
- The buttons on the device's control panel will block if during operation no button is pressed for 1 minute.
- To unlock it, press (-) for 3 seconds.
Note
The heater can be used manually or can be programmed.
Manual mode
3 operating modes:
- Day mode: The temperature can be adjusted from 5 ºC to 35 ºC.
- Sleep mode: The temperature can be adjusted from 5 ºC to 35 ºC.
- Anti-frost mode: The temperature can be adjusted from 5 ºC to 15 ºC.

For the device to be able to operate, the set temperature must always be higher than the room one. The panel will display the room temperature. As the temperature shown on the display is the one next to the device and not the real room one, when setting the temperature, select a few more grades than desired ones.
Turning the device on
- Connect the device to a power supply and turn the power switch on.
- The control panel will flash and the "ºC" symbol, room temperature and power indicator will light up. If this last symbol does not light up, press it.
- Select the desired operating mode by pressing the corresponding button: Day, Sleep or Anti-frost. The display will show the selected mode.
- Use the + and – buttons to set the desired temperature for the selected mode. While the temperature is being set, the "ºC" icon will blink.
- Once the desired temperature has been set, the display will show the room temperature again.
- Repeat the before steps to set the temperature for the other modes.
- Use the on/off button to turn the heater on and off.
Thermostat
- When the device reaches the set temperature, it will automatically switch off and the icon will turn off.
- When the room temperature falls below the set one, the device will automatically turn back on and the icon will light up again.
Note
- The power indicator may blink when the device is about to turn on or off.
- The set temperatures will be saved even if the device is disconnected or turned off and on.
Reset
To reset the device while it is connected to the power supply and the power switch is on, make sure the device is unlocked or unlock it with the remote control and press the power button (-) for 3 seconds. It can also be switched off and on.
Scheduling mode
3 operating modes:
- Day mode: The temperature can be adjusted from 5 ºC to 35 ºC.
- Sleep mode: The temperature can be adjusted from 5 ºC to 35 ºC.
- Anti-frost mode: The temperature can be adjusted from 5 ºC to 15 ºC.
The temperature set manually will be applied to the modes during programmed operations.
Setting current day of the week and time
- Long press the "PROG" button until the display shows "00:00".
- The hour digits will blink. Use the + and – buttons to set the desired hour and press "PROG" to save the settings.
- The minutes digits will blink. Use the + and – buttons to set the desired minutes and press "PROG" to save the settings.
- The display will show the week calendar (Monday-Sunday, 1-7). Select the current day by pressing + and -. Press "PROG" to save the settings.
Setting weekly schedule
- The display will show the first 2 bars for the first period of time (00:00 – 1:00 am) blinking.
It will also show 1 as Monday. - Press the desired mode (Day, Sleep or Anti-frost) for the selected time interval.
- If you select Sleep mode, the display will show and the bar on the top part will blink.
- If you select the Anti-frost mode, the display will show and the bar on the lower part will blink.
- If you select Day mode, the display will show and the top and lower bars will blink.
- Once the first period has been scheduled, press "+" and the next time period's bars will blink.
- Repeat these steps up to 24 hours.
- When all the hours in a day have been scheduled, press "PROG" to end the selected day scheduling and repeat the steps to schedule the 7 days of the week.
- Once the whole week has been scheduled, press "PROG" and the device will automatically save the settings and operate in the set mode.
If the device is disconnected from the power supply, the schedule settings will be saved but the current day and time will be reset.
Resetting the current time and day
- To unblock the appliance, long-press "PROG" until the display shows "00:00". The hour digits will flash, use the + and – buttons to select the desired hour, press "PROG" to switch to minutes settings and use the + and – buttons again. Press "PROG" to save the settings.
- Press "PROG" to save the settings.
- The display will show the week calendar (Monday-Sunday, 1-7). Set the current day using the + and – buttons and press the power switch twice. Then, press "PROG" and the + or – button.
Adjusting temperature under programmed mode
- During operation, press twice the on button on the remote control and use the + and – buttons to select the desired temperature.
- Once the temperature is set, it will be saved for this mode for future operations, including under manual mode.
Note
If the appliance is operating under programmed mode, to change it:
- Press the on button on the remote control twice.
- Press "PROG".
- Select the desired mode and adjust the temperature if necessary, using the + and –buttons.
Remote control
- The remote control requires 1 x CR2025 battery (included).
- Remove the protection label from the battery compartment. If necessary, open the battery cover.
- The radiator can also be scheduled from the remote control following the steps mentioned before.
Note
At the beginning of this manual you will find a QR code. When the code is scanned, it will redirect you to a video where the scheduling function is explained.
CLEANING AND MAINTENANCE
- Turn off, unplug the appliance from the power supply and allow it cool down before cleaning it.
- Use a soft, dry and clean cloth to clean the product's outer housing.
- Do not use abrasive cleaners or scouring pads as they could cause damage to the product's surface.
TECHNICAL SPECIFICATIONS
Product reference: 05332, 05894
Product: ReadyWarm 1800 Thermal / ReadyWarm 1800 Thermal Black
Power and voltage: 1200 W, 220-240 V, 50/60 Hz
Made in China | Designed in Spain
TECHNICAL SUPPORT AND WARRANTY
If at any moment you detect any problem with your product or have any doubt, do not hesitate to contact Cecotec Technical Support Service at +34 963 210 728.
Documents / ResourcesDownload manual
Here you can download full pdf version of manual, it may contain additional safety instructions, warranty information, FCC rules, etc.
Download cecotec READY WARM 1800 THERMAL / 1800 THERMAL BLACK Manual
Advertisement


Need help?
Do you have a question about the READY WARM 1800 THERMAL and is the answer not in the manual?
Questions and answers