Quest 6 Series Installation Manual
Also See for 6 Series:
- Installation manual (2 pages) ,
- Installation manual (2 pages)
Advertisement
Table of Contents
Contents
Quest 6 Series Installation Manual
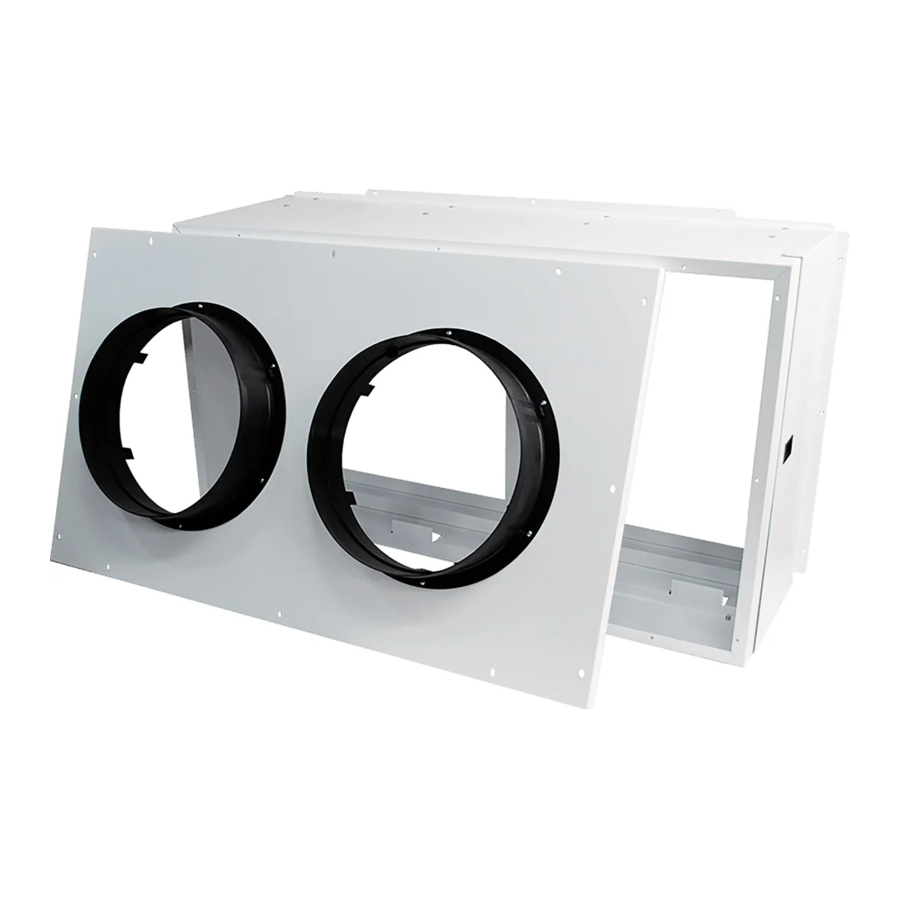
EXHAUST DUCT INSTALLATION GUIDE

| ITEM 1 | 6 Series Dehumidifier (not included) |
| ITEM 2 | (1) Duct Adapter |
| ITEM 3 | (1) 14" Collar Plate |
| ITEM 4 | (22) #10 Screws |
AIR CAN ENTER INTO THE UNIT IN TWO WAYS:
- USE RECTANGULAR DUCT (NOT INCLUDED)
- Attach ITEM 2 (duct adapter) to ITEM 1 (unit) using 10 of ITEM 4 (screws).
- Attach rectangular ducting (not provided) directly to ITEM 2 (duct adapter).
Note: ITEM 3 will not be needed for use with rectangular duct
- USE (2) 14" ROUND DUCTS (NOT INCLUDED)
- Attach ITEM 2 (duct adapter) to ITEM 1 (unit) using 10 of ITEM 4 (screws).
- Attach ITEM 3 (14" collar Plate) to ITEM 2 (duct adapter) using 12 of ITEM 4 (screws).
- Attach 14" duct (not provided) to both 14" duct openings.

When ducting the unit, a dedicated duct system is recommended for each unit. Recommended 25' max run of ducting.
INTAKE DUCT INSTALLATION GUIDE

| ITEM 1 | 6 Series Dehumidifier (not included) |
| ITEM 2 | (1) Duct Adapter (36.2" x 21.0" x 12.75") |
| ITEM 3 | (1) Filter Door |
| ITEM 4 | (12) #10 Self Drilling Screw |
| ITEM 5 | Filters (from unit, not included) |
| ITEM 6 | (1) 14" Collar Plate |
| ITEM 7 | (24) #10 Screws |
AIR CAN ENTER INTO THE UNIT IN TWO WAYS:
- USE RECTANGULAR DUCT (NOT INCLUDED)
- Remove both filters from unit to use in the intake ducting provided.
- Attach ITEM 2 (duct adapter) to ITEM 1 (unit) using 12 of ITEM 4 (screws).
- Use ITEM 7 instead of 4 if unit includes holes.
- Open and remove ITEM 3 (filter door).
- Slide filter into intake ducting.
- Install ITEM 3 (filter door) back into position.
- Attach rectangular ducting (not provided) directly to ITEM 2 (duct adapter).
Note: ITEM 6 will not be needed for use with rectangular duct.
- USE (2) 14" ROUND DUCTS (NOT INCLUDED)
- Remove both filters from unit to use in intake ducting provided.
- Attach ITEM 2 (duct adapter) to ITEM 1 (unit) using 12 of Item 4 (screws).
- Use ITEM 7 instead of 4 if unit includes holes.
- Open and remove ITEM 3 (filter door).
- Slide filter into intake ducting.
- Install ITEM 3 (filter door) back into position.
- Attach ITEM 6 (14" collar plate) to ITEM 2 (duct adapter) using 12 of ITEM 4 (screws).
- Attach 14" duct (not provided) to both 14" duct openings.
When ducting the unit, a dedicated duct system is recommended for each unit. Recommended 25' max run of ducting.
QUESTCLIMATE.COM
1-877-420-1330
Documents / Resources
References
Download manual
Here you can download full pdf version of manual, it may contain additional safety instructions, warranty information, FCC rules, etc.
Advertisement


Need help?
Do you have a question about the 6 Series and is the answer not in the manual?
Questions and answers