
Related Manuals for Sigma ONYX EASY


Summary of Contents for Sigma ONYX EASY
- Page 1 Heart rate Monitors TOPLINE ONYX easY DeUtsCH itaLiano enGLisH esPaÑoL FranÇais neDerLanDs...
-
Page 2: Table Of Contents
INHALT Vorwort und Verpackungsinhalt Grundlegendes Funktionsprinzip Funktionsübersicht (Baumdiagramm) Tastenbelegung und Navigationsprinzip Anlegen des Brustgurtes / Befestigung der Lenkerhalterung Herzfrequenzmessung Einstellungen vor dem ersten Training k Hauptmenü Einstellen Benutzereinstellungen Geräteeinstellung Hauptmenü Training Hauptmenü Zeit Hauptmenü Speicher Gesamtwerte Speicher Einzelspeicher Weitere Informationen Wissenswertes zur Herzfrequenz Beep Übersicht Troubleshooting... -
Page 3: Vorwort Und Verpackungsinhalt
Herzlichen Glückwunsch, dass Sie sich für einen Puls Computer aus dem Hause SIGMA SPORT ® entschieden haben. Ihre neue ONYX EASY wird Ihnen jahrelang ein treuer Begleiter beim Sport und in der Freizeit sein. Die ONYX EASY ist ein technisch anspruchs- volles Messinstrument. -
Page 4: Grundlegendes Funktionsprinzip
2. GRUNDLEGENDES FUNKTIONSPRINZIP 2.1 FUNKTIONSÜBERSICHT Training Zeit 1 Zonen- Uhrzeit Training Datum Stoppuhr Countdown Wecker Speicher 1 Speicher Gesamtwerte Pro Woche Pro Monat Seit Reset www.sigmasport.com... - Page 5 2. GRUNDLEGENDES FUNKTIONSPRINZIP 2.1 FUNKTIONSÜBERSICHT Einstellungen Benutzer Gerät Geschlecht Sprache Geburtstag Datum Gewicht Uhrzeit HF max Lautstärke T. Zone Tastentöne Zonenalarm Mein Name...
-
Page 6: Tastenbelegung Und Navigationsprinzip
Hauptmenüs. 2.2 TASTENBELEGUNG UND NAVIGATIONSPRINZIP Die ONYX EASY umfasst drei Menüebenen. Bei der Navigation durch die Menüs und Untermenüs der ONYX EASY, sollte sich der Benutzer immer an dem Baumdiagramm in Kapitel 2.1 „Funktions- übersicht“ orientieren. Die Menüführung der ONYX EASY wird dem Benutzer durch eine Navigationsebene wesentlich vereinfacht. -
Page 7: Anlegen Des Brustgurtes
2.2 TASTENBELEGUNG UND NAVIGATIONSPRINZIP In der Navigationsebene werden die möglichen Tastenfunktionen der oberen beiden Tasten angezeigt um: k in die nächst tiefere Ebene (Enter) zu gelangen k zurück in die nächst höhere Ebene zu gelangen (Back, off) k ein Training zu beginnen (Start) k ein Training zu beenden (End) Bestätigen Sie die in der Navigationsebene angezeigte Funktion unmittelbar mit einem weiteren Tastendruck. -
Page 8: Herzfrequenzmessung
Den Gurt so umlegen, dass der Sender bei Männern unterhalb des Brustmuskelansatzes und bei Frauen unterhalb des Brustansatzes liegt. Dabei muss das SIGMA Logo immer lesbar nach vorne zeigen. Den Gurt leicht von der Haut abheben. Gerippte Zonen (Elektroden) auf der Rückseite des Senders mit Speichel oder mit Wasser befeuchten. - Page 9 Hinweis: Orientieren Sie sich am Anfang immer an dem unter 2.1 angezeigten Baumdiagramm. Synchronisation zwischen Uhr und Brustgurt Ihre ONYX EASY ist mit einem digitalen und codierten Brustgurt ausgestattet, der Ihnen ein störungsfreies Training in der Gruppe ermöglicht. Durch seine neuartige Technik können Sie sicher sein, dass Ihre Daten vom Brustgurt als digitale Datenpakete verlustfrei zu Ihrer ONYX EASY gelangen.
- Page 10 Hinweis: Sollten Sie diese Anzeige in Ihrer Uhr nicht sehen, so ist die Synchronisation bereits erfolgreich abgeschlossen worden. Nach dem sich Ihre ONYX EASY erfolgreich mit dem Brustgurt synchronisiert hat, können Sie Ihr Training durch Drücken von k START beginnen.
-
Page 11: Einstellungen Vor Dem Ersten Training
2.4 HERZFREQUENZMESSUNG ONYX EASY ausschalten Die ONYX EASY schaltet sich automatisch nach 5 Minuten ab, so lange kein Training aktiv ist. Alternativ können Sie Ihre Uhr jedoch auch jederzeit manuell in den Ruhezustand versetzen. Zum Ausschalten Ihrer ONYX EASY müssen Sie sich im Hauptmenü... -
Page 12: Benutzereinstellungen
Bestätigen Sie die jeweilige Einstellung mit OK und sichern Sie die jeweilige Einstellung am Ende mit k SAVE ab. Hinweis: Die ONYX EASY verfügt über einen zusätzlichen Speicher, so dass bei einem Batteriewechsel die persönlichen Einstellungen Ihrer ONYX EASY erhalten bleiben. - Page 13 Die Auswahl und Einstellung der Trainingszone erfolgt im Menü „Einstellungen // Benutzer // Train. Zone“. Je nach Ihren persön- lichen Zielen haben Sie in der ONYX EASY die Möglichkeit, eine der folgenden Trainingszonen zu aktivieren. 1. Fat Burner Zone: k ca. 55–70 % der HF max.
-
Page 14: Geräteeinstellung
Einstellungsprinzip finden Sie am Anfang dieses Kapitels. Mit der „Mein Name“ Funktion kann eine Indi- vidualisierung der ONYX EASY vorgenommen werden. In der Uhr erscheint dann im Ruhezu- stand (sleep mode) der Name oder ein beliebiger Schriftzug, der bis zu 10 Zeichen lang sein kann. -
Page 15: Hauptmenü Training
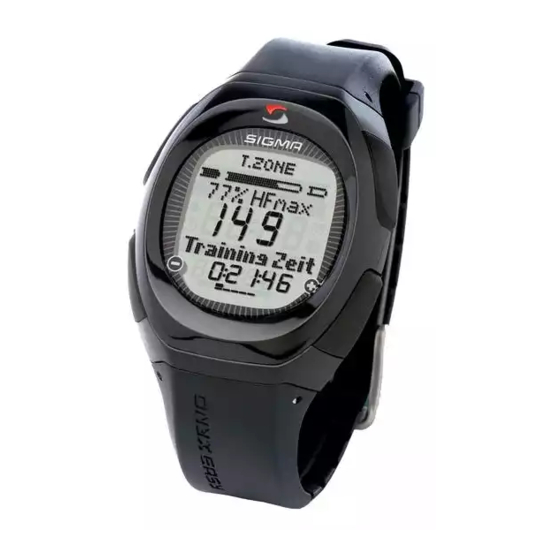
4. HAUPTMENÜ TRAINING Drücken Sie Navigationstaste k ENTER um das Hauptmenü „Training“ zu öffnen. Nachdem sich Ihre ONYX EASY erfolgreich mit dem Brustgurt synchronisiert hat, können Sie Ihr Training durch Drücken von k START beginnen. Im oberen Bereich des Displays finden Sie alle Informationen zu Ihrer Zielzone. -
Page 16: Hauptmenü Zeit
5. HAUPTMENÜ ZEIT Ihre ONYX EASY verfügt über ein Hauptmenü „Zeit“ mit allen wichtigen Zeitfunktionen einer Sportuhr. Übersicht der Zeitfunktionen: k Uhrzeit k Datum k Stoppuhr mit 1 /10 Sekunden k Countdown k Wecker Drücken Sie die Navigationstaste k ENTER um das Menü... - Page 17 Zum Starten Ihrer Stoppuhr drücken Sie k START. Folgen Sie dann den Anweisungen im Display. Die Stoppuhr der ONYX EASY kann auch ohne Brustgurt verwendet werden. Die Uhr bleibt in diesem Fall bis zu 19:59:59 h aktiviert. Hinweis: Die gestartete Stoppuhr läuft auch im Hintergrund weiter, wenn die Uhr in den Ruhe- modus (sleep mode) versetzt worden ist.
- Page 18 5. HAUPTMENÜ ZEIT Sie können Ihre ONYX EASY auch als Wecker oder Reminder einsetzen. Zum Einstellen des Weckers drücken Sie Navi- gationstaste k CHANGE. Folgen Sie dann den Anweisungen im Display. Hinweis: Ist der Wecker auf eine bestimmte Uhrzeit eingestellt, alamiert er Sie jeden Tag um diese Zeit.
-
Page 19: Hauptmenü Speicher
6. HAUPTMENÜ SPEICHER Drücken Sie die Navigationstaste k ENTER um das Menü „Speicher“ zu öffnen. Mit den PLUS /MINUS Tasten können Sie zwischen dem „Gesamtwerte Speicher“ und dem „Einzelspeicher“ wählen. 6.1 GESAMTWERTE SPEICHER Drücken Sie Navigationstaste k ENTER um das „Gesamtwerte“... -
Page 20: Einzelspeicher
Es werden folgende Werte über den gewünsch- ten Zeitraum angezeigt: k Anzahl der Trainingseinheiten k Gesamt Trainingszeit k Durchschnittliche Trainingszeit k Kcal 6.2 EINZELSPEICHER Zusätzlich zu den Gesamtwerten verfügt Ihre ONYX EASY über einen sehr detaillierten Speicher für die Auswertung Ihrer Trai- ningseinheit. www.sigmasport.com... -
Page 21: Weitere Informationen
6.2 EINZELSPEICHER Im einzelnen werden dem Benutzer die folgenden Werte angezeigt: k Datum k Start Zeit k Gesamte Zeit k Mittlere HF k Maximale HF k Kcal k Zeit in HF Zone k % in HF Zone 7. WEITERE INFORMATIONEN 7.1 WISSENSWERTES ZUR HERZFREQUENZ Die Herzfrequenz (HF) wird in Schlägen pro Minute angegeben. - Page 22 7.1 WISSENSWERTES ZUR HERZFREQUENZ Die HF max. wird näherungsweise automatisch in der ONYX EASY mittels der folgenden mathematischen Gleichung bestimmt: Männer: 210 – „halbes Alter“ – (0,11 x persönliches Gewicht in kg) + 4 Frauen: 210 – „halbes Alter“ – (0,11 x persönliches Gewicht in kg)
-
Page 23: Faq
Was passiert, wenn ich während des Trainings den Brustgurt ablege? Die Uhr erhält kein Signal mehr, auf dem Display erscheint die Anzeige „O“– nach kurzer Zeit geht die ONYX EASY in den Ruhe- zustand über. Schalten sich SIGMA Puls Computer komplett ab? Nein –... -
Page 24: Beep Übersicht
Eine schwache Displayanzeige kann die Folge einer zu schwachen Batterie sein. Sie sollte so schnell wie möglich ausgewechselt werden – Batterietyp CR 2032 (Art.-Nr. 00342) 7.3 BEEP ÜBERSICHT Mit verschiedenen Beep Signalen macht die ONYX EASY auf sich aufmerksam. Piepübersicht der ONYX EASY: 1 x lang:... -
Page 25: Troubleshooting
7.3 BEEP ÜBERSICHT 3 x kurz im Intervall: Countdown ist abgelaufen Wecker klingelt 1 x kurz: Tasten Ton 7.4 TROUBLESHOOTING Es konnte kein Signal gefunden werden. Bitte vergewissern Sie sich, dass Sie Ihren Brustgurt richtig angelegt haben. Drücken Sie k SYNC um die Synchronisation erneut zu starten. -
Page 26: Und Gewährleistung
Batteriewechsel vornehmen Im Puls Computer und Brustgurt wird die Batterie CR 2032 (Art.-Nr. 00342) verwendet. Die ONYX EASY ist mit einem Batteriewechsel- fach ausgestattet. Öffnen Sie das Batterie- wechselfach mit dem zugehörigen Schlüssel, wechseln Sie Batterie und verschließen Sie das Batteriewechselfach wieder. - Page 27 7.5 BATTERIEWECHSEL UND GEWÄHRLEISTUNG Wasserdichtigkeit Die ONYX EASY ist bis zu einer Tiefe von 10 m wasserdicht. Unter Wasser dürfen keine Knöpfe gedrückt werden! Gewährleistung Wir haften gegenüber unserem jeweiligen Vertragspartner für Mängel nach den gesetzlichen Vorschriften. Batterien sind von der Gewährleistung ausgenommen.
- Page 28 CONTENT Foreword and package contents Basic operation principle Function summary (tree diagram) Key occupancy and navigation principle Fixing the chest belt / attaching the handlebar holder Measuring the heartbeat Settings before the first training k Main menu Setting Setting User Setting Unit Main menu Training Main menu Time...
-
Page 29: Foreword And Package Contents
Congratulations on choosing a heart rate monitor from SIGMA SPORT . Your new ® ONYX EASY will be a faithful companion for sport and leisure for many years to come. The ONYX EASY is a technically demanding measuring device. In order to learn and apply the varied functions of your new heart rate monitor, please read this user manual carefully. -
Page 30: Basic Operation Principle
2. BASIC OPERATION PRINCIPLE 2.1 FUNCTION SUMMARY Training Time 1 zone Clock training Date Stopwatch Countdown Alarm Memory 1 Memory Total Values Per Week Per Month Since Reset www.sigmasport.com... - Page 31 2. BASIC OPERATION PRINCIPLE 2.1 FUNCTION SUMMARY Setting User Unit Gender Language Birthday Date Weight Clock HR Max. Volume T. zone Button tones (training zone) Zone Alarm My Name...
-
Page 32: Key Occupancy And Navigation Principle
2.2 KEY ALLOCATION AND NAVIGATION PRINCIPLE The ONYX EASY uses three menu levels. When navigating through the menus and sub-menus of the ONYX EASY the user can always refer to the tree diagram in Chapter 2.1 “Function summary”. The menu navigation on the ONYX EASY is made much simpler by the navigation level. -
Page 33: Fixing The Chest Belt
2.2 KEY ALLOCATION AND NAVIGATION PRINCIPLE The possible button functions for the two upper buttons are shown in the navigation level in order to: k Move to the next deeper level (ENTER) k Go back to the next higher level (BACK /OFF) k Start training (START) k End training (END) Confirm the function shown in the navigation level by pressing the... -
Page 34: Measuring The Heartbeat
Then fix the handlebar holder with the O ring and close the wristband. 2.4 MEASURING THE HEARTBEAT When you are not training your ONYX EASY is in sleep mode and can be worn as a normal watch. Before and after training the screen shows the date, time and product name. - Page 35 Note: At the start always refer to the tree diagram shown in 2.1. Synchronisation of Watch and Chestbelt Your ONYX EASY is equipped with a digitally coded chestbelt that enables you to have interference free training.
- Page 36 Note: If you do not see this indication on your watch synchronization has already been completed successfully. After your ONYX EASY has successfully synchronized with your chest belt you can start training by pressing k START. Note: please refer to Chapter 7.4 “Trouble- shooting”...
-
Page 37: Settings Before The First Training
You can also turn your watch to sleep mode manually at any time. To switch off your ONYX EASY you have to be in the Main Menu. Press the Navigation button k OFF to activate sleep mode. -
Page 38: Setting User
OK and save the setting when you have finished using k SAVE. Note: The ONYX EASY has an additional memory so that the personal settings in your ONYX EASY are retained when you are changing the battery. 3.1 SETTING USER In “Setting user”... - Page 39 Heart-circulation training is predominantly used to improve aerobic performance. 3. Personal Zone: ONYX EASY also gives you the opportunity to set your own training zone. To do this you change the upper and lower limits in the “Settings //User // Train. Zone” menu option using the navigation button k CHANGE.
-
Page 40: Setting Unit
In the sub menu “setting” you can personalize the ONYX EASY using the “my name” function. In sleep mode the watch displays the name or any font of up to 10 characters in length. -
Page 41: Main Menu Training
Press the Navigation button k ENTER to open the main menu “Training”. After you have successfully synchronized your ONYX EASY with your chestbelt you can start your training by pressing k START. In the upper area of the screen you can find all the information on your target zone. -
Page 42: Main Menu Time
5. MAIN MENU TIME Your ONYX EASY has a main menu “Time”, for all important time functions. Summary of time functions: k Clock k Date k Stopwatch with 1/10 seconds k Countdown timer k Alarm Press the Navigation button k ENTER to open the “Time”... - Page 43 To start your stopwatch press k START. Then follow the instructions on the screen. The stop watch on ONYX EASY can also be used with the chest belt. In this case the watch stays activated up to 19:59:59 h.
- Page 44 5. MAIN MENU TIME You can also use your ONYX EASY as an alarm or reminder. To set the alarm press the Navigation button k CHANGE. Then follow the instructions on the screen. Note: if the alarm is set to a certain time, it will go off every day at this time.
-
Page 45: Main Menu Memory
6. MAIN MENU MEMORY Press the Navigation button k ENTER to open the “Memory Menu”. Using the PLUS /MINUS buttons you can choose between the “Total values memory” and the “Individual memory”. 6.1 TOTAL VALUES Press the navigation button k ENTER to open the “Total Values”... -
Page 46: Memory
Number of training units k Total training time k Average training time k Kcal 6.2 MEMORY In addition to the total values, your ONYX EASY has a very detailed memory to analyse your training session. www.sigmasport.com... -
Page 47: Other Information
6.2 MEMORY The following values are displayed for the user: k Date k Start time k Total time k Average time k Highest HR k Kcal k Time in HR zone k % in HR zone 7. OTHER INFORMATION 7.1 INFORMATION ON HEART RATE The heart rate (HR) is stated in beats per minute. - Page 48 The right training pulse: The training zone is the range in which the heart rate should move during effective and targeted training. In your ONYX EASY you can choose between the “Fat Burner Zone” and the “Fitness Zone” de- pending on your personal targets. You can find more information about this in Chapter 3.1 “User settings”.
-
Page 49: Faq
What happens if I remove the chest belt during training? The watch will no longer display a signal, the screen will indicate “0” – after a short period of time the ONYX EASY goes into sleep mode (stopwatch does not operate). -
Page 50: Beep Summary
A weak display may be due to weak batteries. You should change them as quickly as possible. – battery type CR 2032 (Item No. 00342) 7.3 BEEP SUMMARY The ONYX EASY provides information with various beep signals. The different volume settings are: 1 x long: When entering Zone... -
Page 51: Troubleshooting
7.3 BEEP SUMMARY 3 x short in interval: Countdown has finished, alarm rings 1 x short: Button beep 7.4 TROUBLESHOOTING No chest belt was found. Please ensure you have placed the chestbelt correctly. Press k SYNC to restart synchro- nization. Please refer to chapter 2.4 “Heart Rate Measurement”... -
Page 52: Changing The Battery/Waterproofing And Warranty
Changing the battery Battery CR 2032 (Item no. 00342) is used in the heart rate monitor and chest belt. ONYX EASY is equipped with a compartment for changing the battery. Open the battery compartment with the key provided, change the battery and close the battery compartment back up. - Page 53 7.5 CHANGING THE BATTERY/WATERPROOFING AND WARRANTY Waterproofing The ONYX EASY is waterproof down to 10 m. Do not press any buttons under water. Warranty We are liable to our contractual partner for faults as defined by law. Batteries are excluded from the warranty. If you need to use...
- Page 54 CONTENU Préface et contenu Principe fondamental de fonctionnement Aperçus des fonctions (Arborescence) Occupation des touches et principe de navigation Mise en place de la ceinture thoracique / Fixation du support sur le guidon Mesure de la fréquence cardiaque Réglages avant le premier entraînement k menu principal réglages Réglages Utilisateur Réglages de l‘appareil...
-
Page 55: Préface Et Contenu
ONYX EASY restera pendant de longues années un compagnon fidèle lors de vos séances de sport et de vos loisirs. Notre ONYX EASY est un instrument de mesure répondant à des exigences techniques élevées. Pour apprendre les nombreuses fonctions de votre nouveau cardio-fréquencemètre et les... -
Page 56: Principe Fondamental De Fonctionnement
2. PRINCIPE FONDAMENTAL DE FONCTIONNEMENT 2.1 APERçUS DES FONCTIONS (Arborescence) Entraînement Temps Entraînement Heure à une zone Date Chronométre Compte à rebours Réveil Mémoire 1 Mémoire Valeurs totales Par semaine Par mois Depuis la remise à zéro www.sigmasport.com... - Page 57 2. PRINCIPE FONDAMENTAL DE FONCTIONNEMENT 2.1 APERçUS DES FONCTIONS (Arborescence) Réglages Utilisateur Appareil Genre Langues Anniversaire Date Poids Heure FC max Volume T-zone (zone d’ Tonalité entrainement) touches Alarme de zone Mon nom...
-
Page 58: De Navigation
2.2 FONCTIONS DES TOUCHES ET PRINCIPE DE NAVIGATION L’ONYX EASY comprend trois niveaux de menus. Pour naviguer dans les menus et sous-menus de l’ONYX EASY, l’utilisateur doit toujours se reporter à l‘arborescence reprise au chapitre 2.1 “Aperçu des fonctions”. La gestion des menus de l’ONYX EASY est fortement simplifiée grâce au niveau de navigation. -
Page 59: Mise En Place De La Ceinture Thoracique / Fixation Du Support Sur Le Guidon
2.2 FONCTIONS DES TOUCHES ET PRINCIPE DE NAVIGATION Dans le niveau de navigation, les différentes fonctions possibles pour les deux touches supérieures s’affichent: k Pour accéder au niveau inférieur suivant (ENTER) k Pour revenir au niveau supérieur précédent (BACK /OFF) k Pour débuter un entraînement (START) k Pour terminer un entraînement (END) Confirmez la fonction affichée dans le niveau de navigation... -
Page 60: Mesure De La Fréquence Cardiaque
2.4 MESURE DE LA FRéQUENCE CARDIAQUE Lorsque vous ne vous entraînez pas, votre ONYX EASY se trouve au repos et peut se porter comme une montre classique. Avant et après l’entraînement, l’écran affiche la date, l’heure et le nom du produit. - Page 61 2.1. Synchronisation entre le cardio-fréquencemètre et la ceinture thoracique Votre ONYX EASY est équipé d’une ceinture thoracique à codage numérique vous permettant de vous entraînez en groupe sans interférences. Grâce à la nouvelle technique utilisée, vous pouvez être sûr que les données de votre ceinture sont transférées vers...
- Page 62 Note: Si vous ne voyez pas cet affichage sur votre montre, cela signifie que la synchro- nisation s‘est déjà achevée avec succès. Après avoir synchronisé votre ONYX EASY avec la ceinture thoracique, vous pouvez commencer votre entraînement en cliquant sur k START.
-
Page 63: Réglages Avant Le Premier Entraînement K Menu Principal Réglages
2.4 MESURE DE LA FRéQUENCE CARDIAQUE Eteindre l‘ONYX EASY L’ONYX EASY s’éteint automatiquement après 5 minutes si aucun entraînement n’est actif. Vous pouvez également mettre votre montre au repos manuellement à tout moment. Pour éteindre votre ONYX EASY, vous devez vous trouvez dans le menu principal. -
Page 64: Réglages Utilisateur
PLUS /MOINS. Confirmez le réglage sélectionné avec OK et enregistrez les différents réglages à la fin avec k SAVE. Note: L’ONYX EASY dispose d’une mémoire supplémentaire de sorte que vous ne perdiez pas vos réglages personnels lorsque vous remplacez la batterie. - Page 65 L’entraînement de la circulation cardiaque sert avant tout à améliorer l’efficacité aérobique. 3. Zone individuelle: Avec l’ONYX EASY, vous avez aussi la possibilité de régler votre propre zone d’entraînement. Pour cela, il vous suffit de changer dans le menu “Régler //Utilisateur // Zone d’entraînement” la limite supérieure et la limite inférieure avec la touche k CHANGE.
-
Page 66: Réglages De L'appareil
7.3. La fonction “Mon Nom” vous permet de procéder à un réglage individualisé de votre ONYX EASY. Le nom ou un autre terme au choix de max. 10 caractères apparaît alors lorsque la montre est au repos (sleep mode). -
Page 67: Menu Principal Entraînement
4. MENU PRINCIPAL TRAINING Appuyez sur la touche de navigation k ENTER pour ouvrir le menu principal “Training”. Après avoir synchronisé votre ONYX EASY avec la ceinture thoracique, vous pouvez commencer votre entraînement en cliquant sur k START. Dans la zone supérieure de l’écran, vous trouverez toutes les informations sur vous zone-cible. -
Page 68: Menu Principal Temps
5. MENU PRINCIPAL TEMPS Votre ONYX EASY dispose d’un menu principal Temps avec toutes les functions de temps importantes d’une montre de sport. Aperçu des fonctions de temps: k Heure /Date k Chrono. d’une précision de 1/10 de sec. k Compte à rebours k Réveil... - Page 69 5. MENU PRINCIPAL TEMPS Votre ONYX EASY vous indique la date. Vous en saurez plus sur le réglage de la date dans le menu principal Réglages au chapitre 3.2 “Réglages de l’appareil”. Le chronomètre sert à mesure des Temps indépendamment d’un entraînement. Pour démarrer le chronomètre, appuyez sur...
- Page 70 5. MENU PRINCIPAL TEMPS Vous pouvez également utiliser votre ONYX EASY comme réveil ou agenda. Pour régler le réveil, appuyez sur la touché de navigation k CHANGE. Suivez les indications apparaissant à l’écran. Remarque: Si le réveil est réglé sur une certaine heure, il sonne chaque jour à...
-
Page 71: Menu Principal Mémoire
6. MENU PRINCIPAL MéMOIRE Appuyez sur la touche de navigation k ENTER pour ouvrir le menu “Mémoire”. Les touches PLUS /MOINS vous permettent de choisir entre “Mémoire valeurs globales” et “Mémoire individuelle”. 6.1 MéMOIRE VALEURS TOTALES Appuyer sur la touche k ENTER pour ouvrir le menu “Valeurs globales”... -
Page 72: Mémoire
Nombre d’unités d’entraînement (“Numéro”) k Temps total d’entraînement k Temps moyen de l’entraînement k Kcal 6.2 MéMOIRE En plus des valeurs globales, votre ONYX EASY est muni d‘une mémoire très détaillée pour évaluer votre unité d‘entraînement. www.sigmasport.com... -
Page 73: Autres Informations
6.2 MéMOIRE Chacune des valeurs suivantes est indiquée à l‘utilisateur: k Date k Heure de départ k Temps total k FC moyenne k FC maximale k Kcal k Temps dans le zone FC k % dans le zone FC 7. AUTRES INFORMATIONS 7.1 INFORMATIONS SUR LA FRéQUENCE CARDIAQUE La fréquence cardiaque (FC) est donnée en pulsations par minute. - Page 74 Sur votre ONYX EASY, vous pouvez choisir entre la zone de combustion des graisses et la zone fitness selon vos objectifs personnels. Vous trouverez plus d’informations à ce sujet au chapitre 3.1 “Installations de l’utilisateur”.
-
Page 75: Faq
Que se passe-t-il si je retire la ceinture thoracique pendant l’entraînement? La montre ne reçoit plus le signal, “O” apparaît sur l’affichage – après un court instant, l’ONYX EASY se met au repos (le chronomètre ne fonctionne pas). Le cardiofréquencemètre SIGMA s’éteint-il complètement? Non –... -
Page 76: Aperçu Des Tonalités
être remplacée aussi vite que possible. – Type de batterie CR2032 (n° d’art. 00342) 7.3 APERçU DES TONALITéS L´ONYX EASY se manifeste en émettant différentes tonalités. Aperçus des tonalités de l´ ONYX EASY: 1 tonalité longue : lorsque vous passez en zone 3 tonalités courtes :... -
Page 77: Recherche De Défaillances
7.3 APERçU DES TONALITéS 3 tonalités courtes à intervalles : Le compte à rebours est terminé le réveil sonne 1 tonalité courte: Tonalité des touches 7.4 RECHERCHE DE DéFAILLANCES La ceinture thoracique ne peut pas être détectée. Assurez-vous que vous avez bien placé la ceinture thoracique. -
Page 78: Remplacement De La Batterie /Etanchéité Et Garantie
Des batteries CR 2032 (Ref. 00342) sont utilisées dans votre cardio-fréquencemètre et dans la ceinture thoracique. L’ONYX EASY est équipée d’un compartiment à piles. Ouvrez le compartiment à piles avec la clé prévue à cet effet, changez les piles puis refermez le compartiment à... - Page 79 7.5 REMPLACEMENT DE LA BATTERIE /ETANCHéITé ET GARANTIE Etanchéité Votre ONYX EASY est étanche jusqu’à une profondeur de 10 m. N’appuyez sur aucun bouton lorsque vous êtes sous l‘eau. Garantie Nous assurons notre responsabilité vis-à-vis de nos partenaires contractuels pour les vices conformément aux dispositions légales.
- Page 80 CONTENUTO Introduzione e contenuto della confezione Principi funzionali di base Panoramica funzioni (diagramma ad albero) Occupazione dei tasti e principi di navigazione Applicazione della cintura pettorale / Fissaggio del supporto a manubrio Misurazione della frequenza cardiaca Impostazioni prima del primo training k impostazione menu principale Impostazione utente Impostazione apparecchio...
-
Page 81: Introduzione E Contenuto Della Confezione
Congratulazioni per aver scelto un cardio- frequenzimetro di SIGMA SPORT . Il Vostro ® nuovo ONYX EASY sarà per voi un accompag- natore fedele per tanti anni per le vostre attività sportive e del tempo libero. ONYX EASY è uno strumento tecnico di misurazione molto esigenze. -
Page 82: Principi Funzionali Di Base
2. PRINCIPI FUNZIONALI DI BASE 2.1 PANORAMICA FUNZIONI (diagramma ad albero) Allenamento Tempo 1 Training Orario zone Data Cronometro Conto alla rovescia Sveglia Memoria Memoria 1 Valori complessivi A Mese A Settimana Dal Reset www.sigmasport.com... - Page 83 2. PRINCIPI FUNZIONALI DI BASE 2.1 PANORAMICA FUNZIONI (diagramma ad albero) Impostazioni Utente Apparecchio Sesso Lingue Anniversario Data Peso Orario FC. Mass. Volume T. zone Tono tasti (training zone) Allarme zona Mio Nome...
-
Page 84: Occupazione Dei Tasti E Principi Di Navigazione
2.2 OCCUPAZIONE DEI TASTI E PRINCIPI DI NAVIGAZIONE ONYX EASY dispone di tre livelli di menu. Per navigare nei menu e sottomenu di ONYX EASY l’utente deve sempre fare riferimento al diagramma ad albero presentato al capitolo 2.1 “Panoramica funzioni”. -
Page 85: Applicazione Della Cintura Pettorale / Fissaggio Del Supporto A Manubrio
2.2 OCCUPAZIONE DEI TASTI E PRINCIPI DI NAVIGAZIONE A livello di navigazione vengono visualizzate le funzioni richiamabili con i tasti superiori per: k muoversi nel livello inferiore successivo (ENTER) k ritornare al livello superiore (BACK /OFF) k dare inizio ad un training (START) k terminare un training (END) Confermate la funzione indicata nel livello di navigazione con premendo ancora una volta il tasto. -
Page 86: Misurazione Della Frequenza Cardiaca
2.4 MISURAZIONE DELLA FREQUENZA CARDIACA Quando non siete in fase di training, il vostro ONYX EASY è in condizione di riposo e può essere indossato come un normale orologio. Prima e dopo il training è possibile leggere sul display la data, l’ora ed il nome del prodotto. - Page 87 2.1. Sincronizzazione tra orologio e fascia toracica ONYX EASY dispone di una cintura pettorale codificata che permette di eseguire un training senza disturbi nel gruppo. Grazie alla sua nuovissima tecnica potrete essere sicuri che i dati trasmessi digitalmente dalla cintura arrivano senza venire persi al vostro ONYX EASY.
- Page 88 La sincro-nizzazione viene avviata automatica- mente e dura solo pochi secondi. Al termine della corretta sincronizzazione ONYX EASY ne da la conferma con “Sync ok”. Nota: nel caso non riusciate a leggere questa indicazione sull’orologio, la sincronizzazione è avvenuta comunque con successo.
-
Page 89: Impostazioni Prima Del Primo Training
2.4 MISURAZIONE DELLA FREQUENZA CARDIACA Spegnimento di ONYX EASY ONYX EASY si spegne automaticamente dopo 5 minuti, se non è attivo alcun training. È comunque possibile riportare l’orologio in condizione di riposo manualmente. Per spegnere il vostro ONYX EASY dovete entrare nel menu principale. -
Page 90: Impostazione Utente
Aumentare /ridurre il valore con PIÙ /MENO. Confermare il dato impostato con OK e salvare al termine le rispettive impostazioni con k SAVE. Nota: ONYX EASY dispone di una memoria sup- plementare così che, quando si sostituiscono le batterie, i valori impostati non vengono persi. - Page 91 3. Zona individuale: Con ONYX EASY avete inoltre la possibilità di impostare la vostra training zone in modo individuale. A tal proposito modificate nel punto del menu “Impostazioni //Utilizzatore // Train.zone” i limiti superiori e inferiori con il tasto di navigazione k CHANGE.
-
Page 92: Impostazione Apparecchio
Con la funzione “Mio nome” è possibile individu- alizzare ONYX EASY. L’orologio visualizza infatti in condizione di riposo (sleep mode) il nome o una scritta qualsiasi, lunga fino ad 10 caratteri. -
Page 93: Menu Training
4. MENU TRAINING Premere il tasto di navigazione k ENTER per aprire il menu “Training”. Quando ONYX EASY si è correttamente sincro- nizzato con la cintura pettorale, è possibile dare inizio al training premendo su k START. Sulla parte alta del display si trovano tutte le informazioni completi della zona meta. -
Page 94: Menu Tempo
5. MENU TEMPO ONYX EASY dispone di tutte le funzioni tempo necessarie di un orologio sportivo. Panoramica delle funzioni tempo: k Ora k Data k Cronometro con 1/10 di secondo k Countdown k Sveglia Premere il tasto di navigazione k ENTER per aprire il menu “Tempo”. - Page 95 Per avviare il cronometro premere su k START. Seguite quindi le indicazioni sul display. Il cronometro di ONYX EASY può essere utiliz- zato anche senza cintura pettorale. L’orologio resta in questo caso attivato fino alle ore 19:59:59.
- Page 96 5. MENU TEMPO Potete utilizzare il vostro ONYX EASY anche come sveglia o promemoria. Per impostare la sveglia premete il tasto di navigazione k CHANGE. Seguite quindi le indicazioni sul display. Indicazione: se la sveglia è impostata ad una determinata ora, suona tutti i giorni a quest’ora.
-
Page 97: Menu Memoria
6. MENU MEMORIA Premere il tasto di navigazione k ENTER per aprire il menu “Memoria”. Con i tasti PIÙ /MENO è possibile scegliere tra la “Memoria del valore complessivo” e la “Memoria singola”. 6.1 VALORI TOTALI Premete il tasto di navigazione k ENTER per aprire il menu “Valori complessivi”... -
Page 98: Memoria Singola
Numero delle unità di training k Tempo di training totale k Tempo di training medio k Kcal 6.2 MEMORIA SINGOLA Oltre ai valori complessivi, ONYX EASY dispone inoltre di una memoria molto dettagliata per la valutazione della vostra unità di allenamento. www.sigmasport.com... -
Page 99: Ulteriori Informazioni
6.2 MEMORIA SINGOLA I seguenti valori vengono mostrati singolarmente all’utilizzatore: k Data k Ora partenza k Tempo totale k FC media k FC massima k Kcal k Tempo nelle zone FC k % nelle zone FC 7. ULTERIORI INFORMAZIONI 7.1 COSE DA SAPERE SULLA FREQUENZA CARDIACA La frequenza cardiaca (FC) è... - Page 100 La zona di training è quell’area in cui la frequenza cardiaca può oscillare durante un training efficace e mirato allo scopo. Nel vostro ONYX EASY potete scegliere tra la Fat-Burner zone e quella Fitness in base ai vostri obiettivi personali. Per ulteriori informazioni consultate il capitolo 3.1 “Impostazioni Utilizzatore”.
-
Page 101: Faq
Cosa succede se mi tolgo la cintura pettorale durante il training? L’orologio non riceve più alcun segnale, sul display viene visualizzato “O” – dopo poco tempo ONYX EASY entra in condizione di riposo (il timer non funziona). I cardiofrequenzimetri SIGMA si spengono completamente? No, in condizione di riposo vengono visualizzati solo l’ora e la... -
Page 102: Riassunto Dei "Bip
La visualizzazione debole può essere causata da una batteria scarica. Occorre quindi sostituirla immediatamente. – tipo di batteria CR 2032 (Art. nr. 00342) 7.3 RIASSUNTO DEI “BIP” ONYX EASY richiama l´attenzione con diversi segnali acustici (bip). Riassunto dei “bip”: 1x lungo: mentre si entra nella zona 3x brevi: quando si è... -
Page 103: Risoluzione Problemi
7.3 RIASSUNTO DEI “BIP” 3x brevi intervallati: Il conto alla rovescia è partito, la sveglia suona 1x breve: Tono dei tasti 7.4 RISOLUZIONE PROBLEMI Impossibile trovare la cintura pettorale. Assicurarsi di averla legata correttamente. Premete k SYNC per ricominciare la sincro- nizzazione. -
Page 104: Sostituzione Della Batteria/Tenuta Stagnae Garanzia
Sostituzione della batteria Nel cardiofrequenzimetro e nella cintura pettorale vengono impiegate le batterie del tipo CR 2032 (Art. nr. 00342). ONYX EASY è dotato di un vano batterie. Aprite il vano batterie con l’apposita chiave, sostituite la batteria e richiudetelo nuovamente. www.sigmasport.com... - Page 105 7.5 SOSTITUZIONE DELLA BATTERIA/TENUTA STAGNA E GARANZIA Impermeabile ONYX EASY è a tenuta stagna fino ad una profondità di 10 m. Sottacqua non va premuto alcun pulsante! Garanzia Siamo responsabili nei confronti dei nostri partner contrattuali ai sensi di legge. Le batterie sono escluse dalla garanzia. Se si...
- Page 106 CONTENIDO Introducción y contenido del embalaje Principio básico de funcionamiento Sinopsis de las funciones (diagrama de árbol) Funciones de las teclas y principio de navegación Colocar el transmisor pectoral / sujetar el soporte para el manillar Medición de la frecuencia cardiaca (FC) Ajustes antes del primer entrenamiento ->...
-
Page 107: Introducción Y Contenido Del Embalaje
Su nuevo ONYX EASY le acompañará durante muchos años cuando practique deporte y en su tiempo libre. El ONYX EASY es un instrumento de medición técnicamente preciso. Para conocer las múlti- ples funciones de su nuevo pulsómetro y poder usarlas, lea cuidadosamente estas instrucciones de uso. -
Page 108: Principio Básico De Funcionamiento
2. PRINCIPIO BáSICO DE FUNCIONAMIENTO 2.1 SINOPSIS DE LAS FUNCIONES (diagrama de árbol) Entrenamiento Tiempo Entrenamiento Hora de una zona Fecha Cronometro Cuenta atràs Despertador Memoria Memoria 1 Valores totales Por semana Por mes Desde la puesta a cero www.sigmasport.com... - Page 109 2. PRINCIPIO BáSICO DE FUNCIONAMIENTO 2.1 SINOPSIS DE LAS FUNCIONES (diagrama de árbol) Rogistros Usario Aparato Sexo Idiomas Aniversario Fecha Peso Hora FC máxima Volumen Zona T (zona de Tonos boton entrenamiento) Alarma zona Mi nombre...
-
Page 110: Funciones De Las Teclas Y Principio De Navegación
2.2 FUNCIONES DE LAS TECLAS Y PRINCIPIO DE NAVEGACIóN El ONYX EASY dispone de tres niveles en cada menú. Para navegar por los menús y los submenús del ONYX EASY, el usuario debería orientarse siempre según el diagrama de árbol contenido en el capítulo 2.1 “Sinopsis de las funciones”. -
Page 111: Colocar El Transmisor Pectoral / Sujetar El Soporte Para El Manillar
2.2 FUNCIONES DE LAS TECLAS Y PRINCIPIO DE NAVEGACIóN En el nivel de navegación se indican las posibles funciones de las dos teclas superiores para: k Acceder al nivel inferior (ENTER) k Volver al nivel superior (BACK /OFF) k Iniciar un entrenamiento (START) k Finalizar un entrenamiento (END) Volviendo a pulsar la tecla podrá... -
Page 112: Medición De La Frecuencia Cardiaca (Fc)
El transmisor debe colocarse de modo que, en los hombres, quede por debayo del músculo pectoral y en las mujeres, por debajo del pecho. A su vez, el logotipo de SIGMA tiene que ser visible por delante. Despegue ligeramente el transmisor de la piel. - Page 113 árbol detallado en 2.1. Sincronización entre el pulsómetro y el transmisor torácico El ONYX EASY está equipado con un transmisor codificado digital- mente que le permitirá entrenar en grupo sin problema alguno. Gracias a la innovadora técnica, puede estar seguro de que el cinturón transmitirá...
- Page 114 “Sync ok”. Nota: Cuando deje de ver esta indicación en su reloj, la sincronización habrá terminado correctamente. Cuando el ONYX EASY ya se ha sincronizado correctamente con el transmisor pectoral puede iniciarse el entrenamiento pulsand k START (Inicio). Nota: En el capítulo 7.4 “Solución de problemas”...
-
Page 115: Ajustes Antes Del Primer Entrenamiento
2.4 MEDICIóN DE LA FRECUENCIA CARDIACA (FC) Desactivar el ONYX EASY Si el entrenamiento no está activo, el ONYX EASY se desconecta automáticamente después de 5 minutos. Por otro lado, también existe la alternativa de poner el reloj en el estado de reposo de manera manual. -
Page 116: Ajustes /Usuario
MÁS /MENOS. Confirme el ajuste correspondiente con OK y guárdelo al final con k SAVE. Nota: El ONYX EASY dispone de una memoria adicional, de modo que, al cambiar las pilas, sus ajustes personales sigan guardados en el ONYX EASY. - Page 117 La zona de entrenamiento se selecciona y con- figura en el menú “Configuraciones //Usuario //Zona entren”. Según sus objetivos personales, en ONYX EASY tiene la posibilidad de activar una de las siguientes zonas de entrenamiento. 1. Zona quemagrasas: k aprox.
-
Page 118: Ajustes /Aparato
De este capítulo encontrará indica- ciones sobre el principio de ajuste. Con la función “Mi nombre” puede individua- lizarse el ONYX EASY. En ese caso, en el reloj aparecerá durante el estado de reposo (sleep mode) el nombre o palabra que se desee, que puede ser de hasta 10 caracteres. -
Page 119: Menú Training
4. MENú TRAINING Para abrir el menú principal “Training” pulse la tecla de navegación k ENTER. Cuando el ONYX EASY ya se ha sincronizado correctamente con el transmisor pectoral puede iniciarse el entrenamiento pulsando k START (Inicio). En la parte superior de la pantalla puede en- contrar toda la información sobre la zona límite. -
Page 120: Menú Tiempo
5. MENú TIEMPO Su ONYX EASY dispone de un menú principal “Tiempo” con todas las funciones importantes en un reloj de deporte. Vista general de las funciones de tiempo: k Hora k Fecha k Cronómetro con 1/10 segundos k Cuenta atrás k Despertador Pulse la tecla de navegación k ENTER para... - Page 121 5. MENú TIEMPO El ONYX EASY le muestra la fecha actual. Encontrará más información sobre el ajuste de la fecha en el menú principal “Ajustes” en el capítulo 3.2 “Ajustes del aparato”. El cronómetro sirve para medir periodos de tiempo independientes de un entrenamiento.
- Page 122 5. MENú TIEMPO También puede configurar su ONYX EASY como despertador o recordatorio. Para ajustar el despertador pulse la tecla de navegación k CHANGE. Siga las indicaciones que aparecen en la pantalla. Indicación: Si el despertador está ajustado a una hora determinada le avisará todos los días a esa hora.
-
Page 123: Menú Memoria
6. MENú MEMORIA Para abrir el menú “Memoria” pulse la tecla de navegación k ENTER. Con las teclas MÁS /MENOS puede escoger entre “Valores totales” y “Memoria”. 6.1 VALORES TOTALES Pulse la tecla de navegación k ENTER para abrir el menú “Valores totales” o cada una de las memorias. -
Page 124: Memoria
Número de unidades de entrenamiento k Tiempo total de entrenamiento k Tiempo medio k Kcal 6.2 MEMORIA Además de los valores totales su ONYX EASY dispone de una memoria muy detallada para evaluar su unidad de entrenamiento. www.sigmasport.com... -
Page 125: Otras Informaciones
6.2 MEMORIA Al usuario se le muestran detallados los siguientes valores: k Fecha k Hora inicio k Tiempo total k FC media k FC máx. k Kcal k Valores de tiempo en zona de frecuencia cardiaca k % en zona de frecuencia cardiaca 7. - Page 126 En su ONYX EASY puede escoger entre la zona quemagrasas y la zona fitness según sus metas personales. En el capítulo 3.1 “Ajustes /Usuario” encontrará más información al respecto.
-
Page 127: Faq
¿Qué sucede si me quito el transmisor pectoral durante el entrenamiento? El reloj ya no recibe ninguna señal, en la pantalla aparece la indicación “O”. Al poco tiempo el ONYX EASY vuelve al estado de reposo (el cronómetro ya no funciona). ¿El pulsómetro SIGMA se desconecta por completo? No. -
Page 128: Vista General De Señales Sonoras
Si la imagen de la pantalla es débil, puede que la batería esté baja. Debería cambiarlas lo antes posible. Tipo de batería CR 2032 (N.º Art. 00342) 7.3 VISTA GENERAL DE SEñALES SONORAS El ONYX EASY utiliza diferentes señales sonoras para llamar su atención. Vista general de señales sonoras: 1 señal larga: al entrar en la zona 3 señales cortas:... -
Page 129: Solución De Problemas
7.3 VISTA GENERAL DE SEñALES SONORAS 3 señales cortas en intervalo: La cuenta atrás ha terminado, suena el despertador 1 señal corta: tono de tecla 7.4 SOLUCIóN DE PROBLEMAS No se encuentra ningún transmisor pectoral. Asegúrese de que se ha colocado el transmisor pectoral correctamente. -
Page 130: Cambio De Baterías/Resistencia Al Aguay Garantía
En el pulsómetro y el transmisor pectoral se utilizan las pilas CR 2032 (N.º Art. 00342). El ONYX EASY está dotado de un comparti- mento para el cambio de la pila. Abra el compartimento de cambio de pila con la llave correspondiente, cambie la pila y vuelva a cerrar el compartimento. - Page 131 7.5 CAMBIO DE BATERíAS/RESISTENCIA AL AGUA Y GARANTíA Resistencia al agua El ONYX EASY es resistente al agua en una profundidad de 10 m. Bajo el agua no se debe pulsar ningún botón. Garantía Nos responsabilizamos ante nuestra correspondiente parte contratante por los defectos según las disposiciones legales.
- Page 132 INHOUD Voorwoord en inhoud van de verpakking Fundamenteel functieprincipe Functieoverzicht (boomdiagram) Toetsindeling en navigatieprincipe Omdoen van de borstband / montage van de stuurbevestiging Hartfrequentiemeting Instellingen vóór de eerste training k hoofdmenu instellen Gebruikersinstellingen („Setting user”) Apparaatinstellingen („Setting Unit”) Hoofdmenu training („training”) Hoofdmenu tijd („time”) Hoofdmenu geheugen („memory”) Totaalwaarden geheugen („Total values“)
-
Page 133: Voorwoord En Inhoud Van De Verpakking
1. VOORWOORD EN INHOUD VAN DE VERPAKKING Hartelijk gefeliciteerd dat u hebt gekozen voor een polscomputer van de onderneming SIGMA SPORT . Uw nieuwe ONYX EASY zal u jarenlang ® trouw begeleiden tijdens sport en vrije tijd. De ONYX EASY is een technisch veeleisend meetinstrument. -
Page 134: Fundamenteel Functieprincipe
2. FUNDAMENTEEL FUNCTIEPRINCIPE 2.1 FUNCTIEOVERZICHT (Boomdiagram) Training Tijd 1-zonetraining Tijd Datum Stopwatch Countdown Wekker Geheugen 1 Geheugen Totaal waarden Per week Per maand Sinds Reset www.sigmasport.com... - Page 135 2. FUNDAMENTEEL FUNCTIEPRINCIPE 2.1 FUNCTIEOVERZICHT (Boomdiagram) Instellingen Gebruiker Apparaat Geslacht Taal Verjaardag Datum Gewicht Tijd HF max Geluidssterkte T-zone Toetstonen (trainingszone) Zonealarm Mijn Naam...
-
Page 136: Toetsindeling En Navigatieprincipe
MINUS schakelt u over van het ene naar het andere hoofdmenu. 2.2 TOETSINDELING EN NAVIGATIEPRINCIPE De ONYX EASY bezit drie menuniveaus. Bij de navigatie door de menu’s en submenu’s van de ONYX EASY dient de gebruiker zich altijd op het boomdiagram in hoofdstuk 2.1 „Functieoverzicht“... -
Page 137: Omdoen Van De Borstband / Montage Van De Stuurbevestiging
2.2 TOETSINDELING EN NAVIGATIEPRINCIPE Op het navigatieniveau worden de mogelijke toetsenfuncties van de twee bovenste toetsen aangegeven om: k In het daaronder liggende niveau (ENTER) te komen k Terug te gaan naar het daarboven liggende niveau (BACK /OFF) k Te beginnen met een training (START) k Te stoppen met een training (END) Bevestig de op het navigatieniveau aangegeven functie direct met druk op de toets. -
Page 138: Hartfrequentiemeting
Fixeer dan de stuurbevestiging met de O-ring en sluit de armband. 2.4 HARTFREQUENTIEMETING Als u niet traint, bevindt uw ONYX EASY zich in rust en kan hij worden gedragen als een nor- maal horloge. Vóór en na de training zijn op het display de datum, tijd, productnaam te lezen. - Page 139 2.1 aangegeven boomdiagram. Synchronisatie van Klok en borstband Uw ONYX EASY is voorzien van een digitaal gecodeerde borstband waardoor u zonder storing in de groep kunt trainen. Door zijn nieuwe techniek kunt u er zeker van zijn dat uw gegevens vanuit de borstband als digitale gegevenspakketten zonder verlies bij uw ONYX EASY komen.
- Page 140 Aanwijzing: mocht u deze indicatie op uw horloge zien, dan is de synchronisatie reeds met succes afgesloten. Nadat uw ONYX EASY met succes met de borst- band is gesynchroniseerd, kunt u met uw trai- ning door het indrukken van k START beginnen.
-
Page 141: Instellingen Vóór De Eerste Training
2.4 HARTFREQUENTIEMETING ONYX EASY uitschakelen De ONYX EASY schakelt automatisch na 5 minuten uit, zolang er geen training actief is. Als alternatief kunt u uw horloge echter ook altijd handmatig op rust zetten. Om uw ONYX EASY uit te schakelen moet u zich in het hoofdmenu bevinden. -
Page 142: Gebruikersinstellingen („Setting User")
PLUS /MINUS. Bevestig elke instelling met OK en sla de instelling uiteindelijk op met k SAVE. Aanwijzing: de ONYX EASY beschikt over een extra geheugen, zodat bij de vervanging van een batterij de persoonlijke instellingen van uw ONYX EASY behouden blijven. - Page 143 De selectie en instelling van de trainingszone vindt plaats in het menu „Instel- lingen //Gebruiker //Train. zone”. Afhankelijk van uw persoonlijke doelstellingen heeft u bij de ONYX EASY de mogelijkheid een van de volgende trainingszones te activeren. 1. Fat Burner-zone: k ca.
-
Page 144: Apparaatinstellingen („Setting Unit")
Met de Mijn-naam-functie („my name function”) kan een individualisering van de ONYX EASY worden uitgevoerd. Op het horloge verschijnt dan in rust (sleep mode) de naam of willekeurige letters die maximaal 10 tekens lang kunnen zijn. -
Page 145: Hoofdmenu Training („Training")
4. HOOFDMENU TRAINING („MAIN MENU TRAINING”) Druk op de navigatietoets k ENTER om het hoofdmenu „Training” („Main menu Training”) te openen. Nadat uw ONYX EASY met succes met de borstband is gesynchroniseerd, kunt u met uw training door het indrukken van k START beginnen. -
Page 146: Hoofdmenu Tijd („Time")
Wekker („Alarm”) Druk op de navigatietoets k ENTER om het menu Tijd te openen. De ONYX EASY geeft u de actuele tijd aan. Meer over het instellen van de tijd vindt u in het hoofdmenu Instellen in hoofdstuk 3.2 „Apparaatinstellingen”. - Page 147 5. HOOFDMENU TIjD („MAIN MENU TIME”) De ONYX EASY geeft u de actuele datum aan. Meer over het instellen van de datum vindt u in het hoofdmenu Instellen in hoofdstuk 3.2 „Apparaatinstellingen”. De stopwatch dient voor de meting van inter- vallen onafhankelijk van een training.
- Page 148 5. HOOFDMENU TIjD („MAIN MENU TIME”) U kunt uw ONYX EASY ook als wekker of geheugensteuntje gebruiken. Voor het instellen van de wekker drukt u op navigatietoets k CHANGE. Volg dan de aanwijzingen op het display op. Tip: is de wekker op een bepaalde tijd ingesteld, dan waarschuwt hij u elke dag op dezelfde tijd.
-
Page 149: Hoofdmenu Geheugen („Memory")
6. HOOFDMENU GEHEUGEN („MAIN MENU MEMORY”) Druk op de navigatietoets k ENTER om het menu „Geheugen” te openen. Met de PLUS /MIN-toetsen kunt u kiezen tussen het „Totaalwaardegeheugen” en het „Afzonderlijk geheugen”. 6.1 TOTAALWAARDEN GEHEUGEN („TOTAL VALUES”) Druk op de navigatietoets k ENTER om het „Totaalwaarde”-menu of het gedetailleerd afzonderlijk geheugen te openen. -
Page 150: Aparte Geheugens
Hierbij worden de volgende waarden over de gewenste periode aangegeven: k Aantal trainingsonderdelen k Totaal trainingstijd („Time”) k Gemiddelde trainingtijd („Average time”) k Kcal 6.2 GEHEUGEN Naast de totaalwaarden beschikt uw ONYX EASY over een zeer gedetailleerd geheugen voor de evaluatie van uw trainingseenheid. www.sigmasport.com... -
Page 151: Verdere Informatie
6.2 GEHEUGEN In detail wordt de gebruiker de volgende waarden getoond: k Datum („Date”) k Starttijd („Start time”) k Totale tijd („Total time”) k Gemiddelde HF („Average HR”) k Maximale HF („Highest HR”) k Kcal k Tijdwaarden in HF zone k % in HF zone 7. - Page 152 De trainingszone is het gebied waarin de hartfrequentie zich tijdens een effectieve en doelgerichte training dient te bewegen. In uw ONYX EASY kunt u kiezen tussen de „Fat Burner-zone” en de „Fitnesszone” al naargelang uw persoonlijke doelstelling. Meer informatie hierover vindt u in hoofdstuk 3.1 „Gebruikersinstel- lingen”.
-
Page 153: Faq
Wat gebeurt er als ik tijdens de training de borstband afdoe? Het horloge ontvangt geen signaal meer, op het display verschijnt de indicatie „O“ – na korte tijd gaat de ONYX EASY over op rust (stopwatch loopt niet). Worden SIGMA pulscomputers compleet uitgeschakeld? Nee –... -
Page 154: Piepoverzicht
Zij moet zo snel mogelijk worden vervangen. – batterijtype CR 2032 (art. nr. 00342) 7.3 PIEPOVERZICHT Met verschillende piepsignalen wordt u attent gemaakt op de ONYX EASY. Bij de geluidsinstellingen onderscheidt men: 1 x lang: bij het ingaan van zone... -
Page 155: Probleemoplossingen
7.3 PIEPOVERZICHT 3 x kort met interval: Countdown is afgelopen wekker gaat af 1 x kort: Toetsen geluid 7.4 PROBLEEMOPLOSSINGEN Er kon geen signaal worden gevonden. Controleer of u uw borstband op de juiste manier hebt omgedaan. Druk op k SYNC om de Synchronisatie opnieuw op te starten. -
Page 156: Batterijvervanging/Waterdichtheid En Garantie
De ONYX EASY is van een batterijwisselvak voorzien. Open het batterijwisselvak met de bijbehorende sleutel, verwissel de batterijen en sluit het batterijwisselvak weer. Waterdicht De ONYX EASY is tot een diepte van 10 m waterdicht. Onder water mag er niet op knoppen worden gedrukt. www.sigmasport.com... - Page 157 SIGMA Elektro GmbH Dr. - Julius - Leber - Straße 15 D - 67433 Neustadt /Weinstraße Tel.
- Page 158 Heart rate Monitors ONYX EASY SIGMA Elektro GmbH SIGMA SPORT USA Dr. - Julius - Leber - Straße 15 North America D - 67433 Neustadt /Weinstraße 1067 Kingsland Drive Tel. + 49 (0) 63 21- 9120 - 0 Batavia, IL 60510, U.S.A.
Need help?
Do you have a question about the ONYX EASY and is the answer not in the manual?
Questions and answers