Table of Contents
Advertisement
Available languages
Available languages
Quick Links
H-12111
PROTEAM
6 QT.
®
CORDLESS VACUUM
NOTE: Read all instructions before using. Save
these instructions. Following the cleaning
instructions will prolong the life of the vacuum.
• Carefully unpack and inspect vacuum for shipping
damage.
• These instructions have important information for
the use and safe operation of the vacuum cleaners.
Read this manual carefully before starting the
machine. Keep these instructions available at
all times and instruct all operators to read these
instructions. If instructions are not followed, an
injury may occur or equipment, furniture or other
property may become damaged.
VACUUM
• The products described in these instructions are
intended for commercial use.
• When using an electrical appliance, basic
precautions should always be followed, including
the following:
• Use only as described in these instructions. Use only
the recommended attachments, battery pack,
charger and replacement parts.
• Do not use the vacuum outdoors or on wet surfaces.
Do not expose to rain or water.
• Do not use or store vacuum in wet or moist
conditions.
• Do not try to recover any liquid with this vacuum.
This vacuum is for dry recovery only.
PAGE 1 OF 37
1-800-295-5510
uline.com
SAFETY
• Do not use a damaged vacuum. If the unit is not
• This vacuum is not intended for use by persons
• Do not allow the vacuum to be used as a toy.
• Do not handle the switch or battery pack with wet
• Do not put any objects into openings. Do not use
• Keep hair, loose clothing, fingers and all parts of
• Use with extra care when cleaning on stairs.
• Do not vacuum flammable or combustible
• Sparks inside the motor can ignite flammable
Pour le français, consulter les pages 25-37.
working as it should, or if it has been damaged, left
outdoors, or exposed to water, call Uline Customer
Service at 1-800-295-5510.
(including children) with reduced physical, sensory,
or mental capabilities, or lack of experience
and knowledge, unless they have been given
supervision or instruction concerning use of the
vacuum by a person responsible for their safety.
Pay close attention when using the vacuum near
children.
hands.
with any opening blocked; keep free of dust, lint,
hair and anything that may reduce air flow.
body away from openings and moving parts.
materials or anything that is burning or smoking,
such as cigarettes, matches or hot ashes.
vapors or dust. To reduce the risk of fire or
explosion, do not use near combustible liquids,
gases, or dusts, such as gasoline or other fuels,
lighter fluid, cleaners, oil-based paints or natural
gas.
Para Español, vea páginas 13-24.
0525 IH-12111
Advertisement
Table of Contents

Related Manuals for U-Line PROTEAM 6 QT


Summary of Contents for U-Line PROTEAM 6 QT
- Page 1 Para Español, vea páginas 13-24. Pour le français, consulter les pages 25-37. H-12111 1-800-295-5510 uline.com PROTEAM 6 QT. ® CORDLESS VACUUM SAFETY NOTE: Read all instructions before using. Save • Do not use a damaged vacuum. If the unit is not these instructions.
-
Page 2: Battery Pack And Charger
SAFETY CONTINUED • To reduce the risk of inhaling toxic vapors or dust, • Do not expose charger and battery packs to rain do not vacuum or use near toxic or hazardous or other liquids; keep dry. Install charger in a safe materials. - Page 3 SAFETY CONTINUED • Do not use a battery pack or vacuum that WARNING! In a double-insulated battery is damaged or modified. Do not crush, drop, charger, two systems of insulation are provided incinerate or damage the battery pack. Do not instead of grounding.
- Page 4 SAFETY CONTINUED ELECTRICAL • Should a thermal trip take place, immediately turn off the vacuum, remove the battery pack, and • The vacuum is supplied with the battery pack and inspect for a blockage and verify the condition of charger. The nominal operational voltage of the the filter bag.
-
Page 5: Operation
OPERATION PREPARING BATTERY PACK FOR 3. A temporary adapter may be used to connect this plug to a two-pole receptacle if a properly CHARGING grounded outlet is not available. (See Figure 3) Plug the charger's power cord into the charger. (See Figure 1) Figure 3 Ungrounded Outlet Box... -
Page 6: Removing Battery Pack
OPERATION CONTINUED 5. The charger indicator light will turn on solid red NOTE: Battery pack is spring-loaded and will (standby) after inserting the battery. When charge need to be pushed fully into position. When cycle begins, the indicator will change from solid fully inserted, the battery latch will spring into red to flashing green. -
Page 7: Quick Start
OPERATION CONTINUED BATTERY PACK FUEL GAUGE 3. Ensure the HEPA Media Dome Filter did not shift during shipping. (See Figure 12) The battery fuel gauge indicates the approximate runtime remaining on the battery pack. (See Figure 9) Figure 12 Figure 9 HEPA Media Dome Filter When the indicator button is pressed, one to four... -
Page 8: Harness Height Adjustment
OPERATION CONTINUED 6. Push the hose into the cap opening. (See Figure 15) 2. To release locking feature, maintain pressure on pull tab and slide and slide the upper harness, identified with a purple "1", to the desired location. Figure 15 3. -
Page 9: Wearing The Backpack Vacuum
OPERATION CONTINUED INTERCHANGEABLE HARNESS PADS WEARING THE BACKPACK VACUUM The upper harness padding and lower harness padding Loosen the shoulder straps and the waist belt. Lift the are attached to the backpack through Velcro straps vacuum and slide your arms through the straps. ®... -
Page 10: Filter Maintenance
OPERATION CONTINUED 4. Adjust the shoulder straps, identified with a purple 5. Connect the sternum strap buckle, identified with "3", so that the upper harness pad touches your a purple "4", and slide the strap up or down on back between your shoulders. Unit should fit the sewn-in wire support for the best fit. -
Page 11: Routine Maintenance
MAINTENANCE CONTINUED 3. Once a month, or as necessary, hand or machine b. Shake out the HEPA Media Dome Filter. wash the Micro Cloth Filter with a mild detergent and NOTE: Do not rinse in water. let it air dry. Do not put it in the dryer. (See Figure 29) c. -
Page 12: Proper Storage
MAINTENANCE CONTINUED ELECTRICAL CORD CARE PROPER STORAGE • Never stretch the cord tightly between the charger When the vacuum is not in use, the vacuum, charger, and the outlet. A cord that is stretched or pulled battery pack and accessories should be stored indoors may not function properly, can damage the cord and in a dry place. - Page 13 H-12111 800-295-5510 uline.mx PROTEAM ASPIRADORA ® INALÁMBRICA – 6 CUARTOS DE GALÓN SEGURIDAD NOTA: Lea todas las instrucciones antes de • No utilice una aspiradora dañada. Si la unidad no utilizarla. Guarde estas instrucciones. Seguir las funciona como debería o si sufrió daños, se dejó instrucciones de limpieza prolongará...
-
Page 14: Batería Y Cargador
CONTINUACIÓN DE SEGURIDAD • Para reducir el riesgo de inhalación de vapores • Al cargar, asegúrese de que el cargador cuente tóxicos o polvo, no aspire ni utilice cerca de por lo menos con seis pulgadas de espacio libre materiales tóxicos o peligrosos. en todas direcciones. - Page 15 CONTINUACIÓN DE SEGURIDAD • No exponga la batería a temperaturas mayores a • Para reducir el riesgo de una descarga eléctrica, 40°C (140°F). Nunca deje la batería en automóviles este cargador cuenta con una clavija polarizada en días cálidos, donde las temperaturas pueden (una punta más ancha que la otra).
- Page 16 CONTINUACIÓN DE SEGURIDAD MOTOR • La aspiradora está equipada con un dispositivo de apagado de protección térmica. Este interruptor • Los motores eléctricos de flujo continuo nunca de apagado térmico integrado retirará energía deben usarse en aplicaciones en donde estén del motor de la aspiradora en caso de que involucradas condiciones secas o húmedas, se detecten temperaturas de funcionamiento...
- Page 17 FUNCIONAMIENTO PREPARAR LA BATERÍA PARA CARGAR 3. Se puede usar un adaptador temporal para conectar este enchufe a un tomacorriente de 1. Conecte el cable del cargador al cargador. dos polos si el tomacorriente aterrizado no está (Vea Diagrama 1) disponible.
-
Page 18: Instalar La Batería
CONTINUACIÓN DE FUNCIONAMIENTO 5. La luz indicadora del cargador se pondrá rojo NOTA: La batería contiene resortes y se sólido (apoyar) después de insertar la batería. necesitará empujar por completo en posición. Cuando el ciclo de carga comienza, el indicador Cuando se inserte por completo, el pestillo de cambiará... -
Page 19: Inicio Rápido
CONTINUACIÓN DE FUNCIONAMIENTO MEDIDOR DE COMBUSTIBLE DE LA BATERÍA 3. Asegúrese de que el Filtro de Domo para Medios HEPA no se mueva durante el envío. El medidor de combustible de la batería indica el (Vea Diagrama 12) tiempo de funcionamiento restante de la batería. (Vea Diagrama 9) Diagrama 12 Diagrama 9... - Page 20 CONTINUACIÓN DE FUNCIONAMIENTO 6. Empuje la manguera dentro de la abertura de la 2. Para liberar la función de bloqueo, mantenga la tapa. (Vea Diagrama 15) presión en la pestaña y deslice el arnés superior, identificado con un "1" morado, a la ubicación deseada.
- Page 21 CONTINUACIÓN DE FUNCIONAMIENTO ALMOHADILLAS DE ARNÉS COLOCARSE LA ASPIRADORA DE INTERCAMBIABLES MOCHILA Las almohadillas de los arneses superior e inferior 1. Afloje las correas del hombro y de la cintura. están fijadas a la mochila mediante correas de Velcro Levante la aspiradora y deslice los brazos a través ®...
-
Page 22: Mantenimiento Del Filtro
CONTINUACIÓN DE FUNCIONAMIENTO 4. Ajuste los tirantes, identificados con un "3" morado, 5. Conecte la hebilla de la correa del esternón, de modo que la almohadilla del arnés superior identificada con un "4" morado, y deslice la correa toque su espalda entre sus hombros. La unidad hacia arriba o abajo en el soporte de alambre debe ajustarse cómodamente con el peso aún cosido para obtener el mejor ajuste. -
Page 23: Mantenimiento De Rutina
CONTINUACIÓN DE MANTENIMIENTO 3. Una vez al mes o según sea necesario, lave el b. Sacuda el Filtro de Domo para Medios HEPA. Microfiltro de Tela a mano o en lavadora con un NOTA: No enjuague en agua. detergente suave y deje secar al aire libre. No lo meta en una secadora. -
Page 24: Solución De Problemas
CONTINUACIÓN DE MANTENIMIENTO CUIDADO DEL CABLE ELÉCRICO ALMACENAMIENTO ADECUADO • Nunca estire el cable con fuerza entre el cargador Cuando la aspiradora no esté en uso, esta, el cargador, y el tomacorriente. Un cable que se estiró o jaló la batería y los accesorios se deben almacenar podría no funcionar correctamente, dañar el en interiores y en un lugar seco. - Page 25 H-12111 1 800 295-5510 uline.ca PROTEAM – ASPIRATEUR SANS CORDON – 6 PINTES SÉCURITÉ REMARQUE : Lire toutes les instructions avant • N'utilisez pas cet aspirateur pour aspirer des l'utilisation. Conservez ces instructions pour liquides. Cet aspirateur est conçu pour le consultation ultérieure.
- Page 26 SÉCURITÉ SUITE • N'aspirez pas de matière inflammable ou • Utilisez uniquement un chargeur ProTeam (Uline combustible ou tout élément qui brûle ou modèle n H-12016) et un bloc-batterie ProTeam produit de la fumée, comme des cigarettes, des (Uline modèle n H-12014).
- Page 27 SÉCURITÉ SUITE • N'utilisez pas et ne rangez pas l'aspirateur ou • Lorsque le bloc-batterie est soumis à rude épreuve, les blocs-batteries dans des endroits humides, du liquide peut s'en éjecter. Évitez alors tout ou à proximité de matériaux inflammables ou contact.
-
Page 28: Alimentation Électrique
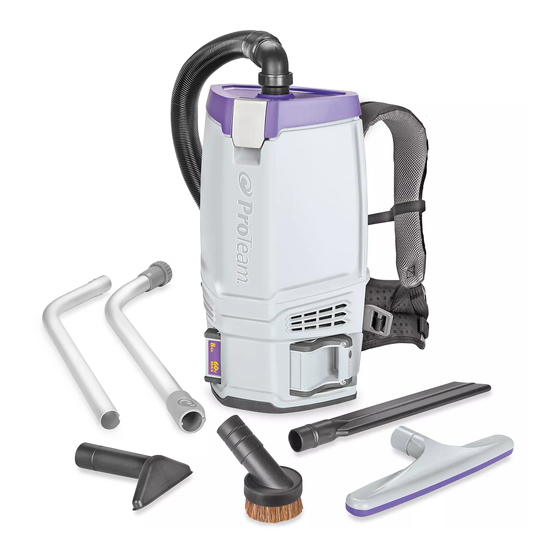
SÉCURITÉ SUITE ALIMENTATION ÉLECTRIQUE AVERTISSEMENT! Pour un chargeur de batterie ARRÊT à double isolation, deux systèmes d'isolation • L'aspirateur est équipé d'un bloc-batterie et d'un sont fournis à la place de la mise à la terre. Sur chargeur. La tension nominale de fonctionnement un appareil à... - Page 29 PIÈCES PIÈCES DESCRIPTION Aspirateur Bloc-batterie Chargeur Tuyau Cordon de chargeur Tube Accessoires Filtre Intercept Micro Microfiltre en tissu Filtre de dôme FONCTIONNEMENT ÉTAPES PRÉPARATOIRES 2. Branchez le cordon d'alimentation du chargeur dans une prise murale de 120 V. (Voir Figure 2) POUR CHARGER LE BLOC-BATTERIE REMARQUE : Cet aspirateur fonctionne sur un Branchez le cordon d'alimentation du chargeur...
- Page 30 FONCTIONNEMENT SUITE 5. Le voyant lumineux du chargeur devient rouge DANGER! Une mauvaise connexion du fixe (veille) après l'insertion de la batterie. Lorsque ARRÊT conducteur de mise à la terre de l'appareil le cycle de charge commence, le voyant passe peut entraîner un risque de choc électrique.
- Page 31 FONCTIONNEMENT SUITE INSTALLATION DU BLOC-BATTERIE RETRAIT DU BLOC-BATTERIE En tenant le bloc-batterie par la poignée, faites- 1. Tenez le bloc-batterie par la poignée et appuyez sur le glisser avec précaution dans l'aspirateur, en le bouton de déverrouillage de la batterie. alignant le bloc-batterie sur le rail de l'aspirateur.
- Page 32 FONCTIONNEMENT SUITE PRÉPARATION RAPIDE 4. Replacez le microfiltre en tissu et le filtre Intercept Micro dans l'aspirateur. (Voir Figure 13) Déverrouillez le collier de serrage situé sur le dessus de l'appareil et faites pivoter le couvercle en position verticale. (Voir Figure 10) Figure 13 Filtre Intercept Micro...
-
Page 33: Réglage De La Hauteur Du Harnais
FONCTIONNEMENT SUITE RÉGLAGE DE LA HAUTEUR DU HARNAIS 3. Assurez-vous que le coussin supérieur est verrouillé en tirant doucement sur la poignée de transport. Pour un port confortable, le harnais supérieur devrait (Voir Figure 18) se poser entre les omoplates. Le harnais supérieur peut être réglé... - Page 34 FONCTIONNEMENT SUITE COUSSINS DE HARNAIS PORT DE L'ASPIRATEUR DORSAL INTERCHANGEABLES Desserrez les bretelles et la ceinture. Soulevez l'aspirateur et glissez vos bras à travers les bretelles. Le rembourrage du harnais supérieur et celui du harnais (Voir Figure 21) inférieur sont fixés au sac à dos par des courroies en Velcro situées à...
-
Page 35: Entretien Du Filtre
FONCTIONNEMENT SUITE 4. Ajustez les bretelles, identifiées par un numéro 5. Attachez la boucle de la sangle de poitrine, « 3 » mauve, de façon à ce que le coussin du identifiée par un numéro « 4 », et faites glisser la harnais supérieur touche le dos entre vos épaules. sangle dans le support cousu vers le haut ou vers le L'appareil doit être confortablement maintenu avec bas pour un meilleur ajustement. -
Page 36: Entretien Régulier
ENTRETIEN SUITE 3. Une fois par mois, ou au besoin, lavez le microfiltre b. Videz le filtre de dôme HEPA en le secouant. en tissu à la main ou à la machine et laissez-le REMARQUE : Ne rincez pas le filtre dans l'eau. sécher. -
Page 37: Entretien Du Cordon D'alimentation
ENTRETIEN SUITE ENTRETIEN DU CORDON D'ALIMENTATION ENTREPOSAGE ADÉQUAT • N'étirez jamais le cordon d'alimentation Lorsque l'aspirateur n'est pas utilisé, l'aspirateur, le complètement entre l'aspirateur et la prise de chargeur, le bloc-batterie et les accessoires doivent courant. Le fait de tendre ou de tirer le cordon peut être remisés à...
Need help?
Do you have a question about the PROTEAM 6 QT and is the answer not in the manual?
Questions and answers