Yamaha PSR-E263, YPT-260 Manual
- Owner's manual (50 pages) ,
- Owner's manual (28 pages) ,
- Owner's manual (28 pages)
Advertisement
About the Manuals
This instrument has the following documents and instructional materials.
- Included Documents
![]()
Owner's Manual (this book)
This book explains how to use the basic functions and how to make detailed settings for the various functions of the instrument. The Appendix section contains various important preset content lists such as Voices, Styles and Effects.

| Downloading the Song Book After completing the user registration at the website below, you can download the Song Book free of charge. Yamaha Online Member https://member.yamaha.com/ You will need the PRODUCT ID on the sheet ("Online Member Product Registration") packaged with this manual in order to fill out the User Registration form. |

Included Accessories
- Owner's manual (this book)
- Music rest
- AC Adaptor
* May not be included depending on your area. Please check with your Yamaha dealer. - Online Member Product Registration
* The PRODUCT ID on the sheet will be needed when you fill out the User Registration form.
Using the Music Rest

Setting Up
Power Requirements
Although the instrument will run either from an AC adaptor or batteries, Yamaha recommends use of an AC adaptor whenever possible. An AC adaptor is more environmentally friendly than batteries and does not deplete resources.
Using an AC Adaptor
Connect the AC adaptor in the order shown in the illustration.


- Use the specified AC adaptor only. Using the wrong AC adaptor can result in damage to the instrument or overheating.
- When using the AC adaptor with a removable plug, make sure to keep the plug attached to the AC adaptor. Using the plug alone can cause electric shock or fire.
- If the plug is accidentally removed from the AC adaptor, slide it back in until it clicks into place, taking care to avoid touching any internal metal parts. To avoid electric shock, short circuit or damage, also be careful that there is no dust between the AC adaptor and plug.
![]()
The shape of the plug differs depending on your area.


- When setting up the product, make sure that the AC outlet you are using is easily accessible. If some trouble or malfunction occurs, immediately turn the power off and disconnect the plug from the outlet.
 NOTE
NOTE
- Follow the order shown above in reverse when disconnecting the AC adaptor.
Using Batteries
This instrument requires six "AA" size, Alkaline (LR6)/ Manganese (R6) batteries, or rechargeable nickelmetal hydride batteries (rechargeable Ni-MH batteries). The Alkaline batteries or rechargeable Ni-MH batteries are recommended for this instrument, since other types may result in poorer battery performance.
- When the batteries run out, or if the instrument is not to be used for a long time, remove the batteries from the instrument.
- Make sure that the power of the instrument is off.
- Open the battery compartment cover located on the instrument's bottom panel.
![]()
- Insert the six new batteries, being careful to follow the polarity markings on the inside of the compartment.
![]()
- Replace the compartment cover, making sure that it locks firmly in place.


NOTICE
- Connecting or disconnecting the power adaptor with bat-teries installed may turn the power off, resulting in loss of data being recorded at the time.
- Make sure to set the battery type correctly.
- When battery power becomes too low for proper opera-tion, the volume may be reduced, the sound may be distorted, and other problems may occur. When this happens, make sure to replace all batteries with new ones or already recharged ones.
NOTE
- This instrument cannot charge the batteries. Use only the specified charger device when charging.
- Power will be automatically drawn from the AC adaptor if an AC adaptor is connected while batteries are installed in the instrument.
Setting the battery type
Depending on the battery type to be used, you may need to change the battery type setting on this instrument. Alkaline (and manganese) batteries are chosen by default. After installing new batteries and turning the power on, make sure to set the Battery Type appropriately (rechargeable or not) via Function number 022.
NOTICE
- Failure to set the battery type may shorten the amount of the battery life. Make sure to set the battery type correctly.
Turning the Power On
Set [MASTER VOLUME] to the MIN position, then press the [ ![]() ] (Standby/On) switch to turn on the power.
] (Standby/On) switch to turn on the power.

Press and hold the [![]() ] (Standby/On) switch for about a second to set the instrument to standby
] (Standby/On) switch for about a second to set the instrument to standby
- Even when the [
![]() ] (Standby/On) switch is in standby status, electricity is still flowing to the product at the minimum level. Remove the electric plug from the outlet when the instrument is not to be used for extended periods of time, or during electrical storms.
] (Standby/On) switch is in standby status, electricity is still flowing to the product at the minimum level. Remove the electric plug from the outlet when the instrument is not to be used for extended periods of time, or during electrical storms.
Auto Power Off function
To prevent unnecessary power consumption, this instrument features an Auto Power Off function that automatically turns the power off if the instrument is not used for approximately 30 minutes. To disable the Auto Power Off function, select "Off" in the Function settings (Function 021).
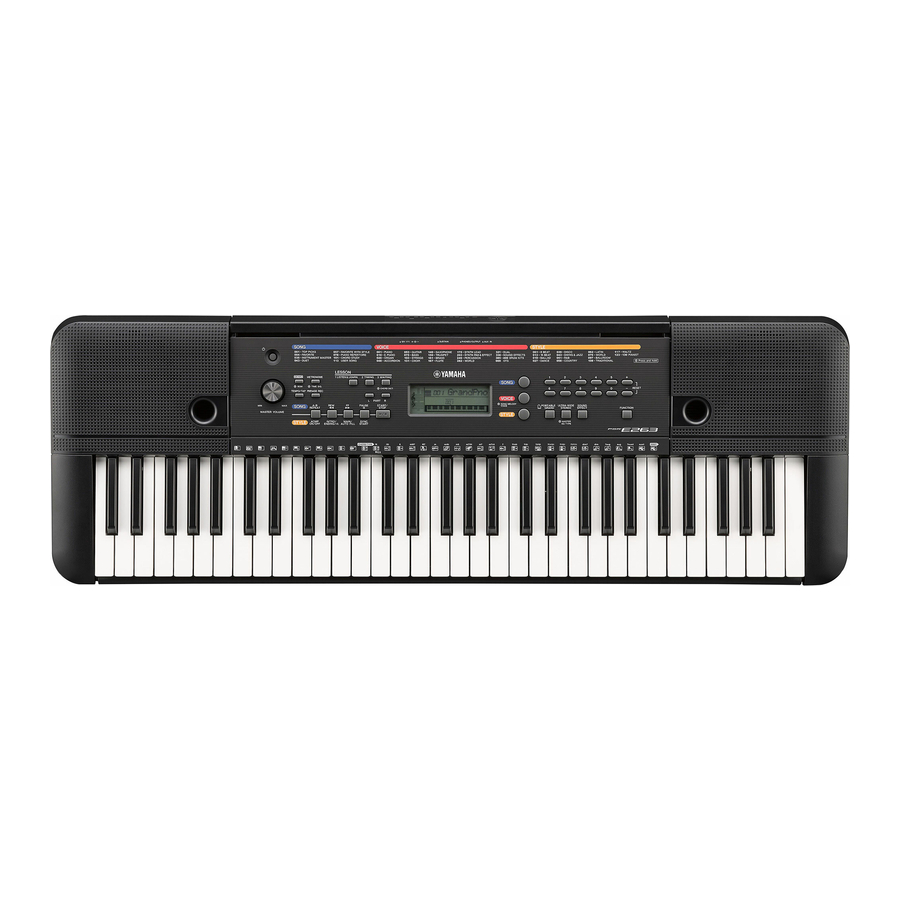
Panel Controls and Terminals
Front Panel

- [
![]() ] (Standby/On) switch
] (Standby/On) switch
Turns the instrument's power on or off. - [MASTER VOLUME] control
Adjusts the overall volume. - [DEMO] button
Starts/stops the Demo.
Holding down this button changes the playback group. - [METRONOME] buttonStarts/stops the metronome.
Holding down this button calls up the Time Signature display - [TEMPO/TAP] button
Calls up the Tempo display. With this status, use the Number buttons to set the tempo of the Song, Style and metronome.
You can set the tempo also by tapping this button several times at the desired tempo. - [PHRASE REC] button
Records your performance. - [1 LISTEN & LEARN] button
Starts the Song with the Lesson 1 mode. - [2 TIMING] button
Starts the Song with the Lesson 2 mode. - [3 WAITING] button
Starts the Song with the Lesson 3 mode. Holding down this button calls up the Chord Dictionary display. In this status, the keyboard is divided into three sections, split at C3 and C6. Specify a chord root in the right section then a chord type in the middle section. As the notes to be played are shown in the display, play the corresponding notes in the left section. When you've played the chord properly, a bell sound signals your success. - PART [L]/[R] buttons
Selects a lesson part or a mute part of the current Song. Pressing the [L] button enters the Duo mode.
In the Song mode
- [A-B REPEAT] button
Turns on/off Song Repeat playback.
Pressing this a first time specifies the starting point A. Pressing this a second time specifies the ending point B. Pressing this again turns off Song Repeat playback. - [REW] button
Returns to the earlier measure of the Song. - [FF] button
Skips ahead to the next beat of the Song. - [PAUSE] button
Stops Song playback at the current position.
In the Style mode
- [ACMP ON/OFF] button
Splits the keyboard into the Left hand (Chord) and Right hand (Melody) sections. - [INTRO/ENDING/rit.] button
By pressing this when the Style is stopped, you can start playback from the Intro.
By pressing this during Style playback, you can switch playback to the Ending.
By pressing this during Ending playback, you can apply a tempo ritardando to playback. - [MAIN/AUTO FILL] button
Switches between the Main A and Main B of the Style. During playback, the Fill-in is added when you press this button.

- [SYNC START] button
Enables/disables the ability to start playback by simply playing the keyboard. - [START/STOP] button
Starts/stops Song playback in the Song mode, or Style playback in the Style mode. - [SONG] button
Calls up the Song selection display. Enters the Song mode. - [VOICE] button
Calls up the Voice selection display.
If you hold down this button in the Song mode, the current Voice will be assigned to the Melody of the current Song. - [STYLE] button
Calls up the Style selection display.
Enters the Style mode. - Number buttons [0]–[9], [+], [-]
Selects the setting value for items such as Voice, Style, Song and Tempo. - [PORTABLE GRAND] button
Makes the appropriate settings for piano performance only. - [ULTRA-WIDE STEREO] button
Press this to turn on the ULTRA-WIDE STEREO Effect. Holding this down calls up the Master EQ Type selection display - [SOUND EFFECT] button
Lets you play various Sound Effects from the keyboard. - [FUNCTION] button
Pressing this repeatedly calls up various parameters in sequence. - Drum illustrations for the Drum Kit
Indicates drum instruments assigned to each key when the Standard Kit 1 is selected.
Rear Panel

- AUX IN jack
For connecting an external audio device. - PHONES/OUTPUT jack
For connecting headphones and external audio equipment
NOTICE
- To avoid possible damage to the external device, first turn on the power to the instrument, then to the external device. When turning off the power, do so in reverse order: first turn off the power to the external device, then to the instrument.
- SUSTAIN jack
For connecting a Footswitch. - DC IN jack
For connecting the AC adaptor.
The "Press & Hold" Symbol

Buttons having this indication can be used to call up an alternate function when the relevant button is pressed and held. Hold down this button until the function is called up.
Let's enjoy playing the keyboard!
Simply playing as a piano
- Press [PORTABLE GRAND]
![]() .
.
![]()
- Play the keyboard like a Pianist!
 .
.
Playing a Voice
- Press [VOICE]
![]() .
.
![]()
- Use the Number buttons to select a Voice.
- Play the keyboard.
 .
.
One Touch Setting
The One Touch Setting feature automatically selects the most suitable Voice when you select a Style or Song (excepting the Song inputted from the [AUX IN] jack). Simply select Voice number "000" to activate this feature.
Playing the keyboard with two persons (Duo mode)
")
When this mode is on, two different players can play the instrument simultaneously, with the same sound, over the same octave range—one person on the left and the other on the right.
To do so, simultaneously hold down the PART [L] button and press the [ ![]() ] (Standby/On) switch to turn on the power. To exit from the Duo mode, press the [
] (Standby/On) switch to turn on the power. To exit from the Duo mode, press the [ ![]() ] (Standby/On) switch to turn off the power, and turn the power back on again normally.
] (Standby/On) switch to turn off the power, and turn the power back on again normally.
Playing a Song
- Press [SONG]
![]() .
.
![]()
- Use the Number buttons to select a Song.
- Press [START/STOP]
![]() to start playback.
to start playback. - Press the PART buttons
![]() to mute the Melody part.
to mute the Melody part.
 .
.
 to start playback.
 to mute the Melody part.
Playing with a Style
- Press [STYLE]
![]() .
.
![]()
- Use the Number buttons to select a Style.
- Press [ACMP ON/OFF]
![]() to turn accompaniment on.
to turn accompaniment on.
![]()
- Press [SYNC START]
![]() to turn Sync Start on.
to turn Sync Start on.
![]()
- Press [INTRO/ENDING/rit.]
![]() .
.
![]()
- Play a chord in the left area of the keyboard to start playback.
![]()
- Play a chord with your left hand and play a melody with your right hand.
- Press [INTRO/ENDING/rit.]
![]() .
. - As desired, press [INTRO/ENDING/rit.]
![]() again to apply ritardando.
again to apply ritardando.
 .
.
 to turn accompaniment on.
 to turn Sync Start on.
 .
.

 .
.Song Lesson
- Press [SONG] then use the Number buttons to select a Song.
- Press the PART buttons
![]() to select the Lesson Part.
to select the Lesson Part.
![]()
- Press the desired Lesson button.
[1 LISTEN & LEARN]
......Simply listen to the Song.
[2 TIMING]
......Learn to play the notes at the correct timing.
[3 WAITING]
......Learn to play the correct notes. - See the evaluation on the display when playback finishes. (Only for [2 TIMING] and [3 WAITING])
 to select the Lesson Part.
Chord Study
A Song category for experiencing the sounds of chords. Simply play back a Song from this category, then play the notes/chord indications shown in the display.
Recording
Record your performance as a User Song (Song number 113, up to approx. 300 notes), which can then be played back on the instrument.
- Press [PHRASE REC]
![]() to enter the Record mode.
to enter the Record mode.
To exit from the Record mode, press this button again.
![]()
- Play the keys in the Record mode to start the recording.
- Stop the recording by pressing the [START/ STOP]
![]() .
. - To listen to the recorded Song and stop the playing, use [START/STOP].
 to enter the Record mode.
 .
.Playing an External Audio Device with the Built-in Speakers
- Turn off the power for both the external audio device and this instrument.
- Connect the audio device to the instrument's [AUX IN] jack
![]() .
.
Use an audio cable with no resistance having a stereo-mini plug on one side for connecting to this instrument, and a proper plug to match the output jack of the external audio device on the other side.
![]()
- Turn on the audio device, and then this instrument.
- Start play back of the connected audio device. The sound of the audio device is output through the speakers of this instrument.
- Stop playback of the audio device.
 .
.
NOTICE
- When turning off the power, first turn off the power to the instrument, and then to the external device to avoid damage to the devices.
Making detailed settings
- Press [FUNCTION]
![]() repeatedly to call up the desired setting from various items such as Transpose, Tuning, Split Point, Sustain, and Time Signature of the metronome.
repeatedly to call up the desired setting from various items such as Transpose, Tuning, Split Point, Sustain, and Time Signature of the metronome. - Use the Number buttons to set the value.
 repeatedly to call up the desired setting from various items such as Transpose, Tuning, Split Point, Sustain, and Time Signature of the metronome.
Function List
| Function Number | Function name | Display | Range/Settings | Default Value | Descriptions | ||||||||||||||||||
| Volume | |||||||||||||||||||||||
| 001 | Style Volume | StyleVol | 000–127 | 100 | Determines the volume of the Style. | ||||||||||||||||||
| 002 | Song Volume | SongVol | 000–127 | 100 | Determines the volume of the Song. | ||||||||||||||||||
| Overall | |||||||||||||||||||||||
| 003 | Transpose | Transpos | -12–12 | 0 | Determines the pitch of the instrument in semitone increments. | ||||||||||||||||||
| 004 | Tuning | Tuning | 427.0Hz–453.0Hz | 440.0Hz *** | Determines the fine tuning of the pitch of the entire instrument in approx. 0.2Hz increments. | ||||||||||||||||||
| 005 | Split Point | SplitPnt | 036–096 (C1–C6) | 54 (F#2) | Determines the Split "point"—in other words, the key that separates the auto accompaniment range and Voice. | ||||||||||||||||||
| Voice | |||||||||||||||||||||||
| 006 | Volume | M.Volume | 000–127 | * | Adjusts the volume of keyboard performance when performing along with a Song or a Style. | ||||||||||||||||||
| 007 | Octave | M.Octave | -2 – +2 | * | Determines the octave range for the Voice. | ||||||||||||||||||
| 008 | Chorus Depth | M.Chorus | 000–127 | * | Determines how much of the Voice's signal is sent to the Chorus effect. | ||||||||||||||||||
| Effects | |||||||||||||||||||||||
| 009 | Reverb Type | Reverb | 01–03 (Hall 1–3) 04–05 (Room 1–2) 06–07 (Stage 1–2) 08–09 (Plate 1–2) 10 (Off) | ** | Determines the Reverb type, including off (10). | ||||||||||||||||||
| 010 | Reverb Level | RevLevel | 000–127 | 64 | Determines how much of the Voice's signal is sent to the Reverb effect. | ||||||||||||||||||
| 011 | Chorus Type | Chorus | 1 (Chorus1) 2 (Chorus2) 3 (Chorus3) 4 (Flanger1) 5 (Flanger2) 6 (off) | ** | Determines the Chorus type, including off (6). | ||||||||||||||||||
| 012 | Panel Sustain | Sustain | ON/OFF | OFF *** | Determines whether the Panel Sustain function is on or off. | ||||||||||||||||||
| 013 | Master EQ Type | MasterEQ | 1 (Speaker) 2 (Headphone) 3 (Boost) 4 (Piano) 5 (Bright) 6 (Mild) | 1 (Speaker) *** | Sets the equalizer applied to the speaker output for optimum sound in different listening situations. Master EQ types
| ||||||||||||||||||
| 014 | Wide Type | Wide | 1 (Wide1) 2 (Wide2) 3 (Wide3) | 2 (Wide2) | Determines the Ultra-Wide Stereo type. Higher values produce a greater Wide effect. | ||||||||||||||||||
| 015 | Voice Output | VoiceOut | 1 (Normal) 2 (Separate) | 2 (Separate) | When the Duo mode is on, this function is effective. If "Normal" is selected, the performance sounds of the left section and the right section will sound from both the left and right speakers. If "Separate" is selected, the performance sound of the left section will sound from the left speaker, and the performance sound of the right section will sound from the right speaker. | ||||||||||||||||||
| Metronome | |||||||||||||||||||||||
| 016 | Time Signature Numerator | TimeSig | 00–15 | ** | Determines the time signature of the Metronome. | ||||||||||||||||||
| 017 | Metronome Volume | MetroVol | 000–127 | 100 | Determines the volume of the Metronome. | ||||||||||||||||||
| Lesson | |||||||||||||||||||||||
| 018 | Your Tempo | YourTemp | ON/OFF | ON *** | This parameter is for the Lesson 3 "Waiting." When set to ON, playback tempo will change for matching the speed you are playing at. When set to OFF, playback tempo will be maintained regardless of the speed you are playing at. | ||||||||||||||||||
| Demo | |||||||||||||||||||||||
| 019 | Demo Group | DemoGrp | 1 (Demo) 2 (Preset) 3 (User) | 1 (Demo) | Determines the repeat playback group. With the default setting, pressing the [DEMO] button will play back only three internal Demo Songs repeatedly. This setting can be changed so that, for example, all internal Songs (excepting Songs 101– 112) automatically play back, letting you use the instrument as a background music source.
| ||||||||||||||||||
| 020 | Demo Play Mode | PlayMode | 1 (Normal) 2 (Random) | 1 (Normal) | Determines the repeat playback mode. | ||||||||||||||||||
| Auto Power Off | |||||||||||||||||||||||
| 021 | Auto Power Off Time | AutoOff | OFF, 5/10/15/30/60/ 120 (minutes) | 30 minutes *** | Specifies the time that will elapse before the instrument's power is automatically turned off. | ||||||||||||||||||
| Battery | |||||||||||||||||||||||
| 022 | Battery Type | Battery | 1 (Alkaline) 2 (Ni-MH) | 1 (Alkaline) *** | Selects the type of batteries you have installed to this instrument. Alkaline: Alkaline battery/manganese battery Ni-MH: Rechargeable battery | ||||||||||||||||||
* The appropriate value is automatically set for each Voice combination.
** The appropriate value is automatically set for each Song or Style.
*** The Backup parameters. The Backup parameters and the User Song will be maintained even if you turn off the power.
Initialization
This operation initializes the backup parameters and the User Song. While holding down the highest white key, press the [ ![]() ] (Standby/On) switch to turn the power on.
] (Standby/On) switch to turn the power on.
Specifications
Product Name
- Digital Keyboard
Keyboards
- 61 standard-size keys (C1–C6)
Display
- LCD display
Voice
- 384 panel Voices + 16 drum/SFX kits
- Polyphony: 32
Style
- 130 Preset Styles
- Style Control: ACMP ON/OFF, SYNC START, START/STOP, INTRO/ENDING/rit., MAIN/AUTO FILL
Effects
- Reverb: 9 types
- Chorus: 5 types
- Ultra-Wide Stereo: 3 types
- Master EQ: 6 types
Song
- 112 Preset Songs
Recording
- 1 (up to approx. 300 notes)
Amplifier
- 2.5W + 2.5W
Speakers
- 12cm x 2
Power Consumption
- 6W (When using PA-130 AC adaptor)
Power Supply
- Adaptor: Yamaha PA-130 or an equivalent recommended by Yamaha
- Batteries: Six 1.5V "AA" size alkaline (LR6), manganese (R6) or six 1.2V "AA" size Ni-MH rechargeable batteries (HR6)
Dimensions (W x D x H)
- 940mm x 317mm x 106mm
(37" x 12-1/2" x 4-3/16")
Weight
- 4.0kg (8lbs 13oz.) (not including batteries)
Separately Sold Accessories
- Footswitch: FC4A/FC5
- Keyboard Stand: L-2C
- Headphones: HPH-50/HPH-100/HPH-150
- Adaptor: Yamaha PA-130 or an equivalent recommended by Yamaha
* The contents of this manual apply to the latest specifications as of the printing date. Since Yamaha makes continuous improvements to the product, this manual may not apply to the specifications of your particular product. To obtain the latest manual, access the Yamaha website then download the manual file. Since specifications, equipment or separately sold accessories may not be the same in every locale, please check with your Yamaha dealer.
PRECAUTIONS
PLEASE READ CAREFULLY BEFORE PROCEEDING
Please keep this manual in a safe and handy place for future reference.
- This AC adaptor is designed for use with only Yamaha electronic instruments. Do not use for any other purpose.
- Indoor use only. Do not use in any wet environments.
- When setting up, make sure that the AC outlet is easily accessible. If some trouble or malfunction occurs, immediately turn off the power switch of the instrument and disconnect the AC adaptor from the outlet. When the AC adaptor is connected to the AC outlet, keep in mind that electricity is flowing at the minimum level, even if the power switch is turned off. When you are not using the instrument for a long time, make sure to unplug the power cord from the wall AC outlet.
For this instrument
Always follow the basic precautions listed below to avoid the possibility of serious injury or even death from electrical shock, short-circuiting, damages, fire or other hazards. These precautions include, but are not limited to, the following:
Power supply/AC adaptor
- Do not place the power cord near heat sources such as heaters or radiators. Also, do not excessively bend or otherwise damage the cord, or place heavy objects on it.
- Only use the voltage specified as correct for the instrument. The required voltage is printed on the name plate of the instrument.
- Use the specified adaptor only. Using the wrong adaptor can result in damage to the instrument or overheating.
- Check the electric plug periodically and remove any dirt or dust which may have accumulated on it.
Water warning
- Do not expose the instrument to rain, use it near water or in damp or wet conditions, or place on it any containers (such as vases, bottles or glasses) containing liquids which might spill into any openings. If any liquid such as water seeps into the instrument, turn off the power immediately and unplug the power cord from the AC outlet. Then have the instrument inspected by qualified Yamaha service personnel.
- Never insert or remove an electric plug with wet hands.
Do not open
- This instrument contains no user-serviceable parts. Do not open the instrument or attempt to disassemble or modify the internal components in any way. If it should appear to be malfunctioning, discontinue use immediately and have it inspected by qualified Yamaha service personnel.
Fire warning
- Do not put burning items, such as candles, on the unit. A burning item may fall over and cause a fire.
Battery
- Follow the precautions below. Failure to do so might result in explosion, fire, overheating or battery fluid leakage.
- Do not tamper with or disassemble batteries.
- Do not dispose of batteries in fire
- Do not attempt to recharge batteries that are not designed to be charged.
- Keep the batteries separate from metallic objects such as necklaces, hairpins, coins, and keys. Use the specified battery type only.
- Use new batteries, all of which are the same type, same model, and made by the same manufacturer.
- Always make sure all batteries are inserted in conformity with the +/- polarity markings.
- When the batteries run out, or if the instrument is not to be used for a long time, remove the batteries from the instrument.
- When using Ni-MH batteries, follow the instructions that came with the batteries. Use only the specified charger device when charging.
- Keep batteries away from small children who might accidentally swallow them.
- If the batteries do leak, avoid contact with the leaked fluid. If the battery fluid should come in contact with your eyes, mouth, or skin, wash immediately with water and consult a doctor. Battery fluid is corrosive and may possibly cause loss of sight or chemical burns.
If you notice any abnormality
- When one of the following problems occur, immediately turn off the power switch and disconnect the electric plug from the outlet. (If you are using batteries, remove all batteries from the instrument.) Then have the device inspected by Yamaha service personnel.
- The power cord or plug becomes frayed or damaged.
- It emits unusual smells or smoke.
- Some object has been dropped into the instrument.
- There is a sudden loss of sound during use of the instrument.
Always follow the basic precautions listed below to avoid the possibility of physical injury to you or others, or damage to the instrument or other property. These precautions include, but are not limited to, the following:
Power supply/AC adaptor
- Do not connect the instrument to an electrical outlet using a multiple-connector. Doing so can result in lower sound quality, or possibly cause overheating in the outlet.
- When removing the electric plug from the instrument or an outlet, always hold the plug itself and not the cord. Pulling by the cord can damage it.
- Remove the electric plug from the outlet when the instrument is not to be used for extended periods of time, or during electrical storms.
Location
- Do not place the instrument in an unstable position where it might accidentally fall over.
- Before moving the instrument, remove all connected cables, to prevent damage to the cables or injury to anyone who might trip over them.
- When setting up the product, make sure that the AC outlet you are using is easily accessible. If some trouble or malfunction occurs, immediately turn off the power switch and disconnect the plug from the outlet. Even when the power switch is turned off, electricity is still flowing to the product at the minimum level. When you are not using the product for a long time, make sure to unplug the power cord from the wall AC outlet.
- Use only the stand specified for the instrument. When attaching it, use the provided screws only. Failure to do so could cause damage to the internal components or result in the instrument falling over.
Connections
- Before connecting the instrument to other electronic components, turn off the power for all components. Before turning the power on or off for all components, set all volume levels to minimum.
- Be sure to set the volumes of all components at their minimum levels and gradually raise the volume controls while playing the instrument to set the desired listening level.
Handling caution
- Do not insert a finger or hand in any gaps on the instrument.
- Never insert or drop paper, metallic, or other objects into the gaps on the panel or keyboard. This could cause physical injury to you or others, damage to the instrument or other property, or operational failure.
- Do not rest your weight on, or place heavy objects on the instrument, and do not use excessive force on the buttons, switches or connectors.
- Do not use the instrument/device or headphones for a long period of time at a high or uncomfortable volume level, since this can cause permanent hearing loss. If you experience any hearing loss or ringing in the ears, consult a physician.
Yamaha cannot be held responsible for damage caused by improper use or modifications to the instrument, or data that is lost or destroyed.
Always turn the power off when the instrument is not in use.
Even when the [![]() ] (Standby/On) switch is in standby status (display is off), electricity is still flowing to the instrument at the minimum level.
] (Standby/On) switch is in standby status (display is off), electricity is still flowing to the instrument at the minimum level.
When you are not using the instrument for a long time, make sure you unplug the power cord from the wall AC outlet.
Make sure to discard used batteries according to local regulations.
The model number, serial number, power requirements, etc., may be found on or near the name plate, which is at the bottom of the unit. You should note this serial number in the space provided below and retain this manual as a permanent record of your purchase to aid identification in the event of theft.
NOTICE
To avoid the possibility of malfunction/ damage to the product, damage to data, or damage to other property, follow the notices below.
Handling
- Do not use the instrument in the vicinity of a TV, radio, stereo equipment, mobile phone, or other electric devices. Otherwise, the instrument, TV, or radio may generate noise. When you use the instrument along with an application on your iPad, iPhone or iPod touch, we recommend that you set "Airplane Mode" to "ON" on that device in order to avoid noise caused by communication.
- Depending on the condition of surrounding radio waves, the instrument may possibly malfunction.
- Do not expose the instrument to excessive dust or vibrations, or extreme cold or heat (such as in direct sunlight, near a heater, or in a car during the day) to prevent the possibility of panel disfiguration, damage to the internal components or unstable operation. (Verified operating temperature range: 5° – 40°C, or 41° – 104°F.)
- Do not place vinyl, plastic or rubber objects on the instrument, since this might discolor the panel or keyboard.
Maintenance
- When cleaning the instrument, use a soft cloth. Do not use paint thinners, solvents, alcohol, cleaning fluids, or chemical-impregnated wiping cloths.
Saving data
- Some of the data of this instrument are retained when the power is turned off. However, the saved data may be lost due to some failure, an operation mistake, etc.
Information
About copyrights
- Copying of the commercially available musical data including but not limited to MIDI data and/or audio data is strictly prohibited except for your personal use.
- This product incorporates and bundles contents in which Yamaha owns copyrights or with respect to which Yamaha has license to use others' copyrights. Due to copyright laws and other relevant laws, you are NOT allowed to distribute media in which these contents are saved or recorded and remain virtually the same or very similar to those in the product.
* The contents described above include a computer program, Accompaniment Style data, MIDI data, WAVE data, voice recording data, a score, score data, etc.
* You are allowed to distribute medium in which your performance or music production using these contents is recorded, and the permission of Yamaha Corporation is not required in such cases.
About functions/data bundled with the instrument
- Some of the preset songs have been edited for length or arrangement, and may not be exactly the same as the original.
About this manual
- The illustrations and LCD screens as shown in this manual are for instructional purposes only, and may appear somewhat different from those on your instrument.
- iPhone, iPad, iPod touch are trademarks of Apple Inc., registered in the U.S. and other countries.
- The company names and product names in this manual are the trademarks or registered trademarks of their respective companies.
Documents / Resources
References
Download manual
Here you can download full pdf version of manual, it may contain additional safety instructions, warranty information, FCC rules, etc.
Advertisement


Need help?
Do you have a question about the PSR-E263 and is the answer not in the manual?
Questions and answers