Table of Contents
Advertisement
Available languages
Available languages
Quick Links
Advertisement
Table of Contents

Related Manuals for Topdon ArtiDiag600 Elite


Summary of Contents for Topdon ArtiDiag600 Elite
- Page 1 USER MANUAL Professional Diagnostic Tool...
-
Page 3: Table Of Contents
CONTENTS SAFETY IS ALWAYS 202 235 THE FIRST PRIORITY! SECTION 1 203 236 WHAT'S IN THE BOX? SECTION 2 204 237 PRODUCT OVERVIEW SECTION 3 GETTING 206 239 STARTED SECTION 4 USING 210 243 YOUR ARTIDIAG SECTION 5 231 262 SPECIFICATIONS SECTION 6 232 263... - Page 4 ENGLISH...
-
Page 5: Safety Is Always The First Priority
SAFETY IS ALWAYS THE FIRST PRIORITY! READ ALL INSTRUCTIONS BEFORE USE For your safety, the safety of others, and to avoid any damage to the product and your vehicle, CAREFULLY READ AND MAKE SURE YOU FULLY UNDERSTAND ALL THE SAFETY INSTRUCTIONS AND MESSAGES IN THIS MANUAL BEFORE OPERATING. -
Page 6: What's In The Box
SECTION 1 WHAT'S IN THE BOX? • ArtiDiag600 Elite • OBD-II Diagnostic Cable • USB Cable (Type-A to Type-C) • Quick User Guide • Carrying Case... -
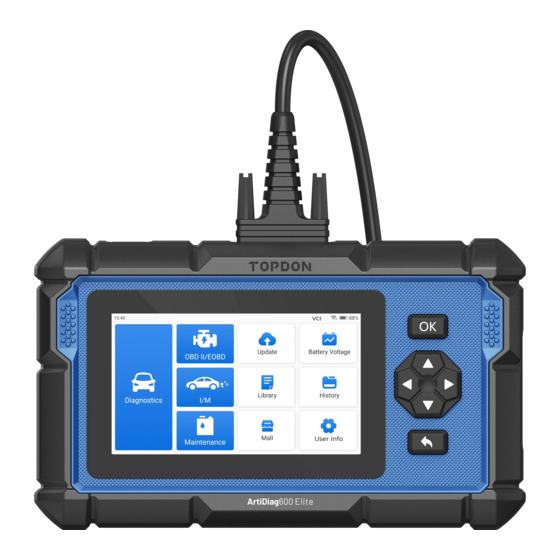
Page 7: Product Overview
SECTION 2 PRODUCT OVERVIEW Figure 2-1... - Page 8 Power / Screen Off Button Long press the button to turn on the ArtiDiag600 Elite. Long press again to display the Power off / Restart / Cancel toolbar, then tap the desired option. Short press the button to wake up / lock the screen.
-
Page 9: Section 3 Getting Started
SECTION 3 GETTING STARTED 3.1 Basic Setup Press and hold the power button for 3 seconds to turn on the ArtiDiag600 Elite. Follow the steps below to set up the ArtiDiag600 Elite. 1. Select the desired system language. Figure 3-1 2. - Page 10 3. Configure the Wi-Fi connection. Select a Wi-Fi from the scanned list and enter the password. Figure 3-3 4. Log in to your TOPDON account. (If you do not have an account, please register with your email.) Figure 3-4...
- Page 11 5. After logging in to your TOPDON account, the home screen will display. Figure 3-5 Note: It is recommended to update the software for better service if a new version is available on the System Update module. 3.2 Connect the ArtiDiag600 Elite to the Vehicle's DLC Use the supplied OBD-II diagnostic cable to connect the ArtiDiag600 Elite to the vehicle's DLC (see Figure 3-6).
- Page 12 Figure 3-6 Note: Make sure the ignition is always OFF before plugging in the unit. 3.3 Turn the Ignition to the "ON" Position (see Figure 3-7) If your vehicle is equipped with a keyless start system and the ignition switch is an "Engine Start Stop" button (see Figure 3-8), press the "Engine Start Stop"...
-
Page 13: Section 4 Using Your Artidiag
SECTION 4 USING YOUR ARTIDIAG 4.1 Home Screen Figure 4-1 Function Icons Allows you to perform diagnostics functions including reading Diagnostic Trouble Codes (DTCs), clearing DTCs, viewing data stream and reading Electronic Control Unit Diagnostics (ECU) version information. Allows you to perform emission-related diagnostics for your vehicle. - Page 14 Provides quick access to check the status of the emission-related systems. (Inspection and Maintenance) Readiness Provides 13 maintenance services including Oil Reset, Throttle Adaptation, EPB Reset, Steering Angle Reset, DPF Regeneration, ABS Bleeding, BMS Reset, Injector Coding, TPMS Rest, AdBlue Reset, AFS Reset, Maintenance Windows Calibration and Stop/Start Reset.
- Page 15 Includes OBD-II Generic DTC Repair Guide, Technical Service Bulletins, DLC Location, Warning Light Library, which provides reference information on vehicle inspection, diagnostics, and Library repair. Provides access to My Profile, Firmware Update, Customer Feedback, Shop Info, System Update and Settings. User Info 4.2 Diagnostics The Diagnostics module allows you to scan supported vehicle...
- Page 16 Identifying via VIN VIN allows you to identify the vehicle via Auto VIN or Enter VIN. • Auto VIN - the ArtiDiag600 Elite automatically reads and decodes the Vehicle Identification Number (VIN). Note: Not all vehicles support automatically reading and decoding the VIN via Auto VIN.
- Page 17 2. Select or enter the make of your vehicle. Note: A demonstration mode (DEMO option on the Make list) is provided to help you become familiar with the Diagnostics functions. 3. Select Automatic / Manual to identify the vehicle. Automatic Manually enter the VIN or tap Read to acquire the VIN, then tap Confirm.
- Page 18 ArtiDiag600 Elite will start scanning the systems supported by the vehicle, and DTC retrieval will begin automatically. Results are displayed progressively as the systems are scanned. Figure 4-5 Button Description Clear DTCs - tap to clear all the DTCs retrieved.
- Page 19 3. Tap the icon at the right side to open the option menu of a particular DTC. Figure 4-6 Icon Description When this icon lights up, tap to open a window that allows you to search on Google for more information about the DTC.
- Page 20 Button Description Report - tap to save the DTCs in report format. (To view the saved reports, go to Folder > Reports > Fault Code Report.) Clear DTCs - tap to clear all the DTCs retrieved. Clear Trouble Code 1. After the vehicle is identified, select the system for which you wish to clear DTCs from the system menu.
- Page 21 Icon Description Tap to have the real-time data stream displayed in a wave-pattern graph. Button Description - tap to select the data streams that you want to be displayed. - tap to display up to 6 data streams in graph. - tap to combine up to 4 data streams in one graph for easier comparison and observation.
- Page 22 2. Select your communication method: Auto Scan or Protocol. Figure 4-8 Auto Scan - the ArtiDiag600 Elite will automatically communicate with the vehicle and identify which protocol the vehicle is using. Protocol - allows you to manually select the communication protocol.
- Page 23 Figure 4-9 Note: Depending on the vehicle make, some functions may not be available. Typical function options may include: DTC & FFD, I/M Readiness, Live Data, On-Board Monitor, Component Test, Vehicle Information and Vehicle Status. 1. Read DTCs This function displays the DTCs retrieved from the emission-related systems.
- Page 24 This function displays the status of the vehicle, including Engine, Transmission, Codes Found, MIL Status, Monitors and Protocol. 4.3.2 Diagnostic Feedback The ArtiDiag600 Elite allows you to instantly send diagnostic feedback (with logs of diagnostic data automatically attached) while you are encountering a software problem with the diagnostics operations.
- Page 25 2. Select the type of problem. 3. Write a description of the problem. 4. Tap Submit to send the feedback. Note: The Diagnostic Feedback function is only available with the Diagnostics module. 4.4 I/M Readiness This function checks whether or not the various emission-related systems on the vehicle are operating properly, and are ready for I/M testing.
- Page 26 4.5 Maintenance This function provides you with 13 maintenance services including Oil Reset, Throttle Adaptation, EPB Reset, Steering Angle Reset, DPF Regeneration, ABS Bleeding, BMS Reset, Injector Coding, TPMS Rest, AdBlue Reset, AFS Reset, Windows Calibration and Stop/Start Reset. 4.5.1 Services Overview Oil Reset This function allows you to reset the oil service lamp for the engine oil life system.
- Page 27 DPF Regeneration This function is mainly used for the regeneration of diesel particulate filters. To keep the filters performing well, it removes particles by means of combustion and oxidation. Injector Coding After replacing injectors, various codes need to be written to correspond to the code of each cylinder injector.
- Page 28 Figure 4-11 2. Select the function you want to perform. 3. Identify the vehicle via VIN or Make (for more on identification operations, refer to Identifying the Vehicle in Auto Scan and Individual System Diagnostic). Then go to the screen for the selected function displays.
- Page 29 4.7 Update This function allows you to update the vehicle-specific Diagnostics software if there is any new software available. To perform the Update function: 1. Tap Update from the home screen and the Update screen will display. Figure 4-13 2. Tap Download to update or download the software. Note: You can also tap Select at the top right corner to batch select and update software.
- Page 30 4.8 Folder This function gives access to Reports (All, System Reports, Fault Code Report, and Data Stream Reports), Live Data Rec., Screenshots and Screen Rec. Figure 4-14 Button Description Tap to search for a particular report Tap to batch select and delete reports 4.8.1 Reports 1.
- Page 31 ArtiDiag600 Elite. 4.8.4 Screen Rec. Tap Folder > Screen Rec. to view the screen recordings saved during the operation of the ArtiDiag600 Elite. 4.9 Library 4.9.1 DTC Repair Guide DTC Repair Guide is an experience-based database that provides code-specific information, including popular fixes and repair steps for identifying faults.
- Page 32 4.10.6 Settings The Settings function allows you to set WLAN, time and date, languages / unit, AutoVIN, check storage and set the ArtiDiag600 Elite to factory settings, view the version information of the ArtiDiag600 Elite, update the ArtiDiag600 Elite, view the Terms of Service and Privacy Policy, set the Auto-Lock time, view the tablet information and log out of your TOPDON account.
-
Page 33: Specifications
SECTION 5 SPECIFICATIONS Display Screen 1280 * 720 Touchable Screen Battery 3350 mAh/3.7 V Input Voltage Range 9-18 V Working Temperature -10 °C to 50 °C (14 °F to 122°F) Storage Temperature -20 °C to 70 °C (-4°F to 158°F) Dimension (L x W x H) 8.9*5.3*1.56 in. -
Page 34: Faq
Regeneration, ABS Bleeding, BMS Reset, Injector Coding, TPMS Rest, AdBlue Reset, AFS Reset, Windows Calibration and Stop/Start Reset. Q: Do I need to update the firmware before using the ArtiDiag600 Elite for the first time? A: Yes. Firmware will automatically update to the latest version. You can also tap User Info >... -
Page 35: Warranty
TOPDON shall not be liable for any incidental or consequential damages arising from the device's use, misuse, or mounting. If there is any conflict between the TOPDON warranty policy and local laws, the local laws shall prevail. This limited warranty is void under the following conditions: •... - Page 36 Scan the QR code for more support!
- Page 37 FRANÇAIS...
- Page 38 LA SÉCURITÉ EST TOUJOURS LA PRIORITÉ ABSOLUE ! LISEZ TOUTES LES INSTRUCTIONS AVANT UTILISATION Pour votre sécurité, celle des autres et pour éviter tout dommage au produit et à votre véhicule, LISEZ ET ASSUREZ-VOUS DE BIEN COMPRENDRE TOUTES LES INSTRUCTIONS DE SÉCURITÉ ET LES MESSAGES DE CE MANUEL AVANT DE PROCÉDER À...
-
Page 39: Section 1 Qu'y A-T-Il Dans La Boîte
SECTION 1 QU'Y A-T-IL DANS LA BOÎTE ? • ArtiDiag600 Elite • Câble de diagnostic OBD-II • Câble USB (Type-A vers Type-C) • Guide rapide de l'utilisateur • Étui de transport... - Page 40 SECTION 2 PRODUCT OVERVIEW Figure 2-1...
- Page 41 Appuyez brièvement sur le bouton pour réveiller / verrouiller l'écran. Connecteur de câble de diagnostic DB15 Connecteur de câble de données utilisé pour connecter l'ArtiDiag600 Elite à un connecteur de liaison de données (DLC) du véhicule. Écran tactile de cinq pouces Bouton OK Utilisé...
-
Page 42: Section 3 Mise En Route
SECTION 3 MISE EN ROUTE 3.1 Configuration de base Appuyez et maintenez le bouton d'alimentation pendant 3 secondes pour allumer l'ArtiDiag600 Elite. Suivez les étapes ci- dessous pour configurer l'ArtiDiag600 Elite. 1. Sélectionnez la langue du système souhaitée. Figure 3-1 2. - Page 43 3. Configurez la connexion Wi-Fi. Sélectionnez un réseau Wi-Fi dans la liste des réseaux détectés et saisissez le mot de passe. Figure 3-3 4. Connectez-vous à votre compte TOPDON. (Si vous n'avez pas de compte, veuillez vous inscrire avec votre adresse e-mail). Figure 3-4...
- Page 44 3.2 Connectez l'ArtiDiag600 Elite au DLC du véhicule Utilisez le câble de diagnostic OBD-II fourni pour connecter l'ArtiDiag600 Elite au DLC du véhicule (voir Figure 3-6). Le port DLC du véhicule est généralement situé sous le tableau de bord. Une fois que le DLC du véhicule est correctement connecté...
- Page 45 Figure 3-6 Remarque: Assurez-vous que le contact est toujours ÉTEINT avant de brancher l'appareil. 3.3 Mettez le contact sur la position « ON » (voir Figure 3-7) Si votre véhicule est équipé d'un système de démarrage sans clé et que le commutateur d'allumage est un bouton « Démarrage du moteur »...
- Page 46 SECTION 4 UTILISATION DE VOTRE ARTIDIAG 4.1 Écran d'accueil Figure 4-1 Icônes de fonction Permet d'effectuer des fonctions de diagnostic, y compris la lecture des codes d'anomalie (DTC), la suppression des DTC, l'affichage du flux de données et la lecture des Diagnostics informations de version de l'Unité...
- Page 47 Permet d'accéder rapidement à l'état des systèmes liés aux émissions. (Inspection et Maintenance) Prêt Fournit 13 services de maintenance, dont la réinitialisation de l'huile, l'adaptation des papillons des gaz, la réinitialisation EPB, la réinitialisation de l'angle de braquage, la régénération DPF, Purge ABS, la réinitialisation BMS, le codage des injecteurs, la réinitialisation du Maintenance...
- Page 48 Comprend un guide de réparation générique DTC OBD-II, des bulletins de service technique, l'emplacement DLC, une bibliothèque de voyants d'avertissement, qui fournit des Bibliothèque informations de référence sur l'inspection, le diagnostic et la réparation des véhicules. Donne accès à Mon profil, Mise à jour du micrologiciel, Commentaires des clients, Informations sur le magasin, Informations...
- Page 49 Le VIN vous permet d'identifier le véhicule via VIN automatique ou Entrer le VIN. • VIN automatique - l'ArtiDiag600 Elite lit et décode automatiquement le numéro d'identification du véhicule (VIN). Remarque : Tous les véhicules ne prennent pas en charge la lecture et le décodage automatiques du VIN via VIN...
- Page 50 ③ ① ② ④ Figure 4-3 ① Icône de recherche Appuyez sur l'icône de recherche pour afficher la barre de recherche, et saisissez la marque du véhicule pour le rechercher. ② Toutes / Asiatiques / Européennes / Américaines / Chinoises Sélectionnez dans ce menu les marques de véhicules fabriquées dans certains pays.
- Page 51 Pour effectuer un Scan automatique, appuyez sur le bouton Scan automatique dans le coin inférieur, l'ArtiDiag600 Elite commencera à scanner les systèmes pris en charge par le véhicule, et la récupération des DTC commencera automatiquement.
- Page 52 Les résultats s'affichent progressivement à mesure que les systèmes sont scannés. Figure 4-5 Description des boutons Effacer les DTC - appuyez pour effacer tous les DTC récupérés. Rapport - appuyez pour enregistrer les résultats du scan en cours au format de rapport. (Pour voir les rapports enregistrés, allez dans Dossier>Rapports >Rapport système.) Réalisation d'un diagnostic du système individuel En plus du Scan automatique, vous pouvez également sélectionner un...
- Page 53 3. Appuyez sur l'icône à droite pour ouvrir le menu d'options d'un DTC particulier. Figure 4-6 Description des icônes Lorsque cette icône s'allume, appuyez dessus pour ouvrir une fenêtre qui vous permet de rechercher sur Google plus d'informations sur le DTC. Lorsque l'icône s'allume, appuyez pour afficher la description détaillée du DTC.
- Page 54 Effacer les codes de trouble 1. Après avoir identifié le véhicule, sélectionnez le système pour lequel vous souhaitez effacer les DTC dans le menu système. 2. Appuyez sur Effacer les codes de trouble dans le menu des fonctions. 3. Appuyez sur OK lorsque les DTCs sont effacés. Remarque : 1.
- Page 55 Description des icônes Appuyez dessus pour afficher le flux de données en temps réel sous forme d'un graphique en forme d'onde. Description des boutons - appuyez pour sélectionner les données en continu que vous souhaitez afficher. - appuyez pour afficher jusqu'à 6 flux de données en continu sous forme de graphique.
- Page 56 2. Sélectionnez votre méthode de communication : Scan automatique ou Protocole. Figure 4-8 Scan automatique - l'ArtiDiag600 Elite communiquera automatiquement avec le véhicule et identifiera le protocole utilisé par le véhicule. Protocole - vous permet de sélectionner manuellement le protocole de communication.
- Page 57 Figure 4-9 Remarque : Selon la marque du véhicule, certaines de ces fonctions peuvent ne pas être disponibles. Les options de fonction typiques peuvent inclure : DTC & FFD, Prêt I/ M, Données en continu, Moniteur embarqué, Test des composants, Informations sur le véhicule et État du véhicule.
- Page 58 Remarque : 1. La procédure d'effacement des DTC doit être effectuée après la réparation nécessaire. Une fois confirmé, les DTC et les FFD stockés dans l'ECU seront effacés. 2. NE PAS DÉMARRER LE MOTEUR PENDANT L'EFFACEMENT DES DTC. Prêt I/M Cette fonction vérifie si les différents systèmes liés aux émissions du véhicule fonctionnent correctement et sont prêts pour les tests I/M.
- Page 59 4.3.2 Retour d'information sur le diagnostic L'ArtiDiag600 Elite vous permet d'envoyer instantanément un retour d'information sur le diagnostic (avec des journaux de données de diagnostic automatiquement attachés) lorsque vous rencontrez un problème logiciel avec les opérations de diagnostic. Pour envoyer un retour d'information sur le diagnostic : 1.
- Page 60 Figure 4-10 4.5 Maintenance Cette fonction vous offre 13 services de maintenance, dont la réinitialisation de l'huile, l'adaptation des papillons des gaz, la réinitialisation EPB, la réinitialisation de l'angle de braquage, la régénération DPF, Purge ABS, la réinitialisation BMS, le codage des injecteurs, la réinitialisation du TPMS, la réinitialisation de l'AdBlue, la réinitialisation de l'AFS, l'étalonnage des fenêtres et la réinitialisation de l'arrêt/redémarrage.
- Page 61 calculer l'angle exact pour les braquages à gauche et à droite. Réinitialisation BMS Après le remplacement de la batterie de voiture, l'unité de contrôle de la batterie de voiture doit être réinitialisée. Cela effacera les informations de défaut (telles qu'un niveau de batterie faible) afin que l'unité...
- Page 62 gaz d'échappement diesel (urée de voiture), une opération de réinitialisation de l'urée est nécessaire. Réinitialisation AFS Cette fonction permet d'initialiser le système de phares adaptatifs. Calibrage des Vitres Cette fonction permet d'effectuer la correspondance des vitres de porte pour récupérer la mémoire initiale de l'ECU, et de récupérer la fonction de montée et descente automatique des vitres électriques.
- Page 63 4.6 Tension de la batterie Cette fonction affiche la tension en temps réel de la batterie de votre véhicule. Figure 4-12 4.7 Mise à jour Cette fonction vous permet de mettre à jour le logiciel de diagnostic spécifique au véhicule s'il existe une nouvelle version disponible. Pour effectuer la fonction de mise à...
- Page 64 2. Appuyez sur Télécharger pour mettre à jour ou télécharger le logiciel. Remarque : Vous pouvez également appuyer sur Sélectionner en haut à droite pour sélectionner et mettre à jour plusieurs logiciels en lot. 4.8 Dossier Cette fonction donne accès aux rapports (Tous, Rapports système, Rapport de codes de défaut et Rapports de flux de données), enregistrement de données en continu, captures d'écran et enregistrements d'écran.
- Page 65 4.8.3 Captures d'écran Appuyez sur Dossier > Capture d'écran pour afficher les captures d'écran enregistrées lors de l'utilisation de l'ArtiDiag600 Elite. 4.8.4 Enregistrements d'écran Appuyez sur Dossier > Enregistrement d'écran pour afficher les enregistrements d'écran enregistrés lors de l'utilisation de l'ArtiDiag600 Elite.
- Page 66 Vous pouvez appuyer sur la photo de profil dans l'écran des Informations utilisateur pour accéder à la page Mon Profil. Avec cette fonction, vous pouvez modifier votre photo de profil/pseudonyme, afficher votre identifiant TOPDON, changer le mot de passe et supprimer votre compte TOPDON. 4.10.2 Mise à jour du firmware Vous permet de mettre à...
- Page 67 VIN automatique, de vérifier le stockage et de réinitialiser l'ArtiDiag600 Elite aux paramètres d'usine, de consulter les informations de version de l'ArtiDiag600 Elite, de mettre à jour l'ArtiDiag600 Elite, de consulter les conditions d'utilisation et la politique de confidentialité, de régler le temps de verrouillage automatique, de consulter les informations sur la tablette et de vous déconnecter de votre compte TOPDON.
-
Page 68: Section 5 Spécifications
SECTION 5 SPÉCIFICATIONS Écran d'affichage Écran tactile de 1280 * 720 Batterie 3350 mAh/3.7 V Plage de tension d'entrée 9-18 V Température de travail -10 °C to 50 °C (14 °F to 122°F) Température de stockage -20 °C to 70 °C (-4°F to 158°F) Dimensions (L x l x H) 8.9*5.3*1.56 in. - Page 69 Q : Dois-je mettre à jour le micrologiciel avant d'utiliser l'ArtiDiag600 Elite pour la première fois ? R : Oui. Le micrologiciel se mettra automatiquement à jour vers la dernière version.
-
Page 70: Section 7 Garantie
S'il y a un conflit entre la politique de garantie de TOPDON et les lois locales, les lois locales prévaudront. Cette garantie limitée est nulle dans les conditions suivantes : •... - Page 71 DEUTSCH...
- Page 72 SICHERHEIT STEHT IMMER AN ERSTER STELLE! LESEN SIE ALLE ANWEISUNGEN VOR DEM GEBRAUCH Um Ihre Sicherheit, die Sicherheit anderer und um Schäden am Produkt und Ihrem Fahrzeug zu vermeiden, LESEN SIE DIESE ANLEITUNG SORGFÄLTIG DURCH UND STELLEN SIE SICHER, DASS SIE ALLE SICHERHEITSANWEISUNGEN UND HINWEISE VOLLSTÄNDIG VERSTANDEN HABEN, BEVOR SIE DAS GERÄT IN BETRIEB NEHMEN.
- Page 73 ABSCHNITT 1 WAS IST IN DER BOX? • ArtiDiag600 Elite • OBD-II-Diagnosekabel • USB-Kabel (Typ-A auf Typ-C) • Schnellstartanleitung • Tragetasche...
- Page 74 ABSCHNITT 2 PRODUKTÜBERSICHT Abb. 2-1...
- Page 75 Strom-/Bildschirm-Aus-Taste Drücken Sie lange auf die Taste, um das ArtiDiag600 Elite einzuschalten. Halten Sie erneut gedrückt, um die Symbolleiste "Ausschalten/Neustarten/Abbrechen" anzuzeigen, und tippen Sie dann auf die gewünschte Option. Drücken Sie kurz auf die Taste, um den Bildschirm aufzuwecken/ zu sperren.
-
Page 76: Abschnitt 3 Erste Schritte
ABSCHNITT 3 ERSTE SCHRITTE 3.1 Grundlegende Einstellungen Drücken und halten Sie die Ein-/Aus-Taste 3 Sekunden lang, um den ArtiDiag600 Elite einzuschalten. Befolgen Sie die untenstehenden Schritte, um den ArtiDiag600 Elite einzurichten. 1. Wählen Sie die gewünschte Systemsprache aus. Abb. 3-1 2. - Page 77 3. Konfigurieren Sie die WLAN-Verbindung. Wählen Sie ein WLAN aus der gescannten Liste aus und geben Sie das Passwort ein. Abb. 3-3 4. Loggen Sie sich in Ihr TOPDON-Konto ein. (Wenn Sie noch kein Konto haben, registrieren Sie sich bitte mit Ihrer E-Mail-Adresse). Abb. 3-4...
- Page 78 Es wird empfohlen, die Software zu aktualisieren, um einen besseren Service zu erhalten, wenn eine neue Version im Modul "Systemupdate" verfügbar ist. 3.2 Verbindung des ArtiDiag600 Elite mit dem DLC des Fahrzeugs Verwenden Sie das mitgelieferte OBD-II-Diagnosekabel, um das ArtiDiag600 Elite mit dem DLC des Fahrzeugs zu verbinden (siehe Abbildung 3-6).
- Page 79 Abb. 3-6 Hinweis: Stellen Sie sicher, dass die Zündung immer ausgeschaltet ist, bevor Sie das Gerät einstecken. 3.3 Drehen Sie die Zündung auf die Position "EIN" (siehe Abbildung 3-7) Wenn Ihr Fahrzeug mit einem schlüssellosen Startsystem ausgestattet ist und das Zündschloss eine "Motor-Start-Stopp"-Taste hat (siehe Abbildung 3-8), drücken Sie die "Motor-Start-Stopp"- Taste, bis sich das Fahrzeug im "EIN"-Modus befindet.
- Page 80 ABSCHNITT 4 VERWENDUNG IHRES ARTIDIAG 4.1 Startbildschirm Abb. 4-1 Funktionssymbole Ermöglicht die Durchführung von Diagnosefunktionen, einschließlich des Lesens von Diagnostic Trouble Codes (DTCs), des Löschens von DTCs, des Einsehens des Datenstroms und des Lesens von Versionsinformationen Diagnostik des elektronischen Steuergeräts (ECU).
- Page 81 Ermöglicht den schnellen Zugriff auf den Status der emissionsrelevanten (Inspektion Systeme. und Wartung) Bereitschaft Bietet 13 Wartungsdienste, darunter Öl zurücksetzen, Drosselklappenanpassung, EPB zurücksetzen, Lenkwinkel zurücksetzen, DPF-Regeneration, ABS-Blutung, BMS zurücksetzen, Injektor-Codierung, TPMS zurücksetzen, AdBlue- Wartung Rücksetzung, AFS-Rücksetzung, Windows-Kalibrierung und Stopp/Start- Rücksetzung. Zeigt die Spannung der Fahrzeugbatterie in Echtzeit an.
- Page 82 Enthält eine OBD-II Generische DTC-Reparaturanleitung, technische Servicebulletins, DLC- Standortinformationen und eine Warnleuchtenbibliothek, Bibliothek die Referenzinformationen zur Fahrzeuginspektion, Diagnose und Reparatur bereitstellt. 4.2 Diagnose Mit dem Diagnosemodul können Sie unterstützte Fahrzeugsysteme (Auto Scan) nach Diagnose-Fehlercodes (DTCs) scannen oder ein einzelnes System auswählen, um Versionsinformationen lesen, Fehlercode lesen, Fehlercode löschen und Datenstrom lesen.
- Page 83 Identifizierung über VIN VIN ermöglicht die Identifizierung des Fahrzeugs über Auto VIN oder VIN eingeben. • Auto VIN - der ArtiDiag600 Elite liest und dekodiert automatisch die Fahrzeugidentifikationsnummer (VIN). Hinweis: Nicht alle Fahrzeuge unterstützen das automatische Lesen und Dekodieren der Fahrgestellnummer über Auto VIN.
- Page 84 ③ Symbol für die Spannung der Fahrzeugbatterie Zeigt die Spannung der Fahrzeugbatterie in Echtzeit an. ④ Hersteller (Fahrzeugmarke) Optionen 2. Wählen Sie oder geben Sie die Marke Ihres Fahrzeugs ein. Hinweis: Ein Demonstrationsmodus (DEMO Option auf der Marke -Liste) hilft Ihnen, sich mit den Diagnosefunktionen vertraut zu machen.
- Page 85 Vergleich durchzuführen. Um einen Auto Scan durchzuführen, tippen Sie auf die Auto Scan- Schaltfläche in der unteren Ecke. Der ArtiDiag600 Elite beginnt mit dem Scannen der vom Fahrzeug unterstützten Systeme, und die Fehlercodeabfrage wird automatisch starten.
- Page 86 Hinweis: Je nach Fahrzeugmarke sind einige Funktionen möglicherweise nicht verfügbar. Fehlercode lesen 1. Nachdem das Fahrzeug identifiziert wurde, wählen Sie das System, für das Sie DTCs abrufen möchten, aus dem Systemmenü aus. 2. Tippen Sie auf Fehlercode lesen im Funktionsmenü. ArtiDiag wird mit der ECU kommunizieren, um die aktuellen DTCs (Diagnose-Fehlercodes) für das ausgewählte System abzurufen und anzuzeigen.
- Page 87 Symbolbeschreibung Wenn dieses Symbol aufleuchtet, tippen Sie darauf, um ein Fenster zu öffnen, in dem Sie nach weiteren Informationen zum DTC auf Google suchen können. Wenn das Symbol leuchtet, tippen Sie darauf, um die detaillierte Beschreibung der DTC anzuzeigen. Wenn dieses Symbol aufleuchtet, tippen Sie auf, um das Standbild anzuzeigen, das zum Zeitpunkt des Auftretens des DTC aufgenommen wurde.
- Page 88 Echtzeitdaten 1. Nachdem das Fahrzeug identifiziert wurde, wählen Sie das System, für das Sie den Datenstrom lesen möchten, aus dem Systemmenü aus. 2. Tippen Sie auf Live-Daten im Funktionsmenü. Eine Datenstromliste wird angezeigt. Abb. 4-7 Symbolbeschreibung Tippen Sie auf , um den Echtzeit-Datenstrom in einem Wellenmusterdiagramm anzuzeigen.
- Page 89 - Tippen Sie auf, um Echtzeit- Datenstrominformationen für Vergleiche und Analysen aufzuzeichnen und zu speichern. Um die aufgezeichneten Datenströme anzusehen, gehen Sie zu Ordner > Live-Datenaufzeichnung. - tippen Sie auf , um die aktuellen Datenstromwerte im Berichtsformat zu speichern. Um die gespeicherten Berichte anzuzeigen, gehen Sie zu Ordner >...
- Page 90 Abb. 4-8 Auto Scan - das ArtiDiag600 Elite kommuniziert automatisch mit dem Fahrzeug und erkennt, welches Protokoll das Fahrzeug verwendet. Protokoll - ermöglicht die manuelle Auswahl des Kommunikationsprotokolls. 3. Wählen Sie eine Funktion aus, um fortzufahren. Abb. 4-9 Hinweis: Je nach Fahrzeugmarke sind einige Funktionen möglicherweise...
- Page 91 Typische Funktionsoptionen können sein: DTC & FFD, I/M-Bereitschaft, Live-Daten, On-Board-Monitor, Komponententest, Fahrzeuginformationen und Fahrzeugstatus. DTC & FFD (Standbild-Daten) Diese Funktion hilft beim Abrufen und Löschen von DTCs, die in der ECU des Fahrzeugs gespeichert sind, und zeigt FFD der emissionsbezogenen Systeme an. 1.
- Page 92 Diese Funktion zeigt den Status des Fahrzeugs an, einschließlich Motor, Getriebe, gefundene Codes, MIL-Status, Monitore und Protokoll. 4.3.2 Diagnose-Feedback Mit dem ArtiDiag600 Elite können Sie sofort ein Diagnose- Feedback senden (mit automatisch angehängten Protokollen der Diagnosedaten), wenn Sie ein Softwareproblem bei den Diagnosevorgängen feststellen.
- Page 93 4.4 I/M-Bereitschaft Diese Funktion überprüft, ob die verschiedenen emissionsbezogenen Systeme des Fahrzeugs ordnungsgemäß funktionieren und für die I/M-Prüfung bereit sind. Es kann auch den Betriebsstatus des Monitors überprüfen und bestätigen, ob die Reparatur eines Autofehlers korrekt durchgeführt wurde. Hinweis: Das Fahrzeug sollte nur als inspektionsbereit betrachtet und zur Emissionsprüfung zugelassen werden, wenn alle erforderlichen Tests bestanden wurden.
- Page 94 Öl-Zurücksetzen ist bei jedem Motorölwechsel erforderlich. Drosselklappenanpassung Wenn das Steuergerät versehentlich abgeklemmt wird oder wenn die Drosselklappe ausgetauscht oder gereinigt wird, müssen die Drosselklappenaktuatoren über die Funktion Drosselklappenanpassung initialisiert werden. Dies setzt die Daten des Motorsteuergeräts auf den Ausgangszustand zurück, damit der Gashebel die Luftzufuhr genau regulieren kann.
- Page 95 TPMS zurücksetzen Diese Funktion kann den Reifendruck zurücksetzen und den Reifendruck-Fehlerindikator ausschalten, wenn die Reifendruck- Fehlerindikator leuchtet. EPB zurücksetzen Diese Funktion hilft Ihnen beim Austausch und Zurücksetzen der Bremsbeläge. Es muss in den folgenden Fällen durchgeführt werden: • Die Bremsbeläge und der Verschleißsensor der Bremsbeläge werden ausgetauscht.
- Page 96 Abb.4-11 2. Wählen Sie die Funktion, die Sie ausführen möchten. 3. Identifizieren Sie das Fahrzeug über die FIN oder die Marke (weitere Informationen zu den Identifizierungsvorgängen finden Sie unter Identifizierung des Fahrzeugs in Auto Scan und Individuelle Systemdiagnose). Gehen Sie dann auf den Bildschirm für die ausgewählte Funktion.
- Page 97 4.7 Aktualisieren Mit dieser Funktion können Sie die fahrzeugspezifische Diagnosesoftware aktualisieren wenn eine neue Software verfügbar ist. So führen Sie die Funktion Aktualisieren aus: 1. Tippen Sie auf Aktualisieren auf dem Startbildschirm und der Bildschirm Aktualisieren wird angezeigt. Abb. 4-13 2.
- Page 98 4.8 Ordner Diese Funktion ermöglicht den Zugriff auf Berichte (Alle, Systemberichte, Fehlercodebericht und Datenstromberichte), Live- Datenaufzeichnung, Screenshots und Bildschirmaufzeichnung. Abb. 4-14 Tastenbeschreibungen Tippen Sie darauf, um nach einem bestimmten Bericht zu suchen. Tippen Sie auf , um Berichte stapelweise auszuwählen und zu löschen. 4.8.1 Berichte 1.
- Page 99 Tippen Sie auf Ordner > Bildschirmaufzeichnung, um die während des Betriebs des ArtiDiag600 Elite gespeicherten Screenshots anzuzeigen. 4.8.4 Bildschirmaufzeichnung. Tippen Sie auf Ordner > Bildschirmaufzeichnung, um die während des Betriebs des ArtiDiag600 Elite gespeicherten Bildschirmaufzeichnungen anzuzeigen. 4.9 Bibliothek 4.9.1 DTC-Reparaturanleitung Die DTC-Reparaturanleitung ist eine erfahrungsbasierte Datenbank, die code-spezifische Informationen, einschließlich gängiger...
- Page 100 ändern und Ihr TOPDON-Konto löschen. 4.10.2 Firmware-Update Ermöglicht die Aktualisierung der Firmware, wenn eine neue Version verfügbar ist. 4.10.3 Kundenfeedback Mit dieser Funktion können Sie dem TOPDON Kundenservice ein Feedback zum Produkt schreiben. 4.10.4 Shop-Info Ermöglicht das Speichern von Reparaturwerkstattinformationen. 4.10.5 System-Update Ermöglicht Ihnen die Aktualisierung der Software, wenn eine neue...
- Page 101 Datum, Sprachen/Einheiten, AutoVIN einstellen, den Speicher überprüfen und das ArtiDiag600 Elite auf die Werkseinstellungen zurücksetzen, die Versionsinformationen des ArtiDiag600 Elite einsehen, das ArtiDiag600 Elite aktualisieren, die Nutzungsbedingungen und die Datenschutzrichtlinie einsehen, die Auto-Lock-Zeit einstellen, die Tablet-Informationen einsehen und sich von Ihrem TOPDON-Konto abmelden.
-
Page 102: Abschnitt 5 Spezifikationen
ABSCHNITT 5 SPEZIFIKATIONEN Bildschirm 1280 * 720 Berührbarer Bildschirm Batterie 3350 mAh/3,7 V Eingangsspannungsbereich 9-18 V Arbeitstemperatur -10 °C bis 50°C (14°F bis 122°F) Lagertemperatur -20 °C bis 70°C (-4°F bis 158°F) Abmessungen (L x B x H) 8,9*5,3*1,56 Zoll. (225,15*135,15*39,7 mm) Gewicht 578 g (20,39 Unzen) - Page 103 Injektor-Codierung, TPMS zurücksetzen, AdBlue- Rücksetzung, AFS-Rücksetzung, Windows-Kalibrierung und Stopp/ Start-Rücksetzung. Q: Muss ich die Firmware aktualisieren, bevor ich den ArtiDiag600 Elite zum ersten Mal verwende? A: Ja. Die Firmware wird automatisch auf die neueste Version aktualisiert. Sie können auch auf Benutzer-Info > Firmware-Update tippen, um die Firmware manuell zu aktualisieren.
- Page 104 Teil oder Gerät gemäß seiner Analyse und Bestätigung des technischen Supports entweder reparieren oder ersetzen. TOPDON haftet nicht für Neben- oder Folgeschäden, die durch den Gebrauch, den Missbrauch oder die Montage des Geräts entstehen. Bei Widersprüchen zwischen der TOPDON-Gewährleistungsrichtlinie und den örtlichen Regelungen haben die örtlichen Regelungen...
- Page 105 ESPAÑOL...
- Page 106 ¡LA SEGURIDAD ES SIEMPRE LA PRIMERA PRIORIDAD! LEA TODAS LAS INSTRUCCIONES ANTES DE USAR Para su seguridad, la seguridad de los demás y para evitar cualquier daño al producto y a su vehículo, LEA CUIDADOSAMENTE Y ASEGÚRESE DE ENTENDER COMPLETAMENTE TODAS LAS INSTRUCCIONES Y MENSAJES DE SEGURIDAD EN ESTE MANUAL ANTES DE OPERAR.
-
Page 107: Sección 1 ¿Qué Hay En La Caja
SECCIÓN 1 ¿QUÉ HAY EN LA CAJA? • ArtiDiag600 Elite • Cable de Diagnóstico OBD-II • Cable USB (Tipo-A a Tipo-C) • Guía Rápida del Usuario • Estuche de Transporte... -
Page 108: Sección 2 Visión General Del Producto
SECCIÓN 2 VISIÓN GENERAL DEL PRODUCTO Figura 2-1... - Page 109 Botón de Encendido / Apagado de Pantalla Presiona el botón durante un tiempo prolongado para encender el ArtiDiag600 Elite. Presiona nuevamente durante un tiempo prolongado para mostrar la barra de herramientas Apagar / Reiniciar / Cancelar, luego toca la opción deseada.
- Page 110 SECCIÓN 3 INICIO 3.1 Configuración Básica Presione y mantenga presionado el botón de encendido durante 3 segundos para encender el ArtiDiag600 Elite. Siga los pasos a continuación para configurar el ArtiDiag600 Elite. 1. Seleccione el idioma del sistema deseado. Figura 3-1 2.
- Page 111 3. Configure la conexión Wi-Fi. Seleccione un Wi-Fi de la lista escaneada e ingrese la contraseña. Figura 3-3 4. Inicie sesión en su cuenta TOPDON. (Si no tiene una cuenta, por favor regístrese con su correo electrónico). Figura 3-4...
- Page 112 5. Después de iniciar sesión en su cuenta TOPDON, se mostrará la pantalla de inicio. Figura 3-5 Nota: Se recomienda actualizar el software para un mejor servicio si hay una nueva versión disponible en el módulo de Actualización del Sistema.
- Page 113 Figura 3-6 Nota: Asegúrese de que el encendido esté siempre OFF antes de conectar la unidad. 3.3 Gire la llave de encendido a la posición "ON" (ver Figura 3-7) Si su vehículo está equipado con un sistema de arranque sin llave y el interruptor de encendido es un botón de "Arranque Parada del Motor"...
- Page 114 SECCIÓN 4 USO DE SU ARTIDIAG 4.1 Pantalla Principal Figura 4-1 Iconos de Función Le permite realizar funciones de diagnóstico, incluyendo la lectura de Códigos de Problemas de Diagnóstico (DTC), borrado de DTC, visualización de flujo de datos y lectura de Diagnósticos información de la versión de la Unidad de Control Electrónico (ECU).
- Page 115 Proporciona acceso rápido para verificar el estado de los sistemas (Inspección y relacionados con las emisiones. Mantenimiento) Readiness Proporciona 13 servicios de mantenimiento incluyendo Reinicio de Aceite, Adaptación del Acelerador, Reinicio de EPB, Reinicio del Ángulo de Dirección, Regeneración de DPF, Purga ABS, Reinicio de BMS, Codificación de Mantenimiento Inyectores, Reinicio de TPMS, Reinicio...
- Page 116 Incluye Guía de Reparación de DTC Genérico OBD-II, Boletines de Servicio Técnico, Ubicación de DLC, Biblioteca de Luces de Advertencia, que Biblioteca proporciona información de referencia sobre inspección, diagnóstico y reparación de vehículos. Proporciona acceso a Mi Perfil, Actualización de Firmware, Retroalimentación del Cliente, Información de la Tienda, Información del...
- Page 117 Identificación mediante VIN VIN le permite identificar el vehículo mediante Auto VIN o Ingresar VIN. • Auto VIN – el ArtiDiag600 Elite lee y decodifica automáticamente el Número de Identificación del Vehículo (VIN). Nota: No todos los vehículos soportan la lectura y decodificación automática del VIN mediante Auto VIN.
- Page 118 ③ ① ② ④ Figura 4-3 ① Icono de Búsqueda Toca el icono de búsqueda para mostrar la barra de búsqueda e introduce la marca del vehículo para buscarlo. ② Todas / Asiáticas / Europeas / Americanas / Chinas Selecciona de este menú para filtrar las marcas de vehículos fabricados en ciertos países.
- Page 119 Para realizar un Auto Scan, toca el botón de Auto Scan en la esquina inferior, el ArtiDiag600 Elite comenzará a escanear los sistemas soportados por el vehículo, y la recuperación de DTC comenzará automáticamente.
- Page 120 Los resultados se muestran progresivamente a medida que se escanean los sistemas. Figura 4-5 Descripción del Botón Borrar DTCs - toca para borrar todos los DTCs recuperados. Informe - toca para guardar los resultados del escaneo actual en formato de informe. (Para ver los informes guardados, ve a Carpeta > Informes >...
- Page 121 3. Toca el icono en el lado derecho para abrir el menú de opciones de un DTC particular. Figura 4-6 Descripción del Icono Cuando este icono se ilumine, toque para abrir una ventana que le permite buscar en Google más información sobre el DTC.
- Page 122 Borrar Código de Problemas 1. Después de que el vehículo sea identificado, selecciona el sistema del cual deseas borrar los DTCs desde el menú del sistema. 2. Toca Borrar Código de Problemas en el menú de funciones. 3. Toca OK cuando los DTCs sean borrados. Nota: 1.
- Page 123 Descripción del Icono Toque para que el flujo de datos en tiempo real se muestre en un gráfico en forma de onda. Descripción del Botón - toca para seleccionar los flujos de datos que deseas que se muestren. - toca para mostrar hasta 6 flujos de datos en gráfico.
- Page 124 2. Selecciona tu método de comunicación: Auto Scan o Protocolo. Figura 4-8 Auto Scan - el ArtiDiag600 Elite se comunicará automáticamente con el vehículo e identificará qué protocolo está usando el vehículo. Protocolo - permite seleccionar manualmente el protocolo de comunicación.
- Page 125 Figura 4-9 Nota: Dependiendo de la marca del vehículo, algunas funciones pueden no estar disponibles. Las opciones de función típicas pueden incluir: DTC & FFD, Preparación I/M, Datos en Vivo, Monitor a Bordo, Prueba de Componente, Información del Vehículo y Estado del Vehículo. DTC &...
- Page 126 Nota: 1. El procedimiento de borrado de DTCs debe realizarse después de haber efectuado la reparación requerida. Una vez confirmado, los DTCs y FFD almacenados en la ECU serán borrados. 2. NO ARRANQUES EL MOTOR MIENTRAS BORRAS LOS DTCS. Preparación I/M Esta función verifica si los distintos sistemas relacionados con las emisiones en el vehículo están operando correctamente y están listos para la prueba I/M.
- Page 127 4.3.2 Retroalimentación Diagnóstica El ArtiDiag600 Elite le permite enviar instantáneamente retroalimentación diagnóstica (con registros de datos diagnósticos automáticamente adjuntos) mientras encuentra un problema de software con las operaciones de diagnóstico. Para enviar retroalimentación diagnóstica: 1. Toque el icono ubicado en la esquina superior derecha de cualquier pantalla con este icono.
- Page 128 Figura 4-10 4.5 Mantenimiento Esta función le ofrece 13 servicios de mantenimiento incluyendo Reinicio de Aceite, Adaptación del Acelerador, Reinicio de EPB, Reinicio del Ángulo de Dirección, Regeneración de DPF, Purga ABS, Reinicio de BMS, Codificación de Inyectores, Reinicio de TPMS, Reinicio de AdBlue, Reinicio de AFS, Calibración de Windows y Reinicio de Stop/Start.
- Page 129 derecha. Reinicio de BMS Después de que se reemplaza la batería del coche, la unidad de control de la batería del coche necesita ser restablecida. Esto borrará la información de fallos (como nivel bajo de batería) para que la unidad de control pueda emparejar la información relevante de la batería recién reemplazada.
- Page 130 de escape diésel (urea para automóviles), es necesario realizar una operación de restablecimiento de la urea. Reinicio de AFS Esta función permite inicializar el sistema de faros adaptativos. Reinicio de Stop/Start Esta función puede abrir o cerrar la función automática de arranque- parada mediante el ajuste de la función oculta en la ECU (siempre que el vehículo disponga de la correspondiente función oculta soportada por hardware).
- Page 131 4.6 Voltaje de la Batería Esta función muestra el voltaje en tiempo real de la batería de su vehículo. Figura 4-12 4.7 Actualización Esta función le permite actualizar el software de diagnóstico específico del vehículo sihay algún software nuevo disponible. Para realizar la función de Actualización: 1.
- Page 132 2. Toque Descargarpara actualizar o descargar el software. Nota: También puede tocar Seleccionar en la esquina superior derecha para seleccionar en lote y actualizarel software. 4.8 Carpeta Esta función da acceso a Informes (Todos, Informes de Sistema, Informe de Códigos de Fallo, e Informes de Flujo de Datos), Grabación de Datos en Vivo, Capturas de Pantalla y Grabación de Pantalla.
- Page 133 4.8.3 Capturas de Pantalla Toque Carpeta > Grabación de Pantalla para ver las capturas de pantalla guardadas durante la operación del ArtiDiag600 Elite. 4.8.4 Grabación de Pantalla Toque Carpeta > Grabación de Pantalla para ver las grabaciones de pantalla guardadas durante la operación del ArtiDiag600 Elite.
- Page 134 La función de Configuraciones te permite establecer WLAN, hora y fecha, idiomas/unidad, AutoVIN, verificar almacenamiento y restablecer los ArtiDiag600 Elite a los ajustes de fábrica, ver la información de la versión de los ArtiDiag600 Elite, actualizar los ArtiDiag600 Elite, ver los Términos de Servicio y la Política de Privacidad, configurar el tiempo...
- Page 135 SECCIÓN 5 ESPECIFICACIONES Pantalla Pantalla táctil de 1280 * 720. Batería 3350 mAh/3,7 V Rango de Voltaje de Entrada 9-18 V Temperatura de Operación -10 °C a 50°C (14°F a 122°F) Temperatura de -20 °C a 70°C (-4°F a 158°F) Almacenamiento Dimensiones (L x A x A) 8,9*5,3*1,56 pulg.
-
Page 136: Sección 6 Preguntas Frecuentes
R: Sí. El firmware se actualizará automáticamente a la última versión. También puede tocar Información del Usuario > Actualización de Firmware para actualizar el firmware manualmente. P: ¿Por qué la pantalla de los ArtiDiag600 Elite parpadea cuando el motor está funcionando? R: Eso es un fenómeno normal causado por interferencia electromagnética. - Page 137 TOPDON no será responsable de ningún daño accidental o consecuente causado por el uso, mal uso o instalación del dispositivo. Si hay conflictos entre la política de garantía de TOPDON y las leyes locales, prevalecerán las leyes locales. Esta garantía limitada no es válida en los siguientes casos: •...
- Page 138 ITALIANO...
- Page 139 LA SICUREZZA È SEMPRE LA PRIMA PRIORITÀ! LEGGI TUTTE LE ISTRUZIONI PRIMA DELL'USO Per la tua sicurezza, la sicurezza degli altri e per evitare danni al prodotto e al tuo veicolo, LEGGI ATTENTAMENTE E ACCERTATI DI AVER COMPRESO COMPLETAMENTE TUTTE LE ISTRUZIONI DI SICUREZZA E I MESSAGGI IN QUESTO MANUALE PRIMA DI UTILIZZARE.
-
Page 140: Sezione 1 Contenuto Della Confezione
SEZIONE 1 CONTENUTO DELLA CONFEZIONE • ArtiDiag600 Elite • Cavo diagnostico OBD-II • Cavo USB (Tipo-A a Tipo-C) • Guida rapida per l'utente • Custodia... -
Page 141: Sezione 2 Panoramica Del Prodotto
SEZIONE 2 PANORAMICA DEL PRODOTTO Figura 2-1... - Page 142 Pulsante Accensione / Spegnimento Schermo Premere a lungo il pulsante per accendere l'ArtiDiag600 Elite. Premere nuovamente a lungo per visualizzare la barra degli strumenti di Spegnimento / Riavvio / Annulla, quindi toccare l'opzione desiderata. Premere brevemente il pulsante per risvegliare / bloccare lo schermo.
- Page 143 SEZIONE 3 INIZIO 3.1 Configurazione di base Premere e tenere premuto il pulsante di accensione per 3 secondi per accendere l'ArtiDiag600 Elite. Seguire i passaggi di seguito per configurare l'ArtiDiag600 Elite. 1. Selezionare la lingua del sistema desiderata. Figura 3-1 2.
- Page 144 3. Configurare la connessione Wi-Fi. Selezionare una rete Wi-Fi dalla lista delle reti disponibili e inserire la password. Figura 3-3 4. Accedere al proprio account TOPDON. (Se non si dispone di un account, si prega di registrarsi con il proprio indirizzo email). Figura 3-4...
- Page 145 5. Dopo aver effettuato l'accesso al proprio account TOPDON, verrà visualizzata la schermata principale. Figura 3-5 Nota: Si consiglia di aggiornare il software per un miglior servizio se è disponibile una nuova versione nel modulo di Aggiornamento del sistema. 3.2 Collegare l'ArtiDiag600 Elite al DLC del veicolo.
- Page 146 Figura 3-6 Nota: Assicurati che l'accensione sia sempre SPENTA prima di collegare l'unità. 3.3 Girare l'accensione in posizione "ON" (vedere Figura 3-7) Se il tuo veicolo è dotato di un sistema di avviamento senza chiave e l'interruttore di accensione è un pulsante "Engine Start Stop" (vedere Figura 3-8), premi il pulsante "Engine Start Stop"...
- Page 147 SEZIONE 4 UTILIZZO DI ARTIDIAG 4.1 Schermata principale Figura 4-1 Icone di funzione Consente di eseguire funzioni di diagnostica, tra cui la lettura dei codici di errore diagnostico (DTC), la cancellazione dei DTC, la visualizzazione del flusso di dati e la lettura delle informazioni sulla Diagnostica versione dell'Unità...
- Page 148 Fornisce un accesso rapido per verificare lo stato dei sistemi correlati (Ispezione e alle emissioni. Manutenzione) Prontezza Fornisce 13 servizi di manutenzione, tra cui Reset Olio, Adattamento dell'acceleratore, Reset EPB, Reset Angolo Sterzo, Rigenerazione DPF, Spurgo ABS, Reset BMS, Codificación de Inyectores, Reinicio de TPMS, Manutenzione Reinicio de AdBlue, Reinicio de AFS,...
- Page 149 Include la Guida alla Riparazione dei DTC Generici OBD-II, Bollettini di Servizio Tecnico, Posizione DLC, Libreria delle Spie di Avvertimento, Libreria che fornisce informazioni di riferimento sulla verifica, diagnostica e riparazione del veicolo. Fornisce accesso a Il Mio Profilo, Aggiornamento Firmware, Feedback del Cliente, Informazioni Officina, Aggiornamento del Sistema e Informazioni utente...
- Page 150 Identificazione tramite VIN Il VIN ti consente di identificare il veicolo tramite Auto VIN o Inserisci VIN. • Auto VIN - l'ArtiDiag600 Elite legge e decodifica automaticamente il Numero di Identificazione del Veicolo (VIN). Nota: Non tutti i veicoli supportano la lettura automatica e la decodifica del VIN tramite Auto VIN.
- Page 151 ③ ① ② ④ Figura 4-3 ① Icona di Ricerca Tocca l'icona di ricerca per visualizzare la barra di ricerca e inserire la marca del veicolo per cercarla. ② Tutto / Asiatico / Europeo / Americano / Cinese Seleziona da questo menu per filtrare le marche di veicoli prodotte in determinati paesi.
- Page 152 Per eseguire un Auto Scan, tocca il pulsante Auto Scan nell'angolo in basso, l'ArtiDiag600 Elite inizierà a eseguire la scansione dei sistemi supportati dal veicolo, e il recupero dei DTC inizierà automaticamente.
- Page 153 I risultati vengono visualizzati progressivamente durante la scansione dei sistemi. Figura 4-5 Descrizione dei pulsanti Cancella DTC - tocca per cancellare tutti i DTC recuperati. Report - tocca per salvare i risultati attuali della scansione in formato report. (Per visualizzare i report salvati, vai alla Cartella > Report > Report di sistema.) Eseguire la Diagnosi del Sistema Individuale Oltre all'Auto Scan, è...
- Page 154 3 Tocca l' icona a destra per aprire il menu delle opzioni di un particolare DTC. Figura 4-6 Descrizione delle icone Quando questa icona si illumina, tocca per aprire una finestra che ti consente di cercare su Google maggiori informazioni sul DTC. Quando l'icona si illumina, toccare per visualizzare la descrizione dettagliata del DTC.
- Page 155 Cancellare il Codice di Errore 1 Dopo aver identificato il veicolo, selezionare il sistema per il quale si desidera cancellare i codici di errore dalla menu del sistema. 2 Toccare Cancella Codice di Errore nel menu delle funzioni. 3 Toccare OK quando i codici di errore sono cancellati. Nota: 1 La procedura di cancellazione dei codici di errore dovrebbe essere eseguita dopo che la riparazione richiesta è...
- Page 156 Descrizione delle icone Tocca per visualizzare il flusso di dati in tempo reale in un grafico a onde. Descrizione dei pulsanti - tocca per selezionare i flussi di dati che desideri visualizzare. - tocca per visualizzare fino a 6 flussi di dati in un grafico.
- Page 157 2 Seleziona il tuo metodo di comunicazione: Auto Scan o Protocollo. Figura 4-8 Auto Scan - l'ArtiDiag600 Elite comunicherà automaticamente con il veicolo e identificherà quale protocollo il veicolo sta utilizzando. Protocollo - ti consente di selezionare manualmente il protocollo di comunicazione.
- Page 158 Figura 4-9 Nota: A seconda della marca del veicolo, alcune funzioni potrebbero non essere disponibili. Le opzioni tipiche delle funzioni potrebbero includere: DTC & FFD, I/M Readiness, Dati in Tempo Reale, Monitoraggio a Bordo, Test dei Componenti, Informazioni sul Veicolo e Stato del Veicolo. DTC &...
- Page 159 Nota: 1 La procedura di cancellazione dei DTC dovrebbe essere eseguita dopo che la riparazione richiesta è stata effettuata. Una volta confermato, i DTC e i FFD memorizzati nell'ECU verranno cancellati. 2 NON AVVIARE IL MOTORE DURANTE LA CANCELLAZIONE DEI CODICI DI ERRORE.
- Page 160 4.3.2 Feedback Diagnostico L'ArtiDiag600 Elite consente di inviare immediatamente feedback diagnostico (con registrazioni di dati diagnostici automaticamente allegati) quando si verifica un problema software durante le operazioni diagnostica. Per inviare il feedback diagnostico: 1 Tocca l'icona situata nell'angolo in alto a destra di qualsiasi schermata con questa icona.
- Page 161 Figura 4-10 4.5 Manutenzione Questa funzione fornisce 13 servizi di manutenzione, tra cui Reset Olio, Adattamento dell'acceleratore, Reset EPB, Reset Angolo Sterzo, Rigenerazione DPF, Spurgo ABS, Reset BMS, Codificación de Inyectores, Reinicio de TPMS, Reinicio de AdBlue, Reinicio de AFS, Calibración de Windows y Reinicio de Stop/Start.
- Page 162 Dopo la sostituzione della batteria dell'auto, è necessario reimpostare l'unità di controllo della batteria dell'auto. Ciò cancellerà le informazioni di errore (come il livello basso della batteria) in modo che l'unità di controllo possa abbinare le informazioni rilevanti della batteria appena sostituita.
- Page 163 Esta función permite inicializar el sistema de faros adaptativos. Reinicio de Parada/Inicio Esta función puede abrir o cerrar la función automática de arranque- parada mediante el ajuste de la función oculta en la ECU (siempre que el vehículo disponga de la correspondiente función oculta soportada por hardware).
- Page 164 4.6 Tensione Batteria Questa funzione mostra la tensione in tempo reale della batteria del tuo veicolo. Figura 4-12 4.7 Aggiornamento Questa funzione ti consente di aggiornare il software diagnostico specifico del veicolo se ci sono nuovi aggiornamenti disponibili. Per eseguire la funzione di Aggiornamento: 1 Tocca Aggiornamento dalla schermata principale e verrà...
- Page 165 2 Tocca Scarica per aggiornare o scaricare il software. Nota: Puoi anche toccare Seleziona nell'angolo in alto a destra per selezionare une aggiornare software in blocco. 4.8 Cartella Questa funzione fornisce accesso a Report (Tutti, Report di Sistema, Report di Codici di Errore e Report di Flusso di Dati), Live Data Rec., Screenshots e Screen Rec.
- Page 166 ArtiDiag600 Elite. 4.8.4 Screen Rec. Tocca Cartella > Screen Rec. per visualizzare le registrazioni dello schermo salvate durante l'operazione di ArtiDiag600 Elite. 4.9 Libreria 4.9.1 Guida alla Riparazione dei DTC Guida alla Riparazione dei DTC è un database basato sull'esperienza che fornisce informazioni specifiche del codice, inclusi rimedi popolari e passaggi di riparazione per identificare guasti.
- Page 167 Utente per entrare nella pagina Il Mio Profilo. Con questa funzione, puoi cambiare la tua foto del profilo/alias, visualizzare il tuo ID TOPDON, cambiare la password ed eliminare il tuo account TOPDON. 4.10.2 Aggiornamento Firmware Ti permette di aggiornare il firmware se è disponibile una nuova versione.
- Page 168 automaticamente l'AutoVIN per la diagnostica del veicolo una volta che il VCI del dispositivo è rilevato come collegato al DLC del veicolo. Questa funzione è disabilitata per impostazione predefinita. SEZIONE 5 SPECIFICHE Schermo Display Schermo Touch 1280 * 720 Batteria 3350 mAh/3.7 V Intervallo di Tensione di 9-18 V...
- Page 169 A: Sì. Il firmware si aggiornerà automaticamente all'ultima versione disponibile. È anche possibile toccare Informazioni Utente > Aggiornamento Firmware per aggiornare manualmente il firmware. Q: Perché lo schermo di ArtiDiag600 Elite lampeggia quando il motore è in funzione? A: È un evento normale causato da interferenze elettromagnetiche.
- Page 170 TOPDON non sarà responsabile per eventuali danni incidentali o consequenziali derivanti dall'uso, uso improprio o montaggio del dispositivo. In caso di conflitto tra la politica di garanzia TOPDON e le leggi locali, prevarranno le leggi locali. Questa garanzia limitata è nulla nelle seguenti condizioni: •...
- Page 171 PORTUGUÊS...
- Page 172 SEGURANÇA SEMPRE EM PRIMEIRO LUGAR! LEIA TODAS AS INSTRUÇÕES ANTES DE USAR Para sua segurança, e a segurança dos outros, e para evitar qualquer dano ao produto e ao seu veículo, LEIA ATENCIOSAMENTE E ASSEGURE-SE DE QUE VOCÊ ENTENDE COMPLETAMENTE TODAS AS INSTRUÇÕES DE SEGURANÇA E AS MENSAGENS NESTE MANUAL ANTES DE INICIAR A OPERAÇÃO.
- Page 173 SEÇÃO 1 O QUE TEM NA CAIXA? • ArtiDiag600 Elite • Cabo de Diagnóstico OBD-II • Cabo USB (Tipo-A a Tipo-C) • Guia de Usuário Rápido • Maleta...
- Page 174 SEÇÃO 2 VISÃO GERAL DO PRODUTO Figura 2-1...
- Page 175 Botão de Força Mantenha este botão pressionado para ligar o ArtiDiag600 Elite. Mantenha-o pressionado novamente para exibir a barra de ferramentas de Liga/Desliga / Reiniciar / Cancelar, e então toque na opção desejada. Pressione o botão para despertar / bloquear a tela.
- Page 176 SEÇÃO 3 COMEÇANDO 3.1 Configuração Básica Pressione e mantenha o botão de força por 3 segundos para ligar o ArtiDiag600 Elite. Siga os passos abaixo para configurar o ArtiDiag600 Elite. 1. Selecione o idioma de sistema desejado. Figura 3-1 2. Escolha a região apropriada e o fuso horário.
- Page 177 3. Configure a rede Wi-Fi. Seleciona um Wi-Fi da lista escaneada e digite sua senha. Figura 3-3 4. Faça login em sua conta TOPDON. (Caso não possua uma conta, por favor registre-se com seu e-mail). Figura 3-4...
- Page 178 5. Após fazer login em sua conta TOPDON, a tela inicial será exibida. Figura 3-5 Nota: Recomenda-se atualizar o software para melhoria do serviço caso uma nova versão esteja disponível no módulo de Atualização de Sistema. 3.2 Conecte o ArtiDiag600 Elite ao DLC do veículo Use o cabo de diagnóstico OBD-II fornecido para conectar o...
- Page 179 Figura 3-6 Nota: Nota: Assegure-se de que a ignição esteja sempre DESLIGADA antes de conectar a unidade. 3.3 Leve a Ignição até a Posição "ON" (ver Figura 3-7) Caso o seu veículo seja equipado com um sistema de ignição sem chave e a chave de ignição for um botão "Parada de Partida do Motor"...
- Page 180 SEÇÃO 4 USANDO SEU ARTIDIAG 4.1 Página Inicial Figura 4-1 Ícones de Função Permite que você execute funções de diagnóstico incluindo leitura de Códigos de Problema de Diagnóstico (DTCs), eliminação de DTCs, visualização de fluxos de dados e Diagnósticos leitura de informação da versão da Unidade de Controle Eletrônica (ECU).
- Page 181 Fornece acesso rápido para verificação do status de sistemas relacionados a Prontidão (de emissões. Inspeção e Manutenção) Fornece 13 serviços de manutenção incluindo Reinicialização de Óleo, Adaptação de Acelerador, Reinicialização de EPB, Reinicialização do Ângulo de Direção, Regeneração de DPF, ABS Sangramento, Reinicialização de BMS, Codificação do Injetor, Manutenção Descanso do TPMS, Redefinição do...
- Page 182 Inclui Guia de Conserto DTC Genérico OBD-II, Boletins de Serviço Técnico, Localização DLC, Biblioteca de Luzes de Alerta, que fornece informação de Biblioteca referência em inspeção de veículo, diagnósticos, e conserto. Fornece acesso ao Meu Perfil, Atualização de Firmware, Feedback de Clientes, Informação da Loja, Atualização do Sistema e Informação de...
- Page 183 Identificando via VIN VIN permite que você identifique o veículo através de VIN Automático ou Digitar VIN. • VIN Automático - o ArtiDiag600 Elite lê e decodifica automaticamente o Número de Identificação do Veículo (VIN). Nota: Nota: Nem todos os veículos são compatíveis com a leitura e decodificação automática do VIN através do VIN Automático.
- Page 184 ③ ① ② ④ Figura 4-3 ① Ícone de Busca Toque no ícone de busca para exibir uma barra de busca, e digite o fabricante do veículo para buscá-lo. ② Geral / Asiático / Europeu / Americano / Chinês Selecione este menu para filtrar fabricantes em países específicos.
- Page 185 Para executar um Escaneio Automático, toque no botão de Escaneio Automático no canto inferior, o ArtiDiag600 Elite começará a escanear os sistemas compatíveis com o veículo, e a recuperação de DTC irá começar automaticamente.
- Page 186 Os resultados são exibidos progressivamente conforme os sistemas são escaneados. Figura 4-5 Descrição do Botão Limpar DTCs - toque para eliminar todas as DTCs coletadas. Relatório - toque para salvar os resultados de escaneio atuais em formato de relatório. (Para visualizar os relatórios salvos, vá para Pasta >...
- Page 187 3. Toque no ícone à direita para abrir o menu de opções de uma DTC particular. Figura 4-6 Descrição do Ícone Quando este ícone está aceso, toque-o para abrir uma janela que permite que você faça uma busca no Google para obter mais informações sobre o DTC.
- Page 188 Eliminar Código de Problema 1. Após a identificação do veículo, selecione o sistema para o qual você deseja eliminar DTCs no menu do sistema. 2. Toque em Eliminar Código de Problema no menu de funções. 3. Toque em OK quando as DTCs forem eliminadas. Nota: 1.
- Page 189 Descrição do Ícone Toque para obter o fluxo de dados em tempo real exibido em um gráfico de padrão ondular. Descrição do Botão - toque para selecionar os fluxos de dados que você deseja exibir. - toque para exibir até 6 fluxos de dados em gráficos.
- Page 190 2. Seleciona seu método de comunicação: Escaneio Automático ou Protocolo. Figura 4-8 Escaneio Automático - o ArtiDiag600 Elite se comunicará diretamente com o veículo e identificará qual protocolo o veículo está usando. Protocolo - permite selecionar manualmente o protocolo de comunicação.
- Page 191 Figura 4-9 Nota: Dependendo do fabricante do veículo, algumas funções podem não estar disponíveis. Opções de funções típicas podem incluir: DTC & FFD, Prontidão I/ M, Dados ao Vivo, Monitoramento A Bordo, Teste de Componentes, Informação de Veículo e Estado do Veículo. DTC &...
- Page 192 Nota: 1. O procedimento de eliminação de DTCs deve ser executado após o par requisitado haver sido executado. Uma vez confirmados, os DTCs e FFS armazenados no ECU serão eliminados. 2. NÃO DÊ A PARTIDA NO MOTOR DURANTE A LIMPEZA DE DTCS. Prontidão I/M Esta função verifica se os diversos sistemas de emissão do veículo estão operando adequadamente, e se estão prontos para o teste I/M.
- Page 193 4.3.2 Feedback de Diagnóstico O ArtiDiag600 Elite permite que você envie instantaneamente feedback de diagnósticos (com registros de dados de diagnóstico automaticamente anexados) enquanto você estiver encontrando um problema de software com as operações de diagnósticos. Para enviar feedback de diagnóstico: 1.
- Page 194 Figura 4-10 4.5 Manutenção Esta função fornece a você 13 serviços de manutenção incluindo Reinicialização de Óleo, Adaptação de Acelerador, Reinicialização de EPB, Reinicialização do Ângulo de Direção, Regeneração de DPF, ABS Sangramento, Reinicialização de BMS, Codificação do Injetor, Descanso do TPMS, Redefinição do AdBlue, Redefinição do AFS, Calibração do Windows e Redefinição do Stop/Start.
- Page 195 à direita. Reinicialização de BMS Após a substituição da bateria do carro, a unidade de controle da bateria do carro precisa ser reiniciada. Isto irá eliminar informação de erros (tal como nível baixo de bateria) para que a unidade de controle possa parear a informação relevante da bateria nova.
- Page 196 Parar/Iniciar Redefinir A função pode abrir ou fechar a função iniciar-parar automática através da configuração da função oculta em ECU (desde que o veículo tenha uma função oculta correspondente suportada por hardware). Calibração de Windows O recurso pode realizar a correspondência da janela da porta para recuperar a memória inicial de ECU, e recuperar a função automática ascendente e descendente da janela de energia.
- Page 197 Figura 4-12 4.7 Atualização Esta função permite que você atualize os softwares de Diagnóstico específicos do veículo caso haja novos softwares disponíveis. Para executar a função Atualização 1. Toque em Atualização na página inicial e a tela de Atualização aparecerá. Figura 4-13 2.
- Page 198 Nota: Você também pode tocar em Selecionar no canto direito superior para selecionar e atualizar softwares. 4.8 Pasta Esta função dá acesso a Relatórios (Geral, Relatórios de Sistema, Relatórios de Código de Problema, e Relatórios de Fluxo de Dados), Gravações de Dados ao Vivo, Capturas de Tela e Gravações de Tela. Figura 4-14 Descrições do Botão Toque para buscar por um relatório em particular...
- Page 199 4.8.3 Capturas de Tela Toque em Pasta > Gravação de Tela para ver capturas de tela salvas durante a operação do ArtiDiag600 Elite. 4.8.4 Gravação de Tela Toque em Pasta > Gravação de Tela para ver gravações de tela salvas durante a operação do ArtiDiag600 Elite.
- Page 200 Você pode tocar na foto de perfil na tela de Informação de Usuário para acessar a página Meu Perfil. Com esta função, você poderá trocar sua foto de perfil, ver seu ID TOPDON, alterar sua senha, e deletar sua conta TOPDON.
- Page 201 SEÇÃO 5 ESPECIFICAÇÕES Tela de Exibição Tela Sensível a Toque 1280 * 720 Bateria 3350 mAh/3.7 V Faixa de Tensão de Entrada 9-18 V Temperatura de -10 °C a 50°C (14°F a 122°F) Funcionamento Temperatura de -20 °C a 70°C (-4°F a 158°F) Armazenamento Dimensões (L x G x A) 8.9*5.3*1.56 polegadas (225.15*135.15*39.7...
- Page 202 Você também pode tocar em Informação de Usuário > Atualização de Firmware para atualizar o firmware manualmente. P: Por que a tela do ArtiDiag600 Elite fica piscando quando o motor está ligado? R: Isto é uma ocorrência normal causada por interferência eletromagnética.
- Page 203 A TOPDON não se responsabiliza por quaisquer danos incidentais ou consequentes decorrentes do uso, uso indevido ou montagem do dispositivo. Se houver qualquer conflito entre a política de garantia TOPDON e as leis locais, as leis locais devem prevalecer. Esta garantia limitada é anulada sob as seguintes condições: •...
- Page 204 РУССКИЙ...
- Page 205 БЕЗОПАСНОСТЬ ВСЕГДА НА ПЕРВОМ МЕСТЕ! ПРОЧТИТЕ ВСЕ ИНСТРУКЦИИ ПЕРЕД ИСПОЛЬЗОВАНИЕМ В целях вашей безопасности, безопасности других людей, а также во избежание какого- либо повреждения продукта и вашего автомобиля ВНИМАТЕЛЬНО ПРОЧТИТЕ И УБЕДИТЕСЬ, ЧТО ВЫ ПОЛНОСТЬЮ ПОНИМАЕТЕ ВСЕ ИНСТРУКЦИИ ПО ТЕХНИКЕ БЕЗОПАСНОСТИ, СОДЕРЖАЩИЕСЯ В ДАННОМ РУКОВОДСТВЕ, ПРЕЖДЕ...
- Page 206 РАЗДЕЛ 1 ЧТО В КОРОБКЕ? • ArtiDiag600 Elite • Диагностический кабель OBD-II • USB-кабель (с Type-A на Type-C) • Краткое руководство пользователя • Чехол для переноски...
- Page 207 РАЗДЕЛ 2 ОБЗОР ПРОДУКТА Figura 2-1...
- Page 208 Кнопка включения / выключения экрана Зажатие кнопки позволяет включить ArtiDiag600 Elite. Повторно зажмите для отображения панели инструментов выключения / перезапуска / отмены, затем нажмите нужную опцию. Короткое нажатие кнопки приводит к пробуждению / блокировке экрана. Разъем диагностического кабеля DB15 Подключение кабеля передачи данных используется для...
- Page 209 РАЗДЕЛ 3 НАЧАЛО ЭКСПЛУАТАЦИИ 3.1 Базовые настройки Нажмите и удерживайте кнопку питания в течение 3 секунд, чтобы включить ArtiDiag600 Elite. Выполните приведенные ниже действия, чтобы настроить ArtiDiag600 Elite. 1 . Выберите предпочитаемый язык системы. Figura 3-1 2. Выберите подходящий регион и часовой пояс.
- Page 210 3. Настройте подключение Wi-Fi. Выберите Wi-Fi из отсканированного списка и введите пароль. Figura 3-3 4. Войдите в вашу учетную запись TOPDON. (Если у вас нет учетной записи, пожалуйста, зарегистрируйтесь, указав свой адрес электронной почты). Figura 3-4...
- Page 211 обновления системы. 3.2 Подключите ArtiDiag600 Elite к DLC автомобиля Используйте прилагаемый диагностический кабель OBD-II для подключения ArtiDiag600 Elite к DLC автомобиля (см. рис. 3-6). Разъем DLC автомобиля обычно расположен под приборной панелью. После правильного подключения DLC автомобиля к ArtiDiag600 Elite значок...
- Page 212 Figura 3-6 Примечание: Перед подключением устройства к розетке убедитесь, что зажигание выключено. 3.3 Переведите зажигание в положение «ВКЛЮЧЕНО» (см. рис. 3-7) Если ваш автомобиль оснащен системой запуска без ключа, а ключ зажигания представляет собой кнопку «Старт-стоп» (см. рис. 3-8), нажимайте кнопку «Старт-стоп» до тех пор, пока автомобиль...
- Page 213 РАЗДЕЛ 4 ИСПОЛЬЗОВАНИЕ ВАШЕГО ARTIDIAG 4.1 Главный экран Figura 4-1 Значки функций Позволяет выполнять функции диагностики, включая считывание диагностических кодов неисправностей (DTC), очистку DTC, просмотр потока данных и считывание информации о версии Диагностика электронного блока управления (ECU). Позволяет выполнять диагностику вашего...
- Page 214 Обеспечивает быстрый доступ для проверки состояния систем, Готовность (к осмотру связанных с выбросами. и техническому обслуживанию) Предоставляет 13 услуг по техническому обслуживанию, включая сброс уровня масла, адаптацию дроссельной заслонки, сброс EPB, сброс угла поворота рулевого колеса, регенерацию DPF, Прокачка ABS, сброс Техническое...
- Page 215 Включает в себя общее руководство по ремонту DTC OBD-II, бюллетени технического обслуживания, расположение DLC, библиотеку световых индикаторов, которая Библиотека предоставляет справочную информацию по осмотру, диагностике и ремонту автомобиля. Предоставляет доступ к моему профилю, обновлению встроенного ПО, отзывам клиентов, информации о мастерской, обновлению системы О...
- Page 216 Figura 4-2 Идентификация по VIN VIN позволяет идентифицировать автомобиль с помощью авто- VIN или введения VIN. • Авто-VIN — ArtiDiag600 Elite автоматически считывает и декодирует идентификационный номер транспортного средства (VIN). Примечание: Не все автомобили поддерживают автоматическое считывание и декодирование VIN с помощью функции авто-VIN.
- Page 217 ③ ① ② ④ Figura 4-3 ① Значок поиска Нажмите на значок поиска, чтобы отобразить строку поиска, и введите марку автомобиля для его поиска. ② Все / Азия / Европа / Америка / Китай Выберите в этом меню, чтобы отфильтровать марки автомобилей, произведенных...
- Page 218 помочь в устранении неполадок и проверке правильности ремонта. Отчеты о предварительном и последующем сканировании позволяют записывать состояние автомобиля до и после ремонта для сравнения. Чтобы выполнить автоматическое сканирование, нажмите кнопку автоматического сканирования в нижнем углу, ArtiDiag600 Elite начнет сканирование систем, поддерживаемых...
- Page 219 автомобилем, и поиск DTC начнется автоматически. Результаты отображаются постепенно по мере сканирования систем. Figura 4-5 Описание кнопки Очистить DTC — нажмите, чтобы очистить все извлеченные коды неисправностей. Отчет — нажмите, чтобы сохранить текущие результаты сканирования в формате отчета. (Чтобы просмотреть сохраненные отчеты, перейдите...
- Page 220 ArtiDiag свяжется с ECU и извлечет и отобразит коды неисправностей для выбранной в данный момент системы. 3. Нажмите на значок справа, чтобы открыть опционное меню конкретного кода неисправности. Figura 4-6 Описание значка Когда загорится этот значок, нажмите, чтобы открыть окно, которое позволит вам выполнить поиск...
- Page 221 Очистить DTC — нажмите, чтобы очистить все извлеченные коды неисправностей. Очистить код неисправности 1. После идентификации автомобиля выберите систему, для которой вы хотите удалить коды неисправностей, в системном меню. 2. Нажмите Очистить код неисправности в функциональном меню. 3. Нажмите ОК, когда коды неисправностей будут удалены. Примечание: 1.
- Page 222 Описание значка Нажмите, чтобы отобразить поток данных в реальном времени в виде волнового графика. Описание кнопки — нажмите, чтобы выбрать потоки данных, которые вы хотите отобразить. — нажмите, чтобы отобразить до 6 потоков данных в виде графика. — нажмите, чтобы объединить до 4 потоков данных...
- Page 223 1. Нажмите OBDII / EOBD на главном экране. 2. Выберите свой способ связи: Автоматическое сканирование или Протокол. Figura 4-8 Автоматическое сканирование — ArtiDiag600 Elite автоматически свяжется с автомобилем и определит, какой протокол использует автомобиль. Протокол — позволяет вам вручную выбрать протокол связи.
- Page 224 Figura 4-9 Примечание: В зависимости от марки автомобиля некоторые функции могут быть недоступны. Типичные функциональные опции могут включать: DTC и FFD, готовность к техосмотру, реальные данные, бортовой монитор, тестирование компонентов, информация об автомобиле и его состоянии. DTC и FFD (данные о сохраненных ошибках) Эта...
- Page 225 Примечание: 1. Процедуру очистки кодов неисправностей следует выполнять после проведения необходимого ремонта. После подтверждения коды неисправностей и FFD, хранящиеся в ECU, будут очищены. 2. НЕ ЗАПУСКАЙТЕ ДВИГАТЕЛЬ ВО ВРЕМЯ ОЧИСТКИ КОДОВ НЕИСПРАВНОСТЕЙ. Готовность к техосмотру Эта функция проверяет, правильно ли работают различные системы...
- Page 226 4.3.2 Диагностическая обратная связь ArtiDiag600 Elite позволяет вам мгновенно отправлять отзывы по диагностике (с автоматически прикрепляемыми журналами диагностических данных), когда вы сталкиваетесь с программной проблемой при выполнении диагностических операций. Для отправки отзыва по диагностике: 1. Нажмите на значок , расположенный в правом верхнем углу...
- Page 227 Figura 4-10 4.5 Обслуживание Эта функция предоставляет вам 13 услуг по техническому обслуживанию, включая сброс уровня масла, адаптацию дроссельной заслонки, сброс EPB, сброс угла поворота рулевого колеса, регенерацию DPF, Прокачка ABS, сброс BMS, kодирование инжектора, восстановление TPMS, сброс AdBlue, сброс AFS, калибровка Windows и сброс Stop/Start. 4.5.1 Обзор...
- Page 228 точный угол для левого и правого рулевого управления. Сброс BMS После замены автомобильного аккумулятора необходимо сбросить блок управления автомобильным аккумулятором. Это очистит информацию о неисправности (например, о низком уровне заряда аккумулятора), чтобы блок управления мог сопоставить соответствующую информацию о недавно замененном...
- Page 229 Сброс AFS Эта функция позволяет вам инициализировать адаптивную систему фар. Сброс остановки/запуска Эта функция может открывать или закрывать функцию автоматического запуска-остановки с помощью настройки скрытой функции в ECU (при условии, что автомобиль имеет соответствующую скрытую функцию, поддерживаемую аппаратным обеспечением). Kалибровка Windows Эта...
- Page 230 4.6 Напряжение аккумулятора Эта функция отображает напряжение аккумулятора вашего автомобиля в режиме реального времени. Figura 4-12 4.7 Обновление Эта функция позволяет вам обновить программное обеспечение для диагностики конкретного автомобиля, если доступно какое-либо новое программное обеспечение. Для выполнения функции обновления: 1. Нажмите Обновить на главном экране и отобразится экран обновления.
- Page 231 2. Нажмите Загрузить, чтобы обновить или загрузить программное обеспечение. Примечание: Вы также можете нажать Выбрать в правом верхнем углу для пакетного выбора и обновления программного обеспечения. 4.8 Папка Эта функция предоставляет доступ к отчетам (все, системные отчеты, отчеты о кодах неисправностей и отчеты о потоке данных), записям...
- Page 232 сохраненных во время работы ArtiDiag600 Elite. 4.8.4 Записи экрана Нажмите Папка > Записи экрана для просмотра экранных записей, сохраненных во время работы ArtiDiag600 Elite. 4.9 Библиотека 4.9.1 Руководство по ремонту DTC Руководство по ремонту DTC — это база данных, основанная на...
- Page 233 информации о пользователе, чтобы перейти на страницу «Мой профиль». С помощью этой функции вы можете изменить фотографию / никнейм своего профиля, просмотреть свой TOPDON ID, сменить пароль и удалить свою учетную запись TOPDON. 4.10.2 Обновление встроенного ПО Позволяет обновить встроенное ПО, если доступна новая версия.
- Page 234 ArtiDiag600 Elite, просмотреть информацию о версии ArtiDiag600 Elite, обновить ArtiDiag600 Elite, ознакомиться с Условиями обслуживания и Политикой конфиденциальности, установить время автоматической блокировки, просмотреть информацию о планшете и выйти из своей учетной записи TOPDON. Авто-VIN: При активации этой функции ArtiDiag600 Elite автоматически...
- Page 235 О: Да. Прошивка автоматически обновится до последней версии. Вы также можете нажать «О пользователе» > «Обновление прошивки», чтобы обновить прошивку вручную. В: Почему экран ArtiDiag600 Elite мигает при работающем двигателе? О: Это нормальное явление, вызванное электромагнитными помехами. В: Как сделать снимок экрана? О: Проведите...
- Page 236 РАЗДЕЛ 7 ГАРАНТИЯ Гарантия TOPDON на один год TOPDON гарантирует покупателю, что не будет никаких дефектов материалов и изготовления продукции TOPDON в течение 12 месяцев (гарантийный срок) с даты покупки. При обнаружении дефектов в течение гарантийного периода TOPDON проведёт ремонт или замену дефектных деталей или продуктов после анализа...
- Page 237 日本语...
- Page 238 安全は常に最優先です ! 使用前にすべての説明書をお読みください お客様の安全のために、そして製品とお客様の車への損傷を避けるた めに、お客様が運転する前に、このマニュアルのすべての安全指示と メッセージを十分に理解し、注意深く読み、確認してください。また、 車両のサービスマニュアルを読み、テストまたはサービス手順の前後 に記載された注意事項または指示を遵守する必要があります。 体、 衣服および他の物を動作部品、 または熱いエンジンから距離を持ち、 電気接続との接触を避けること。 エンジンが動いているときに車両が一酸化炭素、有毒なガス、および 粒子状物質を作り出すので、 風通しのよい区域で車両を動かしなさい。 鋭い物体や腐食性の液体からの損傷を防ぐために、常に承認された安 全ゴーグルを着用してください。 試験時には、車両の近くでの喫煙や炎の使用は避けてください。燃料 と電池の蒸気の可燃性は非常に高いです。 運転中にプルーダクトと対話しようとしないでください。どんな気晴 らしでも事故を引き起こす可能性があります。 製品や車両の電子部品の損傷を防ぐために、車両のデータリンクコネ クタ (DLC) と製品を接続または切断する前に、点火をオフにしてくだ さい。...
- Page 239 セクション1 その箱には何が入っていますか。 • ArtiDiag600 Elite • OBD-II 診断ケーブル • USB ケーブル ( タイプ A とタイプ C) • クイック・マニュアル • ハンドキャリー・ケース...
- Page 240 セクション2 製品概要 図 2-1...
- Page 241 電源 / 画面オフボタン ボタンを長押しすると、ArtiDiag600 Elite がオンになります。もう一 度長押しすると、 電源オフ / 再起動 / キャンセルツールバーが表示され、 目的のオプションをタップします。 ボタンを短く押すと、画面が起動 / ロックされます。 DB15 診断ケーブルコネクタ データケーブル接続 ArtiDiag600 Elite を車両データリンクコネクタ (DLC) に接続するために使用します。 5 センチのタッチスクリーン OK ボタン 現在の選択または操作を確認するために使用します。 指向性ボタン カーソルやハイライトをそれぞれの方向に移動するために使用しま す。 アップ ダウン 左 右 戻るボタン 以前に表示したページに戻るために使用します。 USB タイプ C 充電ポート...
- Page 242 セクション3 起動します 3.1 基本設定 ArtiDiag600 Elite をオンにするには、電源ボタンを 3 秒間押し続けます。以 下の手順に従って、ArtiDiag600 Elite を設定してください。 1. 希望システム言語を選択してください。 図 3-1 2. 適切な地域と時間帯を選択してください。 図 3-2...
- Page 243 3. Wi-Fi 接続を構成してください。 スキャンしたリストから Wi-Fi を選択し、 パスワードを入力します。 図 3-3 4. TOPDON 口座がログインします。( アカウントをお持ちでない方は、メー ルでご登録ください。) 図 3-4...
- Page 244 5. 各アカウントにログインするとホーム画面が表示されます。 図 3-5 注 : システム更新モジュールで新しいバージョンが利用可能な場合は、より良いサ ービスのためにソフトウェアを更新することをお勧めします。 3.2 車輌の DLC に ArtiDiag600 Elite を接続します。 付属の OBD-II 診断ケーブルを使用して、ArtiDiag600 Elite を車両の DHL に 接続します ( 図 3-6 を参照 )。車両の DLC ポートは通常ダッシュボードの下 に配置されています。車両の DLC が正しく ArtiDiag600 Elite へ接続した後、 が に変わります。 DLC ロケーションが問題発生した場合は、ライブラリー > DLC ロケーショ...
- Page 245 図 3-6 注 : ユニットに接続する前に、必ず点火がオフになっていることを確認してくださ い。 3.3 点火を on にします ( 図 3-7 参照 ) キーレススタートシステムを搭載しており、イグニッションスイッチが「エ ンジン始動停止」ボタンの場合 ( 図 3-8 参照 )、「エンジン始動停止」ボタ ンを「オン」になるまで押してください。「エンジン始動停止」ボタンを押 している間はブレーキをかけないでください。そうしないと、「オン」の位 置に置くのではなく、車を始動させます。 点火方法は車種によって異なります。詳細は車両の取扱説明書を参照くださ い。 ENGINE START STOP 図 3-7 図 3-8 これで車両の診断を開始する準備が整いました。...
- Page 246 セクション4 ARTIDIAGを使用ください 4.1 ホーム画面 図 4-1 機能アイコン 診断トラブルコード (DTCs) の読み取り、 DTCs のクリア、 データストリームの表示、 電子制御ユニット (ECU) のバージョン情報 の読み取りなど、 診断機能を実行できます。 診断 車両の排ガス関連診断を実行できます。 OBDII/EOBD...
- Page 247 排出関連システムのステータスを確認する I/M ための迅速なアクセスを提供します。 ( 検査とメンテナンス ) 準備 この機能は、オイルリセット、スロットル 調整、EPB リセット、操舵角度リセット、 DPF 再生、ABS ブリーディング、BMS リセ ット、インジェクターコーディング、TPMS リセット、AdBlue リセット、AFS リセット、 メンテナンス Windows キャリブレーション、および停止 / 開始リセット含む 13 つのメンテナンスサ ービスを提供します。 車両バッテリのリアルタイム電圧を表示し ます。 バッテリ電圧 新しいバージョンが利用可能な場合は、車 両固有の診断ソフトウェアを更新できま す。 更新 レポート ( システムレポート、障害コード レポート、データストリームレポート )、 ライブデータ記録、スクリーンショット、 フォルダ スクリーン記録にアクセスできます。...
- Page 248 OBD-II 一般的な DTC 修理ガイド、技術サ ービス速報、DLC の場所、車両検査、診断、 および修理に関する参照情報を提供する警 ライブラリ 告灯ライブラリが含まれています。 マイプロフィール、ファームウェアアップ デート、顧客フィードバック、ショップ情 報、システムアップデートおよび設定への ユーザー情報 アクセスを提供します。 4.2 診断 診断モジュールでは、サポートされている車両システム「自動スキャン」を スキャンして診断トラブルコード (DTCs) を検出するか、個々のシステムを 選択して バージョン情報の読み取り、 トラブルコードの読み取り、トラブ ルコードのクリア、データストリームの読み取りを実行できます 自動スキャンと個々のシステム診断 車両を識別します 自動スキャンまたは個々のシステム診断を実行するには、まず車両を識別す る必要があります。ホーム画面から診断をタップします。診断画面の上部に VIN と MAKE が表示されます。 図 4-2...
- Page 249 VIN 経由識別 VIN によって、AUTO VIN または ENTER VIN を使用して車両を識別できます。 • Auto VIN - ArtiDiag600 Elite は、車両識別番号 (VIN) を自動的に読み取り、デ コードします。 注 : すべての車両が Auto VIN を介して VIN の自動読取りとデコードに対応して いるわけではありません • ENTER VIN- 手動で車両を識別するために車両 VIN を入力します。 Make 経由で識別 1.MAKE をタップすると、車両の製造元のリストが表示されます。 ③ ①...
- Page 250 ③ 車両バッテリー電圧アイコン 車両バッテリのリアルタイム電圧を表示します。 ④ メーカー ( 自動車メーカー ) オプション 2. 車の製造元を選択または入力します。 注 : MAKE リストのデモモードのデモオプションは、診断機能に慣れるのに役 立ちます。 3. 自動 / 手動 を選択して車両を識別します。 自動 手動で VIIN を入力するか、読取をタップして VIN を取得し、確認をタップ します。ArtiDiag は VIN を自動的にデコードして車両を識別します。 手動 車両を識別するために車両情報を手動で選択します。 車両が識別されると、システムメニューが表示されます。 注 : システムは、車両のメーカー、モデル、および年によって異なる場合があ ります。 図 4-4...
- Page 251 自動スキャン 自動スキャンは、車両でサポートされているシステムを検出し、これらのシ ステムの DTCs 取得し、車両の完全な健康診断を提供します。修理の前後に 自動スキャンを実行すると、トラブルシューティングと修理の検証に役立ち ます。プリスキャンとポストスキャンレポートでは、修理前と修理後の車両 の状態を記録し、比較することができます。 自動スキャンを実行するには、下の隅にある自動スキャンボタンをタップす ると、 ArtiDiag600 Elite が車両がサポートするシステムのスキャンを開始し、 DTC の検索が自動的に開始されます。 結果は、システムがスキャンされるにつれて徐々に表示されます。 図 4-5 ボタン説明 DTCs のクリア : タップすると、取得したすべての DTCs がクリアされます。 レポート - をタップすると、現在のスキャン結果がレポート形式で保存され ます。( 保存されたレポートを表示するには、フォルダ > レポート > システム レポート ) を参照してください。 個々のシステム診断を行います 自動スキャンに加えて、個々のシステムを選択して、バージョン情報の読み 取り、トラブルコードの読み取り、トラブルコードのクリア、データストリ ームの読み取りを実行することもできます。 注 :...
- Page 252 トラブルの読取 1. 車両が特定されたら、システムメニューから DTCs を取得したいシステム を選択します。 2. 機能メニューのトラブルコードの読み取りをタップします。 ArtiDiag は ECU と通信し、現在選択されているシステムの DTCs を取得して 表示します。 3. 右側の をタップすると、特定 DTC のオプションメニューが開きます。 図 4-6 アイコン説明 このアイコンが点灯したら、タップしてウィンドウが開 き、DTC に関する詳細情報を Google で検索することが できます。 アイコンが点灯したとき、タップして DTC の詳細説明を 表示します。 このアイコンが点灯したら、タップして DTC 発生時の静 止画を表示します。 このアイコンが点灯したら、タップして、有益な修理対 策を表示します。...
- Page 253 ボタン説明 レポート - をタップすると、dtcs をレポート形式で保存できます。( 保存され たレポートを表示するには、フォルダ > レポート > フォールト・コード・レ ポート ) に移動します。 DTCs のクリア : タップすると、取得したすべての DTCs がクリアされます。 トラブル・コードをクリアします 1. 車両が特定されたら、システムメニューから DTCs をクリアしたいシステ ムを選択します。 2. 機能メニューのトラブルコードのクリアをタップします。 3.DTCs がクリアされたら、OK をタップします。 注 : 1.DTCs のクリアの手順は、必要な修復が完了した後に実行する必要があり ます。確認が完了すると、ECT に保存されている DTCs とフリーズデータ がクリアされます。 2.DTCs をクリアしている間は、エンジンを起動しないでください。 ライブ・データ...
- Page 254 アイコン説明 リアルタイムのデータストリームを波形グラフに表示す るには、タップします。 ボタン説明 - タップすると表示したいデータストリームを選択しま す。 - タップすると最大 6 つのデータストリームをグラフに表 示します。 - アイコン - タップすると、最大 4 つのデータストリーム を 1 つのグラフに結合して、 比較と観察を容易にします。 - をタップすると、比較と分析のためにリアルタイムのデ ータストリーム情報を記録して保存できます。記録され たデータストリームを見るには、フォルダ > ライブ・デ ータ・記録へ行きます。 - をタップすると、現在のデータストリームの値がレポー ト形式で保存されます。保存されたレポートを表示する には、フォルダ > レポート > データストリームレポート を参照してください。 注 : ライブデータストリームを見るために車両を運転する必要がある場合は、 常に...
- Page 255 4.3 OBDII / EOBD OBDII / EOBD 機能を使用すると、車両のエミッション関連診断を実行でき ます。 4.3.1 OBDII 診断を実行する 1. ホーム画面から OBDII/EOBD をタップします。 2. コミュニケーション方法を選択します : 自動スキャンまたはプロトコル。 図 4-8 自動スキャン - ArtiDiag600 Elite は自動的に車両と通信し、車両が使用してい るプロトコルを識別します。 プロトコル - 通信プロトコルを手動で選択できます。 3. 続行する機能を選択します。...
- Page 256 図 4-9 注 : 車両のメーカーによっては、一部の機能を利用できない場合があります。 典型的な関数オプションには次のものがあります。DTC & FFD、I/M 準備、 ライブデータ、車載モニター、コンポーネントテスト、車両情報、車両状態。 DTC & FFD( フリーズフレームデータ ) この機能は、車両の ECU に保存された DTCs の取得と消去を支援し、エミ ッション関連システムの FFD を表示します。 1.DTCs を読取します この関数は、 エミッション関連システムから取得された DTCs を表示します。 2.DTCs を除去します この機能を使用すると、エミッション関連システムから取得した DTCs をク リアできます。 3.FFD この機能は、エミッション関連の障害が発生したときのデータと動作条件の スナップショットを取得します。 注 : 1.DTCs のクリアの手順は、必要な修復が行われた後に実行する必要があり ます。確認が完了すると、ECU に保存されている DTCs と FFD はクリアさ れます。...
- Page 257 • VIN。 • キャリブレーション ID (CID)。 • 校正検証番号 (CVN)。 • 点火エンジン (IUPR) の使用時性能追跡 • ECU 名 車両状態 この機能は、エンジン、トランスミッション、検出されたコード、MIL ステ ータス、モニタ、プロトコルを含む車両のステータスを表示します。 4.3.2 診断フィードバック ArtiDiag600 Elite を使用すると、診断操作でソフトウェアの問題が発生してい るときに、診断フィードバックを即座に送信できます ( 診断データのログが 自動的に添付されます )。 診断フィードバックを送信するには : 1. この が表示されている画面の右上にあるアイコンをタップします。 2. 問題の種類を選択します。 3. 問題の説明を書きます。 4. 送信をタップしてフィードバックを送信します。...
- Page 258 注 : 診断フィードバック機能は、診断モジュールでのみ使用できます。 4.4 I/M 準備 この機能は、車両上のさまざまな排ガス関連システムが正常に動作している かどうかを確認し、I/M テストの準備が整っているかどうかを確認します。 また、モニターの走行状態を確認したり、車の故障の修理が正しく行われて いるかを確認することもできます。 注 : 車両は検査の準備ができているとみなされ、必要なすべてのテストに合 格した場合にのみ排出ガスを通過させるべきです。 図 4-10 4.5 メンテナンス この機能は、オイルリセット、スロットル調整、EPB リセット、操舵角度 リセット、DPF 再生、ABS ブリーディング、BMS リセット、インジェク ターコーディング、TPMS リセット、AdBlue リセット、AFS リセット、 Windows キャリブレーション、および停止 / 開始リセット含む 13 つのメン テナンスサービスを提供します。 4.5.1 サービス概要 オイルリセット この機能により、エンジン・オイル・ライフ・システムのオイル・サービス ・ランプをリセットすることができます。 エンジンオイルライトシステムは、 車両の走行状況や天候に応じて最適なオイル交換間隔を計算します。エンジ...
- Page 259 ンオイルを交換するたびにオイルリセットが必要です。 スロットル調整 ECU が誤って切断された場合、またはスロットルを交換またはクリーニング した場合は、スロットル適応機能を使用してスロットルアクチュエータを初 期化する必要があります。これにより、ECU のデータが初期状態にリセット され、スロットルがエアインテークを正確に調整できるようになります。 操舵角度リセット ステアリング角度センサを交換した場合、またはステアリング角度が不正確 である場合、またはステアリング角度が中心になっていない場合は、相対ゼ ロ位置を見つけるためにステアリング角度リセット機能を実行する必要があ ります。ECU は、この位置を基準として、左右のステアリングの正確な角度 を計算することができます。 BMS リセット 車のバッテリーを交換した後、車のバッテリー制御ユニットをリセットする 必要があります。これは、制御ユニットが新たに交換されたバッテリに関す る関連情報を一致させることができるように、故障情報 ( 例えば、低バッテ リレベル ) をクリアする。 DPF 再生 この機能は、主にディーゼルパティキュレートフィルターの再生に使用され ます。フィルターの性能を維持するために、燃焼と酸化によって粒子を除去 します。 ABS ブリーディング この機能により、アンチロックブレーキシステム(ABS)の動作状態を確認 するためのテストを実行できます。 次の場合に実行する必要があります。 • ABS に空気が含まれている場合。 • ABS コンピューター、ABS ポンプ、ブレーキマスタシリンダー、ブレーキシ リンダー、ブレーキライン、またはブレーキフルードを交換した場合。...
- Page 260 次の場合に実行する必要があります。 ブレーキパッドとブレーキパッド摩耗センサーが交換されました。 ブレーキパッドインジケーターランプが点灯している。 ブレーキパッドセンサー回路が短絡しているが、回復している。 サーボモーターを交換してください。 AdBlue リセット ディーゼル排ガス処理液 ( 自動車尿素 ) を交換または充填した後、尿素リセッ ト操作が必要です。 AFS リセット この機能は、アダプティブヘッドライトシステムを初期化することができま す。 停止 / スタートリセット この機能は、ECU で隠し機能を設定することにより、自動スタート / ストッ プ機能を開閉することができます ( ハードウェアが対応する隠し機能を車両 に搭載している場合 )。 窓キャリブレーション この機能は、ドアウィンドウのマッチングを実行して ECU 初期メモリを復元 し、パワーウィンドウの自動昇順 / 降順機能を復元することができます。 4.5.2 ステップ サービスリセットを実行するには : 1. ホーム画面からメンテナンスをタップすると、 機能メニューが表示 されます。 図 4-11...
- Page 261 2. 実行する機能を選択します。 3.VIN または MAKE を介して車両を識別します ( 識別操作の詳細については、 自動スキャンにおける車両の識別と個々のシステム診断を参照してくださ い )。次に、選択した機能表示の画面に移動します。 4. 画面の指示に従ってサービスのリセットを実行します。 4.6 バッテリ電圧 この機能は、車両バッテリのリアルタイム電圧を表示します。 図 4-12 4.7 更新 この機能を使用すると、新しいソフトウェアが利用可能な場合に車両固有の 診断ソフトウェアを更新できます。 更新機能を実行するには : 1. ホーム画面から更新をタップすると、更新画面が表示されます。...
- Page 262 図 4-13 2. ダウンロードをタップしてソフトウェアを更新またはダウンロードしま す。 注 : 右上の 選択 をタップして、ソフトウェアを一括選択して更新することもで きます。 4.8 フォルダ この機能は、レポート (ALL、システムレポート、障害コードレポート、お よびデータストリームレポート )、ライブデータ記録、スクリーンショット、 スクリーン記録にアクセスできます。 図 4-14...
- Page 263 1. フォルダ > レポートをタップします。 2. 特定のレポートを選択して、そのレポートの詳細を表示します。 4.8.2 ライブデータ記録 1. フォルダ > ライブデータ記録をタップして、記録されたデータストリーム のリストを表示します。 2. 特定のデータストリームをタップして、そのデータストリームの録画ビデ オを再生します。 4.8.3 スクリーンショット 画面上部のフォルダー > スクリーン rec をタップすると、ArtiDiag600 Elite の 操作中に保存されたスクリーンショットが表示されます。 4.8.4 スクリーン記録 フォルダ > 画面記録をタップすると、ArtiDiag600 Elite の操作中に保存された 画面録画が表示されます。 4.9 ライブラリ 4.9.1 DTC 修理ガイド DTC 修復ガイドは、障害を特定するための一般的な修正や修復手順など、コ...
- Page 264 り、灯の説明、運転への影響、一般的な原因、対応策、関連する FAQs など が含まれます。 警告灯ライブラリを表示するには : ライブラリ > 警告灯ライブラリをタップします。警告灯のリストが表示され ます。希望する警告ランプをタップすると、詳細が表示されます。 4.10 ユーザー情報 ユーザー情報機能は、マイプロフィール、ファームウェアアップデート、顧客 フィードバック、ショップ情報、システムアップデート、設定へのアクセスを 提供します。 4.10.1 マイ・プロフィール ユーザー情報画面でプロフィール写真をタップすると、マイプロフィールペ ージに移動できます。この機能を使用すると、プロフィール写真 / エイリア スの変更、TOPDON ID の閲覧、パスワードの変更、TOPDON アカウントの 削除ができます。 4.10.2 ファームエア・アップデート 新しいバージョンが利用可能な場合は、ファームウェアを更新することがで きます。 4.10.3 顾客へのフィードバック この機能を使用すると、TOPDON アフターセールスチームに製品に関するフ ィードバックを書き込むことができます。 4.10.4 店情報 店情報の情報を保存することができます。 4.10.5 システム更新...
- Page 265 新しいバージョンが利用可能な場合は、ソフトウェアを更新することができ ます。 4.10.6 設定 设定機能を使えば WLAN、时间も曜日、言語 / 部 AutoVIN を設定し、記憶を チェックして ArtiDiag600 Elite をファクトリーに設定して、ArtiDiag600 Elite のバージョン情報を見て更新することもできます。また、サービス項目とプ ライバシーの政策を見て、Auto-Lock 時刻設定、視点タブレット TOPDON 口 座情報ログアウトご利用頂けます。 AutoVIN: この機能を有効にすると、デバイスの VCI が車両の DLC に接続され ていることが検出されると、ArtiDiag600 Elite は自動的に車両診断のための AutoVIN を実行します。この機能はデフォルトで無効になっています。 セクション5仕様 表示画面 1280 * 720 タッチ式スクリーン バッテリ 3350 mAh/3.7 V 電圧範囲をインプットします...
- Page 266 ェクターコーディング、TPMS リセット、AdBlue リセット、AFS リセット、 Windows キャリブレーション、および停止 / 開始リセット含む 13 つのメンテ ナンスサービスを提供します。 Q: 初めて ArtiDiag600 Elite をご使用になる前に、ファームウェアのアップデー トが必要ですか ? A: はい。ファームウェアは自動的に最新バージョンに更新されます。ユーザー 情報 > ファームウェアアップデートをタップして、手動でファームウェアをア ップデートすることもできます。 Q: エンジンが作動中に ArtiDiag600 Elite の画面が点滅するのはなぜですか ? A: それは電磁干渉による正常な発生です。 Q: スクリーンショットの撮影方法は ? A: 下にスワイプしてスクリーンショットをタップし、画面上のアイコンをタッ プしてスクリーンショットを撮影します。保存した画像を表示するには、フォ ルダ > スクリーンショットをタップします。...
- Page 267 セクション7 TOPDON の 1 年間の限定保証 TOPDON は、購入日から 12 ヶ月以内(保証期間)に材料とプロセスが欠陥がな いことを元の購入者に保証します。 保証期間内に報告された欠陥について、TOPDON は技術サポートに基づいて欠 陥部品や製品の修理または交換を分析および確認します。 TOPDON は、デバイスの使用、誤用、や取り付けによる付随的または結果的な 損害に対して責任を持っていません。 TOPDON 保証ポリシーと現地の法律は何かの競合がある場合は、現地の法律に 準拠してください。 次の場合は、この限定保証は無効です。 • 無許可店舗や技術者による誤用、取り外し、変更、修理 • 不注意な処理や不適切な操作 知らせこのマニュアルのすべての情報は、出版時に利用可能な最新の情報 に基づいて、正確性や完全性は保証されていません。TOPDON は予告ない で変更する権利を保持しています。 より多くのサポートのために qr コードをスキャンしてください !
-
Page 268: Compliance Information
COMPLIANCE INFORMATION Regulatory Compliance FCC ID: 2AVYW-AD500O3 IC: 32511-AD500O3 HVIN: ArtiDiag600 Elite FCC & ISED Statement This device complies with Part 15 of the FCC Rules [and contains license-exempt transmitter(s)/receiver(s) that comply with Innovation, Science and Economic Development Canada’s licence-exempt RSS standard(s)]. - Page 269 on, the user is encouraged to try to correct the interference by one or more of the following measures: -- Reorient or relocate the receiving antenna. -- Increase the separation between the equipment and receiver. -- Connect the equipment into an outlet on a circuit different from that to which the receiver is connected.
- Page 270 +86-755-21612590 +1-833-629-4832 (North America) +34 930 038 094 (Europe) EMAIL SUPPORT@TOPDON.COM WEBSITE WWW.TOPDON.COM FACEBOOK @TOPDONOFFICIAL @TOPDONOFFICIAL...
Need help?
Do you have a question about the ArtiDiag600 Elite and is the answer not in the manual?
Questions and answers