Advertisement
- 1 Overview
- 2 Getting Started
- 3 Hardware Features
- 4 Software Features
-
5
Using Your Quantum HD
- 5.1 Volume Control
- 5.2 Multichannel Volume Control
- 5.3 Speaker Switching
- 5.4 Setting the Gain
- 5.5 Display Screens
- 5.6 Stereo Linking
- 5.7 Reamping a Guitar
- 5.8 Using the Optical Inputs/Outputs
- 5.9 Using the Quantum HD as a Standalone Mixer
- 5.10 Using the Quantum HD as an Audio Interface on Mobile Devices
- 5.11 Using the Quantum HD as a Standalone Mic Preamp (ADAT Expansion)
- 6 Specifications
- 7 Technical Support
- 8 Dinner is Served
- 9 Documents / Resources
Overview
Introduction

Quantum HD interfaces provide unmatched sound capture with recallable, next generation MAX-HD microphone preamps, premium industrial design, and unparalleled DAW integration. All you need is a computer with USB connection, a few microphones, cables, powered speakers, your instrument and creativity, and you're ready to record, mix, and release your music.
We encourage you to contact us with questions or comments regarding your PreSonus Quantum HD interface. PreSonus Audio Electronics is committed to constant product improvement, and we highly value your suggestions. We appreciate the support you have shown us through the purchase of this product and are confident that you will enjoy your Quantum interface!
About this manual: We suggest that you use this manual to familiarize yourself with the features, applications, and correct connection procedures for your Quantum interface before trying to connect it to your computer. This will help you avoid problems during installation and setup. This manual covers the operation of both the Quantum HD 2 and Quantum HD 8. Whenever a functional difference is described, the Quantum HD 8's features will be called out first, followed by the Quantum HD 2.
Quantum HD Features
- 8 MAX-HD microphone preamps (2 preamps for the HD 2)
- Back panel combo jacks (both 1/4-inch TRS and XLR)
- + 75 dB microphone preamp range
- 2 instrument inputs (front panel 1/4-inch TS)
- 2 monitor outputs (balanced, 1/4-inch TRS)
- 8 analog line outputs (balanced, 1/4-inch TRS; 2 line outputs for the HD 2)
- 2 mono re-amp outputs (front panel 1/4-inch TS)
- 2 stereo headphone outputs (1 for the HD 2)
- 2 Optical In & 2 Optical Out (ADAT)
- Front panel control of monitor levels and muting
- Control volume for all or some of the outputs with one knob
- Support for multichannel workflows (only applicable to HD 8; up to 9.1)
- Internal, ADAT, S/PDIF or Word Clock (HD 8 only) synchronization capability
- Operation using either a desktop or mobile device (direct connection to host or local network required) using the Universal Control application:
- All settings can be controlled via the Universal Control application
- Up to 32 bit conversion
- Up to 192 kHz sample rate
- 124 dB converters
What's in the Box
Your Quantum HD interface package contains the following:

 Note: All companion software and drivers for your PreSonus Quantum HD interface are available for download from your MyPreSonus user account. Simply visit http://my.presonus.com and register your Quantum HD interface to receive downloads and licenses. For more info on product registration and downloading Universal Control, see Getting Started section.
Getting Started
There's more to your Quantum HD Interface than what comes in the box! Let's take a moment to register your Interface and download Universal Control. Universal Control provides updates and upgrades for the Quantum HD, so make sure to follow the directions below to ensure you get the most out of your new interface.
Product Registration
Your Quantum HD is a powerful audio interface, loaded with professional audio tools and flexible monitoring controls. Before connecting to a computer, please visit www.presonus.com and navigate to the Quantum HD product page to verify the latest system requirements for your interface.
Once you've verified that you meet the latest system requirements, follow these steps:
- Visit My.PreSonus.com and create or log into your user account.

- At the top of your MyPreSonus homepage, click onto the "Register Products" button. After clicking, a dialog window will appear.

- From the dialog window, specify the date you purchased the interface and the serial number on your interface. After you're done, click "Register".

- After clicking Register, another dialog window will appear where you can initiate your Studio One Pro downloads.
- To download Universal Control, navigate to the Quantum HD product page from your MyPreSonus homepage. For more information about Universal Control, check out Universal Control section.


Note: The speed of your processor, amount of RAM, and capacity, size, and speed of your hard drives will greatly affect the overall performance of your recording system. A faster processor and more RAM can reduce signal latency (delay) and improve overall performance.
Universal Control Installation
To download Universal Control, navigate to the Quantum HD product page from your MyPreSonus homepage. The installation process will slightly differ between those with Windows and those with macOS devices.
Installation for Windows
The Universal Control installer will take you through each step of the installation process. This application will install the ASIO drivers. Please read each message carefully. It is recommended that you quit all applications before you start the installation.
Installation for macOS
The Universal Control installer will take you through each step of the installation process. Universal Control will install PreSonus' high-performance audio driver. Universal Control also installs any necessary firmware updates, so it is highly recommended that you install this application. The Universal Control installer will take you through each step of the installation process.
Note: For macOS users, when the installation is complete, you will find the Universal Control application in your Applications folder. It is recommended that you place this in your Dock for easy access.
Firmware Updates
Universal Control fro desktop is designed to verify that your Quantum HD interface has the correct firmware version installed. After you have connected your Quantum HD to an available USB-C port, you will be prompted if your Quantum HD interface needs its firmware updated. Once prompted, click on the "Update Firmware" button to begin the update.

Do not power off or disconnect your Quantum interface during the firmware update. Once the firmware update is successfully completed, you will be alerted and instructed to reboot your device.
Hardware Setup
Now that you've registered your interface and downloaded Universal Control, you're ready to start using your new Quantum HD! Follow the steps below to connect your Quantum HD to the computer:
- Connect the IEC cable (HD 8) or AC adapter (HD 2) from the power outlet to your Quantum HD.
- Connect the provided USB-C to USB-C cable from your Quantum HD to the host computer.
- Connect your monitor speakers, headphones, MIDI device, or any other compatible instrument to the interface. For more information about I/O connections, refer to the Quantum HD Hookup Diagrams.
![]()
Before powering the Quantum HD, lower the volume of your monitor speakers and remove headphones from your ears. - Apply power to Quantum HD by pressing the power switch (located on the front panel of the HD 8 and the back panel of the HD 2).

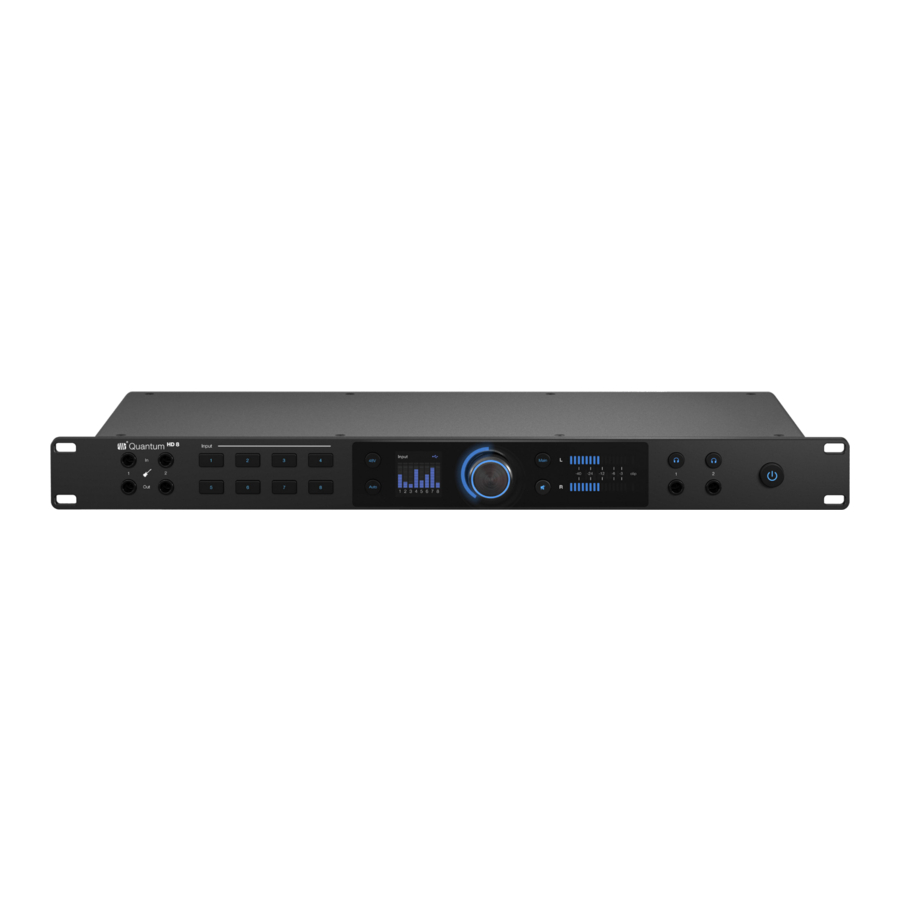
Hardware Features
The following section provides an overview of the front and back panel connections and controls for both the Quantum HD 8 and HD 2 interfaces.
Front Panel

Instrument Inputs - Your Quantum HD audio interface is equipped with two ¼-inch (TS) connectors for use with passive instruments like a guitar, bass, etc.

Note: Any connection made into the front panel ¼-inch port will defeat the corresponding combo jack on the back panel (Channels 1 or 2). For example, if you plugged a ¼-inch guitar cord into input 1 of your Quantum interface, the corresponding back input 1 would no longer be available for use. If you wanted to sing and plug in your guitar at the same time, you could plug your guitar ¼-inch into input 1 and plug an XLR microphone cable into the back panel input 2.
Re-amp Outputs - Your Quantum HD has two dedicated ¼-inch (TS) instrument level outputs. You can use these outputs to send a dry pre-recorded guitar out to an external amplifier for further processing / recording in your DAW.
Note: The impedance for this output is fixed at 100 ohms.

Channel Select Buttons - Pressing the channel select button will select a channel to edit its parameters (the button will change to white when selected).
When in Channel Edit mode:
- The display will switch from all metering to showing the exact gain value plus metering for the currently selected channel.
- The knob will turn white and control the gain level of the selected channel.
- Press the knob to access the channel's settings page.
To return the knob to output control, press either the monitor control or the headphone button. After 10 seconds of inactivity, the knob will switch back to either Monitor Control or Headphone Control mode depending on the last used mode.
Phantom Power - While a channel is selected, pressing the 48V button will turn phantom power on or off; the button will illuminate red when 48V is on or blue when off. When phantom power is on for a channel, the number under the input meter for that channel on the display will turn red.

When a channel is not selected, you can quickly see which channels have 48V on by pressing and holding the 48V button. Channel select buttons with 48V on will illuminate red, and channel select buttons without 48V will illuminate white while the 48V button is being held.
You can quickly turn phantom power On or Off for multiple channels by pressing and holding the 48V button, then pressing the channel select buttons you'd like phantom power applied to (red means 48V is active on that channel, white means it is not active). When the 48V button is released, it will illuminate blue again.
Phantom power is only required for condenser microphones and can severely damage ribbon microphoness. Therefore, switch phantom power off for all channels where it is not required.
Auto Gain Button - After you've selected a channel, press the Auto Gain button to have the Quantum HD automatically set the gain level for the selected channel (for more information about Auto Gain, see Setting the Gain section). Auto Gain is only available for the microphone and guitar inputs (not line level signals).

Note: When not in Channel Edit mode, press the Auto Gain button to activate Auto Gain on multiple channels.
Color Display – Your Quantum HD audio interface has a color display that can show real-time metering, parameter values, and additional menus (see Display Screens section for more information about the display modes).

Illuminated Knob Position - The illuminated ring around the knob shows relative knob position and changes color depending on the active mode. See Display Screens section for more information about how the illuminated knob color indicates display modes.
Control Knob - Quantum HD audio interfaces use a multi-function, endless control knob. This knob can be used to control monitor or headphone volume, channel gain, and navigate menus.

The control knob has three functions:
- Press - Pressing the center of the knob will either change display views while metering is displayed or toggle parameters when in Channel Settings mode.
- Press and hold - Pressing and holding the knob will access the Quantum HD's global settings menu.
- Rotate - Rotating the knob will adjust the volume for outputs (monitor output or headphones), change the preamp gain level for a selected input channel, or navigate menus depending on the context.
Speaker Control ("Main" Button) - Pressing the Main button will switch the knob to control the main output level. This is the default mode for the knob and any other mode, other than Headphone Control, will time out and return to Monitor Control mode.

Mute / Dim Button - By default, pressing the mute button will mute the main outputs. Optionally, when using Universal Control, the mute button can be configured to function as a dim button. The amount of dim applied is -10 dB by default but can also be user defined.

Note:Mute / dim does not affect headphones.
LED Output Level (HD 8 only) - These meters display the signal level before the main output level control.

Headphone Control Buttons - The HD 8 has two headphone control buttons, while the HD 2 has one. Pressing either headphone control button (1 or 2) will enable control of the selected headphone output of the device via the knob (the LED ring will turn green when you press either button). Press either headphone button again to return to Speaker Control mode or just press the Main button.

Note: When in Headphone Control mode, the knob will NOT time out and return to Monitor Control.
Headphone Outputs - The HD 8 has two headphone outputs, while the HD 2 has one. Connect stereo headphones to either ¼-inch TRS stereo jack. By default, both headphone outputs mirror main outputs 1 / 2.

Note: The audio source for each headphone can be changed in Universal Control or Studio One Pro (for example, headphone 1 or 2 can be used to listen to audio being sent to outputs 3 / 4 or additional mixes).
Power On / Off Button - Latching power switch. The power button is located on the front panel of the HD 8 while it is located on the back panel of the HD 2.

Note: For HD 8 users, the LED light in the power switch also shows you the status of clock synchronization (purple means there's no source detected or the interface is searching for a source, while blue means the source has been detected).
Back Panel

Power Input- The Quantum HD 8 is powered via the included, separate IEC (AC) cable, with a universal power supply capable of running any AC mains voltage from 100 to 240 V at 50 or 60 Hz. The Quantum HD 2 is powered via the included, separate AC adaptor (PSU).

Optical In and Out - Two optical in and out ports that can carry 16 channels of digital audio in ADAT format at 44.1 / 48 kHz or 8 channels at 88.2 / 96 kHz. This input is disabled at 176.4 / 192 kHz sample rates. Optical In is also capable of receiving clock from external devices. The Quantum HD 8 can also be used as a standalone ADAT I/O expansion device (see more in Using the Optical Inputs/Outputs section).

USB-C Connector - Connect your Quantum HD Interface to your computer with the supplied USB-C to USB-C cable.

DB-9 Connector:

- MIDI Input and Output - One 5-pin MIDI input port and one 5-pin MIDI output port for sending and receiving MIDI data between your computer and external MIDI devices.
- S/PDIF In and Out - Two RCA jacks carrying two-channel digital audio in or out in the S/PDIF format. Routing of S/PDIF can be changed in Universal Control. The S/PDIF Input appears as Inputs 9 and 10 and Outputs 9 and 10.
Word Clock In and Out (Only HD 8 interfaces) - A BNC connector carrying the Quantum HD 8's word clock. This is used to synchronize other digital audio equipment.

Monitor Outputs - Use main 1 and 2 to connect to your primary set of studio monitors. The monitor outputs are also DC coupled for sending control voltages.
Line Outputs – The Quantum HD 8 includes eight TRS line outputs on ¼-inch jacks, while the HD 2 includes 2. Use main 1 and 2 to connect to your primary set of studio monitors. Outputs 3 and 4 can be used for additional monitors to A - B (Main 1/2 vs Out 3/4) or be used to send audio to outboard FX processors, etc. All line outputs are also DC coupled for sending control voltages.

Microphone / Line Combo Inputs – The Quantum HD series features PreSonus MAX-HD microphone preamplifiers for use with many types of microphones. The Quantum HD 8 has eight preamps, while the Quantum HD 2 has two.

MAX-HD preamps are ultra-low noise with a gain range of 0 to +75dB, allowing you to boost signals with minimum background noise. Line inputs have a trim range of plus or minus 12 dB to boost or reduce the signal. When a line level signal is connected to the 1/4-inch port of combo input, the microphone preamp is bypassed.
Quantum HD 8 Hookup Diagram

Note: Using the front Instrument Inputs disables the corresponding inputs on the rear panel. Unplug from the front panel to access back panel Inputs 1 & 2.
Quantum HD 2 Hookup Diagram

Note: Using the front Instrument Inputs disables the corresponding inputs on the rear panel. Unplug from the front panel to access back panel Inputs 1 & 2.
Software Features
Universal Control
Universal Control is both a driver-management utility and software control interface for your Quantum HD. Universal Control provides the following:
- Hardware control - All of Quantum's front panel hardware controls can be controlled using Universal Control, facilitating easy hardware manipulation even if Quantum is installed in a location out of reach of the computer operator.
- Low-latency monitoring - Using Universal Control eliminates the latency associated with DAW I/O buffering that makes monitoring problematic for the performer. By removing the DAW's software input monitoring feature from the monitoring signal flow altogether, the need to adjust I/O buffer sizes and latency is no longer an issue.
- Send / Cue buses - Universal Control has stereo aux buses, with independent send levels per input.
- Configuration management - Universal Control configurations can be saved and loaded to / from disk as Scenes, for convenient and unlimited session management.
For more information about Universal Control, Studio One Pro software integration, how to use Universal Control and more, download the Quantum USB Software Reference Manual from your MyPreSonus account or in the Support dropdown menu of the Quantum HD product page on PreSonus.com.
Studio One Pro and Other Popular DAWs
The Quantum HD interface is compatible with any audio-recording application that supports Core Audio, WDM, or ASIO. To make the process of creating new music as seamless as possible, all PreSonus professional recording products come with Studio One Pro recording and production software.
Your purchase of the Quantum HD comes with a perpetual license of Studio One Pro and one year subscription to Studio One Pro+, a state-of-the-art audio recording, editing, mixing and mastering suite.
After registering your Quantum HD, your Studio One Pro downloads will be available from within your MyPreSonus user account. Download the Studio One Pro installer from your MyPreSonus account.

- Windows users: Launch the Studio One Pro installer and follow the onscreen instructions.
- Mac users: Drag the Studio One Pro application into the Applications folder on your Mac hard drive.
The first time you launch Studio One Pro, you will be prompted to install its companion content. Select the content you wish to add and click "Install." The content will automatically begin to download and install from your MyPreSonus user account.

Operating instructions for Studio One Pro is beyond the scope of this Owner's Manual, but Studio One Pro comes bundled with an array of demo and tutorial materials. Instructions are also available in the Studio One Pro Reference Manual and via our online Knowledge Base page.
If you're using another DAW, please consult the documentation that came with your DAW for specific instructions on how to select the Quantum HD driver as the audio-device driver for your software.
Using Your Quantum HD
Once you've registered your new Quantum HD interface and downloaded all the required software, you are ready to start using the interface! The sections below detail how to use your Quantum HD.
Volume Control
When in Monitor (blue) or Headphone (green) control mode, rotating the control knob clockwise will increase the volume, while rotating the knob counterclockwise will decrease the volume. While turning the encoder, the display will switch from metering to showing the exact volume value then time out back to metering.

Multichannel Volume Control
Quantum HD allows the knob to be a master volume level knob for some or all connected speakers for use in multichannel mixing environments. In Universal Control's mixer settings, you can assign the speakers you'd like to control with the knob.
While turning the control knob, the display will switch screens from metering to displaying the exact output volume value of the monitors.
Note: Multichannel volume control is not available if Speaker Switching is active (for more information about Speaker Switching see Speaker Switching section). See the "Quantum USB Software Reference Manual" for more information about how to use Universal Control to make the most of your HD interface.
Sends and FlexChannel
Output channels that are used in Multichannel Output mode are unavailable for FlexChannel routing (sends and returns).
If a FlexChannel output is in use before entering Multichannel Output mode, the FlexChannel output will be reassigned to the multichannel output and return to its original assignment when leaving Multichannel Output mode.
Speaker Switching
The Quantum HD series allows one to check their mix on different speaker sets (A and B) to ensure a mix translates well. Activate a Speaker Switching mode in Universal Control to change the behavior of the Main button.
When Speaker Switching is enabled in Universal Control, pressing the Main button will follow the toggle behavior set in Universal Control. While the knob is in Main output control mode (blue) and Speaker Switching is active:
- Press the Main button to switch to an alternate (B) speaker set.
![]()
- The Main button will change to purple while the alternate speakers are active.
- Press the Main button again to switch back to the original speaker set.
![]()
Depending on the mode selected (A - B or A - A+B), the screen will temporarily show which speaker set is selected.
![]()


Note: See the "Quantum USB Software Reference Manual" for more information about Speaker Switching via Universal Control.
Setting the Gain
Channel Gain
After pressing the button for the channel that you are setting the gain for, the display screen will switch from all metering to displaying the exact gain value plus metering for the currently selected channel. Additionally, the illuminated ring around the control knob will turn white.

Turning the control knob clockwise will increase the gain level of the selected channel in steps of 1 dB, and turning the knob counterclockwise will decrease the gain level of the selected channel in steps of 1 dB.

Note: While setting the gain, use the input meter to ensure a strong signal without clipping (the top bar of the meters will illuminate red when clipping occurs).
Auto Gain for Single Channels
The Auto Gain button on your Quantum HD interface automatically sets the gain level for the channel(s) you'll be using. Please note that Auto Gain is available for microphone and guitar inputs only. If you would like Auto Gain applied to a single channel, follow the directions below:
- Press the number of the channel that you are setting the gain for.
![]()
- Press the Auto Gain button.
![]()
- Auto Gain will go into "listening" mode for 10 seconds.
- While "listening", the Auto Gain button and the knob (cap) will turn red. The illuminated ring around the knob will also act as a countdown timer.
![]()
- When Auto Gain starts to "listen", begin playing or singing the loudest you think you'll be while recording.
- After 10 seconds, the knob (cap) will blink green 3 times if successful, then the knob and ring will return to white again showing the new gain position.
- The screen will show "Complete":
![]()
- If Auto Gain cannot determine the best level, the knob (cap) will blink red 3 times and the knob will return to the last known gain level position (white).
- The screen will show "Try Again":
![]()
- The screen will show "Try Again":


Auto Gain for Multiple Channels
In other situations, you may want to set Auto Gain for multiple channels at once. Please note that Auto Gain is available for microphone and guitar inputs only. While in Main or Headphone output knob modes (meters are shown), follow the directions below:
- Press the Auto Gain button.
![]()
- The channel select buttons will be white, and the screen will change to the "Select Channel" display screen:

- The channel select buttons will be white, and the screen will change to the "Select Channel" display screen:
- Press the channel select buttons that should be set automatically by Auto Gain.
![]()
- When a channel is selected, the button will turn solid red.
- If no channels are selected, and Auto Gain is pressed again then Quantum HD will return to the last known monitor mode (main or headphone).
- When you've finished selecting channels for Auto Gain, press the Auto Gain button again to go into "listening" mode.
- Auto Gain will go into "listening" mode for 10 seconds.
- While "listening", the Auto Gain button and the knob (cap) will turn red. The ring around the bottom of the knob will also act as a countdown timer.
- This screen will change to the "Listening" screen:
![]()
- When Auto Gain starts to "listen", begin playing or singing the loudest you think you'll be while recording.
- After 10 seconds, the knob (cap) will blink green 3 times if successful, then the knob and ring will return to white again showing the new gain position.
- The screen will show "Complete":
![]()
- If Auto Gain cannot determine the best level, the knob (cap) will blink red 3 times and the knob will return to the last known gain level position (white). The display will change to the "Try Again" display screen:
![]()


While Auto Gain is "listening" (single or multi):
- Pressing the Auto Gain button will cancel Auto Gain and return to the last known gain level position for the selected channel.
- Pressing a different channel select button will also cancel Auto Gain and select the corresponding channel.
- Pressing the Main or headphone buttons will also cancel Auto Gain and change the knob to control output level for the corresponding mode.
- Pressing 48V will have no effect until "listening" is complete.
- Pressing mute (or dim depending on how it is set up in Universal Control) will still mute or dim the main outputs and will not cancel Auto Gain.
Display Screens
The display contains metering, values, menus, and other important information. Refer to the subsections below for more information about each available display mode.
Monitor Control Mode

The Monitor Control is the default display screen, and when this mode is in use, the ring around the knob is illuminated blue.

Input Meters - These meters indicate the input level of the analog inputs on your Quantum HD.
Output Meters - These meters indicate the output level on your Quantum HD. As seen in the images above, the output meters are only featured on the HD 2 screen.
Clip Indicator - Indicator will light when input signal reaches -0.5 dBFS. At this level, the signal will begin to overload the analog-to-digital converters and exhibit signs of clipping.
USB Status - Confirms that the Quantum HD is connected to a USB host.
Red USB icon - USB host not detected (stand alone mode)
Blue USB icon - USB host detected
Note: Your Quantum HD Interface will remember the last view selected and return to that screen when a screen timeout occurs or whenever the device is powered off and then back on.
While turning the knob:

- Output Name - Displays the currently selected output name.
- Volume Level Value - Displays the current level value.
- Output meters - These meters display the Main L / R signal level before the main output level control.
Note: After a few seconds of inactivity, the display will return to the last known Monitor Control view.
Headphone Control Mode

When you press the headphone button, the headphone control display will appear on the display screen as you rotate the control knob. The ring around the knob will illuminate green.

Output Name - Displays the currently selected output name.
Headphone Volume Value - Displays the current output level.
Output meters - These meters display the Main L / R signal level before the main output level control.
Channel Edit Mode

To enter Channel Edit mode, press onto the channel button(s) associated with the channel(s) you'd like to edit. The Channel Edit screen will appear on the monitor screen and the ring around the knob will illuminate white.

- Input Name - Displays the channel number and any custom labeling.
- Gain Value - Displays the current gain value.
- Input Meter - This meter indicates the input level of the selected channel.
![warning]() Note: After a few seconds of inactivity, the display will return to the last known Monitor or Headphone Control view.
Note: After a few seconds of inactivity, the display will return to the last known Monitor or Headphone Control view.
Additional Channel Settings

To enter the additional channel settings, press the knob once while in Channel Edit Mode. From here, you can choose to enable or disable a HPF or -20 dB pad:

- HPF (High-Pass Filter) 80Hz - This can be used to cut low-end rumble and other unwanted low frequencies from your recordings. This option is turned off by default.
- 20 dB Pad - Reduces the overall gain level for the channel by -20 dB (microphone only). This option is turned off by default.
Global Settings
To adjust your interface's global settings, press and hold the knob while in Monitor Control mode. From the global settings:
- Turn the knob clockwise or counterclockwise to navigate the parameter list.
- Press the knob while on a parameter to control the value of the parameter.
- Turn the knob to change a parameter's value.
- Press the knob again to change focus back to the global settings list.


- Display Brightness - Adjusts the brightness of the display from 1% (min) to 100% (max).
- 100% (default)
- LED Brightness - Adjusts the brightness of all LEDs from 1% (min) to 100% (max).
- 100% (default)
- Clock Source - Sets the clock source to either:
- Internal (default)
- S/PDIF
- ADAT
- Word Clock (HD 8 only)
- Sample Rate - Sets the sample rate to either:
- 44.1 (default)
- 48
- 88.2
- 96
- 176.4
- 192 kHz
![warning]() Note: Sample Rate is not controllable via the Quantum HD front panel when connected to a computer or mobile device. Use Universal Control or other applications specific to your operating system to change the sample rate.
Note: Sample Rate is not controllable via the Quantum HD front panel when connected to a computer or mobile device. Use Universal Control or other applications specific to your operating system to change the sample rate.
- Standalone Mode (HD 8 Only) - Changes whether Quantum HD acts as a standalone mixer or as a standalone mic pre for use with ADAT enabled audio interfaces. Set the mode to either:
- Mixer
- ADAT
- Reamp Out - In ADAT expansion mode the "Reamp Out" option just selects between the ADAT inputs. In other words, with this option, you can select which reamp output to mirror out of ADAT outputs (ADAT 1 / 2 or ADAT 3 / 4, etc.). This option would be helpful if you would like to connect another HD 8 that is located in a different room as your primary interface.
- Mobile Mode -
- Off: Use this mode for macOS, Windows, and iOS / iPadOS devices (no channel or sample rate limitations).
- Android: Use this mode for Android OS 14+ devices. This option is best for most applications and supports 2 (QHD 2) or 8 (QHD 8) input channels.
- Android+: This mode is also used for Android OS 14+ devices (for use with specific applications that can access full channel counts).
![warning]() Note: In Android or Android+ modes, sample rate is capped at 48 kHz.
Note: In Android or Android+ modes, sample rate is capped at 48 kHz.
- Reset to Factory Settings - Resets all device parameters to their original settings.
- "No" (default, pressing knob will return to menu navigation)
- "Yes" (pressing the knob will reset device settings)
- Firmware Version - Displays the current device firmware.
Alternate Metering Displays
While in Monitor or Headphone control modes, pushing the knob will cycle through several different metering displays:
- Analog Inputs (Home)

- Analog Outputs
![]()


- ADAT Inputs
![]()
- ADAT Outputs
![]()


Note: ADAT channels that become unavailable due to current sample rate, above 48 kHz as an example, will appear grayed out to indicate the channels are not supported at the current sample rate.
Stereo Linking
Stereo linking turns adjacent mono channels (1 + 2, 3 + 4, etc.) into stereo pairs. When channels are linked as a stereo pair, any control adjustments will affect both channels of the stereo signal identically.
To link channels, follow the instructions below:
- Press and hold the channel select button of an odd numbered channel (like 1, 3, 5, etc.).
![]()
- Then, press the channel select button that is next in the number sequences (for example, press and hold 1, then press 2).
![]()
- Both channel select buttons will turn white when selected to show that they are linked.
- All current control settings of the left channel are copied to the right channel (except pan, as noted below).
- Any changes to gain level or channel settings (like 48V) will now affect both channels.
- Linked channels will be panned hard left and right respectively.


To unlink channels, repeat step one (press the two buttons simultaneously). Channel panning for each channel will return to center when unlinked and the gain level will stay where it was set while linked.
Note: Stereo linking can also be done in Universal Control.
Linking Constraints:
- Only odd numbered channels can be made into a stereo pair (ex., 1, 3, etc.).
- Only similar input types can be linked such as analog to analog, S/PDIF to S/PDIF or ADAT to ADAT.
- Only the same types of input jacks can be linked (for example, a mic input cannot be linked with a line or instrument input).
Reamping a Guitar
Reamping is a powerful tool to fill out the texture in a mix and can become an essential step in recording electric guitar and bass. Reamping is not limited to guitar applications though. It can be used to process anything in your mix, from vocals to synths, kick to piano. There are no rules. Reamping is also the best way to incorporate your stompbox collections into your post-production, "in the box" mix.
The Quantum HD has two dedicated instrument level outputs (output channels 11 - 12). These outputs can be used to send a previously recorded "dry" audio track from your DAW directly to an external amp and/or stompbox effect pedal. Then, the combo microphone inputs can be used to mic the amp and record back into your DAW. These outputs are labeled as Reamp 1 (channel 11) and Reamp 2 (channel 12) in your DAW.
Note: The instrument impedance level is optimally set for re-amping. Output level will be controlled from your DAW.
Using the Optical Inputs/Outputs
In addition to the analog inputs, the Quantum HD has 2 ADAT optical input and output ports. This can provide up to sixteen additional audio inputs at 44.1 / 48 kHz or eight at 88.2 / 96 kHz using a separate 8-channel microphone preamp equipped with an ADAT output.
The 8-channel preamp's ADAT out port connects to the Quantum HD's optical in port with a single TOSLINK optical cable (not provided). Both devices must be synchronized by following the directions below:
- In Universal Control, set the clock source to S/PDIF, ADAT, or Word Clock (HD 8 only).
- Alternatively, long press the Quantum HD knob to access the global settings. Then, navigate to "Clock Source" and press the knob to switch between clock sources.
If your optical expansion is also a Quantum HD 8, the expansion preamps on optical can be controlled via
Universal Control or Studio One Pro (this only works with multiple Quantum HD 8s).
See the Quantum USB Software Reference Manual for additional information about remote controlling ADAT Pre expansion Quantum HDs.
The following applies to the ADAT ports:
- At 44.1 and 48 kHz, ports 1 and 2 each support eight channels of I/O (16 total).
- At 88.2 and 96 kHz, up to four channels of audio are routed per port (8 channels total, when both ports are used).
- All digital is disabled at 192 kHz.
| Sample Rate (kHz) | Input Port 1 | Input Port 2 | Output Port 1 | Output Port 2 |
| 44.1 & 48 | 1 - 8 | 9 - 16 | 1 - 8 | 9 - 16 |
| 88.2 & 96 | 1 - 4 | 5 - 8 | 1 - 4 | 5 - 8 |
| 176.4 & 192 | Disabled | Disabled | Disabled | Disabled |
Note: If only using one, 8-channel ADAT mic preamp with a Quantum HD, Optical Port 1 (in or out) must be used.
Using the Quantum HD as a Standalone Mixer
When not connected to a computer (USB sync light will be solid red), the Quantum HD will send (sum) all analog inputs to Main Outputs 1 and 2. This lets you use the inputs and main outs as a simple mixer to send audio to another mixer, speakers, or listen with headphones when the computer is off. By default, all channel gain levels will be set to minimum as soon as Quantum HD enters standalone mode in order to avoid feedback loops.
When using the Quantum HD as a standalone mixer, you can use the interface to:
- Adjust the volume of the main output with the knob when in Main Output control mode (illuminated with blue light).
- Adjust the volume of the headphone outputs with the knob when in Headphone control mode (illuminated green).
- Adjust the input gain of a channel with the knob when in Channel Edit mode (illuminated white).
- Turn 48V on or off for channels.
- Use single or multi Auto Gain to auto-set gain levels.
- Stereo link channels.
- Mute the main output with the mute button (dim is not available).
All channels are mono by default in this mode. This allows you to hear the channels in the center of the stereo field. Use Stereo Linking to pan channel 1 hard left and channel 2 hard right (or any other channel pairs).
Changes to the following Universal Control mixer settings will be saved to Quantum HD and be retained in standalone mode:
- Channel level, pan position, stereo link, and solo / mute status
- Channel gain and 48V / HPF status / Pad status
- Main and headphone output levels
Note: When not by a computer, you can always plug Quantum HD into a phone or tablet with a USB cable to have full control of Quantum HD with the Universal Control app (see below).
Using the Quantum HD as an Audio Interface on Mobile Devices
Apple devices can have either lightning or USB-C ports. It may be necessary to use a camera connector kit to connect. Only Android devices with USB-C ports are supported.
When plugged directly into a mobile device (iOS, iPadOS, or Android), the Quantum HD series uses the audio driver built into the respective operating system (i.e. class-compliant). As such, only analog inputs and outputs are available due to driver technical limitations. Channels are all mono by default in this mode (class compliant mode). This allows you to hear and record in the center of the stereo field. Use Stereo Linking (described in Stereo Linking section) to pan linked channels hard left and right accordingly.
All analog inputs can be available for assignment in your mobile application as well as each of the output pairs. Not all applications can make use of all inputs and outputs even if the class-compliant driver supports all analog ins and outs.
- For example, using a DAW on iOS, you can select an input channel and assign the input to Quantum HD channel 1. Additionally, you can select an output channel and assign the output to Quantum HD outputs 3 / 4; after assigning the outputs, audio will pass out of Line Outs 3 / 4 at unity.
Output Volume Level control is only possible via the knob for the Main Output 1/2. Any audio sent to other outputs will output at unity. Levels must be controlled via your application!
Using the Quantum HD as a Standalone Mic Preamp (ADAT Expansion)
When using the Quantum HD in ADAT mode, the mic preamps are used as an expansion to an audio interface that supports ADAT optical in and out. The mic preamps will pass signals directly to their corresponding ADAT output. For example, channel 1 will send its signal directly to ADAT output 1 and so on. You can enable ADAT mode in Quantum HD's global settings, under standalone mode.
- Once connected, you can send audio from your DAW directly to any of the available ADAT outputs. For example, from your DAW, you can select a channel and set the output to the external Outputs 17 / 18 (ADAT), assuming a sample rate of 48 kHz or less.
- The HD 2 or HD 8 (connected to computer) knob can control the output volume of ADAT connected HD 8s.
- Any additional HD 8 preamps connected via ADAT to either an HD 8 or HD 2 that's connected to a computer can have their gain and phantom power remote controlled in Universal Control.
Please see the Quantum USB Software Reference Manual for additional information.
Note: Ensure that your expansion audio devices are in sync by setting their sample rates and clock sources to match the audio interface (connected to the computer). If your audio interface is a Quantum HD 8, the power button light will illuminate purple when looking for a clock source (or when no source is found) and remain blue when a source is detected.
Specifications
AD / DA CONVERSION
| Sample Rates | 44.1, 48, 88.2, 96, 176.4, 192 kHz | |
| Bit Depth | 32-bit | |
INPUTS
| Instrument Inputs | ||
| Connector Type | ¼-inch Female | |
| Gain Range | -7 dB to +68 dB | |
| Maximum Input Level | +21 dBu (unbalanced, minimum gain) | |
| Frequency Response | 20 Hz to 20 kHz, +/- 0.1 dB (unity gain, reference 1 kHz) | |
| Dynamic Range | 121 dB (A-weighted, typical) | |
| THD + N | 0.0003% (1 kHz, minimum gain) | |
| Input Impedance | 1M Ohms | |
| Microphone Inputs | ||
| Connector Type | Combo-style, XLR / TRS (digital control, +75 dB mic range) | |
| Maximum Input Level | +18 dBu (balanced, minimum gain) | |
| Gain Range | 0 to +75 dB | |
| Frequency Response | 20 Hz to 20 kHz, +/- 0.1 dB (unity gain, reference 1 kHz) | |
| Dynamic Range | 121 dB (A-weighted, typical) | |
| THD + N | 0.002% (1 kHz, minimum gain) | |
| EIN | -130 dBu (max gain, 150 Ohms, 20 kHz BW, A-weighted) | |
| Input Impedance | 1,600 Ohms | |
| Line Inputs | ||
| Connector Type | Combo-style, XLR / TRS | |
| Maximum Input Level | +18 dBu (balanced, minimum gain) | |
| Frequency Response | 20 Hz to 20 kHz, +/- 0.1 dB (unity gain, reference 1 kHz) | |
| Dynamic Range | 121 dB (A-weighted, typical) | |
| THD + N | 0.001% (1 kHz, minimum gain) | |
| Input Impedance | 10K Ohms | |
| Digital Trim | -12 to +12 dB | |
OUTPUTS
| Main Outputs | ||
| Connector Type | ¼-inch Female, TRS | |
| Maximum Output Level | +18 dBu | |
| Frequency Response | 20 Hz to 20 kHz, +/- 0.2 dB (unity gain, reference 1 kHz) | |
| Dynamic Range | 125 dB (A-weighted, typical) | |
| THD + N | 0.001% (1 kHz, +4 dBu) | |
| Output Impedance | 51 Ohms | |
| Trim Range | -∞ dB to 0 dB | |
| Line Outputs | ||
| Connector Type | ¼-inch Female, TRS | |
| Maximum Output Level | +18 dBu | |
| Frequency Response | 20 Hz to 20 kHz, +/- 0.2 dB (unity gain, reference 1 kHz) | |
| Dynamic Range | 25 dB (A-weighted, typical) | |
| THD + N | 0.001% (1 kHz, +4 dBu) | |
| Output Impedance | 51 Ohms | |
| Re-Amp Outputs | ||
| Connector Type | ¼-inch Female, TS | |
| Maximum Output Level | +4 dBu (Balanced) | |
| Frequency Response | 20 Hz to 20 kHz, +/- 0.3 dB (unity gain, reference 1 kHz) | |
| Dynamic Range | 117 dB (A-weighted) | |
| THD + N | 0.001% (1 kHz, +4 dBu) | |
| Output Impedance | 100 Ohms | |
| Trim Range | -∞ dB to 0 dB | |
| Headphone Outputs | ||
| Connector Type | ¼-inch Female, TRS (1-4) | |
| Maximum Output Level | 11 dBu (50 Ohms) | |
| Frequency Range | 20 Hz to 20 kHz, +/- 0.3 dB (unity gain, reference 1 kHz) | |
| Dynamic Range | 118 dB (A-weighted) | |
| THD + N | 0.001% (1 kHz) | |
| Output Impedance | 33 Ohms | |
| Trim Range | -∞ dB to 0 dB | |
DIGITAL I/O
| S/PDIF I/O | ||
| Connector Type | Phono RCA (1 in, 1 out) | |
| Supported Sample Rates (kHz) | 44.1, 48, 88.2, 96 | |
| ADAT I/O | ||
| Connector Type | Optical TOSLINK (2 in, 2 out) | |
| Format | ADAT Digital Lightpipe with S/MUX II 16 channels at 44.1/48 kHz 8 channels at 88.2/96 kHz | |
| Word Clock I/O (HD 8 Only) | ||
| Specification | AES-11 2009 Annex B | |
| Connector Type | BNC | |
| Jitter | Complies with AES 3-4-2009 (<0.025 UI) | |
| MIDI I/O | ||
| Connector Type | 5-pin DIN (off DB-9) | |
| Synchronization Sources | ||
| Sources | Internal, ADAT, S/PDIF, and Word Clock (HD 8 only) | |
| POWER | HD 8 | HD 2 |
| Connector Type | IEC 3-conductor receptacle | DC Connector |
| Configuration | Internal, Universal | External, Universal |
| Power Input | 100-240V, 50 or 60 Hz | 12V DC, 2A |
| PRODUCT DIMENSIONS | HD 8 | HD 2 |
| Length | 19" (483mm) | 8.5" (215mm) |
| Width | 8.6'' (219mm) | 7.5" (215mm) |
| Height | 1.7'' (44mm) | 1.9'' (28mm) |
| Weight | 6.3lb (2.86 kg) | 2.9lb (1.32 kg) |
Technical Support
PreSonus has a plethora of resources available online, as well as technical support if you come across an issue.
Before requesting technical support, please check the PreSonus Knowledge Base for solutions to commonly asked questions. We have many informational resources available where you're likely to find a solution to any issues you're experiencing—no registration, ticket submission, or wait time required!
For Technical Support, click onto the "Support" tab inside your MyPreSonus account. From here, you can create a new ticket and view both open and closed support tickets. Support for all PreSonus hardware and software products is provided via email. Note that your product must be registered to receive support.
For video Studio One Pro tutorials and product specific guides, visit the PreSonus YouTube Channel.
For information on repairs, visit PreSonus Product Repairs.
Dinner is Served
Added bonus: PreSonus' previously Top Secret recipe for...
Chicken and Andouille Gumbo
Ingredients:
- 1 C All-Purpose flour
- ¾ C Vegetable Oil
- 1 large onion (diced)
- 1 small onion (quartered)
- 6 celery stalks (diced)
- 1 large green bell pepper (diced)
- 3 cloves garlic (2 minced, 1 whole)
- 1 lb link Andouille sausage
- 4 Chicken leg quarters
- 4 qt water
- 4 bay leaves
- 1 tsp thyme
- 1 tsp Old Bay seasoning
- 1-2 C frozen okra, sliced
- ¼ C fresh parsley, minced
- 6-8 eggs (optional)
Cooking Instructions:
- In a large pot, combine whole chicken leg quarters, water, quartered onion, Old Bay, 2 bay leaves and 1 whole clove garlic. Cover and bring to a low boil. Simmer stock until chicken is falling off the bone. Remove the chicken and set aside. Discard the onion, bay leaves, and garlic, reserving the liquid.
- In a heavy saucepan, heat 1 Tbsp of the oil on medium high heat and brown the andouille until it is cooked through. Set aside sausage for later.
- In the same saucepan, add and heat remaining oil. Slowly add flour 1-2 Tbsp at a time, stirring continuously. Continue cooking and stirring the roux until it is a dark brown (it should look like melted dark chocolate). Be careful to not to get the oil too hot or the flour will burn and you'll have to start over.
- Once roux has reached the correct color, add diced onion, celery, green pepper, and minced garlic. Cook until vegetables are very tender. Do not cover.
- Slowly add 1 quart of chicken broth and bring to a low boil, stirring constantly.
- Transfer roux mixture to a soup pot and bring to low boil. Do not cover, the roux will settle on the bottom of the pot and burn.
- Add remaining chicken broth, bay leaves, and thyme. Simmer for 30 minutes.
- While gumbo is simmering, debone and shred chicken and slice the andouille.
- Add chicken and andouille to gumbo and return to a simmer. Simmer for 30-45 minutes.
- Stir in frozen okra and parsley and bring to a rolling boil.
- Optional: Crack one egg into a teacup and quickly pour into the boiling gumbo. Repeat with the other eggs being careful not to cluster them too closely. After all the eggs have risen back to the surface, reduce heat and simmer.
- Correct seasoning with salt and pepper (red, white and/or black) if necessary.
- Serve over rice with potato salad.
Serves 12
Documents / Resources
References
Studio One Pro+
![www.presonus.com]() PreSonus | Wherever sound takes you.
PreSonus | Wherever sound takes you.![presonus.com]() PreSonus | Wherever sound takes you.
PreSonus | Wherever sound takes you.https://s1manual.presonus.com
![www.youtube.com]() PreSonus Audio Electronics - YouTube
PreSonus Audio Electronics - YouTube![legacy.presonus.com]() PreSonus | Wherever sound takes you.
PreSonus | Wherever sound takes you.
Download manual
Here you can download full pdf version of manual, it may contain additional safety instructions, warranty information, FCC rules, etc.
Advertisement


Need help?
Do you have a question about the Quantum HD Series and is the answer not in the manual?
Questions and answers