Advertisement
- 1 Overview
- 2 Getting Started
- 3 Hardware Features
- 4 Software Features
- 5 Using Your Product
- 6 Technical Specifications
- 7 Support
- 8 PreSonus' previously Top Secret recipe for Redfish Couvillion
- 9 Documents / Resources
Overview
Introduction
Thank you for purchasing the PreSonus Quantum ES Audio Interface! Quantum ES interfaces provide unmatched sound capture with recallable, next generation MAX-HD microphone preamps, premium industrial design, and unparalleled DAW integration. All you need is a computer with USB connection, a few microphones, cables, powered speakers, your instrument and creativity, and you're ready to record, mix, and release your music.

About this manual: This manual covers the operation of both the Quantum ES 2 and Quantum ES 4. Whenever a functional difference is described, the Quantum ES 4's features will be mentioned first, followed by the Quantum ES 2. To avoid problems during installation and setup, we suggest that you use this manual to familiarize yourself with the features, applications, and correct connection procedures before trying to connect your Quantum interface to your computer.
Product Features
- 4 PreSonus MAX-HD microphone preamps (2 Preamps for the ES 2)
- + 75 dB microphone preamp range
- Back panel combo jacks (both ¼-inch TRS and XLR)
- 2 instrument inputs (1 for the ES 2)
- 4 TRS line outputs on ¼-inch jacks (2 outputs for the ES 2)
- 2 stereo headphone outputs (1 headphone output for the ES 2)
- Top panel control of monitor levels and muting
- Control volume for all or some outputs with one knob
- High performance, low noise converters: Hear and capture audio with stunning accuracy
- MAX-HD microphone preamps: The next generation of PreSonus preamp design, MAX-HD preamps are clean, transparent, and accurate with enough gain for gain-hungry microphones used in modern recording and broadcast.
- Auto Gain: Before recording, gain levels can be automatically set to capture your best performance.
- Best-in-class LED Metering: Bright and responsive LED metering provides accurate readings for input and output audio levels.
- Studio One Pro integration: Remote control your preamp gain, phantom power, channel settings and more all from Studio One Pro
- Operation using either a desktop or mobile device (direct connection to host or local network required) using the Universal Control application:
- All settings can be controlled via the Universal Control application
- Up to 24-bit conversion
- Up to 192 kHz sample rate
- 115 dB dynamic range
What's in the Box
Your Quantum ES interface package contains the following:

Note: All companion software and drivers for your PreSonus Quantum ES interface are available for download from your MyPreSonus user account. Simply visit http://my.presonus.com and register your Quantum ES interface to receive downloads and licenses.
Getting Started
There's more to your Quantum ES Interface than what comes in the box! Let's take a moment to register your Interface and download Universal Control. Universal Control provides updates and upgrades for the Quantum ES, so make sure to follow the directions below to ensure you get the most out of your new interface.
Product Registration
Your Quantum ES is a powerful audio interface, loaded with professional audio tools and flexible monitoring controls. Before connecting to a computer, please visit www.presonus.com and navigate to the Quantum ES product page to verify the latest system requirements for your interface.
Once you've verified that you meet the latest system requirements, follow these steps:
- Visit My.PreSonus.com and create or log into your user account.

- At the top of your MyPreSonus homepage, click onto the "Register Products" button. After clicking, a dialog window will appear.

- From the dialog window, specify the date you purchased the interface and the serial number on your interface. After you're done, click "Register".

- After clicking Register, another dialog window will appear where you can initiate your Studio One Pro downloads.
Note: The speed of your processor, amount of RAM, and capacity, size, and speed of your hard drives will greatly affect the overall performance of your recording system. A faster processor and more RAM can reduce signal latency (delay) and improve overall performance.


Universal Control Installation
To download Universal Control, navigate to the Quantum ES product page from your MyPreSonus homepage. The installation process will slightly differ between those with Windows and those with macOS devices.
Installation for Windows
The Universal Control installer will take you through each step of the installation process. This application will install the ASIO drivers. Please read each message carefully. It is recommended that you quit all applications before you start the installation.
Installation for macOS
The Universal Control installer will take you through each step of the installation process. Universal Control will install PreSonus' high-performance audio driver. Universal Control also installs any necessary firmware updates, so it is highly recommended that you install this application. The Universal Control installer will take you through each step of the installation process.
Note: For macOS users, when the installation is complete, you will find the Universal Control application in your Applications folder. It is recommended that you place this in your Dock for easy access.
Firmware Updates
Universal Control is designed to verify that your Quantum ES interface has the correct firmware version installed. After you have connected your Quantum ES to an available USB-C port, you will be prompted if your Quantum ES interface needs its firmware updated. Once prompted, click on the "Update Firmware" button to begin the update.

Do not power off or disconnect your Quantum interface during the firmware update. Once the firmware update is successfully completed, you will be alerted and instructed to reboot your device.
Hardware Setup
Now that you've registered your interface and downloaded Universal Control, you're ready to start using your new Quantum ES! Follow the steps below to connect your Quantum ES to the computer:
- Place your Quantum ES interface on an even surface that allows airflow and provides enough space for the connection of input and output cabling.
- Connect the provided USB-C to USB-C cable from your Quantum ES to the host computer.

Before powering the Quantum ES, lower the volume of your monitor speakers and remove headphones from your ears.
- Apply power to Quantum ES by pressing the back panel power switch.
- For more information about I/O connections, refer to the Quantum ES Hookup Diagrams.
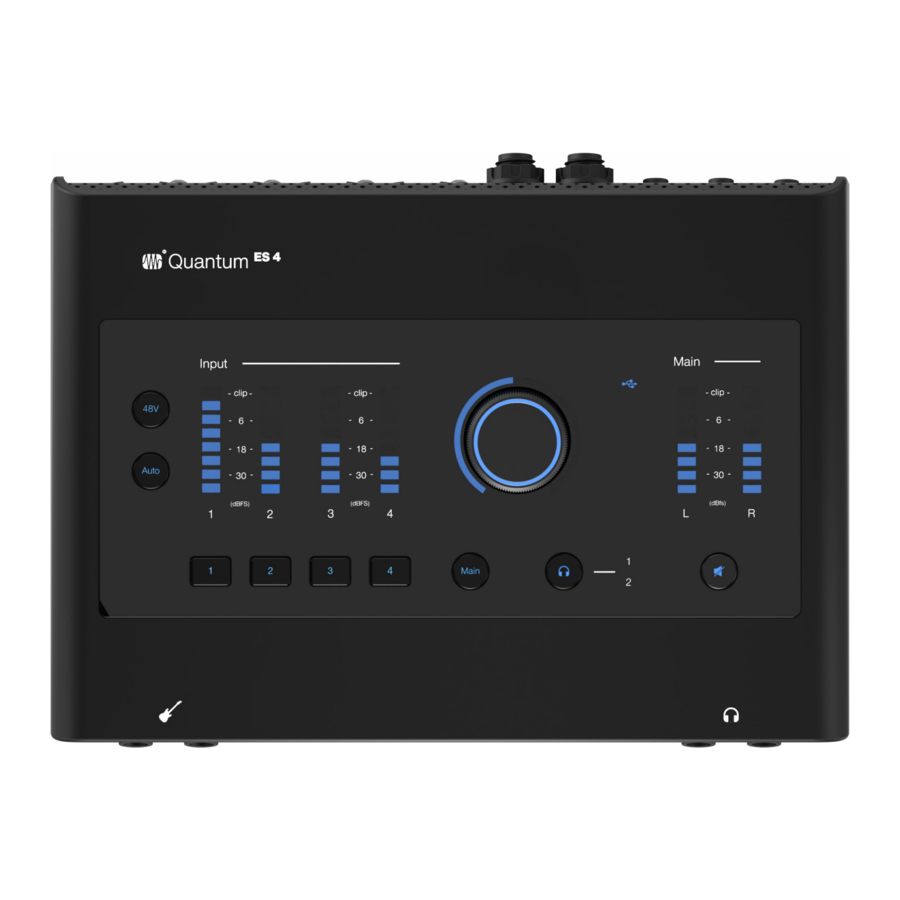
Hardware Features
The following section provides an overview of the front, top and back panel connections and controls for both the Quantum ES 4 and ES 2 interfaces.
Front Panel


Instrument Input – Your Quantum ES audio interface is equipped with TS instrument inputs for use with passive instruments like guitar, bass, etc. The Quantum ES 4 has two instrument inputs, while the ES 2 has one instrument input.
Note: Any connection made into the front panel ¼-inch port will defeat the corresponding combo jack on the back panel (channel 1 for the ES 2, and Channels 1 or 2 for the ES 4). For example, if you plugged a ¼-inch guitar cord into input 1 of your Quantum interface, the corresponding back input 1 would no longer be available for use. If you wanted to sing and plug in your guitar at the same time, you could plug your guitar ¼-inch into input 1 and plug an XLR microphone cable into the back panel input 2.

Headphone Output – Connect stereo headphones to the ¼-inch TRS jacks. The headphone output carries audio routed to Main Outputs L and R. The Quantum ES 4 has two headphone outputs, while the ES 2 has one.
Note: The audio source for each headphone can be changed in Universal Control or Studio One Pro (for example, headphone output 2 can be used to listen to audio being sent to Outputs 3 / 4).
Top Panel


Phantom Power - While a channel is selected, pressing the 48V phantom power button switches phantom power on or off; the button will illuminate red when this function is switched on and blue when switched off.
When a channel is not selected, you can quickly see which channels have 48V on by pressing and holding the 48V button. Channel select buttons with 48V on will illuminate red and channel select buttons without 48V will illuminate white while the 48V button is being held. While the 48V button is being held, you can press a channel select button to turn 48V on or off for that Channel. When the 48V button is released, it will illuminate blue again.
Phantom power is only required for condenser microphones and can severely damage ribbon microphoness. Therefore, switch phantom power off for all channels where it is not required.

Auto Gain Button - When a channel is selected, press the Auto Gain button to have the Quantum ES automatically set the gain level for the selected channel (for more information about Auto Gain, see section "Auto Gain"). Auto Gain is only available for the microphone and guitar inputs (not line level signals).
Note: When not in Channel Edit mode, press the Auto Gain button to activate Auto Gain on multiple channels.

Clip LED - LED will illuminate red when the input signal reaches -0.5 dBFS. At this level, the signal will begin to overload the analog-to-digital converters and exhibit signs of clipping.
Input Meters - These meters indicate the input level of the analog inputs.

USB Status – The LED color shows if you are connected to a device via USB (computer or mobile device).
- Alternating red and blue LEDs indicates that Quantum ES is looking for a device.
- A solid blue LED indicates that Quantum ES is successfully connected to a device.
- A solid red LED indicates that Quantum ES did not detect a device to connect to and is in standalone mode.
- A blinking red LED indicates that Quantum ES will require additional power via the "Aux" port on the back.

Channel Select Buttons - To control the gain level of a specific channel, press the desired channel select button. Press the channel select button again or either the Main or headphone buttons to exit Channel Edit mode.
When in Channel Edit mode:
- Both the button and knob will turn white.
- Turning the knob will control the gain level for the selected channel (see the Stereo Linking section for info on controlling gain for linked channels).
Note:After 10 seconds of inactivity, the knob will switch back to either Monitor Control or Headphone Control mode depending on the last used mode.

Illuminated Knob Position - The illuminated ring around the knob shows relative knob position and changes color depending on the active mode. It shows the current relative position of the knob for either main output, gain, or headphone level.
Control Knob - Quantum ES uses a multipurpose, endless knob. This knob can be used to control either main output, gain, or headphone level.

Speaker Control ("Main" Button) - Pressing the Main button will switch the knob to control the main output level. This is the default mode for the knob and any other mode, other than Headphone Control, will time out and return to Monitor Control.
Speaker Switching is available for Quantum ES 4 users. When Speaker Switching is enabled in Universal Control, pressing the Main button will follow the toggle behavior set in Universal Control. For example, pressing the Main button can toggle between your main speakers and alternate speakers (A - B). For more on Speaker Switching, check out section "Speaker Switching".

Headphone Control Button – Pressing the headphone control button will enable knob control of the headphone output level (encoder will turn green). For the ES 2, simply press the headphone button again to return to Speaker Control mode or just press the Main button.
For the ES 4 users,
- Press the headphone button once to control headphone 1; the number 1 will light up blue.
- Press the headphone button again to control headphone 2; the number 2 will light up blue.
- Pressing the headphone button while headphone 2 is active will switch control back to headphone 1.
The last selected headphone control (1 or 2) is what will be active when the headphone button is pressed. For example, let's say the Main button is pressed while headphone 2 is active. If the headphone button is pressed again, control will return to headphone 2 (the last selected control).
Note: When in Headphone Control mode, the knob will NOT time out and return to Monitor Control.

Output Meters - These meters display the signal level before the main output level control.

Mute / Dim Button - By default, pressing the Mute button will mute the Main outputs. Optionally, when using Universal Control, the mute button can be configured in Universal Control to function as a dim button. The amount of dim applied is -10 dB by default but can also be changed in the Settings Panel of the Universal Control mixer.
Note: Mute / Dim does not affect headphones.
Back Panel


Kensington slot – For use with Kensington or Kensington-style locks, the Kensington slot allows you to lock your interface to a stationary object, such as your desk.

Power On / Off Switch – The push button switch turns the device on and off.
Note: When the device you are connected to does not provide enough power via USB-C, auxiliary power is required (see below).

MIDI Input and Output - One 3.5mm MIDI input port and one 3.5mm MIDI output port receives or sends MIDI data between your computer and external MIDI devices.
Note: Type-B, MIDI 3.5mm to 5-pin DIN adapters are not included.

Auxiliary Power Connector (USB-C) – When the device you are connected to does not provide enough power via USB-C, auxiliary power is required using an additional power cable (not included).
For the ES 4, a USB-C to USB-C cable and corresponding USB-C, 5VDC 2.6A 9W wall plug / external battery is required for auxiliary power.
For the ES 2, a USB-C to USB-C cable and corresponding USB-C, 5VDC 1.8A 13W wall plug / external battery is required for auxiliary power.
USB-A to USB-C cables or adapters will not provide adequate power for either interface.

USB-C Connector - Connect your Quantum ES interface to your computer or mobile device with the included USB-C to USB-C cable or adapter.
Note: Use of a different cable than the included one may affect performance or bus power.

Monitor Outputs – Use the two TRS ¼-inch ports labeled Main to connect your main pair of studio monitors. The monitor outputs are also DC coupled for sending control voltages.
Line Outputs – For the Quantum ES 4, line outputs 3 and 4 can be used either to send line level audio to other devices such as headphone amplifiers for cue mixes or to connect an alternate pair of studio monitors to compare mixes (for more on this, check out the speaker switching section). All line outputs are also DC coupled for sending control voltages.
Note: When Speaker Switching mode is active, cue mixes are not possible and will be deactivated in Universal Control.

Microphone / Line Inputs – Each analog input on your Quantum interface features a combo jack. This convenient connector accepts either a ¼-inch TRS plug or an XLR plug. The Quantum ES 4 includes four PreSonus MAX-HD microphone preamplifiers, while the ES 2 includes two for use with many types of microphones.
MAX-HD preamps are ultra-low noise with a gain range of 0 to +75dB, allowing you to boost signals and minimize background noise. Line inputs have a trim range of plus or minus 12 dB to boost or reduce the signal. When a line level signal is connected to the 1/4-inch port of combo input, the microphone preamp is bypassed.
Quantum ES 4 Hookup Diagram

Note: Using the front Instrument Inputs disables the corresponding inputs on the rear panel. Unplug from the front panel to access back panel Inputs 1 & 2.
Quantum ES 2 Hookup Diagram

Note: Using the front Instrument Input disables Input 1 on the rear panel. Unplug from the front panel to access the back panel Input 1.
Software Features
Universal Control
Universal Control is both a driver-management utility and software control interface for your Quantum ES. Universal Control allows users of other popular DAW applications to access these functions as well.
Universal Control provides the following:
- Hardware control - All of Quantum's top panel hardware controls can be controlled using Universal Control, facilitating easy hardware manipulation even if Quantum is installed in a location out of reach of the computer operator.
- Low-latency monitoring - Using Universal Control eliminates the latency associated with DAW I/O buffering that makes monitoring problematic for the performer. By removing the DAW's software input monitoring feature from the monitoring signal flow altogether, the need to adjust I/O buffer sizes and latency is no longer an issue.
- Send / Cue buses (ES 4 only) - Universal Control has stereo aux buses, with independent send levels per input.
- Configuration management - Universal Control configurations can be saved and loaded to / from disk as Scenes, for convenient and unlimited session management.
For more information about Universal Control, Studio One Pro software integration, how to use Universal Control and more, download the Quantum USB Software Reference Manual from your MyPreSonus account or in the Support dropdown menu of the Quantum ES product page on Presonus.com.
Studio One Pro and Other Popular DAWs
The Quantum ES interface is compatible with any audio-recording application that supports Core Audio, WDM, or ASIO. To make the process of creating new music as seamless as possible, all PreSonus professional recording products come with Studio One Pro recording and production software.
Your purchase of the Quantum ES comes with a six-month subscription to Studio One Pro+, a state-of-theart audio recording, editing, mixing and mastering suite.

After registering your Quantum ES, your Studio One Pro downloads will be available from within your MyPreSonus user account. Download the Studio One Pro installer from your MyPreSonus account.
- Windows users: Launch the Studio One Pro installer and follow the onscreen instructions.
- Mac users: Drag the Studio One Pro application into the Applications folder on your Mac hard drive.

The first time you launch Studio One Pro, you will be prompted to install its companion content. Select the content you wish to add and click "Install." The content will automatically begin to download and install from your MyPreSonus user account.
Operating instructions for Studio One Pro is beyond the scope of this Owner's Manual, but Studio One Pro comes bundled with an array of demo and tutorial materials. Instructions are also available in the Studio One Pro Reference Manual and via our online Knowledge Base page.
If you're using another DAW, please consult the documentation that came with your DAW for specific instructions on how to select the Quantum ES driver as the audio-device driver for your software.
Using Your Product
Once you've registered your new Quantum ES interface and downloaded all the required software, you are ready to start using the interface! The sections below detail how to use your Quantum ES.
Volume Control
Main Output

Press the Main button to enter / return to Main Output control mode.
When the knob is blue it controls the main output volume.
- Turning the knob clockwise increases the volume.
- Turning the knob counterclockwise decreases the volume.
Headphone Output

Press the headphone button to enter / return to Headphone Output control mode.
When the illuminated ring around the knob is green, it controls the headphone volume.
- Turning the knob clockwise increases the volume.
- Turning the knob counterclockwise decreases the volume.
Setting the Gain manually

To set the gain manually, press the number of the channel that you are setting the gain for. The knob base will switch to showing relative gain level, and the knob will turn white.
- Turning the knob clockwise will increase the gain level of the selected channel.
- Turning the knob counterclockwise will decrease the gain level of the selected channel.
- While setting the gain, use the input meter to ensure a strong signal without clipping.
Auto Gain
The Auto Gain button on your Quantum ES interface automatically sets the gain level for the channel(s) you'll be using. Please note that Auto Gain is available for microphone and guitar inputs only.
Auto Gain for a Single Channel
In some situations, you may want to set Auto Gain for a single channel. To do so, follow these directions:
- Press one of the channel select buttons to adjust a channel's gain level.
![]()
- Press the Auto Gain button.
![]()
- Auto Gain will go into "listening" mode for 10 seconds.
- While "listening", the Auto Gain button and the knob (cap) will turn red. The ring around the bottom of the knob will also act as a countdown timer.
- When Auto Gain starts to "listen", begin playing or singing the loudest you think you'll be while recording.
- After 10 seconds, the knob (cap) will blink green 3 times if successful, then the knob and ring will return to white again showing the new gain position.
- If Auto Gain cannot determine the best level, the knob (cap) will blink red 3 times and the knob will return to the last known gain level position (white).


Auto Gain for Multiple Channels
In other situations, you may want to set Auto Gain for multiple channels at once. When in Main Output or Headphone Output modes:
- Press the Auto Gain button.
![]()
- All channel select buttons will be white.
- Press the channel select buttons that should be set automatically by Auto Gain.
![]()
- When a channel is selected, the button will turn solid red.
- If no channels are selected, and Auto Gain is pressed again then Quantum ES will return to the last known monitor mode (Main or Headphone)
- When you've finished selecting channels for Auto Gain, press the Auto Gain button again to go into "listening" mode.
- Auto Gain will go into "listening" mode for 10 seconds.
- While "listening", the Auto Gain button and the knob (cap) will turn red. The ring around the bottom of the knob will also act as a countdown timer.
- When Auto Gain starts to "listen", begin playing or singing the loudest you think you'll be while recording.


After 10 seconds, the knob (cap) will blink green 3 times if successful, then the knob and ring will return to white again, showing the new gain position. If Auto Gain cannot determine the best level, the knob (cap) will blink red 3 times and the knob will return to the last known gain level position (white).
While Auto Gain is "listening" (single or multi):
- Pressing the Auto Gain button will cancel Auto Gain and return to the last known gain level position for the selected channel.
- Pressing a different channel select button will also cancel Auto Gain, and select the corresponding channel.
- Pressing the Main or Headphone buttons will cancel Auto Gain and change the knob to control output level for the corresponding mode.
- Pressing 48V will have no effect until "listening" is complete.
- Pressing the mute button (or dim depending on how it is setup in Universal Control) will still mute or dim the main outputs and will not cancel Auto Gain.
Stereo Linking
Stereo linking turns adjacent mono channels (1 + 2, 3 + 4) into stereo pairs. When channels are linked as a stereo pair, any control adjustments will affect both channels of the stereo signal identically. To link channels, follow the instructions below:
- Press and hold the channel select button of an odd numbered channel (like 1 or 3).
![]()
- Then, press the channel select button that is next in the number sequences (ex., press and hold 1, then press 2).
![]()
- Both channel select buttons will turn white when selected to show that they are linked.
- All current control settings of the left channel are copied to the right channel (except pan, as noted below).
- Any changes to gain level or channel settings (like 48V) will now affect both channels.
- Linked channels will be panned hard left and right respectively.


To unlink channels, repeat step one (press the two buttons simultaneously). Channel panning for each channel will return to center when unlinked and the gain level will stay where it was set while linked.
Note: Stereo linking can also be done in Universal Control.
Linking Constraints:
- Only odd numbered channels can be made into a stereo pair (ex., 1, 3).
- Only the same types of input jacks can be linked (for example, a mic input cannot be linked with a line or instrument input).
Speaker Switching
The Quantum ES 4 allows one to check their mix on different speaker sets to ensure a mix translates well. Activate the Speaker Switching mode in Universal Control to change the behavior of the Monitors Control button.
When the knob is in Main Output control mode (blue):
- Press the Main button to switch to an different alternate speaker set (purple)
![]()
- Press the Main button again to return to the main speaker set (blue)

Note: When Speaker Switching mode is active, cue mixes are not possible and will be deactivated in Universal Control.
Using the Device as a Standalone Mini-Mixer
When not connected to a computer (USB sync light will be solid red), your Quantum ES will send (sum) all analog inputs to Main Outputs 1 and 2. This lets you use the inputs and main outs as a simple mixer to send audio to another mixer, speakers, or listen with headphones when the computer is off. By default, all channel gain levels will be set to minimum as soon as Quantum ES enters standalone mode in order to avoid feedback loops.
What can you do in mini-mixer mode?
- Adjust the volume of the main output with the knob when in Main Output control mode (blue).
- Adjust the volume of the headphone outputs with the knob when in Headphone control mode (green).
- Adjust the input gain of a channel with the knob when in Channel Edit mode (white).
- Turn 48V on or off for channels.
- Use single or multi Auto Gain to auto-set gain levels.
- Stereo link channels.
- Mute the main output with the mute button (dim is not available).
For both Quantum ES interfaces, the channels are mono by default in this mode. This allows you to hear the channels in the center of the stereo field. Use Stereo Linking (described above) to pan channel 1 hard left and channel 2 hard right (or channels 3 and 4).
Changes to the following Universal Control mixer settings will be saved to Quantum ES and be retained in standalone mode, including:
- Channel level, pan position, stereo link, and solo / mute status
- Channel gain and 48V / HPF status
- Main and headphone output levels
Note: When not by a computer, you can always plug Quantum ES into a phone or tablet with a USB cable to have full control of Quantum ES with the Universal Control app (auxiliary power may be required).
Using the Device as an Audio Interface on Mobile Devices
When plugged directly into a mobile device (iOS, iPadOS, Android), Quantum ES interfaces use the audio driver built into the respective operating system (class-compliant).
For both Quantum ES interfaces, the channels are mono by default in this mode (class compliant mode). This allows you to hear and record channels 1 - 4 in the center of the stereo field. Use Stereo Linking (described above) to pan the first channel hard left and the second linked channel hard right.
Power provided by mobile devices varies greatly. For both Quantum ES Interfaces, you should always use a USB-C to USB-C cable when connecting to a mobile device and the USB-C port labeled "Aux" for additional power. Please note the differences in USB-C wall plug requirements between the Quantum ES 4 and ES 2:
- Quantum ES 4 users: if the USB sync light is blinking red, you will need to use a 5V, 2.6A USB-C wall plug with a USB-C to USB-C cable (not included) to power Quantum ES.
- Quantum ES 2 users: if the USB sync light is blinking red, you will need to use a 5V, 1.8A USB-C wall plug with a USB-C to USB-C cable (not included) to power Quantum ES.
Note: Apple devices can have either lightning or USB-C ports. It may be necessary to use a camera connector kit to connect. Only Android devices with USB-C ports are supported
For ES 4 users, all inputs can be available for assignment in your mobile application as well as each of the 2 output pairs (outputs 1 - 4). Not all applications can make use of all inputs and outputs, even if the classcompliant driver supports all analog ins and outs.
For example, using a DAW on iOS, you can select an input channel and assign the input to Quantum ES channel 1. Additionally, you can select an output channel and assign the output to Quantum ES outputs 3 / 4; after assigning the outputs, audio will pass out of Line Outs 3 / 4 at unity.
Output volume level control is only possible via the control knob for the Main Output 1 / 2. Any audio sent to other outputs will output at unity. Levels must be controlled in your music software.
Loopback Audio
(Desktop Only)
Quantum ES audio interfaces allow you to take audio from the operating system or software application and send it to another application for the purpose of recording or live streaming. For example, you can take audio from your operating system (Windows or macOS) and send it to Studio One Pro to record in real-time.
See the Quantum USB Software Reference Manual for more information on selecting audio input sources and output destinations in an application as well as tips on using Universal Control's mixer to balance all of the audio.
Recovery Mode
In the rare case that Quantum ES becomes unresponsive, the firmware can be restored by putting Quantum ES into recovery mode and connecting to Universal Control. To enter recovery mode:
- Ensure the Quantum ES is powered off.
- Press and hold the knob.
![]()
- Power on Quantum ES.
![]()
- The light ring around the knob will blink blue to show that it is in recovery mode.
- In Universal Control, Quantum ES should be listed along with "Update Firmware".
- In Universal Control, click on "Update Firmware" to begin recovery.


Note: If the firmware becomes corrupted for any reason, Quantum ES will power down and the knob will blink red. Follow the process above and use Universal Control to recover the firmware.
Technical Specifications
| AD / DA CONVERSION | ||
| Sample Rates | 44.1, 48, 88.2, 96, 176.4, 192 kHz | |
| Bit Depth | 24-bit | |
| INPUTS | ||
| Instrument Inputs | ||
| Connector Type | ¼-inch Female | |
| Gain Range | -7 dB to +68 dB | |
| Maximum Input Level | +15 dB (unbalanced, minimum gain) | |
| Frequency Response | 20 Hz to 20 kHz, +/- 0.2 dB (Unity Gain, Relative to 1khz) | |
| Dynamic Range | 115 dB (A-weighted, typical) | |
| THD + N | 0.002% (1 kHz, minimum gain) | |
| Input Impedance | 1M Ohms | |
| Microphone Inputs | ||
| Connector Type | Combo-style, XLR / TRS | |
| Maximum Input Level | +14 dBu (balanced, minimum gain) | |
| Gain Range | 0 to +75 dB | |
| Frequency Response | 20 Hz to 20 kHz, +/- 0.2 dB (unity gain, reference 1 kHz) | |
| Dynamic Range | 115 dB (A-weighted, typical) | |
| THD + N | <0.001% (1 kHz, minimum gain) | |
| EIN | -129 dBu (max gain, 150 Ohms, 22 kHz BW, A-weighted) | |
| Input Impedance | 1,600 Ohms | |
| Line Inputs | ||
| Connector Type | Combo-style, XLR / TRS | |
| Maximum Input Level | +15 dBu (balanced, minimum gain) | |
| Frequency Response | 20 Hz to 20 kHz, +/- 0.1 dB (unity gain, reference 1 kHz) | |
| Dynamic Range | 115 dB (A-weighted, typical) | |
| THD + N | 0.001% (1 kHz, minimum gain) | |
| Input Impedance | 10,000 Ohms | |
| Digital Trim | -12 to +12 dB | |
| OUTPUTS | ||
| Main Outputs | ||
| Connector Type | ¼-inch Female, TRS | |
| Maximum Output Level | +15 dBu | |
| Frequency Response | 20 Hz to 20 kHz, +/- 0.2 dB (relative to 1 kHz) | |
| Dynamic Range | 120 dB (A-weighted, typical) | |
| THD + N | 0.001% (1 kHz, +4 dBu) | |
| Output Impedance | 22 Ohms | |
| Trim Range | -∞ dB to 0 dB | |
| Line Outputs | ||
| Connector Type | ¼-inch Female, TRS | |
| Maximum Output Level | +15 dBu | |
| Frequency Response | 20 Hz to 20 kHz, +/- 0.1 dB (unity gain, reference 1 kHz) | |
| Dynamic Range | 120 dB (A-weighted, typical) | |
| THD + N | <0.001% (1 kHz, +4 dBu) | |
| Output Impedance | 51 Ohms | |
| Headphone Outputs | ||
| Connector Type | ¼-inch Female, TRS Stereo | |
| Maximum Output Level | 7.5 dBu (50 Ohms) | |
| Frequency Range | 20 Hz to 20 kHz, +/- 0.2 dB (unity gain, reference 1 kHz) | |
| Dynamic Range | 111 dB (A-weighted) | |
| THD + N | 0.02% (1 kHz) | |
| Output Impedance | 22 Ohms | |
| Trim Range | -∞ dB to 0 dB | |
| POWER | ES 4 | ES 2 |
| Aux Power DC Connector | USB-C (USB-C to USB-C cable required, not included) | |
| Aux Power DC Requirements | 5VDC, 2.6A | 5VDC, 1.8A |
| PRODUCT DIMENSIONS | ES 4 | ES 2 |
| Length | 8.4'' (213 mm) | 6.9'' (175 mm) |
| Width | 6.2'' (157 mm) | 6.2'' (157 mm) |
| Height | 1.9'' (48 mm) | 1.9'' (48 mm) |
| Weight | 1.8 lb (0.81 kg) | 1.5 lb (0.68 kg) |
Support
PreSonus has a plethora of resources available online, as well as technical support if you come across an issue.
Before requesting technical support, please check the PreSonus Knowledge Base for solutions to commonly asked questions. We have many informational resources available where you're likely to find a solution to any issues you're experiencing—no registration, ticket submission, or wait time required!
For Technical Support, click onto the "Support" tab inside your MyPreSonus account. From here, you can create a new ticket and view both open and closed support tickets. Support for all PreSonus hardware and software products is provided via email. Note that your product must be registered to receive support.
For video Studio One Pro tutorials and product specific guides, visit the PreSonus YouTube Channel.
For information on repairs, visit PreSonus Product Repairs.
PreSonus' previously Top Secret recipe for Redfish Couvillion
Ingredients:
¼ C Vegetable oil
¼ C flour
1 onion diced
1 clove garlic minced
1 green pepper diced
3 celery stalks diced
1 14oz can diced tomatoes
1 bottle light beer
2 bay leaves
1 tsp thyme
2 lbs Redfish fillets
Cooking Instructions:
- In a heavy saucepan or large skillet, heat oil on medium high and slowly add flour a tablespoon at a time to create a roux. Continue cooking the roux until it begins to brown, creating a dark blond roux.
- Add garlic, onions, green pepper, and celery to roux.
- Sauté vegetables for 3-5 minutes until they start to soften.
- Add tomatoes, bay leaves, thyme, and redfish. Cook for several minutes.
- Slowly add beer and bring to a low boil.
- Reduce heat and simmer uncovered for 30-45 minutes until redfish and vegetables are completely cooked, stirring occasionally. Break up redfish into bite size chunks and stir in. Add pepper or hot sauce to taste. Do not cover.
- Serve over rice
Serves 6-8
While not one of Southeast Louisiana's more famous dishes, Redfish Couvillion is a favorite way to serve our favorite Gulf fish. Also known as Reds or Red Drum, Redfish is not only fun to catch, it's also delicious!
Baton Rouge • USA
www.presonus.com
Documents / Resources
References
Download manual
Here you can download full pdf version of manual, it may contain additional safety instructions, warranty information, FCC rules, etc.
Advertisement


Need help?
Do you have a question about the Quantum ES Series and is the answer not in the manual?
Questions and answers