Advertisement
Introduction
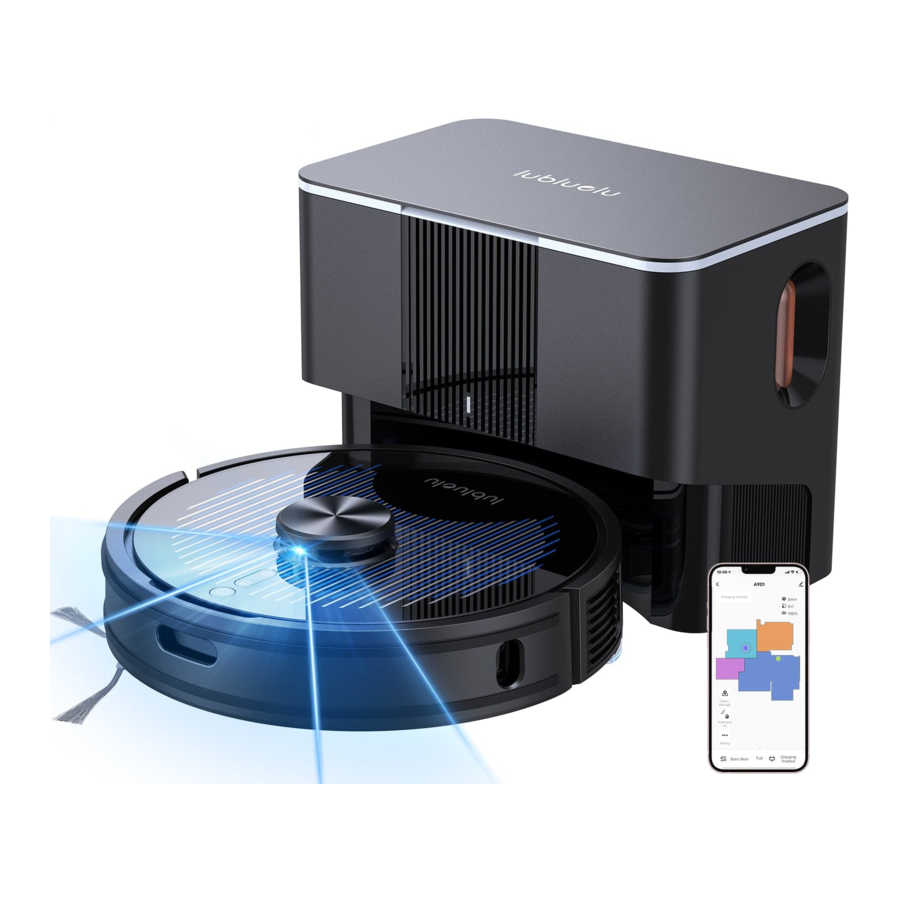
Packing List

Main Unit

Sensor and Structure

2-in-1 Dustbin & Water Tank

Dust collection charging base station

Installation and APP Connection
Notices

Please sort out the wires, debris and fragile, unstable, valuable and potentially dangerous objects on the ground before starting the device.

Do not try to clean plenty of water with the robot.

Avoid personal injury or property damage caused by entanglement, jamming, dragging, or bumping of equipment.

When used in a suspended circumstance, it shall be protected by rails to avoid accidental falling or pushing other articles from falling; otherwise, personal or property damage may be caused.
- Remove the protective strips.
![]()
- Align the side brush with the hole and tighten the screw.
![]()
- Place the dustbin & charging base on a flat ground against the wall away from the steps, then power on the charging base.
Note: Keep the base more than 1 meter away from both sides and more than 2 meters away from the front.
The status indicator will light up when the base is powered on.
![]()
- Roll the power cable into the winding bracket to prevent it being dragged or displaced by the robot.
![]()
- Do not move the charging base arbitrarily and keep it away from direct sunlight

- Turn on the power supply and align the electrodes with the pins to start charging.
![]()


Note:
- The Robot cannot be charged when it is powered off.
- Charging time is about 4~5H.
- Don't place any articles within the charging base so as not to affect the robot returning for charging.
Install Mopping Module
- Add water into water tank: Open the tank cover, add an appropriate amount of water and then screw it tight. Do not add any cleaning agent
![]()
- Tighten the water filling lip and press it flat to ensure good sealing effect.
![]()
- Install the bracket and the mop.
![]()
- Install the combination till the sound of 'click' is heard to ensure correct installation.
![]()


Note:
- Do not use the mopping function on the carpet, otherwise the carpet will get wet.
- Install mopping bracket and the mopping-sweeping mode is selected by default both vacuum and mopping), quite mode is also selected by default.
- Without mopping bracket, the sweeping instead of mopping is selected by default (sweeping only).
- Power on the robot according to the figure and align the electrodes with the pins to start charging.
![]()
- Activate the WiFi in phone to connect to 2.4Ghz network.
![]()
- Download App: Search "Smart Life" in Appstore or scan the QR code.


- Registration: Open the APP and complete the registration.
![]()
- .Log in the APP and click "Add Device"/+ Button.
![]()
- Choose "Small Home Appliances – Robot Vacuum (Wi-Fi").
![]()
- Enter the password and click "Next".
![]()
- Press "Child Lock + Charging" for 3 seconds till it flashes and the robot will start network configuration.

- Click "Confirm the Indicator is Blinking" button.
![]()
- Select the AP mode.
![]()
- Click "Next".
![]()
- Then select SMATR LIFE SMATR LIFE -A901 and return.
![]()
- Wait for the connection.
![]()
- Click "Done" to log in APP.
![]()


Use Instructions
Operations
(The robot can't work when it is powered off.)

Start/Pause
Short press 'ON/OFF' button to start robot, press it again to pause. When the robot is on, it will scan the surroundings to generate the map and dynamic cleaning route, and clean the whole room along the edge first then the Zigzag route.

Child Lock
Long press child lock for 3 seconds to activate or inactivate it.
Note: The Child Lock can be controlled through APP.

Charging
Short press the "Charging button" and the robot will return to the base for charging.
Note:
- If the battery is less than 15%, the robot will return the charge base for charging automatically.
- If the battery is more than 80%, then robot automatically returns to the spot it was cleaning before continuing by default (it can be canceled through APP).
- Before the robot is powered on, please clean the cables (including power cord) to avoid the robot being disturbed.
Dustbin Function
When the sweeping is done, the robot will return to charge base for charging and dust collection automatically.

Note:
- When the robot is being charged, the status indicator will flash. When it's fully charged, the indicator will be always on.
- Prior to the dust collection at the base, please confirm the cover has been fully tightened; otherwise, the status indicator will turn red and the APP will report error, then the dust collection will stop.
Function Module
House Cleaning
(default)
- Click "Start Cleaning" to power on the robot.
- Before the first use, the robot will scan the surroundings at home and generate the map with smart area division.
![]()
- According to the existing area division, the robot will start cleaning along the edges to form the sealing zones, then fill in the zones along the Zigzag route and complete the remaining zones.
- After the cleaning, the robot will return to the charge base for charging.

Note:
- To generate the map better, it's recommended to start from the charge base for the first use.
- Do not move the robot arbitrarily when it's working; otherwise, it may enter the repositioning state; if the positioning fails, the robot will give up the previous task and may fail to return for charging.)
Room Clean
- Select "
![]() Up Arrow" and switch to Room Clean in the APP.
Up Arrow" and switch to Room Clean in the APP. - Select the area to be cleaned on the map and click "Start Cleaning"
![]()
- The robot will clean the designated area.

Note:
- Please clear the obstacles around the designated area to ensure the robot can access.
- The map needs to be generated in the APP before use.
Zone Clean
- Select "Zone Clean" in the APP and click "+ Zone Clean" in the right. Select an area to be cleaned on the map and click "Start", the robot will start the cleaning within the customized area.
![]()

Note:
- Please clear the obstacles around the designated area to ensure the robot can access.
- The map needs to be generated in the APP before use.
Point Clean

- Select "Point Clean" in the APP.
- Select a point to be cleaned on the map, then click "Start Cleaning" to start cleaning.
- The robot will move to the designated location and clean an area of 1.5m × 1.5m square with itself as the center, then return to the base for charging.
Note:
- The map needs to be generated in the APP before use.
Forbidden Area

Select "Forbidden Area" in the APP and set the forbidden area, then save the settings and the robot will not access to the set area for cleaning.
Note:
- The map needs to be generated in the APP before use.
- The selected forbidden area should not be too close to the charging base; otherwise, the robot and the APP will report error.
- When robot Vacuum is moved or the domestic environment has significantly changed, the map may become invalid and the restricted area may get lost.
Maintenance
It's recommended to clean the rolling brush every 1~2 weeks.
- Press the release button upward to remove the brush cover.
![]()
- Remove the roller brush.
![]()
- Cut off the hair with the cleaning brush and clean the residues with the brush side.
![]()


Side brush
(clean every 1~2 weeks)
- Clean the hairs with the cleaning brush

- Restore the side brush in the robot after cleaning.

Note: It is recommended to replace the side brush every 3~6 months (especially when the side brush is seriously deformed) for the sake of satisfactory cleaning effect.
2 in 1 dust box water tank and filter assembly
- Remove the 2-in-1 dustbin & water tank.
![]()

Clean the filter assembly (every 1~2 months)
- Open the upper cover of the dustbin, remove the primary filter, sponge and high-efficiency filter.
![]()
- Tap the HEPA for cleaning along the edge of dustbin.
![]()
- Clean the primary filter with the cleaning brush.
![]()
- Wipe the dustbin with a paper tissue to remove the remaining dust
![]()
- If the 2-in-1 dustbin & water tank and filter assembly are washed with clean water, please dry the dustbin & water tank and filter assembly in time.
![]()
- Remove the mop bracket and seepage mop.
![]()
- Rinse and dry the seepage mop and mop bracket.


Notes:
- Please do not add detergent when washing the dustbin with water; make it thoroughly dry after wash.
- It is recommended to replace the HEPA filter every 3~6 months
- If the mopping function is not used for long, please pour out the water in the dustbin & water tank, remove and clean the mop bracket assembly.
Clean the main unit

Clean the infrared bumper sensor (to be cleaned every month)

Clean the edge sensor(to be cleaned every month)

Clean the wall TOF sensor (once a month)

Clean the charging electrodes (once a month)
Clean the Charging Base
- Remove the upper cover.
![]()
- Take out the bag full of dust.
![]()
- Take out the filter for cleaning.
![]()
- Install the filter and new bag.
![]()
- If the duct is blocked by foreign matters, place the robot flat and remove the screws on the lower shell of with a screwdriver.
![]()
- Remove the lower shell and clean the air duct.
![]()
- Clean the charging electrodes of the base (once a month)
![]()


Notes:
- The charging electrodes, the anti-drop sensor and the wall TOF sensor include sensitive electronic components, please wipe with a dry paper tissue for cleaning to prevent component being damaged by wet wipes.

Clean the signal transmitting area (to be cleaned every month)
Battery
- The machine is equipped with high-performance rechargeable lithium-ion battery. For the sake of battery performance, please keep the machine fully charged in daily maintenance.
- If the machine will not be used for a long time, please power it off before storage and charge the battery at least every three months to avoid battery failure.
OTA Firmware Upgrade
- When the firmware needs to be upgraded, it can be done through the APP. The upgrade may take some time and consume some electricity, so it's recommended to complete the firmware upgrade on the base.
Malfunctions and Troubleshooting
| Descriptions | Solutions | |
| Robot cannot be switched on |
| |
| Robot cannot be charged |
| |
| Robot cannot return to charging base |
| |
| Abnoral behaviors | Please power off and restart the robot. | |
| Strange noises when cleaning | The main brush, side brush or wheel may be entangled with foreign objects, please clean up after power off. | |
| Reduced cleaning ability or flashes out of the robot |
| |
| Failed WIFI connection |
| |
| No water seepage or little water seepage although the dustbin & water tank has been installed |
| |
| Serious water leakage from the dustbin & water tank |
| |
| Appointment cleaning cannot be activated |
| |
| The robot fails to continue cleaning |
| |
| The status indicator of the base is always red (abnormal air pressure detection of the base) |
| |
| The base status indicator is flashing red |
| |
| Abnormal noise from the dustbin |
| |
| Robot Status | APP Prompt | Voice Prompt |
| Fall (Anti-Drop Sensor Alarm) | Cliff Sensor Error, please clean the cliff sensor and start the robot away from the cliff. | Anti-drop sensors error, pls put the robot on the ground to start it, please start the robot after putting it on the ground. |
| LDS Abnormal | LDS Error, please check LDS and move robot to new location and start. | Please make sure the LDS LiDAR head is not blocked or stuck. |
| Wheel electricity abnormal | Wheel Error, please turn the wheels and clear by hand. | Please check whether the driving wheel is stuck. |
| Main bumper abnormal | Bumper Error, please clean the bumper and tap it. | Please check and tap the robot main bumper. |
| LDS LiDAR bumper abnormal | LDS Bumper Error, please move robot and tap the LDS bumper. | Please check whether the laser bumper is stuck. |
| Fall (Wheel abnormal) | Wheel is suspended, please put the robot on the ground and start. | Wheel is suspended, please put the robot on the ground to start it. |
| Robot stuck | Robot is stuck, please help robot to get out of trouble. | Please help the robot to get out of trouble. |
| Side brush is abnormal | Side brush is abnormal, please check whether it is entangled. | Please check the side brush whether it is entangled. |
| Rolling brush is abnormal | Roll brush Error, please check roll brush and clean up. | Please check the roller brush whether it is entangled. |
| Charging is abnormal | Dapter Error, please use the specified adapter. | Please use the specified adapter for charging. |
| Anti-drop sensor is abnormal | Cliff Sensor Error, please clean the cliff sensor and start the robot away from the cliff. | Please clean the anti-drop sensors, and start the robot away from the cliff. |
| Robot Leans | Robot tilt, please put robot on the ground and start. | Please put the robot on a level ground to start. |
| Power off charging alarm | Power Off, please turn the power on and recharge. | Please turn the power on and charge. |
| Start at forbidden area and alarm | Forbidden Zone Error, please put robot away from the forbidden area and start. | Forbidden area or virtual wall detected, please move the robot away and restart. |
| Low battery alarm | Low Battery, please charge. | Low battery, please recharge and start. |
| The robot is trapped | The robot is trapped, please remove obstacles around the robot or move robot to a new location to start. | Please remove obstacles around the robot or move robot to a new location to start. |
| TOF sensor is abnormal | Wall Sensor Error, please clean the wall sensor. | Please clean the along wall TOF sensors. |
| Reset factory default | (N/A) | Please start after factory default reset. |
| The robot is trapped | The robot is trapped, please remove obstacles around the robot or move robot to a new location to start. | Please remove obstacles around the robot or move robot to a new location to start. |
*Attention
The status of the robot light indicator for the voice error message is "red light is always on".
Safety Warnings
Application Restrictions
- This machine is used for indoor cleaning only. Do not use the machine outdoors (such as open balcony), on non-floors (such as sofa) or in commercial or industrial places.
- Do not use the machine in the place of cliff without protective rails (such as duplex floors, open balcony, furniture top).
- Do not use the machine in the place more than 40°C or less than 0°C or on the ground with any liquids and viscous substances.
- Please hang up the wires on the ground indoors before use, to avoid the wires being entangled during cleaning.
- Please remove the fragile items and debris (such as vases, plastic bags, etc.) on the ground to avoid valuables being damaged due to obstacles or minor collisions.
- Those with physical, mental or perceptual impairments, including children, are prohibited to use or operate the machine.
- This machine should not be used as a toy by the children. Please keep children and pets away when the machine is working.
- Place the cleaning brush beyond the reach of the children.
- Do not place any objects (including children or pets) on the stationary or moving machine.
- Do not keep any parts of human body or pets such as hair and finger close to the suction port during the cleaning.
- Do not use the machine to clean the burning objects (such as unquenched cigarette butts)
- Do not use the machine to clean the plush carpet (some dark carpets may not be cleaned properly)
- Do not use the machine to clean the hard or sharp objects (such as decoration wastes, glass, iron nails, etc.)
- Do not use the bumper as the handle.
- Please cut off the power before cleaning or maintaining the machine or the charging base.
- Do not wipe any parts of the machine with a damp cloth or any liquid.
- Please strictly abide by the operation instructions. Any losses or injuries caused by improper operation shall be borne by the user.
- Do not activate the mop function on carpets or on top of furniture.
- Please remove the water tank during charging.
![shock hazard]() To reduce the risk of electric shock, this appliance has a polarized plug (one blade is wider than the other). This plug will fit in a polarized outlet only one way. If the plug does not fit fully in the outlet, reverse the plug. If it still does not fit, contact a qualified electrician to install the proper outlet. Do not change the plug in any way.
To reduce the risk of electric shock, this appliance has a polarized plug (one blade is wider than the other). This plug will fit in a polarized outlet only one way. If the plug does not fit fully in the outlet, reverse the plug. If it still does not fit, contact a qualified electrician to install the proper outlet. Do not change the plug in any way.
 To reduce the risk of electric shock, this appliance has a polarized plug (one blade is wider than the other). This plug will fit in a polarized outlet only one way. If the plug does not fit fully in the outlet, reverse the plug. If it still does not fit, contact a qualified electrician to install the proper outlet. Do not change the plug in any way.
Battery and Charging
- Do not use the battery, charging base or charger produced by any third parties.
- Do not disassemble, repair or modify the battery or charging base without authorization.
- Do not keep the charging base close to heat sources (such as radiator).
- Do not wipe or clean the spring contacts of the charging base with a damp cloth or wet hands.
- Do not discard the used battery arbitrarily. The used battery should be handed over to professional recycling agency for proper disposal.
- Do not use the machine if the power cord is broken or wrecked, please buy new power cord through official channels.
- Please power off the machine during transportation. It's recommended to transport the machine with original package.
- If the machine will not be used for a long time, please power it off after being fully charged, then store in a cool and dry place. Charge the battery at least every three months to avoid the battery failure due to excessive discharging.
Documents / Resources
References
Download manual
Here you can download full pdf version of manual, it may contain additional safety instructions, warranty information, FCC rules, etc.
Advertisement


Need help?
Do you have a question about the A901 and is the answer not in the manual?
Questions and answers