Advertisement
Quick Links
THIS INSTRUCTION BOOKLET CONTAINS IMPORTANT SAFETY INFORMATION.
PLEASE READ AND KEEP FOR FUTURE REFERENCE.
60 minutes approx
assembly time
assembly required
This product is intended for domestic use only, not for commercial purposes.
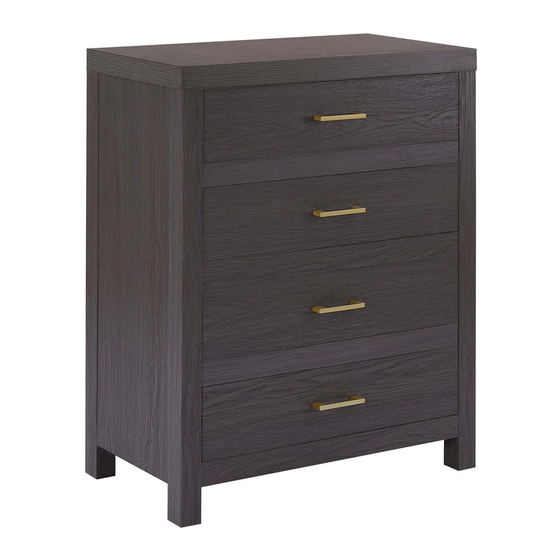
Tall chest
Two adults
Range Name: Piper
Product Dimensions: L79 x W38.9 x H93.7 (cm)
Page 1
Advertisement

Subscribe to Our Youtube Channel
Related Manuals for DUSK Piper Tall chest


Summary of Contents for DUSK Piper Tall chest
- Page 1 Range Name: Piper Product Dimensions: L79 x W38.9 x H93.7 (cm) Tall chest THIS INSTRUCTION BOOKLET CONTAINS IMPORTANT SAFETY INFORMATION. PLEASE READ AND KEEP FOR FUTURE REFERENCE. 60 minutes approx Two adults assembly time assembly required Page 1 This product is intended for domestic use only, not for commercial purposes.
-
Page 2: Care And Maintenance
Important Assembly Tip Before you begin, we advise laying everything out on a clean and soft level surface to avoid damaging the unit or your floor. It's best to identify all of the parts and fittings to build your tall chest, and to familiarise yourself with all of the parts and fittings before building. Top Tip We recommend that you build your new tall chest in the room you'd like it to be located. -
Page 3: Parts Checklist
Parts checklist Please check you have all the parts listed below with your product: Do not discard any of the packaging until you have checked that you have all the parts and the pack of fixings. Page 3... -
Page 4: Tool Required
Fittings checklist Please check you have all the fittings listed below with your product: 36mm Cam bolt x25pcs M15x9.5mm Cam x31pcs M7.8x30mm Wood dowel x38pcs(+2 extra) M3.8x35mm Screw x20pcs M4x35mm Screw x2pcs Drawer connector x8pcs (+1 extra) M3.5x12mm Screw x16pcs M4.7x12.5mm Screw x16pcs Bracket x2pcs (+2 extra) - Page 5 Step 1: 10pcs 4pcs Step 2: 3pcs 6pcs 6pcs Page 5...
- Page 6 Step 3: 2pcs 3pcs 160°~185° Step 4: 2pcs 6pcs 3pcs Page 6...
- Page 7 Step 5: 4pcs 4pcs Step 6: 6pcs 5pcs Page 7...
- Page 8 Step 7: 6pcs 3pcs Step 8: 12pcs 5pcs 3pcs Page 8...
- Page 9 Step 9: 8pcs 2pcs 2pcs Step 10: 8pcs 8pcs Page 9...
- Page 10 Step 11: 2pcs 2pcs Before applying the bracket to the wall, check pipes and cables that may be hidden behind. WARNING: Manufacturer assumes no liability for improper installation or excessive loads placed on screws or bracket. This wall anchor is not a substitute for proper adult supervision.
- Page 11 Step 12: 20pcs 8pcs 16pcs Step 13: 4pcs 4pcs 16pcs 8pcs 4pcs Adjust drawer sides' position by turning Screw (G) clockwise or counterclockwise as necessary. Page 11...
- Page 12 Step 14: 16pcs 16pcs ° Step 15: Page 12...
Need help?
Do you have a question about the Piper Tall chest and is the answer not in the manual?
Questions and answers