Bissell CrossWave HF3 3649 Series Manual
- Manual (8 pages) ,
- Quick start manual (7 pages) ,
- Manual (5 pages)
Advertisement
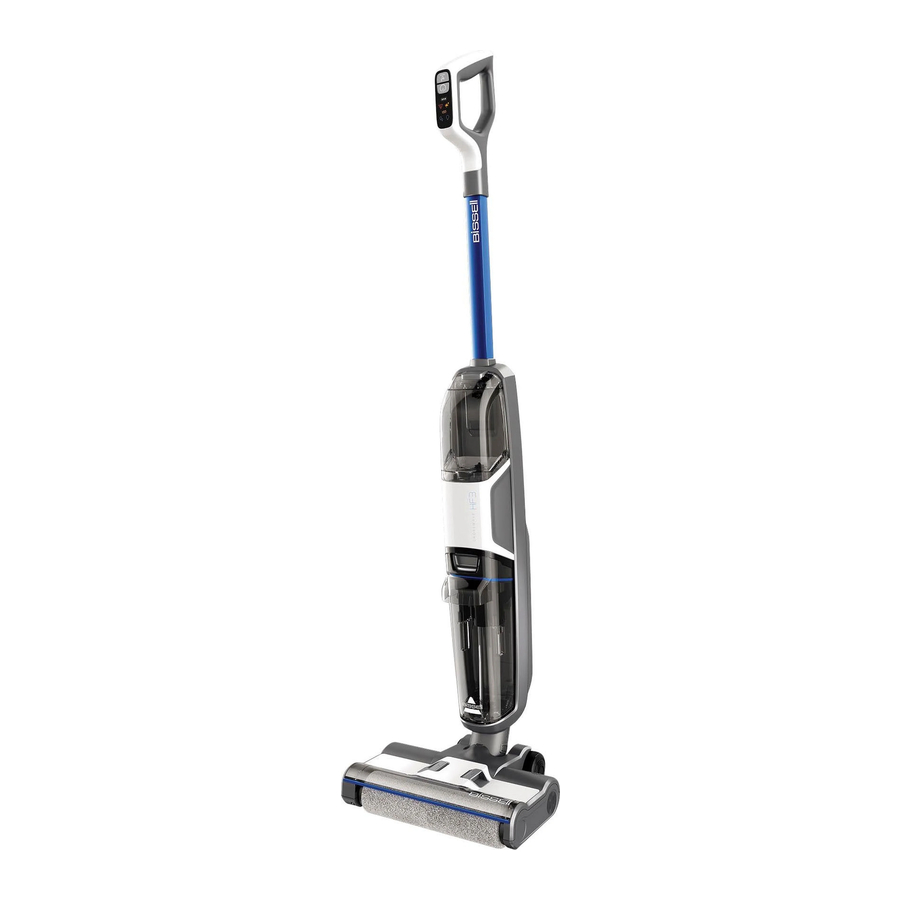
Product Overview

- Clean-Out Cycle Button
- Mode Button
- Power Button
- Clean Water Tank
- Dirty Water Tank Release Button
- Dirty Water Tank
- Brush Roll Window
What's in the Box?

User Interface

- Water Spray Rate Indicator
- Brush Roll Obstruction Indicator
- Dirty Water Tank Full/Missing Indicator
- Error Indicator
- Battery Level Indicator
- Power Activation Switch (machine must be reclined)
- Water Spray Rate Selection Button
- Self-Cleaning Cycle Activation Switch
Assembly & Charging the Battery
 Go to support. BISSELL.com for assembly videos.
- Firmly insert the handle into body of machine until it clicks into place.
![]()
- Plug charging adapter into docking station.
![]()
- Plug the adapter into wall outlet.
![]()
- Place on the docking station to charge.
![]()
- Fully charge machine before first use. Battery icon lights will indicate charge.
![]()
Low Battery: One battery segment will flash blue.
Charging Mode: Blue light will flash according to battery status.
Charging Complete: All three segments will be solid blue.


Filling the Clean Water Tank
Keep plenty of CrossWave® formulas on hand so you can clean whenever it fits your schedule. Only use CrossWave formulas in your machine. Other formulas or household cleaners may harm the machine. Do not use hard floor formula on area rugs or carpet.
- Choose your formula.* Scan the QR code with your smartphone camera or visit BISSELL.com for formulas.
![]()
![]()
- The clean water tank is the top tank on the front of the machine. Press down on the button at the top of the tank and pull to remove.
![]()
- Lift the flap and hold open.
![]()
- Fill machine clean water tank with warm water (140°F/60°C) to water fill line (15 fl. oz.).
![]()
- Then add formula* to the formula line (2.5 fl. oz.) and close flap.
![]()
- Insert tank by lining up bottom edge and pressing until it clicks into place.
![]()


*Compatible BISSELL formulas include: Multi-Surface, Wood Floor, Area Rug, PET Multi-Surface with Febreze Freshness, Hard Floor Sanitize, Simply Multi-Surface Formula

To reduce the risk of fire and electric shock due to internal component damage, use only BISSELL cleaning formula intended for use with the hard floor device.
Cleaning Your Floors
Go to support. BISSELL.com for assembly videos.
- Recline the machine. Press the power button ON.
![]()
![warning]() Note: The unit must be reclined before power button will activate.
Note: The unit must be reclined before power button will activate. - Press the WATER FLOW button to switch between LO and HI Modes.
![]()
LO Mode: Blue light solid
HI Mode: Blue light solid - Solution will dispense automatically. Make forward and backward passes to clean your floors.
![]()
- The dirty water tank indicator will flash red when tank is full or removed.
![]()
- Turn the machine OFF by pressing the power button and return machine to the upright position.
![]()


Cleaning with Hard Floor Sanitize Formula
Please read "DIRECTIONS FOR USE" on Hard Floor Sanitize label. Use on hard nonporous floors only.
- Remove visible soil before cleaning. In HI Mode, make forward and backward passes.
![]()
- Allow floor to remain visibly wet with formula for five minutes. This may require additional passes in HI mode.
![]()
- In HI Mode, make forward and backward passes to extract formula. Allow to air dry.
![]()


 ATTENTION
- This machine is designed to be used on sealed hard floors.
- Do not overwet hardwood floors. Be careful not to run over loose objects or edges of area rugs. Stalling the brush may result in premature belt failure.
Using the Self-Cleaning Cycle
- Place the machine on the docking station. Make sure there is cleaning formula in the clean water tank and the dirty water tank is empty.
![]()
- Press the self-cleaning button to start the cycle. The button light will pulse while cycle is running.
![]()
- Once complete, remove the brush roll to dry. See "AfterCleaning Care" for instructions.
![]()


After-Cleaning Care
- To release dirty water tank, press the button on the top of the dirty water tank, grab the front handle and pull the tank out.
![]()
- Hold the top of the tank near the sides of the filter and pull up to remove.
![]()
- Use the strainer on the clean-out brush to strain debris out of dirty water while pouring into a utility sink or similar waste water receptacle. Dispose of debris in trash and rinse the tank.
![]()
- Remove the filter from the top of the dirty water tank by pulling it up.
![]()
- Wash filter with warm water and mild detergent. Rinse the bottom of the tank cover. Note: Filter must be completely dry before reinstalling.
![]()
- Remove the brush roll cover.
![]()
- Pull the brush roll tab to remove. To remove the brush roll filter, which sits behind the brush roll, pull up on the black tab.
![]()
- The brush roll, window and brush roll filter can be hand washed. Use the cleaning tool to scrub parts.
![]()
- Use the hook on the cleaning tool to remove hair and debris from brush roll.
![]()
- Remove the machine from the dock and wipe out the tray.
![]()
- Leave all parts out to dry for 24 hours before reassembling.
![]()
- Place the end of the brush into the left side of the foot. Press the tab of the brush down so it locks into place.
![]()
- Replace the brush roll window by aligning window with foot. Press the window down until it clicks into place.
![]()
- Reassemble the dirty water tank.
![]()
![warning]() Note: Filter must be completely dry before reinstalling.
Note: Filter must be completely dry before reinstalling. - Insert the bottom of the tank first. Pivot the top toward the machine until it clicks into place.
![]()


Storing Your Machine
Store your machine in a protected, dry area. Since this product uses water, it must not be stored where there is danger of freezing. Freezing will damage internal components and may void the warranty.
NOTICE
To reduce the risk of a leaking condition, do not store machine where freezing may occur. Damage to internal components may result.
To reduce the risk of fire, electric shock or injury, turn power OFF and disconnect plug from electrical outlet before performing maintenance or troubleshooting on the dock.
Troubleshooting
Below are some of the issues you may run into. If you don't see the issue you're experiencing below, visit support. BISSELL.com or contact Consumer Care.
| Problem | Possible Cause | Remedies | |
| Machine is not working. | Dirty water tank full or not seated properly. | Empty and reseat tank. | |
| Brush roll window is not latched in place. | Reinstall brush roll window. | ||
| Machine is not reclined. | Recline machine before pressing power button. | ||
| Reduced or no suction | The suction path is blocked. | Clean the suction path. | |
| The brush roll is entangled by hair and other objects. | Clean the brush roll. | ||
| Abnormal noise in motor operation | The suction path is blocked. | Clean the suction path. | |
| Machine is not charging | Adapter not connected to charging station. | Check adapter connection to charging base. | |
| Dirty water tank icon is flashing | Tank is full or not installed correctly. | Remove, empty and reinstall tank. | |
| Brush roll icon is flashing | The brush roll is entangled by hair and other objects. | Clean the brush roll. | |
| Self-cleaning cycle button is flashing | The cleaning cycle was cut off due to full dirty water tank. | Remove, empty and reinstall tank. | |
| Can't complete self-cleaning cycle | The battery needs to be charged. | Fully charge before use. | |
| Clean water tank is empty. | Refill tank. | ||
| Dirty water tank is full. | Empty tank. | ||
Note: Any other servicing should be performed by an authorized service representative.
To reduce the risk of fire, electric shock or injury, turn power OFF and disconnect plug from electrical outlet before performing maintenance or troubleshooting on the dock.
Warranty
Limited 18-month warranty, may vary by state. Visit support. BISSELL.com or call 1-844-383-2630 for complete warranty information.
NOTICE
Disconnecting the battery will destroy the appliance and invalidate the warranty.
IMPORTANT SAFETY INSTRUCTIONS
READ ALL INSTRUCTIONS BEFORE USING YOUR APPLIANCE.
When using an electrical appliance, basic precautions should be observed, including the following:
TO REDUCE THE RISK OF FIRE, ELECTRIC SHOCK OR INJURY:
- Unplug from electrical socket when not in use, before cleaning maintaining or servicing the appliance.
- Use indoors only.
- Do not immerse. Use only on hard floor surfaces moistened by cleaning process.
- Use only cleaning products intended for use with this appliance to prevent internal component damage. See the Cleaning Formulas section of this guide.
- Do not allow to be used as a toy. Close attention is necessary when used by or near children.
- Do not use for any purpose other than described in this user guide. Use only manufacturer's recommended attachments.
- Do not charge with damaged cable or plug. If appliance is not working as it should, has been dropped, damaged, left outdoors or dropped into water, have it repaired by a qualified technician.
- Do not pull or carry by cord, use cord as a handle, close door on cord, or pull cord around sharp edges or corners. Do not run appliance over cord. Keep cord away from heated surfaces.
- Do not unplug by pulling on cord. To unplug, grasp the plug, not the cord.
- Do not handle plug or appliance with wet hands.
- Do not put any object into openings. Do not use with any opening blocked; keep openings free of dust, lint, hair, and anything that may reduce air flow.
- Keep hair, loose clothing, fingers, and all parts of body away from openings and moving parts of the appliance and its accessories.
- Use extra care when cleaning on stairs.
- Do not use to pick up flammable or combustible materials (lighter fluid, gasoline, kerosene, etc.) or use in areas where they may be present.
- Do not pick up anything that is burning or smoking, such as cigarettes, matches, or hot ashes.
- Do not use without filters in place.
- Risk of injury from moving parts. Brush roll may start unexpectedly. Turn OFF before cleaning or servicing.
- Turn OFF all controls, including the Power Switch and disconnect charger from electrical outlet before making any adjustments, performing maintenance, troubleshooting, changing accessories or storing appliance. Such preventative safety measures reduce the risk of starting the appliance accidentally.
- Recharge only with the charger specified by the manufacturer. A charger that is suitable for one type of battery pack may create a risk of fire when used with another battery pack.
- Use only with Shi Ying Yuan SAW15A-260-0500UD charger or Yinli YLJXA-T260050 charger.
- Battery pack, charging port on the appliance and charger output are not to be short-circuited.
- Do not use appliance that is damaged or modified. Damaged or modified batteries may exhibit unpredictable behavior resulting in fire, explosion or risk of injury.
- Do not expose battery pack or appliance to fire or excessive temperature. Exposure to fire or temperature above 130°C/265°F may cause explosion.
- Follow all charging instructions and do not charge the appliance outside of the temperature range specified in the instructions. Charging improperly or at temperatures outside of the specified range may damage the battery and increase the risk of fire.
- Have servicing performed by a qualified repair person using only identical replacement parts. This will ensure that the safety of the product is maintained.
- Do not modify or attempt to repair the appliance except as indicated in the instructions for use or care.
- Keep the temperature range of between 4-40°C/40-104°F when charging battery, storing unit or during use.
- Do not charge the machine outdoors.
- Do not turn your appliance ON until you are familiar with all instructions and operating procedures.
- This appliance contains batteries that are non-replaceable.
- Do not incinerate the appliance even if it is severely damaged. The batteries can explode in a fire.
- The battery must be removed from the appliance before it is scrapped.
- Keep appliance on a level surface.
- Do not use appliance in an enclosed space filled with vapors given off by oil-based paint, paint thinner, some moth-proofing substances, flammable dust, or other explosive or toxic vapors.
- Do not use to pick up toxic material (chlorine bleach, ammonia, drain cleaner, etc.)
- Do not pick up hard or sharp objects such as glass, nails, screws, coins, etc.
- Plastic film can be dangerous. To avoid danger of suffocation, keep away from children.
SAVE THESE INSTRUCTIONS
THIS MODEL IS FOR HOUSEHOLD USE ONLY.
COMMERCIAL USE OF THIS UNIT VOIDS THE MANUFACTURER'S WARRANTY.

- Keep appliance on a level surface.
- If your appliance has a motorized brush roll, do not leave machine running in the same spot without the handle fully upright.
- To reduce the risk of a leaking condition, do not store where freezing may occur. Damage to internal components may result.
Go to support.BISSELL.com for a comprehensive walkthrough of your new purchase, including videos, tips, support, and more.
Documents / Resources
References
Download manual
Here you can download full pdf version of manual, it may contain additional safety instructions, warranty information, FCC rules, etc.
Advertisement


Need help?
Do you have a question about the CrossWave HF3 and is the answer not in the manual?
Questions and answers