Advertisement
- 1 Product Overview
- 2 What's in the Box?
- 3 Assembly
- 4 Changing the Brush Roll
- 5 Filling the Clean Water Tank
- 6 Cleaning Your Floors
- 7 Emptying the Dirty Water Tank
- 8 Using the Clean-Out Cycle
- 9 After-Cleaning Care
- 10 Storing Your Machine
- 11 Troubleshooting
- 12 IMPORTANT SAFETY INSTRUCTIONS
- 13 Documents / Resources
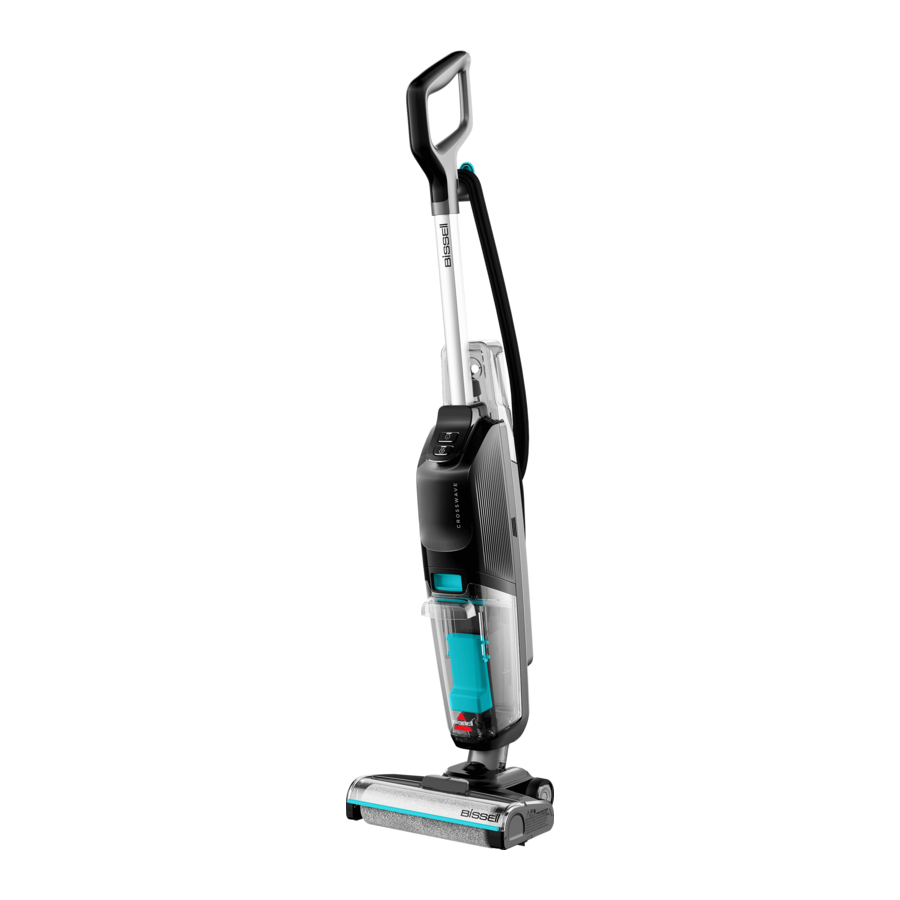
Product Overview

- Handle
- Power Button
- Cleanout Cycle Button
- Clean Water Tank
- Dirty Water Tank Removal Button
- Dirty Water Tank with Filter
- Brush Roll Window Release Button
- Brush Roll Window
Meet your new BISSELL® product!
Go to support.BISSELL.com for a comprehensive walkthrough of your new purchase, including videos, tips, support, and more. Want to get started right away? This guide has all the information you need to set up your new product. Let's take a look...
What's in the Box?
Standard accessories may vary by model. To identify what should be included with your purchase, please refer to the "Carton Contents" list located on the carton top flap.

Assembly
Go to support. BISSELL.com for assembly videos.
 |  |  | ||||||
| 1. Insert handle until it clicks into place. | 2. Insert clean tank into back of machine until it clicks into place. | 3. Wrap cord. To easily unwrap, turn Quick Release™ Cord Wrap down. |
 Note: Remove cardboard insert from bottom of foot before first use.
Changing the Brush Roll
Visit global. BISSELL.com to purchase additional brush rolls.
 |  |  |
| 1. Press button and pull up on tab to remove brush window. | 2. Pull tab to remove brush roll. | 3. Reinstall brush roll. Place end of brush into right side of foot. |
 |  |  |
| 4. Press tab of brush down to lock into place. | 5. Reinstall brush roll window. Align tabs on edges of foot. | 6. Press window so it clicks into place. |
Filling the Clean Water Tank
For additional tips and tricks on filling your tank visit support. BISSELL.com
Keep plenty of CrossWave® formulas on hand so you can clean whenever it fits your schedule. Only use CrossWave formulas in your machine. Other formulas or household cleaners may harm the machine. Do not use hard floor formula on area rugs or carpet.
 |  |  |
| 1. Choose your formula.* Scan the QR code with your smartphone camera or visit BISSELL.com for formulas. | 2. Pull clean water tank up to remove. | 3. Unscrew cap. |
 |  |  |
| 4. Fill clean water tank with warm water (140°F/60°C) to water fill line (21 fl. oz.). | 5. Add formula* to the formula line (3 fl. oz.). | 6. Screw cap back on. Align clean water tank with grooves on back of machine and slide it until it clicks into place. |
*Compatible BISSELL formulas include: Multi-Surface, Wood Floor, PET Multi-Surface with Febreze Freshness, Hard Floor Sanitize, Simply Multi-Surface Pet.
Certain trademarks used under license from The Procter & Gamble Company or its affiliates.
Cleaning Your Floors
For cleaning tips for stuck-on messes and more, visit support. BISSELL.com.
 |  |  | |
| 1. Press power button to turn machine ON. | 2. Recline machine to start brush roll spinning. Brush roll will not spin when machine is upright. | 3. Fluid will begin once machine is reclined and may take up to 10 seconds to fully wet brush roll. Use steady forward and backward strokes to ensure best performance. | |
Note: This product is intended for hard floor use only. Do not use on carpet or area rugs.
Cleaning with Hard Floor Sanitize Formula
Please read "DIRECTIONS FOR USE" on Hard Floor Sanitize label. Use on hard nonporous floors only.
 |  |  | |||
| 1. Remove visible soil before cleaning. Make forward and backward passes. | 2. Allow floor to remain visibly wet with formula for five minutes. This may require additional passes. | 3. Make forward and backward passes to extract formula. Allow to air dry. | |||
Emptying the Dirty Water TankGo to support. BISSELL.com | |||||
 |  |  | |||
| 1. Press button on top of dirty water tank, grab front handle and pull out. | 2. Hold top of tank near sides of filter and pull up to remove. | 3. Pour dirty water into a sink or similar wastewater receptacle and thoroughly rinse tank. | |||
Using the Clean-Out Cycle
Go to support. BISSELL.com
Note: Empty dirty water tank before beginning and make sure filter stays dry. Use clean-out cycle after each use.
 |  |  | |
| 1. Make sure water reaches clean-out cycle line on clean water tank. Refill with water if needed. | 2. Plug in machine and place in storage tray.
| 3. Press the clean-out cycle button to begin. | |
After-Cleaning CareFor more helpful maintenance tips, check out support. BISSELL.com. | |||
 |  | | |
| 1. Remove brush roll. Pull brush roll tab and let dry completely. If brush roll window is dirty, wipe excess dirt or rinse to clean. | 2. Remove machine from tray and wipe excess water or dirt. | 3. Empty dirty water tank and strainer. | |
 |  |  | |
| 4. Remove filter from lid. Open screen and remove debris. | 5. Wash filter in warm water and mild detergent. Clean and dry filter after each use. Replace every 3 months. | 6. Rinse the bottom of the tank cover to remove wet debris. | |
 |  |  | |
| 7. Let parts air dry for 24 hours before next use. | 8. Reinstall brush roll. Reinstall filter, strainer, and tank lid. | 9. Insert bottom of tank first. Pivot top toward the machine until it clicks. | |
Note: Any other maintenance or servicing not included in this manual should be performed by an authorized service representative.
Storing Your Machine
When finished using the product, wrap cord around cord wrap for storage. Store machine indoors in a dry location in an area where the product is not likely to get damaged.
Troubleshooting
Below are some of the issues you may run into. If you don't see the issue you're experiencing below, visit support. BISSELL.com.
| Problem | Possible Cause | Remedies | |
Reduced or no spray | Clean water tank may be empty or seated incorrectly. | Refill and reinstall the clean water tank. | |
| System isn't completely primed. | Allow machine to run for 15-20 seconds to fully prime. | ||
| Brush window is not latched in place. | Unplug machine and reinstall brush window. | ||
| Clean tank filter is dirty. | Remove clean tank from machine and locate small white foam filter under where the tank connects to the body. Clean any debris from foam filter and reinstall. | ||
Loss of suction or streaking | Tanks may not be seated properly. | Remove both tanks and reseat them so they fit properly on machine. | |
| Dirty water tank is full. | Empty dirty water tank. | ||
| Brush window is not latched in place. | Unplug machine and reinstall window. | ||
| Debris channel in foot is clogged by debris. | Clean channel with a paper towel. | ||
| Filter clogged by debris. | Remove debris clogging filter screen and clean filter. | ||
Brush roll is not turning | Brush roll is not installed properly. | Follow instructions for replacing brush roll. | |
| Machine is standing upright. | Step on foot and recline body of machine to turn brush roll on. | ||
| Brush roll stalled by debris. | Unplug machine. Remove brush window and brush roll to remove obstruction. | ||
Machine won't turn on | Brush roll stalled by debris. | Unplug machine. Remove brush window and brush roll to remove obstruction. | |
Machine is leaking | Cap of clean water tank is not closed properly. | Remove clean water tank and reinstall cap. | |
Brush roll stops turning unexpectedly, motor continues to operate | Machine is overheating. | Unplug machine from power and allow to cool for 30 minutes. | |
Warranty
Limited 2-year warranty, may vary by state. Visit support. BISSELL.com or call 1-800-237-7691 for complete warranty information.
We're Waggin' Our Tails!
BISSELL proudly supports BISSELL Pet Foundation® and its mission to help save homeless pets. When you buy a BISSELL® product, you help save pets, too. We're proud to design products that help make pet messes, odors and pet homelessness disappear.
Visit BISSELLsavespets.com to learn more.
| But wait, there's more! Join us online for a complete guide to your new product, including troubleshooting, product registration, parts, and more. Go to support.BISSELL.com.  |
IMPORTANT SAFETY INSTRUCTIONS
![]() READ ALL INSTRUCTIONS BEFORE USING YOUR APPLIANCE.
READ ALL INSTRUCTIONS BEFORE USING YOUR APPLIANCE.
When using an electrical appliance, basic precautions should be observed, including the following:
 TO REDUCE THE RISK OF FIRE, ELECTRIC SHOCK OR INJURY:
|
|
SAVE THESE INSTRUCTIONS
THIS MODEL IS FOR HOUSEHOLD USE ONLY.
COMMERCIAL USE OF THIS UNIT VOIDS THE MANUFACTURER'S WARRANTY.
Improper connection of the equipment-grounding conductor can result in a risk of electrical shock. Check with a qualified electrician or service person if you aren't sure if the outlet is properly grounded. DO NOT MODIFY THE PLUG. If it will not fit the outlet, have a proper outlet installed by a qualified electrician. This appliance is designed for use on a nominal 120-volt circuit, and has a grounding attachment plug that looks like the plug in the illustration. Make certain that the appliance is connected to an outlet having the same configuration as the plug. No plug adapter should be used with this appliance.
GROUNDING INSTRUCTIONS

This appliance must be connected to a grounded wiring system. If it should malfunction or break down, grounding provides a safe path of least resistance for electrical current, reducing the risk of electrical shock. The cord for this appliance has an equipmentgrounding conductor and a grounding plug. It must only be plugged into an outlet that is properly installed and grounded in accordance with all local codes and ordinances.
Documents / Resources
References
Download manual
Here you can download full pdf version of manual, it may contain additional safety instructions, warranty information, FCC rules, etc.
Download Bissell SprinWave Hard Floor Expert 3831 Series Manual
Advertisement


Need help?
Do you have a question about the SprinWave Hard Floor Expert and is the answer not in the manual?
Questions and answers