Bowflex SelectTech 560 Manual
- Assembly & owners manual (17 pages) ,
- Assembly & owners manual (16 pages) ,
- Troubleshooting manual (2 pages)
Advertisement
- 1 Introduction
- 2 Specifications
- 3 Features
-
4
Operation
- 4.1 Fitness Trainer App (Bowflex SelectTech App)
- 4.2 Getting to know your Bowflex SelectTech Dumbbells
- 4.3 Getting Started (Battery Installation)
- 4.4 Getting Started without the App
- 4.5 Understanding and testing the locking mechanism function
- 4.6 Testing proper locking mechanism function
- 4.7 Optional Accessories
- 5 Maintenance
- 6 Troubleshooting
- 7 Important Safety Instructions
- 8 Documents / Resources
Introduction
Congratulations on your purchase of the Bowflex™ SelectTech™ 560 Dumbbell set. This innovative dumbbell is a versatile training tool that will help you reach your fitness goals. This product has been carefully engineered and manufactured to provide a wide array of weight options starting at 2.3 kg (5 lbs) and going all the way up to 27.2 kg (60 lbs). The Bowflex™ SelectTech™ 560 Dumbbell is equipped to count each rep, and present your workout on a Bluetooth® device as you do it!
Specifications
Total Weight: approximately 28.1 kg (62 lbs.)
Power Requirements: 2 AAA (LR03) Batteries
Operating Voltage: 1.8V - 3.0V

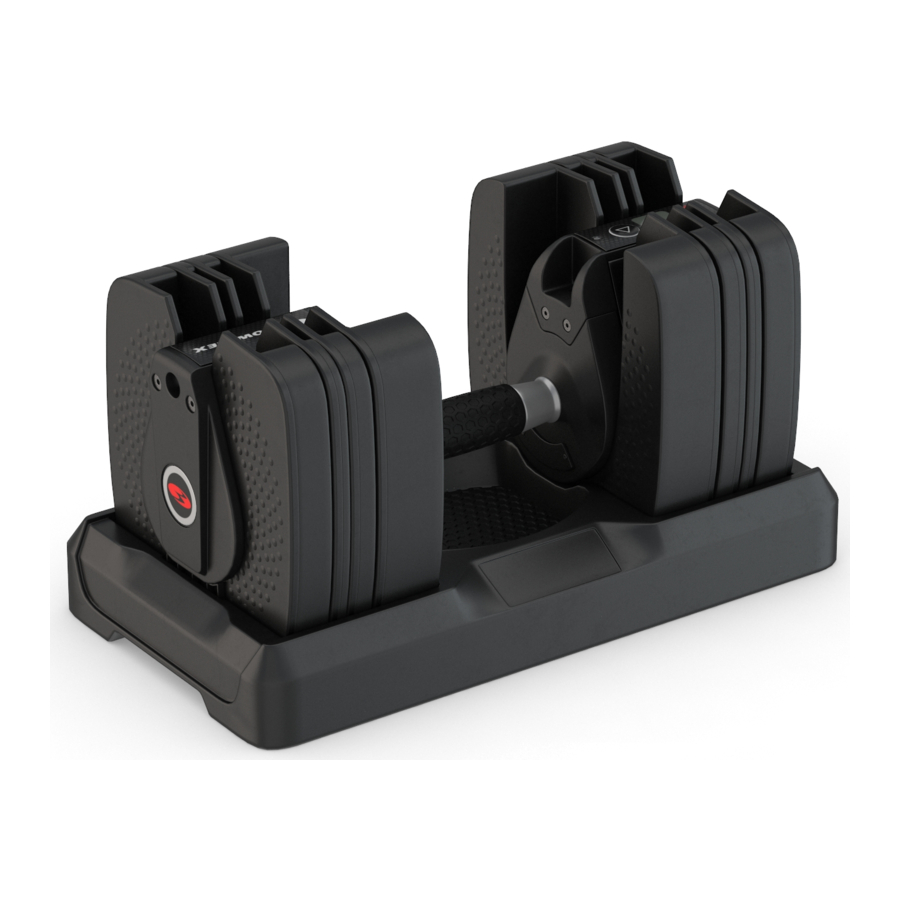
Features

- Handle Assembly
- Weight Selection Window
- Adjustment Grip
- ► Button
- Display
- Sensor Assembly
- Selection Discs
- Audio Off Icon
- Battery Icon
- Bluetooth® Synced Icon
- Weight Plate, 2.3 kg (5 lbs) *
- Weight Plate, 1.1 kg (2.5 lbs) *
- Weight Plate, 4 kg (8.75 lbs) *
- Weight Plate, 0.6 kg (1.25 lbs) *
- Locking Tab
- Lifting Handle
- Base Assembly
- Locking Tab, Base
- Weight Plate, 4.5 kg (10 lbs) *
- Bluetooth® connectivity (not shown)
* Please be advised that due to tolerances in the manufacturing process, individual weight plates may vary slightly from their stated weight values.
Operation
Fitness Trainer App (Bowflex™ SelectTech™ App)
The Bowflex™ SelectTech™ Fitness App provides a variety of workouts that use the Bowflex™ SelectTech™ 560 Dumbbell as the core piece of equipment. In addition to the workouts, the App can also track your current exercise and save the workout results.
The Fitness Trainer App has three options to encourage you to reach your fitness goals:
- "6-Week Challenge" is a total body workout program designed to maximize the use of the dumbbells with additional core exercises. The 6-Week Challenge provides a fully developed exercise plan to keep you engaged and focused as you work out your entire body. Each exercise is presented in a specific sequence, and provides the number of reps and set count. After each exercise period, a rest period is provided to recover and prepare for the next set.
- "Choose a Workout" provides a selection of bundled exercises that form a specifically focused workout. The exercises follow a sequence for the workout and provide the rep and set counts similar to the 6-Week Challenge.
- "Just Lift" is the base for every exercise, and is the option for stand-alone exercises. Just Lift allows a user to perform any dumbbell exercise and the sensor will count the reps. Since a Just Lift exercise is not programmed, the user must decide the exercise, the number of reps, and how many sets.
When selecting an option, consider the level of encouragement you may require to complete your fitness goal. Be sure to only perform what you are comfortable doing based on your current fitness level and knowledge.
In addition to the motivation provided by the workouts and rep count, the Bowflex™ SelectTech™ App will track your results during a synced exercise. Total weight lifted, total workout time, calories burned, and date of workout are tracked on your smart device and can be reviewed and compared. Exercises with suggested quantities for reps and sets of reps can be modified through the App. Read the "Getting Started" procedure to properly calibrate and use the sensor.
Be sure to enable the Bluetooth® feature on your smart device before a workout. When synced, the dumbbell displays the Bluetooth® icon. No workouts are tracked without a synced smart device during a workout. Push the button twice to stop the current exercise period and skip to the rest period.

Note: For a more accurate calorie count, enter your age and weight into the App.
Getting to know your Bowflex™ SelectTech™ Dumbbells
After carefully removing the dumbbell from its box, there are some initial steps that should be taken to familiarize yourself with the function of the product, and to assure that all aspects of the dumbbell are performing accordingly to the specifications.
 Do not drop the dumbbell. Dropping the dumbbell will damage the weight plates and/or the locking mechanism, and can cause the weight plates to disengage (drop) from the handle without warning. This can cause serious injury, and will void the warranty.
- After removing the dumbbell from its protective packaging, inspect the products and packaging material for any damages.
- Push down slightly on the Handle Assembly to make sure it is fully seated in the Base. Rotate each Adjustment Grip several full rotations to make sure it turns freely in both directions. Make sure there is a click at each weight increment of the Adjustment Grip. This click will help you locate the proper alignment to select a given weight increment.
![]()
- The weight increments range from 2.3 to 27.2 kg (5 lbs to 60 lbs). The dumbbell displays pounds or kilograms depending on which selection window is viewed. To properly select a given weight (9.1 kg [20 lbs], for example), rotate the Adjustment Grip until that number (9.1 or 20) is shown in the Weight Selection Window.
Note: Please be advised that due to tolerances in the manufacturing process, individual weight plates may vary slightly from their stated weight values. The selected weight value will be shown for a few seconds on the display if not paired with the app. - After confirming the proper rotational function of the Adjustment Grip, turn it until the number 5 is shown in the Weight Selection Window.
- With the Adjustment Grip set to 2.3 (or 5), pull the Handle Assembly straight up from the Base. This will remove only the Handle Assembly from the Base, and let all of the Weight Plates stay in the Base. The Handle Assembly without plates gives the initial weight of 2.3 kg (5 lbs).
- The dumbbell Weight Plates are symmetrical. The handle is inserted with either end facing the user.
NOTICE: When you remove the dumbbell from the Base or return it to the Base, use a vertical motion, perpendicular to the Base. Do not tilt the dumbbell or move it laterally (parallel to the Base) until it is fully clear of the unselected weight plates.
![]()


Do not lean on the dumbbell handles or use them to support your body weight, such as using them as a base to perform a push up. Doing so will damage the weight plates and/or the locking mechanisms, and can cause the weight plates to disengage (drop) from the handle without warning. This can cause serious injury, and will void the warranty.
Inspect the dumbbells prior to each use. Do not use a dumbbell with worn or damaged parts. If purchased in US/Canada, contact Customer Service for repair information. If purchased outside US/Canada, contact your local distributor for repair information.
There are 16 weight increments:
| kg | 2.3 | 3.4 | 4.5 | 5.7 | 6.8 | 7.9 | 9.1 | 10.2 | 11.3 | 13.6 | 15.9 | 18.4 | 20.4 | 22.7 | 24.9 | 27.2 |
| lbs | 5 | 7.5 | 10 | 12.5 | 15 | 17.5 | 20 | 22.5 | 25 | 30 | 35 | 40 | 45 | 50 | 55 | 60 |
Getting Started (Battery Installation)
- Insert the AAA (LR03) batteries into the Sensor Assembly. The display will show three dashes with power supplied.
![]()
![]()
![warning]() Do not mix old and new batteries.
Do not mix old and new batteries.
Do not mix alkaline, standard (carbon-zinc), or rechargeable (Ni-Cd, Ni-MH, etc) batteries. - Insert the outer part of the Sensor Assembly, and then pivot it into the dumbbell until the Sensor Assembly snaps into place.
![]()
- Download the free Bowflex™ SelectTech™ App to your Bluetooth® enabled smart device. The App is available on Google Play™ and the App Store.
- Open the App and pair your Bluetooth® enabled smart device to the Bowflex™ SelectTech™ 560 Dumbbell.
Note: When synced, the dumbbell will display the Bluetooth® icon. - Be sure the workout area is clear of obstacles or bystanders.
- Select the desired weight of the dumbbells for the workout. The App will display the selected weight.
- Place your synced smart device in a location where it can be easily viewed during the workout. The App will provide instructions, as well as current rep count, during the set.
- Decide on an exercise ("Just Lift"), a workout ("Choose a Workout"), or the "6-Week Challenge" by selecting it on the App. The App will begin a 10 second countdown.
Carefully lift the dumbbell and hold it at the ready position for the exercise. At the end of the countdown, the sensor will calibrate the Start Point. - Start your first rep when the App tells you to begin.
Follow proper form and move fully through the exercise. This will calibrate the End Point, creating the Fitness Envelope.
Each rep will be confirmed with an audible beep (if not muted) and an increase in the total rep count.
![]()
Note: Push the ► button to pause a workout. To adjust the sound setting, push and hold down the ► button on the dumbbell for 2 seconds. The Audio Off icon will be displayed when muted.
![]()
- Continue your exercise.
During the 6-Week Challenge or a workout, the App will track each exercise period and then shift into a rest period. A count down will start for the rest period. At the end of the count down, the App will shift to the next exercise period. Be sure to follow the instructions from the App to know if it is another set of the same exercise or a new exercise. The Fitness Envelope will need to be calibrated for each new exercise.
Note: Push the ► button twice to skip to the next period (exercise or rest period).


The sensor will power off after 10 minutes of no activity.
Getting Started without the App
If using the dumbbell without the App, follow the general steps from the "Getting Started" section.
- With the dumbbell powered up and the workout area clear, push the ► button.
- Carefully lift the dumbbell and hold it at the ready position for the exercise. After approximately 10-12 seconds, the display will flash twice, confirming the Start Point has been calibrated.
- Begin your first rep. This will create the Fitness Envelope for the exercise. The dumbbell counts each rep that moves fully within the Fitness Envelope.
- When done with the exercise, push the ► button twice to start the rest period. The sensor will power off after 2 minutes of no activity. No workouts are tracked without a synced smart device during a workout.
Understanding and testing the locking mechanism function
The Bowflex™ SelectTech™ Dumbbell features an exclusive locking mechanism designed to ensure proper and complete selection of the weight plates as well as to ensure weight plate retention during the workout.

Fully understand the function of this mechanism and do tests of the mechanism regularly to make sure it operates correctly.
After replacing any part of your Bowflex™ SelectTech™ Dumbbell, be sure to perform the following procedures before using your Dumbbell for any exercises:
Function
The locking mechanism provides two key functions:
- The mechanism will only allow the Adjustment Grip to be rotated when the Handle Assembly is completely inserted and engaging the Dumbbell Base.
- The mechanism is designed to lock the Handle Assembly to the base if the Adjustment Grip is not fully engaging the selected weight plates.
Purpose
The locking mechanism serves two important purposes:
- The mechanism will prevent deselecting (dropping) weight plates from the dumbbell when it is NOT in the Dumbbell Base.
- The mechanism will prevent partial selection of the weight plates in which the plates are not fully supported and the locking pin is not fully engaged.
Given the importance of this locking mechanism, it is critical that you understand how it operates, and periodically test it to make sure it is functioning correctly.
Testing proper locking mechanism function
- With the Handle Assembly set in the Dumbbell Base, turn the Adjustment Grip to the 2.3 kg (5 lbs) setting. You will know you have fully and correctly selected the number when you feel the Adjustment Grip settle into a notch (known as a detent). You will also hear a slight, but audible, clicking noise that corresponds with the detent locations for each number.
- You should be able to withdraw the Handle Assembly from the Base leaving all the weight plates behind.
- With the Handle Assembly removed from the Base and on the ground, gently attempt to turn the Adjustment Grip. The Adjustment Grip should not rotate. A locking pin in the mechanism prevents the assembly from rotating when withdrawn from the Base.
![warning]() Do not use too much force to try to turn the locked Adjustment Grip. Too much force can damage the locking mechanism.
Do not use too much force to try to turn the locked Adjustment Grip. Too much force can damage the locking mechanism. - After confirming the proper function of the locking mechanism as described above, fully insert the Handle Assembly back into the Dumbbell Base.
- With the Handle Assembly back in the Base, turn the Adjustment Grip to a position that is between the numbers 4.5 to 5.7 ( or 10 and 12.5). This represents an incomplete weight selection where the Adjustment Grip has not fully selected a weight and is in-between the selection detents (clicks).
- With the Adjustment Grip in this improper position, gently attempt to lift up on the Handle Assembly to remove it from the Base. You should find that the Handle Assembly is locked to the Base and cannot be removed from it.
![warning]() If the Handle Assembly comes free from the Base with the partial weight selection, do not use the Dumbbell. If purchased in US/ Canada, contact the retailer or Customer Service for service. If purchased outside US/Canada, contact your local distributor for assistance.
If the Handle Assembly comes free from the Base with the partial weight selection, do not use the Dumbbell. If purchased in US/ Canada, contact the retailer or Customer Service for service. If purchased outside US/Canada, contact your local distributor for assistance. - Return the improperly selected Adjustment Grip to a full and proper weight selection and confirm that the Handle Assembly can once again be removed.
- Be sure the parts of the Dumbbell Handle Assembly have not become loose. Do this by setting the Adjustment Grip to 2.3 kg (5 lbs) and removing the Handle Assembly from the Base. Grasp the Handle Assembly by the ends and twist it by rotating the end caps in opposite directions. The Handle Assembly should not exhibit any free play and all of the Selection Discs should feel tightly connected.
- You have now tested the function of the locking mechanism. We suggest you repeat this test monthly to make sure that the locking mechanism operates correctly.
![warning]() Do not use the Handle Assembly to lift the Dumbbell and Base together. To lift the Dumbbell and Base together, fully engage the Weight Plates and use the Lifting Handles molded into the Base Assembly.
Do not use the Handle Assembly to lift the Dumbbell and Base together. To lift the Dumbbell and Base together, fully engage the Weight Plates and use the Lifting Handles molded into the Base Assembly.
If the dumbbell locking mechanism operates unsatisfactorily in the test procedure above, do the following:- Stop use of the product immediately until approved service is available.
- If purchased in US/Canada, contact the retailer or Customer Service for service. If purchased outside US/Canada, contact your local distributor for assistance.
Optional Accessories
Bowflex™ SelectTech™ Stand

Maintenance
Equipment must be examined for damage and repairs before each use. The owner is responsible to perform routine testing of the locking mechanisms. Worn or damaged components must be replaced immediately or the equipment removed from service until the repair is made. Only manufacturer supplied components can be used to maintain and repair the equipment.
If at any time the Warning labels become loose, unreadable or dislodged, replace the labels. If purchased in US/Canada, contact Customer Service for replacement labels. If purchased outside US/Canada, contact your local distributor for them.
The Bowflex™ SelectTech™ Dumbbell is a very low maintenance product. However, there are steps that you should take to keep the product performing and looking its very best.
Should your SelectTech™ Dumbbell handle assembly, plates or base become soiled you may clean them with a cloth lightly dampened with warm water and a small amount of mild soap. Wipe dry with a separate cloth.
The SelectTech™ Dumbbell is internally lubricated and will not require further internal lubrication. The contact between weight plates and selection discs is not lubricated but has naturally low friction. This generally will not require any lubrication. Should you feel it necessary to lubricate the weight plates and/or selection discs, use only a silicon lubricant, preferably "food grade".
Do not use any solvents, harsh detergents, chemicals or bleach on this product − doing so may damage the materials, resulting in degradation of the product's performance or strength.
Do not attempt to disassemble the Handle Assembly. The Handle Assembly is not designed to be user serviced. Doing so will void the manufacturers warranty. If purchased in US/Canada, contact Customer Service for assistance. If purchased outside US/ Canada, contact your local distributor for assistance.
Battery Icon Displayed on the Smart Dumbbell Module
The Console will display the battery icon for ten seconds when the batteries are at approximately 10% of their rated power during power up. When replacing the batteries, make sure the batteries point in the +/- direction shown in the battery bay.

Do not mix old and new batteries.
Do not mix alkaline, standard (carbon-zinc), or rechargeable (Ni-Cd, Ni-MH, etc) batteries.
- Press and hold down the securing snap on the Sensor Assembly, and pivot the Sensor Assembly up and out from the dumbbell.
![]()
- Remove the old batteries.
- Insert new AAA (LR03) batteries into the Sensor Assembly. The display will show three dashes with power supplied.
![]()
![warning]() Do not mix old and new batteries.
Do not mix old and new batteries.
Do not mix alkaline, standard (carbon-zinc), or rechargeable (Ni-Cd, Ni-MH, etc) batteries. - Insert the outer part of the Sensor Assembly, and then pivot it into the dumbbell until the Sensor Assembly snaps into place.
- The dumbbell is ready for use.


Troubleshooting
| Problem | Solution |
| Handle Assembly does not fully insert into Base when no Weight Plates are selected (handle has no plates attached). | Use a vertical motion to return the Handle Assembly. Do not tilt or move laterally the Handle Assembly. |
| Handle Assembly does not fully insert into Base when Weight Plates are selected (handle has plates attached). | Check to see if you have selected different weights on each of the dumbbells (for example one dumbbell is set to 10 and the other is set to 15). If this is the case, you must replace the Handle Assembly into the corresponding Base. |
| Verify that the Weight Plates not selected (those plates remaining in the Base Assembly) are in their correct spots and have not been moved to a different support slot. This may be blocking the dumbbell from fitting back into the Base. | |
| Check to see if there is any dirt, debris or other obstruction in the Base. Remove anything found from the Base. You may need to remove the weight plates from the Base to accomplish this check. Place each Weight Plate back in the appropriate location and orientation. | |
| Adjustment Grip will not turn while Handle Assembly is in Base. | Check to be sure that the Handle Assembly is fully depressed into the Base. If not fully depressed, the locking mechanism will not be released and may be keeping the Adjustment Grip from rotating. |
| Check to see if there is any dirt, debris or other obstruction in the dumbbell Base. Remove anything found from the Base. You may need to remove the Weight Plates from the Base to accomplish this check. Place each Weight Plate back in the appropriate location and orientation. | |
| Display shows Battery Icon | Replace batteries. |
Important Safety Instructions
This icon means a potentially hazardous situation which, if not avoided, could result in death or serious injury.
Before using this equipment, obey the following warnings:
- Read and understand the complete Owner's Manual. Keep Owner's Manual for future reference.
- Read and understand all warnings on this machine. If at any time the Warning labels become loose, unreadable or dislodged, replace the labels. If purchased in US/Canada, contact Customer Service for replacement labels. If purchased outside US/Canada, contact your local distributor for them.
- Children must not be let on or near to this machine. Moving parts and other features of the machine can be dangerous to children.
- Not intended for use by anyone under 14 years of age.
- Not intended for use by persons with medical conditions where those conditions may impact the safe operation of the Dumbbells or pose a risk of injury to the user.
- Consult a physician before starting an exercise program. Stop exercising if you feel pain or tightness in your chest, become short of breath, or feel faint. Contact your doctor before you use the machine again.
- This machine is for home use only.
- Periodically inspect and test the locking mechanism for correct function. Follow the test procedures included in this manual.
- Do not operate this machine outdoors or in moist or wet locations.
- Before you start your workout, make sure that your surroundings are free from possible interference and third parties. Your workout free space should be 0.6 m (24") more than the maximum reach of the exercise in all directions.
- Do not over exert yourself during exercise. Operate the machine in the manner described in this manual.
- Do not try to force the Adjustment Grip to turn when the Dumbbell has been removed from the Dumbbell base.
- Do not drop or let the Dumbbells fall freely to the ground. Damage to the product and possible personal injury can occur.
- Do not let the Dumbbells forcefully hit together during operation. Damage to the product and possible personal injury can occur.
- Do not lean on the Dumbbell handles or use them to support your body weight, such as using them as a base to perform a push up. Damage to the product and possible personal injury can occur.
- Do not try to disassemble your Dumbbell handles, or base assembly. The product is not designed to be serviced by the customer. If purchased in US/Canada, contact Customer Service for repair information. If purchased outside US/Canada, contact your local distributor for repair information.
- The Dumbbells are very heavy. If you are not using the optional Dumbbell Stand, put the Dumbbell assembly directly on the floor for best support.
- Children should be supervised to ensure that they do not play with the appliance.
Safety Warning Labels and Serial Number
Record serial number in the Serial Number field at the beginning of this manual.
Note: Each dumbbell base has a unique serial number.

(Label is available in English and French Canadian only.)
If purchased in US/Canada: To register your product warranty, go to: www.bowflex.com/register or call 1 (800) 605–3369.
If purchased outside US/Canada: To register your product warranty, contact your local distributor. For details regarding product warranty or if you have questions or problems with your product, please contact your local distributor. To find your local distributor, go to: www.nautilusinternational.com or www.nautilus.cn
Nautilus, Inc., 5415 Centerpoint Parkway, Groveport, OH 43125 USA, www.NautilusInc.com - Customer Service: North America (800) 605-3369, csnls@nautilus.com
Nautilus (Shanghai) Fitness Equipments Co, Ltd, Room 1701 &1702, 1018 Changning Road, Changning District, Shanghai, China 200042, www.nautilus.cn - 86 21 6115 9668
outside U.S. www.nautilusinternational.com
Documents / Resources
References
Download manual
Here you can download full pdf version of manual, it may contain additional safety instructions, warranty information, FCC rules, etc.
Advertisement


Need help?
Do you have a question about the SelectTech 560 and is the answer not in the manual?
Questions and answers