TruSens Z-6000, Z-7000 Manual
- Owner's manual (10 pages) ,
- Owner's manual (10 pages)
Advertisement
FEATURE HIGHLIGHTS
TRU-BEAM![]()
TRU-BEAM™ UV-C
Proprietary TRU-BEAM UV-C system. No replacements required.

Dual-sided Filtration
Combination filter featuring True HEPA to capture pollutants and Activated Carbon to capture odors and VOCs on both sides.

SensorPod™
Remote air quality monitor that ensures cleaner air, right where you need it.

Informs and Adapts
Color-coded illumination provides additional information by communicating air quality in real-time.
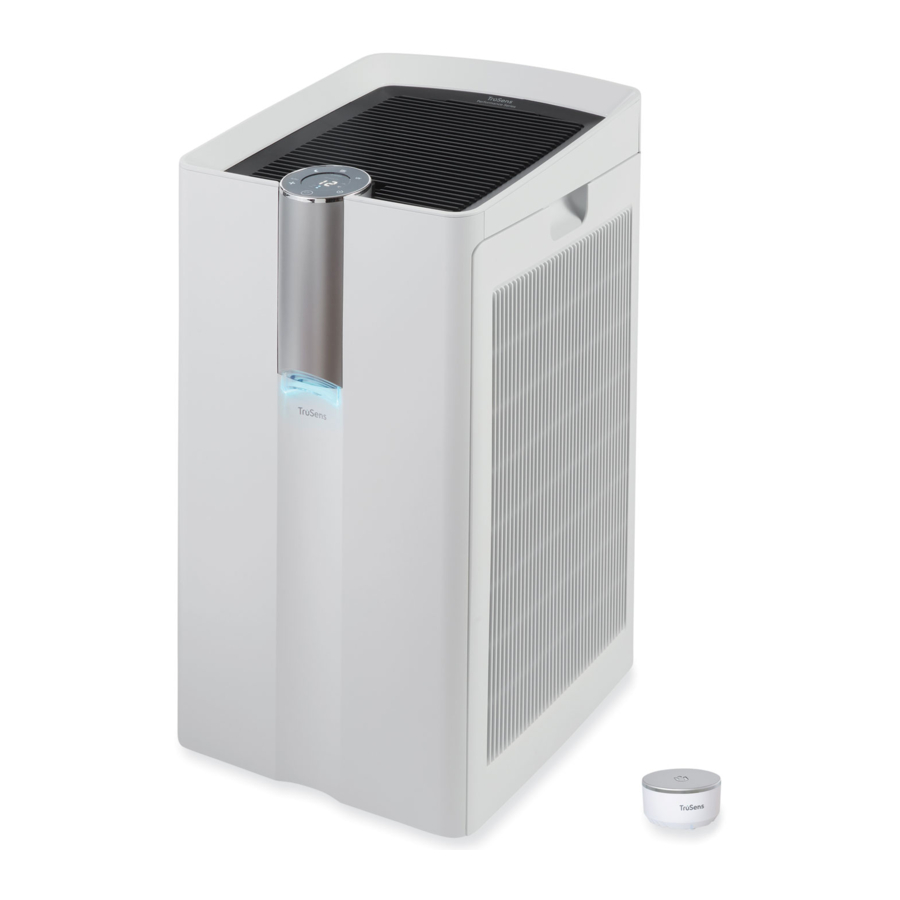
PRODUCT OVERVIEW

GETTING STARTED

Install the filter (combination True HEPA/Carbon)
Remove side panel door (a), prefilter (b) then bagged True HEPA/Carbon filter. Remove plastic bag from filter (c) and install inside the purifier with HEPA layer (white) on the inside, and the Carbon layer (black) on the outside. Replace the prefilter and side panel door.
 NOTE: Perform steps on both left and right sides.

Set up
Plug-in your SensorPod™, and place upright on a tabletop or counter across the room, within line of sight of the purifier.
Plug-in your air purifier unit and power on. Place the purifier on a flat surface, free from obstructions.
Signal strength may vary by location.
Start living with cleaner air!
The purifier will automatically adjust fan speeds based on the air quality readings from SensorPod, and will deliver purified air in the room.

CONTROL PANEL

 SensorPod™ Signal Indicator
 Power Button
 Fan Speed Settings
Select fan speed or AUTO mode. In AUTO mode, purifier automatically adjusts fan speed based on air quality readings from SensorPod.
(AUTO mode only available when purifier is paired with SensorPod and receiving signal)
![]() Dimmer Mode
Dimmer Mode
Display illumination turns off without sacrificing the effectiveness of the purifier. Simply press the button again to bring back all display features.
![]()
Filter Indicator Reset
HEPA and Carbon indicators glow red when it is time to replace the filters. Simply hold Filter Reset button for 3 seconds to reset the indicators. If replacing the filter before HEPA and Carbon indicators turn red, hold Filter Reset button for 10 seconds to reset the indicators.
(See replacement instructions. Follow above Reset button instructions after replacing filter.)
![]()
UV Mode
UV-C within the purifier's filter chamber are on when the  symbol is on.
 Timer Mode
Purifier will automatically turn off after 2, 4, 8, or 12 hours. To cancel this countdown, simply press button until no timer setting is displayed.
AIR QUALITY DISPLAY
Real-time Feedback
The enhanced SensorPod™ evaluates the condition of your air by measuring both particulate matter (PM1.0, PM2.5, PM10) and volatile organic compounds (VOCs). It calculates the overall air quality using a proprietary algorithm that is reactive to genuine increases in pollutants without overreacting.
The illuminated, color-coded display communicates good, moderate or poor air quality and a numeric value provides a greater level of detail.
In AUTO mode, the purifier automatically adjusts the fan speed in response to these air quality readings.

TruSens utilizes the Air Quality Index (1-500) created by the U.S. Environmental Protection Agency (EPA).
SPECIFICATIONS
| Air Inlet | Dual-sided |
| Air Outlet | Top |
| Smoke CADR | Z-6000: 485 Z-7000: 519 |
| Room size at 2 air changes per hour (ACH) | Z-6000: 1,750 ft² (162 m²) Z-7000: 2,000 ft² (186 m²) |
| Room size at 4.84 air changes per hour (ACH) | Z-6000: 752 ft² (70 m²) Z-7000: 805 ft² (75 m²) |
| Sensor | SensorPod™, works up to 49 ft (15 m) from purifier |
| Fan Speed Settings | Whisper, 1, 2, 3, Turbo, AUTO |
| Purification Levels | Washable Prefilter, Carbon, True HEPA, TRU-BEAM™ UV-C |
| Timer Settings | 2, 4, 8, 12 hr |
| Filter Change Indicators | HEPA, Carbon |
| Noise | Z-6000: 30.0 - 63.3 dB(A) Z-7000: 30.0 - 65.9 dB(A) |
| Dimensions | Z-6000: 14.7 x 18.4 x 27.3 in (374 x 468 x 693 mm) Z-7000: 14.7 x 18.4 x 31.7 in (374 x 468 x 806 mm) |
| Weight | Z-6000: 42.1 lb (19.1 kg) Z-7000: 45.2 lb (20.5 kg) |
| Motor Type | DC motor |
| Power Requirements | 100-240VAC / 50-60 HZ |
| Power Consumption | Z-6000: 109.3 W | Z-7000: 118.7 W |
| Warranty | 2 years |
Replacement Filters
| Combination True HEPA/ Carbon Filter | Z-6000 | AFCHZ6000-01 | 2 pack | Replace every 12 months |
| Z-7000 | AFCHZ7000-01 | 2 pack |
CARE & MAINTENANCE

Always power off the purifier by pressing the Power Button and unplugging the power cord.
To access the filter chamber, gently remove both side panel filter doors (Fig. A).

REPLACING TRUE HEPA/CARBON FILTERS
The HEPA and Carbon indicators will glow red when it is time to change the combination filter.
- Gently remove the washable prefilters from both sides (Fig. B). Refer tocleaning instructions.

- Remove the current combination True HEPA/ Carbon filters from both sides (Fig. C).

- Gently install the replacement combination True HEPA/Carbon filters with the HEPA layer (white) on the inside, and the Carbon layer (black) on the outside.
- Replace the prefilters and side panel filter doors on both sides.
- Plug-in and power on your purifier, and hold the Reset button until the red filter indicators turns off.


Refer to True HEPA/Carbon filter replacement part number.
WASHING THE PREFILTERS
We recommend that you visually inspect the prefilters every month, and clean as needed. Hand wash the prefilters every time you change the combination True HEPA/Carbon filters.
- Gently remove both side panel filter doors.
- Gently remove the prefilters (Fig. D).

- Gently clean with a dampened cloth – allow prefilters to air dry before re-installing.
- Replace the prefilters (Fig. E) and both side panel filter doors.


FAQ & TROUBLESHOOTING
| Where do I place the SensorPod™? | Anywhere you want to measure the air quality within the room. For optimal results, place the SensorPod™ up to 49 ft (15 m) away from the air purifier on a counter or table, within line of sight of the purifier. In Auto Mode, the purifier will work to distribute clean air until the SensorPod reads an acceptable level of air quality. |
| How often do I need to change the filters? | That's easy! The purifier's replacement indicators will notify you when it is time to replace the combination True HEPA/Carbon filters. Plan on replacing the filters every 12 months. |
| How often do I need to wash the prefilters? | The prefilter captures larger particles and preserves the efficiency of the other filters, so we recommend that you visually inspect the prefilters every month and wash as needed. |
| Purifier won't turn on. | Check that the power cord is connected securely to both the wall outlet and the purifier. Check if there is a power outage in the outlet by trying a nearby light or device, or by trying a working device in the same outlet. Check that the filters and filter covers are fitted properly into filter chamber. Please contact us if you're still having a problem! |
| Purifier won't go into Auto Mode. OR Air quality indicators are off. OR Purifier's sensor signal indicator is blinking. | First, check that the SensorPod is plugged-in and that its light is solid. Next, check that the SensorPod is within range of the purifier (up to 49ft/15m). If both are true and the connection is still failing, see below instructions on repairing the SensorPod's connection. |
| I've lost my SensorPod™! | Don't worry! Please contact our customer support team and you can order a replacement SensorPod. Follow the easy pairing instructions below to pair your replacement SensorPod with your existing air purifier! |
Pairing SensorPod™ and Purifier
The SensorPod communicates with the purifier using radio frequency signals, and will be paired on the production line and ready for use when you open the box. In the rare event that the signal is interrupted, the purifier's sensor indicator light ![]() will blink. You can repair the connection in just a few easy steps.
will blink. You can repair the connection in just a few easy steps.
- Unplug the SensorPod.
- HOLD the Power Button on the purifier for 3 seconds, when you should hear two chimes.
- Plug-in the SensorPod and press and HOLD the pairing button underneath the SensorPod for 5-7 seconds (Fig. F).
![]()
- The connection is established when the purifier's sensor indicator light is lit with no blinking, and the air quality indicators turn on.

SAFETY INFORMATION
READ & SAVE THESE INSTRUCTIONS / READ THE LABEL AND ANY OPERATING MANUAL BEFORE USING
PRECAUTIONS
Unplug or disconnect the appliance from the power supply before replacing filters, or when appliance is not in use.
To reduce the risk of fire or electric shock, do not use this machine with any solid-state speed control device.
Do not operate any purifier with a damaged cord or plug, or if the wall socket is loose.
Do not run cord under carpeting, throw rugs, runners, or similar coverings. Do not run cord under furniture or appliances. Arrange cord away from traffic area and where it will not be tripped over.
Skin or eye damage may result from directly viewing the light produced by the lamps in the apparatus.
UV radiation emitted from this device.
- Unintended use of the device, or damage to the housing, may result in exposure to ultraviolet radiation.
- Ultraviolet radiation may cause eye and skin irritation.
- Avoid exposing eyes and skin to ultraviolet radiation.
- Remove all packaging, including the filter bag, before use.
- Appliances that are obviously damaged must not be operated.
- This appliance must only be connected to a wall socket outlet matching the supply plug type and rating stated on the rating plate.
- Locate air purifier near the outlet wall socket and do not use extension cords.
- This appliance can be used by children aged from 8 years and above and persons with reduced physical, sensory or mental capabilities or lack of experience and knowledge if they have been given supervision or instruction concerning use of the appliance in a safe way and understand the hazards involved.
- KEEP OUT OF THE REACH OF CHILDREN. Children shall not play with the appliance.
- Do not attempt to sevice or repair this product yourself.
- Only use the air purifier and SensorPod with the power cable provided.
- Only clean this machine with a damp cloth, do not use solvents or bleach.
- Ensure appliance is always placed on firm level surface before operation.
- Do not block or obstruct the air intake or outlet vents.
- Do not insert fingers or other items into the air intake or outlet vents.
- When the air purifier is in standby mode the SensorPod is still transmitting a signal/data.
FIRST AID INSTRUCTIONS - Seek medical attention in event of injury.
The use of this device is a supplement to and not a substitute for standard infection control practices; users must continue to follow all current infection control practices, including those practices related to cleaning and disinfection of environmental surfaces.
SUPPORT
We value your feedback. Please contact us to share your experience.
Visit our website at www.trusens.com
Email us at support@trusens.com
Call us at 1-833-TRUSENS (1-833-878-7367)
Subscribe to our YouTube channel TruSens & Follow us @TruSensWellness

Documents / Resources
References
Download manual
Here you can download full pdf version of manual, it may contain additional safety instructions, warranty information, FCC rules, etc.
Advertisement


Need help?
Do you have a question about the Z-6000 and is the answer not in the manual?
Questions and answers