Advertisement
INTRODUCTION
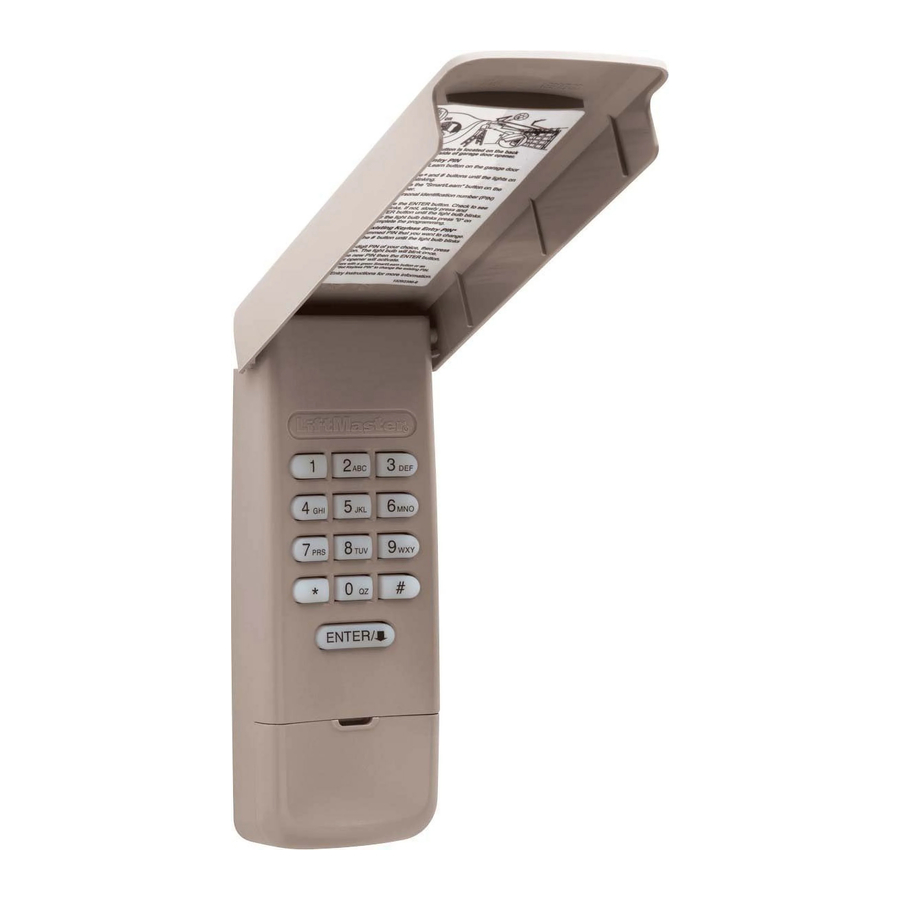
For use with Security+ 2.0™ Garage Door Openers. All Security+ 2.0™ Garage Door Openers have a yellow Learn button and two yellow antennas. Refer to your product owner's manual for additional programming instructions if necessary. The product will activate when the 4-digit Personal Identification Number (PIN) and ENTER button are pressed on the Keyless Entry.
Install the battery and program the Keyless Entry prior to installation. Make sure the garage door opener has a working light bulb because it is a programming indicator.

This product can expose you to chemicals including lead, which are known to the State of California to cause cancer or birth defects or other reproductive harm. For more information go to www.P65Warnings.ca.gov
| |
To prevent possible SERIOUS INJURY or DEATH from a moving gate or garage door:
|
PROGRAM INITIAL PIN - using the Learn button
- Locate the Learn button on the garage door opener.

- Press and release the Learn button. The LED will light. Within 30 seconds...
![]()
- Enter a 4-digit personal identification number (PIN) of your choice: ? ? ? ?
![]()
- Press and hold the ENTER button until... ...the light bulb blinks.
![]()


PROGRAM INITIAL PIN - using a multi-function door control
*Optional accessory
- Press the LEARN button on the door control to enter Programming Mode.
![]()
- Press the LEARN button again, the LED will flash once.
![]()
- Enter a 4-digit personal identification number (PIN) of your choice: ? ? ? ?
![]()
- Press and hold the ENTER button until.....the light bulb blinks.


To test, press the PIN, then press the ENTER button. The garage door opener will activate. To program the Keyless Entry to more than one garage door opener, repeat the steps above using a new PIN for each additional garage door opener.
CHANGE AN EXISTING PIN
- Press the programmed PIN that you want to change.
![]()
- Press and hold the # button until......the light bulb blinks twice.
![]()
- Enter the new 4-digit PIN of your choice, then press the ENTER button.

- To test, press the new PIN, then the ENTER button. The garage door opener will activate.
![]()


PROGRAM A TEMPORARY PIN
A temporary 4-digit PIN can be programmed to allow access to visitors. Each programmed PIN can program one temporary PIN. The temporary PIN can be set for a number of hours or a number of door openings. The temporary PIN cannot be the same as any previously programmed PIN.
- Press any programmed PIN, then press and hold the button until...

- Enter the temporary 4-digit PIN of your choice, then press the ENTER button.

- Press the number of hours the temporary PIN will work (up to 255). + Then press the * button.

OR
Press the number of openings the temporary PIN will work (up to 255). + Then press the # button.


To test, press the temporary PIN, then press the ENTER button. The garage door opener will activate. If the temporary PIN was set for a number of openings, the test will use up one opening.
To clear the temporary PIN, repeat steps 1-3 above, setting the number of hours or openings to 0 in step 3.
INSTALLATION
- Select a location to mount the Keyless Entry at a minimum height of 5 feet (1.5 m) out of the reach of children.
- Remove battery cover and battery.
- M ark the top mounting hole and drill 1/8 inch (3.2 mm) pilot hole.
- Install the top screw, allowing 1/8 inch (3.2 mm) to protrude above the surface. Position the Keyless Entry over the top screw.
- Mark the bottom hole and drill 1/8 inch (3.2 mm) pilot hole. Install the bottom screw. Do not overtighten to avoid cracking the plastic housing.
- Reinstall battery and replace cover.


OPERATION
The garage door opener activates when the PIN and ENTER button are pressed. The keypad will blink for 15 seconds, during that time the ENTER button can be used to stop, start or reverse the door.
If the wrong number is accidentally pressed, press the correct PIN then the ENTER button. The Keyless Entry will transmit only the last four digits that were pressed before the ENTER button.
ONE BUTTON CLOSE: The Keyless Entry has a feature that allows the door to be closed using the ENTER button instead of a PIN.
 NOTE: This feature is not available on external receivers.
To deactivate the one button close feature:
- Press and hold the 1 and 9 buttons for 10 seconds.
- The keypad will blink four times when the one button close feature is deactivated.
To activate the one button close feature:
- Press and hold the 1 and 9 buttons for 10 seconds.
- The keypad will blink twice when the one button close feature is activated.
REPLACEMENT PARTS
Keypad cover 41D621-1
Battery 10A25
Battery cover 41D541
BATTERY
To prevent possible SERIOUS INJURY or DEATH:
- NEVER allow small children near batteries.
- If battery is swallowed, immediately notify doctor.
Replace the battery when the keypad becomes dim or does not light after a button is pressed.

Dispose of old battery properly.
ONE YEAR LIMITED WARRANTY
LiftMaster warrants to the first consumer purchaser of this product that it is free from defect in materials and/or workmanship for a period of 1 year from the date of purchase.
1-800-528-9131
Documents / Resources
References

Download manual
Here you can download full pdf version of manual, it may contain additional safety instructions, warranty information, FCC rules, etc.
Advertisement


Need help?
Do you have a question about the 877LM and is the answer not in the manual?
Questions and answers