ZOOM H6essential Manual
- Operation manual (142 pages) ,
- Manual (21 pages) ,
- Quicktour (20 pages)
Advertisement
- 1 Attaching the XY mic capsule (XYH-6e)
- 2 Inserting microSD cards
- 3 Turning the power on
- 4 Making settings when first turned on
- 5 Preparing to record with the XY mic
- 6 Preparing to record with inputs 1–4
- 7 Recording
- 8 Playing recordings
- 9 Accessing online help (2D code)
- 10 Functions of parts
-
11
Troubleshooting
- 11.1 Sound is not output or the volume is very low
- 11.2 Monitored sound is distorted
- 11.3 "MIC INPUT OVERLOAD!" or "INPUT 1 (2/3/4) OVERLOAD!" appears
- 11.4 Recording is not possible
- 11.5 The recorded sound breaks up
- 11.6 Not recognized by computer when connected
- 11.7 Date and time are reset frequently
- 11.8 Operation is not possible
- 12 Documents / Resources
Attaching the XY mic capsule (XYH-6e)
Removing the cover from the mic capsule connector

Attaching the XY mic capsule (XYH-6e)
Attach by sliding until a clicking sound is made.
")
Inserting microSD cards

Supported recording media:
microSDHC: 4 GB – 32 GB
microSDXC: 64 GB – 1 TB
We recommend using microSD cards that have been confirmed to operate with this product. See the ZOOM website (zoomcorp.com) for information about microSD cards that have been confirmed to work with this unit.
- Always turn the power off before inserting or removing a microSD card.
- To remove a microSD card, push it further into the slot and then pull it out.
Turning the power on

Power can also be supplied through the USB (Type-C) port by connecting a commercially-available portable battery or a dedicated AC adapter (AD-17).
Making settings when first turned on
Use  (select) and
  (confirm/execute) according to the screen.

Accessibility setting
A function that can enable audio guidance and beep sounds is included to assist use by people with vision impairments.

Language setting
Press ![]() to return to the previous screen.
to return to the previous screen.

Date format setting
The year, month and day will be used in recording file names in the order set here.

Date and time settings
- Select a setting item and confirm.

- Change the value and confirm.

- After setting all the items, select "OK" to complete setting the date and time.


Battery type setting

We recommend running SD card tests on microSD cards after purchasing them new or using them with a different device.

After settings are complete, the Home Screen will open.
Home Screen overview

Preparing to record with the XY mic
Enabling tracks
The indicator will light red, showing it is ready to record.

Connecting headphones and adjusting the volume

Reducing noise from wind and vocal pops

 can be pressed to return quickly to the Home Screen (from most screens).
Tip to improve recording sound quality
If the H6essential is placed directly on a table, reflected sound can interfere with recording and reduce clarity. We recommend using a tripod, for example, to distance it from the table. Placing a handkerchief, for example, can also be effective in reducing sound reflected from a table.

Preparing to record with inputs 1–4
Connecting dynamic/condenser mics

Turn on phantom power for inputs that have condenser mics connected.

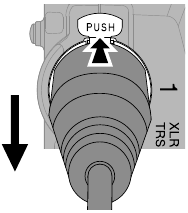
When disconnecting an XLR plug, pull it while pushing  on the connector.
Connecting wireless mics
If the receiver output jack is stereo mini, use an adapter for XLR conversion.

Connecting mixers and other line-level equipment
Use a cable or adapter so that a TRS plug is used to connect to the H6essential.

When stereo-linked, tracks are recorded as a stereo file with the odd-numbered track on L and the even-numbered track on R.

Adjusting the monitoring mix

Select a track and confirm.

Adjust the monitoring balance and confirm.
Press  to return to the Home Screen.

Recording
- The indicator will light red and recording will start.

- This ends recording.


Slide  toward HOLD when recording to prevent misoperation.
Using the Recording Screen

 MARK MARK | This adds a marker for cueing during playback. |
 OUTPUT OUTPUT | Use this to set the line output level. |
 TRASH TRASH | This stops recording and moves the file to the trash. |
Playing recordings
This starts playback.

Using the Playback Screen

 FILE LIST FILE LIST | This opens the FILE LIST Screen. |
 AB REPEAT AB REPEAT | Use this for repeat playback of a specified range (A–B). |
| OUTPUT | Use this to set the line output level. Use this also to normalize the audio and set the playback speed. |
 EXPORT EXPORT | Use this to convert and export files. |
 TRASH TRASH | This moves the file to the Trash. |
Accessing online help (2D code)
Select Help from the SYSTEM menu to show a 2D code.
Scan it with a smartphone to access detailed documents about the product.
")
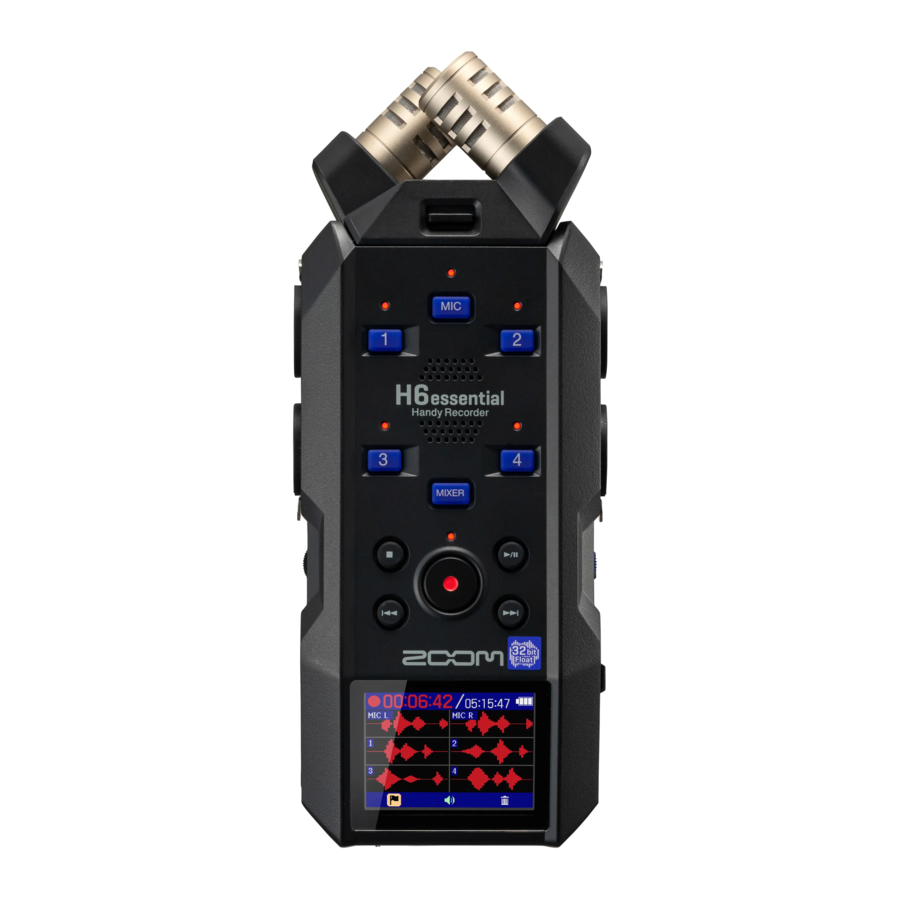
Functions of parts
Top

 Mic capsule (XY mic)
This stereo mic has two crossing directional mics. This mic can record three-dimensional sound with natural depth and width.
 Track buttons/Status indicator
Press a track button, lighting its status indicator red, to enable that track for recording.
 Speaker
Sound is output here during file playback.
 MIXER button
This opens the Mixer Screen.
 Transport buttons
STOP button: This stops recording or playback.
PLAY/PAUSE button: This starts/pauses playback of recorded files.
REC button/Indicator: This starts recording. The indicator lights during recording.
REW button: This skips to the previous file. Press and hold this to search backward.
FF button: This skips to the next file. Press and hold to search forward.
 Display
This shows various types of information.
Left side

 INPUT 1, INPUT 3 jacks
Connect mics and instruments to these. These support XLR and 1/4-inch phone (TRS) plugs.
VOLUME dial
Use this to adjust the volume output from the speaker and headphones.
Headphone jack
This can output sound to headphones.
USB port (Type-C)
Connect this to a computer, smartphone or tablet to use file transfer and audio interface functions.
This supports operation on USB bus power.
Use a USB cable that supports data transfer.
LINE OUT jack
This outputs sound to a connected device.
Right side

microSD card slot
Insert a microSD card here.
Select dial
Use this to select menu items.
 ENTER button
Press this to confirm menu items.
INPUT 2, INPUT 4 jacks
Connect mics and instruments to these. These support XLR and 1/4-inch phone (TRS) plugs.
Front end

POWER/HOLD switch
Use this to turn the power on/off and to disable button operation.
REMOTE connector
Connect a ZOOM BTA-1 or other dedicated adapter here.
This enables use of the H6essential Control smartphone/tablet app to operate the H6essential wirelessly.
Bottom
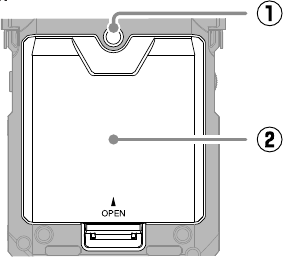
Tripod mounting threads
Use these when connecting a tripod.
Battery cover
Open this when installing and removing AA batteries.
Troubleshooting
Sound is not output or the volume is very low
- Check the headphone and LINE OUT connections.
- Confirm that the headphone volume and line output level are not too low.
- Check the orientation of the mic or the volume settings of the connected equipment.
- Check the mixer settings.
Monitored sound is distorted
- Use
![]() to adjust the volume.
to adjust the volume.
 to adjust the volume.
"MIC INPUT OVERLOAD!" or "INPUT 1 (2/3/4) OVERLOAD!" appears
- The input sound is too loud. Increase the distance between the mic and the sound source.
- Wind can also cause loud noises to be input. We recommend using the Lo Cut setting to reduce noise if air is blown directly at a mic, for example, when recording outdoors or when a mic is near the mouth of a speaker.
Recording is not possible
- Confirm that the microSD card has open space.
- Confirm that a microSD card is loaded properly in the card slot.
The recorded sound breaks up
- Test the microSD card. See the Operation Manual for details.
- Use the H6essential to format the microSD card.
- We recommend using microSD cards that have been confirmed to operate with this product. See the ZOOM website (zoomcorp.com) for information about microSD cards that have been confirmed to work with this unit.
Not recognized by computer when connected
- Use a USB cable that supports data transfer.
Date and time are reset frequently
- If power is not supplied by an AC adapter or batteries for a long time, date and time settings will be reset.
If the Set Date/Time Screen appears during startup, set them again.
Operation is not possible
- Confirm that
![]() is not set to HOLD.
is not set to HOLD.
 is not set to HOLD.
Documents / Resources
References
Download manual
Here you can download full pdf version of manual, it may contain additional safety instructions, warranty information, FCC rules, etc.
Advertisement


Need help?
Do you have a question about the H6essential and is the answer not in the manual?
Questions and answers