Table of Contents
Advertisement
Quick Links
Advertisement
Table of Contents

Related Manuals for ELEKTRA EKLIPTO


Summary of Contents for ELEKTRA EKLIPTO
- Page 1 User Manual...
- Page 3 Elektra product. Our customers can exploit the "Product registration' procedure within 6 months from the billing by Elektra therefore extending the validity of the Warranty for another 6 months, with respect to the date of billing After 6...
-
Page 4: Table Of Contents
CONTENT 1. INTRODUCTION 1.1 Identification data of the manufactorer 1.2 Recipients 1.3 Purpose of this manual 2. SIMBOLS DESCRIPTION 3. DESCRIPTION OF THE MACHINE 3.1 General 3.2 Keypad 3.3 Machine identification data and name plates 3.4 Dimensional drawing 3.5 Table of technical data 4. - Page 5 7. PROGRAMMING 7.1 Programming doses 7.2 Reading and resetting counters 7.3 Editing parameters 8. CLEANING 8.1 Non-ordinary maintenance and service operation 8.2 Cleaning frequency table 8.3 Display cleaning 8.4 Cleaning of the machine surface 8.5 Wand cleaning 8.6 Coffee group cleaning 8.7 Periodic boiler emptying 8.8 Cleaning of the sprayhead, filter holder and filter 9.
-
Page 7: Introduction
1. INTRODUCTION 1.1 IDENTIFICATION DATE OF THE MANUFACTURER MANUFACTURER: ELEKTRA SRL OPERATING HEADQUARTERS: ELEKTRA SRL Via Bonisiolo 15, Mogliano Veneto 31021 (TREVISO) ITALY info@elektracoffee com www.elektracoffee.com AFTER-SALES SERVICES: service@elektracoffee.com All the machine manuals are available for download in the reserved area at: aftersales.elektracoffee.com... -
Page 8: Purpose Of This Manual
1.3 PURPOSE OF THIS MANUAL The present manual was drafted to provide the user with all the information necessary to use the machine correctly, highlighting the residual risks and also those deriving from an incorrect use. This manual is integral part of the machine it is supplied with and must be carefully stored. -
Page 9: Description Of The Machine
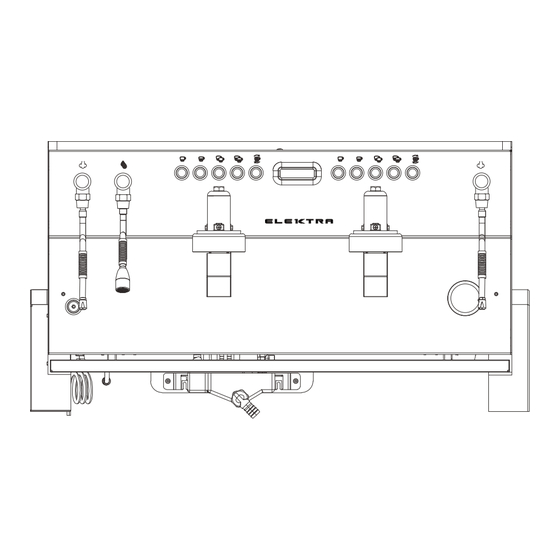
3. DESCRIPTION OF THE MACHINE 3.1 GENERAL Steam lever ON/OFF switch Power cord Hot water lever Coffee group Water inlet Brewing buttons Pressure gauge Double portafilter Display Deep tray Single portafilter Steam wand Cup warmer Hot water wand Water outlet... -
Page 10: Keypad
The nameplate must not be removed for any reason, under penalty of forfeiture of the guarantee and the unavailability of spare parts, which IMPORTANT cannot be identified. 04/24 Model: EKLIPTO E2 Input:220-240V 50-60 Hz Nominal power: 3150W S/N EKXXXXXX Boiler press.: Pn=1.3 Bar=0.13MPa Inlet water press: min 0.10MPa / max 0.60Mpa... -
Page 11: Dimensional Drawing
3.4 DIMENSIONAL DRAWING... -
Page 12: Table Of Technical Data
3.5 TABLE OF TECHNICAL DATA Description 1 GROUP 2 GROUPS DIMENSIONS 866x588xH470 NET WEIGHT HEIGHT WORKING AREA (with portafilter) NO. OF SELECTION BUTTONS DISPLAY BOILER CAPACITY BOILER HEATING 2800W ELEMENT PROTECTION OF BOILER Resettable double HEATING thermostat GAUGE 1 Double scale VOLTAGE SUPPLY Single phase 220- 240V 50-60Hz... -
Page 13: Safety Precautions
Keep this booklet in a safe and accessible place for further consultation. 4.1 INTENDED USE EKLIPTO is a professional machine The machine is not intended for d e s i g n e d a n d b u i l t o n l y a n d outdoor use. -
Page 14: General Warnings
4.2 GENERAL WARNINGS The use of any electric appliance implies the observance of some fundamental rules. The appliance should be installed from a professional skilled technician with knowledge about electrical connections and WARNING Hydraulic connections. In case of any doubt please contact the authorized distributor. Do not touch the appliance with your hands or feet wet or damp Do not pull the power cord to disconnect the plug from the power WARNING... - Page 15 Access to the service areas is restricted to those persons with the relevant practical experience, especially in terms of safety and hygiene. • The appliance must be installed only in places where it can be checked by skilled personnel. • The machine can only be used by children aged from 8 years and above and persons with reduced physical, sensory or mental capabilities or lack of experience and knowledge, if they are supervised or have been instructed on the safe use of the equipment and understand the hazards involved.
-
Page 16: Residual Risk
IMPORTANT After unpacking check that the machine is not damaged. If in doubt, do not use the machine and contact an Elektra authorized Service Centre. WARNING... -
Page 17: Positioning
4.6 POSITIONING The machine is not suitable for the installation in close proximity of water jets or heat sources. At a distance of 150 mm from walls or other objects to facilitate ventilation. Position the appliance horizontally on a flat, stable surface so that the upper part of the machine is more than 1.5 metres above the floor. -
Page 18: Cleaning 1
4.9 CLEANING Before carrying out any intervention that involves manual cleaning of the internal parts, be sure to have cut off the power to the machine using the main switch or by disconnecting the power cable. Do not clean the machine with direct jets of water and do not immerse it in water or other liquids. -
Page 19: Installation
5. INSTALLATION Make sure that the machine has been installed by qualified technical personnel, Installation must be carried out according to the manufacturer's instructions. WARNING An incorrect installation can cause damage to persons, animals or things; the manufacturer declines all responsibility for such situation. WARNING 5.1 POSITIONING OF THE MACHINE 150mm... - Page 20 • Before connecting to the water mains, flush the pipe with approximately 5 litres of water from the tap. • For the correct use of the machine, it is essential for the customer to install an external Softener Filter with a water check valve system. •...
-
Page 21: Power Main Connection
5.3 POWER MAINS CONNECTION The connection to the electricity mains must be made by a qualified technician in compliance with current regulations. The technician must make sure that the electrical system is properly connected to the WARNING earthing system and that the line voltage and frequency correspond to the data shown on the identification plate. -
Page 22: Power On
5.4 POWER ON 1. After connecting the machine to the water supply, make sure that the tap is open. V 1.12 2. Turn the power button to the “I” position to switch on the machine. The display shows the software version for a few seconds. - Page 23 HEATING BOILER 105 C 4. Heating the boiler. During the heating stage, the display shows the boiler temperature and all LEDs on the button panel light up in sequence from right to left. Wait approx. 20 minutes for the set temperature to be reached.
-
Page 24: Boiler Emptying At First Start-Up
5.5 BOILER EMPTYING AT FIRST START-UP After switching on the machine for the first time, it is necessary to empty the boiler to eliminate any residues. This operation must be repeated once a week so that the water is periodically replaced;... -
Page 25: Circuit Flushing At The First Start-Up
5.6 CIRCUIT FLUSHING AT FIRST START-UP When installed for the first time, dispense 1.5 litres of water from each delivery point by pressing the coffee group head dispensing buttons, those of the hot water wand, and lowering the levers so that steam comes out for 1 minute. - Page 26 Place the cup under the spout. Press a button relating to the drink to be d i s p e n s e d ; r e f e r t o p a r a g r a p h " 3 . 2 Function of dispensing buttons"...
-
Page 27: Steam Dispensing
6.2 STEAM DISPENSING The steam dispensing is used to manually heat and froth the milk and is performed using the wand lever on the side of the machine, right or left, depending on the configuration. Place a container with milk under the wand and lower the lever. -
Page 28: Programming
7. PROGRAMMING 7.1 PROGRAMMING DOSES With the machine switched on in brewing mode, press the button on the panel SELECT DRINK 120C of the first group on the left and hold it down for ten seconds until you see GR.X PROGRAMMING. -
Page 29: Reading And Resetting Counters
When programming is complete, after a few seconds the machine returns to its initial SELECT DRINK brewing mode. 120C To exit the programming stage without making any changes, wait thirty seconds without pressing any keys. IMPORTANT 7.2 READING AND RESETTING COUNTERS With the machine switched on in brewing mode, press the button on the panel of... -
Page 30: Editing Parameters
Cleaning cycle Checking the counter to monitor the cleaning carried out by each group present (GR). Press buttons to scroll through the Cleaning cycle groups and review the number of cleanings performed for each key. Pr e s s t o m o v e o n t o t h e s u b s e q u e n t parameter. - Page 31 Languages To set the desired language from those present in the LANGUAGE software on the display (Italian, English, German, Dutch, ENGLISH Polky, Espaniol) Temperature measurement unit Temp. Meas. Unit To change the temperature display mode, °C or °F. °C Boiler temperature To change the boiler temperature, from a minimum of Boiler temperat.
- Page 32 Water filter To program the number of liters for the water filter. This parameter can be used when the machine is connected to Water filer a water softener to prevent scale formation in the hydraulic system. When the set parameter is reached, the machine displays a WATER FILTER alarm.
-
Page 33: Cleaning
8. CLEANING Read and strictly respect the safety instructions before performing any type of intervention on the machine. See the Quick Guide supplied with IMPORTANT the machine. Do not use solvents, chlorine-based products or abrasive agents to carry cleaning operations. Do not clean the machine with direct water jets and WARNING never immerse the machine in water or other liquids. -
Page 34: Display Cleaning
8.3 DISPLAY CLEANING Clean the display with a soft, dry cloth. 8.4 CLEANING OF MACHINE SURFACE Clean the exterior of the machine daily using a non-abrasive sponge moistened with a non-aggressive detergent. Rinse thoroughly and dry with a soft cloth. 8.5 WAND CLEANING Clean the wands frequently with a damp cloth to prevent residues from encrusting the... -
Page 35: Coffee Group Cleaning
Steam wand 1 Take a container with 500ml of cold water and mix with 50 ml of Carimali liquid detergent. 2 Put the steam wand in the container and, for a total of 10 times, lower and lift the steam wand (1 second low, 10 seconds high). -
Page 36: Periodic Boiler Emptying
Switch off the machine. Switch the machine on using the main switch while simultaneously holding down keys (of the group to CLEANING be washed) until the button LEDs light up and the message Cleaning, where “GR1" stands, for example, for Group Hold down until dispensing begins, which consists of ten pulses for a total duration of 100 seconds. -
Page 37: Cleaning Of The Sprayhead, Filter Holder And Filter
8.8 CLEANING OF THE SPRAYHEAD, FILTER HOLDER AND FILTER Carry out this operation when the machine is cold and with the main switch in the “0” position. WARNING To remove other coffee residues, use the brush supplied to wipe the coffee group spray head and the filter holder. - Page 38 ( t h e k i n d r e c o m m e n d e d b y Elektra). Soak all metal components for about 10 minutes.
- Page 39 -Lift the grill. -Lift the bowl and remove it, empty it out and wash it well using water and dishwashing detergent. If necessary, remove any residues with a pipe cleaner; Check that the direct drain is not clogged as this could cause the tank to fill up and stop the machine from working.
-
Page 40: Error Messages
9. ERROR MESSAGES ALARM CODE ERROR TYPE DESCRIPTION CHECK FILLING UP Boiler filling alarm Filling Time Out. The Check that the water feed cock is open. T.O. boiler filling stage has e x c e e d e d t h e Check that the water connection pipe is not maximum time of 120 crushed or disconnected. -
Page 41: Led Lights
10. LED LIGHTS Eklipto is provided of a decorative RGB LED line on the back. This can be set through the holes on the top of the machine. The RGB LED strip has 20 built-in colors and two working modes.
Need help?
Do you have a question about the EKLIPTO and is the answer not in the manual?
Questions and answers