Bartscher Silversteam2 5230M Original Instruction Manual
Hide thumbs
Also See for Silversteam2 5230M:
- Manual (94 pages) ,
- Manual (20 pages) ,
- Original instruction manual (18 pages)
Advertisement
Quick Links
Advertisement

Related Manuals for Bartscher Silversteam2 5230M


Summary of Contents for Bartscher Silversteam2 5230M
- Page 1 Silversteam2 5230M - 5110M - 7110M - 10110M 116822 - 116826 - 116828 - 116831...
- Page 2 Bartscher GmbH Phone: +49 5258 971-0 Franz-Kleine-Str. 28 Fax: +49 5258 971-120 D-33154 Salzkotten Technical Support Hotline: +49 5258 971-197 Germany www.bartscher.com Version: 1.0 Date of preparation: 2024-11-05...
- Page 3 Original instruction manual Safety ......................2 Explanation of Signal Words ..............2 Safety instructions..................3 Intended Use ................... 6 Unintended Use ..................6 General information ..................7 Liability and Warranty ................7 Copyright Protection ................7 Declaration of Conformity ................ 7 Transport, Packaging and Storage ..............
- Page 4 Safety Diese Bedi enungsanlei tung besc hrei bt di e Installation, Bedi enung und Wartung des Geräts und gilt als wic htige Inform ationsquelle und N achschl agew erk. Z najom ość w szystkich zaw artyc h w ni ej wsk az ówek dotycz ącyc h bezpi ecz eńs twa i obsł ugi stanowi w arunek bez pi ecz nej i prawi dłow ej pr acy z urządz eni em. Ponadto należy przestrzeg ać odpowi ednio do mi ejsca użytk owani a urządz eni a l okal nyc h przepis ów dotycz ącyc h z apobieg ani a wy padk om oraz og ólnyc h zas ad BH P. This ins truc tion m anual is an integral part of the pro duct and m ust be kept i n the imm edi ate vici nity of the devic e for installati on, operation, m aintenanc e and cleani ng pers onnel to acc ess at all times . If the devic e is pass ed on to a thir d pers on, the operating instructions m us t al so be handed over.
- Page 5 Safety WARNING! The signal word WARNING warns against hazards that may lead to moderate or severe injuries or death if the hazards are not avoided. CAUTION! The signal word CAUTION warns against hazards that may lead to light or moderate injuries if the hazards are not avoided. , di e IMPORTANT! The signal word IMPORTANT indicates possible property damages,...
- Page 6 Safety • Always completely unwind the power cord. • Never place the appliance or other objects on the power cord. • Always take hold of the plug to disconnect the appliance from the power supply. • Check the power cord regularly for damage. Do not use the appliance if the power cord is damaged.
- Page 7 Safety Operator’s responsibility The operator is responsible for complying with the currently applicable laws, regulations, ordinances and existing national regulations on accident prevention, environmental protection, as well as the internal operation, operating and safety instructions that apply at the respective installation site. Obligations of the operator: •...
- Page 8 Safety Improper Use • Unintended or prohibited use may cause damage to the appliance. • The appliance may only be used when its technical condition is flawless and allows for safe operation. • The appliance may only be used when all connections are executed according to rules of law in force.
- Page 9 General information General information Liability and Warranty The appliance was built in accordance with the current state of the art and recognized technical safety principles. Nevertheless, during its use, there may be a threat to the health and life of the user or bystanders, or the danger of damage to the device or other assets.
- Page 10 Transport, Packaging and Storage Transport, Packaging and Storage Delivery Check Immediately upon reception, check the delivery for completeness and possible shipping damage. In the case of visible transport damage refuse to accept the appliance or accept it conditionally. Mark and note the scope of damage in shipping documents/consignment list of the shipping company and lodge a complaint.
- Page 11 Technical Data Technical Data Version / characteristics of combi steamers 116822, 116826, 116828, 116831 • Series: Silversteam2 • Operating mode: electric • Appliance connection: ready to plug in (116822) / 3NAC (116826, 116828, 116831) • Functions: – forced air – steaming –...
- Page 12 Technical Data Technical Specifications Name: Combi steamer Silversteam2 5230M 116822 Art. No.: Material: CNS 18/10 Thermal processing chamber material: CNS 18/10 Number of guide rail pairs: Guide rail format: 2/3 GN Distance between guide rail pairs, in Temperature range, min.–max., in °C: 50 - 280 Time setting, from–to, in min.:...
- Page 13 Technical Data Name: Combi steamer Silversteam2 5110M 116826 Art. No.: Material: CNS 18/10 Thermal processing chamber material: CNS 18/10 Number of guide rail pairs: Guide rail format: 1/1 GN | 600 x 400 Distance between guide rail pairs, in Temperature range, min.–max., in °C: 50 - 280 Time setting, from–to, in min.: 0 - 120...
- Page 14 Technical Data Name: Combi steamer Silversteam2 7110M 116828 Art. No.: Material: CNS 18/10 Thermal processing chamber material: CNS 18/10 Number of guide rail pairs: Guide rail format: 1/1 GN | 600 x 400 Distance between guide rail pairs, in Temperature range, min.–max., in °C: 50 - 280 Time setting, from–to, in min.: 0 - 120...
- Page 15 Technical Data Name: Combi steamer Silversteam2 10110M 116831 Art. No.: Material: CNS 18/10 Thermal processing chamber material: CNS 18/10 Number of guide rail pairs: Guide rail format: 1/1 GN | 600 x 400 Distance between guide rail pairs, in Temperature range, min.–max., in °C: 50 - 280 Time setting, from–to, in min.: 0 - 120...
- Page 16 Technical Data Protective Measures The combi steamer is equipped with the following safety and protective mechanisms: Protective thermostat in thermal processing chamber: if temperature in the thermal processing chamber reaches 350°C, the thermostat interrupts the supply circuit of the appliance's heaters. WARNING! That protection must be reactivated by technical service personnel as its operation indicates that other elements must be inspected.
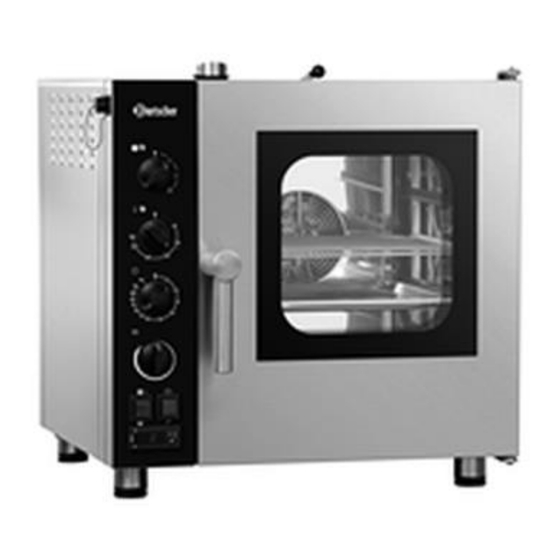
- Page 17 Technical Data List of Components of the Appliance Fig. 1 1. Housing 2. Control panel 3. Ventilation openings 4. Thermal core probe connection 5. Vapour extraction 6. Humidity discharge valve 7. Fan (2 pcs) 8. Air control plate 9. Guide rails 10.
- Page 18 Installation Instructions Installation Instructions Installation CAUTION! Incorrect installation, positioning, operation, maintenance or misuse of the appliance may lead to personal injury or property damage. Positioning and installation, as well as repairs may be performed by authorised technical service only and in compliance with the applicable national law.
- Page 19 Installation Instructions Transport to Installation Room Use protective clothing and use a forklift to move the appliance to the room where it is to be installed: To ensure proper transportation, forks should be inserted from the left-hand side or from the rear side, and NEVER from the front side (Fig.
- Page 20 Installation Instructions Fig. 3 Fig. 4 When choosing an installation site, keep the following factors in mind (Figure 4): – NEVER leave flammable, explosive nor heat-sensitive items near the appliance; – NEVER place explosive items (e.g., gas cylinders nor pressurised cylinders) near the appliance, otherwise there is a risk of deflagration;...
- Page 21 Installation Instructions Appliance Preparation • Prior to installation, check that all components required for installation are available and intact. If a component is missing or damaged, contact the manufacturer or dealer. Removal of protective films (Fig. 5) • Carefully remove protective film from the appliance. Remove any adhesive residue with a suitable solvent, without damaging the surface with tools nor aggressive or corrosive cleaning agents.
- Page 22 Installation Instructions Appliance Positioning To ensure proper height of use, the appliance should be placed on: – a suitable piece of equipment (Fig. 7); – a base supplied by the manufacturer; – another oven of the same series (using the appropriate and optionally available connecting kit);...
- Page 23 Installation Instructions Minimum distances to be maintained (Fig. 9, 10) • Before positioning the appliance, check the dimensions and exact positions of the electric, water, and vapour extraction connections. • Install the appliance only: – under a hood of sufficient power; •...
- Page 24 Installation Instructions ATTENTION! Appliances, whether stationary or on a cart, must be — if necessary — easy to move for any emergency maintenance work. Make sure that any masonry structures that may be constructed after installation (e.g., walls, new narrower doors, renovations, etc.) does not adversely affect the operation of the appliance.
- Page 25 Installation Instructions Electrical Connection • Before connecting the appliance to the power supply, make sure that voltage and frequency values on the rating plate are conforming to the existing electric installation. Connect the appliance only if the above mentioned parameters are consistent with each other! The allowable voltage deviation is ±10%.
- Page 26 Installation Instructions The appliance is delivered with a certified power cord and plug: it is prohibited to manipulate them or modify them. Potential Equalising Connection • Each appliance must be integrated into an efficient potential equalising system that complies with the regulations in force in the country of installation.
- Page 27 Installation Instructions Fig. 14 • It is recommended to: – install (not included in the delivery) a shut-off valve a (Fig. above) between the water connection and the appliance, so that the appliance can be disconnected from the water supply if necessary; –...
- Page 28 Installation Instructions Inlet Water Properties The inlet water must feature the following properties: Drinking water quality Maximum temperature 15°C ±5 (cold water) Hardness (CaCO3) 3–9 °f (30–90 ppm; 1.5–5 °d) Pressure 1.5–3 bar (150–300 kPa) 7.0–8.5 TDS (residual solids) 40–150 mg/l Langelier index >0,5 Salt and Metal Ion Content...
- Page 29 Installation Instructions Drain Connection • Water used for humidification or cleaning is drained from the heat processing chamber through a drain, which can sometimes contain fats dripping from food, especially if fatty foods (e.g., poultry) are frequently processed. Fig. 15 •...
- Page 30 Installation Instructions Steam Exhaust Connection ATTENTION! It is mandatory for the appliance to be installed under a kitchen hood with sufficient capacity. Depending on the model, there are one/two fume extraction hoods at the rear of the appliance, as well as a shaft for exhausting vapour/moisture normally generated during the thermal processing.
- Page 31 Installation Instructions Inspection During Commissioning When commissioning, the following conditions must be met: – Internal lighting switches on automatically. – The appliance is switched off after opening the door and is switched on again after closing it. – The temperature setting thermostat in the appliance is triggered only when the set temperature is reached.
- Page 32 Operating Instruction Operating Instruction Indications for the User WARNING! Risk of burns! During operation, the housing and appliance door become very hot and remain hot for a while after switching the appliance off. Never touch the appliance during operation or immediately after it has been switched off.
- Page 33 Operating Instruction • When the combi steamer is to be placed on another combi steamer or appropriate base it is not recommended to use guides higher than the ones enabling the user to look into the container. Due to safety reasons, when the appliance is installed, it is mandatory to place a safety sticker at the height of 1600 mm from the floor, saying: 'Risk of burning! Hot liquid inside the container!', which is part of the delivery.
- Page 34 Operating Instruction Fig. 17 Fig. 18 • To provide for perfect and uniform thermal processing of food, we recommend using GN containers or baking trays with limited height, in order to secure good and suitable air circulation (Fig. 18). • There must be a clearance of at least 2 cm between the top GN container/baking tray and food in bottom food containers.
- Page 35 Operating Instruction overloading it, to ensure effective air circulation between GN containers/baking trays: Owing to this thermal processing results can be optimised and processing times can be reduced. Recommendations for cooking Roasting For more effective cooking, it is recommended to place the roasted foods on the steel rod grill in order to achieve more uniform cooking between the upper and lower part without having to turn the product during cooking.
- Page 36 Operating Instruction chamber temperature must be maximum 3 °C-5 °C higher than the temperature which the core must reach. E.g. for an average fillet (60°C in the core) set the device temperature at 63 °C. Pasteurisation in a container In that process the product is considered pasteurised when the core temperature reaches a value between 83 °C and 85 °C.
- Page 37 Operating Instruction • Reinigen Sie das Ger ät und Zubehörteile vor dem Gebrauch gründlic h nac h den Anweis ungen im Absc hnitt 6 „R einigung“. Uw aż ać, aby do ins tal acji elek trycz nej i skrzy nki rozdzi elcz ej ni e dostała się w oda. Trocknen Sie das Ger ät und Zubehörteil e gründlic h ab! •...
- Page 38 Operating Instruction Control Panel Function selector knob OFF position Cooking/roasting Cooking/roasting with steam Combi steaming Temperature control Setting of cooking/roasting with steam (approx. 110°C) Temperature scale in °C (50–280) Timer Unlimited time position Time scale in minutes (0–120) Steam injection controller Steam injection scale (1–10) Fan speed selector switch Level 2 fan speed setting...
- Page 39 Operating Instruction Settings Cooking/Roasting With Hot Air 1. To set the cooking/roasting with hot air, rotate the M 1 function selector knob clockwise to I 2 position. 2. Then, set the temperature by rotating the M 2 temperature controller clockwise to the selected position. 3.
- Page 40 Operating Instruction Cooking/roasting with steam 1. To set the cooking/roasting with steam, rotate the M 1 function selector knob clockwise to I 3 position. 2. Then, set the temperature by rotating the M 2 temperature controller clockwise to the selected position. For traditional cooking/roasting with steam, it is recommended to set the appliance to 110°C, which is marked as I...
- Page 41 Operating Instruction Combi steaming (cooking/roasting with air circulation/steam) 1. To set the cooking/roasting with air circulation/steam, rotate the M 1 function selector knob clockwise to I 4 position. 2. Then, set the temperature by rotating the M 2 temperature controller clockwise to the selected position.
- Page 42 Operating Instruction Cooking/roasting with thermal core probe 1. Us the M 1 function selector knob to select the cooking/roasting mode, rotating it to one of the following positions: I 2 – I 3 – I 4. 2. Set the temperature by rotating the M 2 temperature controller clockwise to the selected position.
- Page 43 Operating Instruction • Reinigen Sie das Ger ät und Zubehörteile vor dem Gebrauch gründlic h nac h den Anweis ungen im Absc hnitt 6 „R einigung“. Uw aż ać, aby do ins tal acji elek trycz nej i skrzy nki rozdzi elcz ej ni e dostała się w oda. Trocknen Sie das Ger ät und Zubehörteil e gründlic h ab! •...
- Page 44 Operating Instruction Dishes Recommended core temperature Beef tenderloin 53 °C - 58 °C Beef (cutlet, entrecôte, steak) 50–55°C: light thermal processing 55–65°C: medium thermal processing 66–70°C: strong thermal processing Pork tenderloin 58 °C - 64 °C 72 °C - 75 °C Veal roast 80 °C - 85 °C Pork knuckle/ribs...
- Page 45 Operating Instruction Humidity Discharge Valve The humidity extraction function consists in removal of humidity that may condense in the thermal processing chamber during cooking/roasting process. 1. Set the discharge valve lever to the following positions: left: VALVE CLOSED right: VALVE OPEN Also, when the discharge vale is closed, there is no threat of overpressure in the thermal processing chamber existing, for the...
- Page 46 Cleaning and Maintenance Cleaning and Maintenance The operator must ensure that the device and its safety components are kept in good condition. Control and safety systems should be checked for their effectiveness. Maintenance, cleaning and repairs must only be carried out by suitably trained and specialised personnel.
- Page 47 Cleaning and Maintenance Safety Instructions for Cleaning • Before cleaning, disconnect the appliance from the power supply. • Leave the appliance to cool down completely. • Make sure water does not enter the appliance. Do not immerse the appliance in water or other liquids during cleaning.
- Page 48 Cleaning and Maintenance Cleaning User's Regular Cleaning 1. To secure correct operation, hygiene and efficiency, clean the appliance regularly at the end of each working day, and, if necessary, also in the meantime or when the appliance is not to be used for a longer time. With regular cleaning you may avoid burning leftovers of baked goods and roasts.
- Page 49 Cleaning and Maintenance Guide Rails To facilitate the cleaning of the thermal processing chamber, remove guide rails from the appliance. 1. Loosen knurled screws (1) (right and left). 2. Slide the guide rails up (2) and take them out of the thermal processing chamber (3).
- Page 50 Cleaning and Maintenance Control Panel Ventilation Filter Clean the control panel ventilation filter at least once a month. 1. Pull the ventilation filter from its holder by holding its sides with your fingers. 2. Clean the ventilation filter manually with the use of water and soap.
- Page 51 Possible Malfunctions Maintenance • Regularly (at least once a year), have an authorized and specialised personnel verify the appliance. To this end, contact the service company. • Before attempting any maintenance works, disconnect the power supply, close water supply and completely dry the appliance. •...
- Page 52 Disposal Error Solution If the appliance does not switch on following the actions above, contact the service company. Fan stops during Switch the appliance off and wait for the motor overheating operation protection to be automatically re-set Make sure that ventilation openings are not covered nor obstructed If the malfunction persists, contact the service company Water does not...
Need help?
Do you have a question about the Silversteam2 5230M and is the answer not in the manual?
Questions and answers