Advertisement
Quick Links
CHC i83
GNSS RTK Receiver
with Internal 2-Watt UHF Radio, 4G Cell Modem
User Manual
Also see the Getting Started Guide for your selected Field Software.
This manual is for use with CHC i83 RTK GNSS receivers sold by iGage Mapping Corporation.
The CHC factory User Manual may supplement the information contained in this document. See
https://igage.com/out/CHC/i83/usermanual/index.htm:
Receivers purchased from other sources that appear to be similar will not match internal components provisioned
by iGage: Cell Modems, UHF Radios, OEM GNSS receivers, firmware and registration.
The 'iGx Download Tool' supplied with only works with receivers purchased from iGage. The download tool is not
sold separately.
23 November 2024
CHCi83_UserManual_RevM_85_110_505.docx
1
CHC i83 User Manual
Advertisement

Related Manuals for CHCNAV CHC i83


Summary of Contents for CHCNAV CHC i83
- Page 1 Also see the Getting Started Guide for your selected Field Software. This manual is for use with CHC i83 RTK GNSS receivers sold by iGage Mapping Corporation. The CHC factory User Manual may supplement the information contained in this document. See https://igage.com/out/CHC/i83/usermanual/index.htm:...
- Page 2 ‘iGage Mapping Corporation’ are Trademarks of iGage Mapping Corporation of Salt Lake City Utah, USA. CHCNAV is a trademark of Sanghai Huace Navigation Technology Limited. All product and brand names mentioned in this publication are trademarks of their respective holders.
- Page 3 This device must accept any interference received, including interference that may cause undesired operation. An FCC License is required to use the i83 as a UHF Base in transmit mode. See https://igage.com/fcc.htm: Also consult the section Radio Notices on page 12 of this User Manual. CHC i83 User Manual...
- Page 4 Downloading, Processing and Archiving Static Data ..29 Technical Support .............. 6 Installing the Download Tool .......... 29 iGage sourced CHC i83 receivers ........6 Starting the iGx Download Tool ........29 iGage CHC i83 ..............6 Downloading Data ............29 USB Cable Download .............
- Page 5 Manually Converting Heights ........70 #8 GPS Suitable Locations ..........54 Examples................. 70 Best Case Scenario ............54 Warranty ..............71 Worst Case Scenarios .............55 #9 Optimizing Occupations in the Real-World .....58 Exclusions ................. 71 #10 Mission Planning .............58 RMA .................. 72 CHC i83 User Manual...
- Page 6 Don’t hesitate to call iGage for assistance deploying, using or updating your device. Remote assistance is available. iGage sourced CHC i83 receivers The iGage sourced i83 is a variant of the CHC i83. There are many versions of the receiver differing by hardware options: GNSS Antenna and Antenna Model...
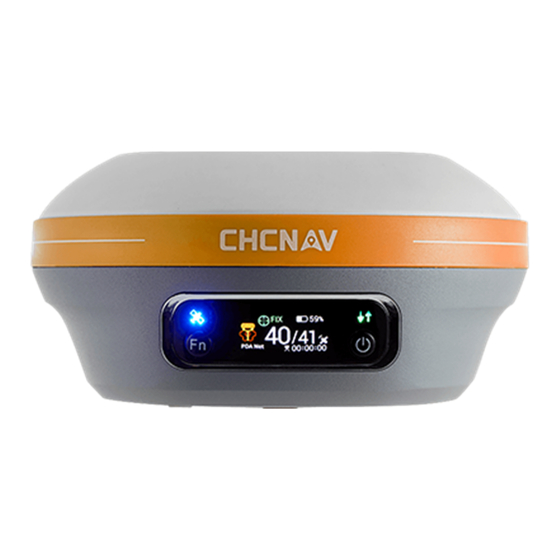
- Page 7 Battery charge Solution type Current observation recording time SV Used/Tracking Indicates the number of satellites that the receiver is tracking: Satellite LED When the receiver is searching and not tracking satellites it blinks Blue once every 5-seconds. CHC i83 User Manual...
- Page 8 Connect a UHF Radio Antenna when using the Internal UHF Base or Internal UHF Rover mode. An antenna is not required when using: NTRIP, APIS or Static Only operation. An antenna is required if the i83 is a UHF Base or UHF Rover. CHC i83 User Manual...
- Page 9 GNSS engine, high-speed IMU for tilt compensation, a 2-watt Tx/Rx UHF radio, a 4G cellular GSM modem, Bluetooth radio, and Display. Note: the i83 may be delivered with an orange or blue decorative band. There is CHC i83 User Manual...
- Page 10 Sealed rugged hard cases with custom foam inserts, and plenty of open compartments to protect your receiver and accessories. Optional Accessories iGA, High Gain UHF Antenna Extends UHF Radio range, excellent spare antenna in case the factory antenna is broken. CHC i83 User Manual...
- Page 11 DO NOT leave the i83 or accessories inside a vehicle in the summer. Temperatures higher than 160°F will permanently reduce battery capacity and battery life. GNSS receivers and especially Lithium-Ion batteries are like puppies: In the summer if you leave them in your vehicle with the windows rolled up, you will kill them. CHC i83 User Manual...
- Page 12 U.S. Food and Drug Administration. Persons with pacemakers should: • ALWAYS keep the radio more than 6 inches (15 cm) from their pacemaker when the radio is turned ON. CHC i83 User Manual...
- Page 13 Type Wattage 35 Watts Mobile; 35 Watts Base Bandwidth 12.5 kHz Interconnection None Digital Data Emission Type The States where you might work or ‘USA’ Location Antenna Mounted On Survey Tripod, not to exceed 20 feet CHC i83 User Manual...
- Page 14 Base Output Power Setting You probably will want the radio in your Base to output as high of power as possible. If 2-watts with an elevated antenna is not sufficient, we recommend purchasing a high-power repeater. CHC i83 User Manual...
- Page 15 7002 Register: Expiration date Register: FOREVER RTK V: 8.1 RTK: Primary Version Number Click to return to OEM V: 14259 OEM: GNSS Board firmware version the Main Menu UHF V:04.04.06 UHF: Radio Firmware version CHC i83 User Manual...
- Page 16 Format: CHC516, RTD, CMR, RTCM2.3, RTCM3.0, RTCM3.2. (Only asked for Base operation.) CHC516 is preferred and should be compatible with any modern receiver that accepts RTCM3.2 correction formats. (Only asked for Base operation.) OK: select and click to save changes. CHC i83 User Manual...
- Page 17 IMU Tilt Enabled Note: Carlson has dropped support for all CHC receivers from all versions of SurvCE and SuvPC higher than 6.08. If you absolutely must use SurvCE or SurvPC, please read these detailed instructions: CHC i83 User Manual...
- Page 18 Connecting a computer or Mobile Device Device Wi-Fi Overview: SSID: GNSS-####### device-serial-number Wi-Fi Key: (open) if a Wi-Fi Password is requested, try 12345678 Address: 192.168.1.1 port: User Name: admin lower case password: password lower case CHC i83 User Manual...
- Page 19 If a password is requested, try 12345678, then click on Next. Open a browser window on your PC and type in the GPS IP address: http://192.168.1.1 A Login screen will be shown: and the is password. Login Account admin Password CHC i83 User Manual...
- Page 20 America, the modem power must be cycled to reset the cellular network. In other words, if the receiver is turned on and you insert or change the SIM card, you must cycle the receiver’s power. Configuring the APN and Dialing parameters with LandStar8 Connect to the receiver. From the main menu Config (tab), click the Advanced button: CHC i83 User Manual...
- Page 21 Configuring the APN and Dialing parameters with the Web Interface Follow the Wi-Fi connection instructions ‘Connecting to a PC or Smartphone via Wi-Fi’ on page 18. Click on the left bar item Network Setting then Network: Mobile Network Setting: CHC i83 User Manual...
- Page 22 ‘Call Sign’ which must be broadcast at least once every 15-minutes. You can download the iGx_RadioChannel.exe tool along with prebuilt common radio frequency groups from the iGage.com website: https://igage.com/out/RadioChannelFiles/cfg_WebInterface/index.htm CHC i83 User Manual...
- Page 23 Open a browser and go to this address http://192.168.1.1/set_en.html (1) Click on ‘Choose File’ and browse to the settings file, then (2) click on ‘Upload radio channel list’ the new radio table list will be installed in the head. CHC i83 User Manual...
- Page 24 Once you configure the caster, it will stay setup until a complete factory reset is performed. This is a once and done configuration. 1. Connect to the receiver via Wi-Fi as shown in ‘Connecting to a PC or Smartphone via Wi-Fi’ on page 18. CHC i83 User Manual...
- Page 25 2. The receiver status screen will be displayed: 3. Click on I/O Settings: 4. Click on the button for the first line, usually line 8: Connect TCP Server… 5. The TCP Server/NTRIP Caster dialog is shown: Configure: CHC i83 User Manual...
- Page 26 Login to the receiver as shown above. Click on Receiver Configuration, then Reference Station Settings: Base. Click on Reference Station Mode Manual The receiver’s autonomous position will be loaded, click Save to start Base operation at the entered coordinate. CHC i83 User Manual...
- Page 27 The i83 receiver can directly record 3 types of observation files: RINEX2 Legacy: no longer suitable for GNSS receivers. RINEX3: correct choice if you don’t want to use the iGx_Download helper tool. HCN: correct choice if you want to use iGx_Download. CHC i83 User Manual...
- Page 28 By default, the i83 will record one file and then stop recording. To record continuous files, log into the device web interface as shown in the section Connecting to a PC or Smartphone via Wi-Fi on page 18. Click on Data Recording, then Settings: These are the settings for making multiple 120-minute-(2-hour) files: CHC i83 User Manual...
- Page 29 The receiver mounts just like a USB thumb drive (flash drive) on your computer. No special drivers are required. To download data from your receiver: 1. Turn on the GPS receiver. 2. Plug the USB-C connector into the USB hole on your receiver: and the other end into a USB port on your computer. CHC i83 User Manual...
- Page 30 Connect to the receiver from your computer using Wi-Fi. Click on the Network icon in the System Tray Find the receiver, it will be named ‘GNSS-xxxxxxxx‘ followed by the full serial number of your device: Click on the receiver, then click on Connect: CHC i83 User Manual...
- Page 31 Clicking twice on the header will reverse the grid sort order. If you have any short or unneeded occupations, you can select and delete them with: <- the ‘Delete Occupation’ button. For each required observations, enter the values you recorded in your field book: CHC i83 User Manual...
- Page 32 If you are using the occupation file in another application select the ‘Configuration’ tab, then choose 'Show Advanced Settings = Normal’ (or Advanced). An ‘Export RINEX’ button will now be shown on the main ‘Occupations’ tab: CHC i83 User Manual...
- Page 33 ‘Antenna Type’, the ‘Antenna Height’ and the ‘Email address.’ Next the program will prompt you with instructions for automatically entering the Zipped observation file name into the browse dialog: CHC i83 User Manual...
- Page 34 When files are downloaded from the receiver, the receiver type is associated with the .HCN file. The ‘Receiver Model’ shows an occupation’s associated hardware type: If this is consistently incorrect, you can change the device type while the receiver is connected on the ‘Configuration’ tab. CHC i83 User Manual...
- Page 35 (Hidden when Simple) Pressing the button will launch the UNAVCO TEQC tool and run a standard RINEX QC run on the currently selected observation file. When the run is complete, the results will be shown in a window: CHC i83 User Manual...
- Page 36 After you send a file, the resulting filename will be shown. You need to let the factory support person know what the filename is so they can find it on our servers. Advanced Configuration Settings Configuring the Download Tool Click on the 'Configuration' tab: At a minimum enter these values: CHC i83 User Manual...
- Page 37 There are similar Archive buttons on the main page: one archives the current occupation and the other archives the entire current project. The download tool does not provide a method to restore these backups, however they are standard ZIP files, and the Windows operating system does include a tool to decompress them. CHC i83 User Manual...
- Page 38 > Clear data > Clear To delete/cleanup these read-only receivers you log into the Web interface, click on Settings: Then use the Clear buttons: to clear the recording bins or ‘Clear All’ files on the receiver. CHC i83 User Manual...
- Page 39 Meters for you. SLANT HEIGHT in Meters: If you measure a slant height in meters, enter an ‘S’ after the measurement and the program will compute the vertical height for you. CHC i83 User Manual...
- Page 40 If you select RINEX2 then you can individually remove observations from GNSS constellations. ‘Included Excluded CORS Stations’ (Hidden when Simple) iGx Download will automatically fill in the Included and Excluded CORS boxes for OPUS submissions (both using the online form and OPUS_Upload). CHC i83 User Manual...
- Page 41 When you submit a file to OPUS, you need to provide your Email address so the OPUS processor can return a solution to you. The email address that you enter here will be automatically entered for all submissions performed by the program. 'Show Advanced Settings' CHC i83 User Manual...
- Page 42 Format Extended (Only shown when PPP Service = OPUS) The NGS returns three styles of reports: Standard: Single Page Report Extended: Standard + baseline details + State Plane in (s)Ft Standard + XML: Single Page + XML CHC i83 User Manual...
- Page 43 Clicking this button runs the CHCData tool in manual mode. You can browse for HCN files and manually convert them to standard RINEX files. Results are always placed in a subfolder named ‘RINEX’ under the file to be converted. CHC i83 User Manual...
- Page 44 GPS Settings (Hidden when Simple) To modify the ‘GPS Settings’ or view the log, select the 'Configuration' tab, then choose 'Show Advanced Settings = Advanced.’ When ‘Advanced’ is selected, two more tabs will be displayed: CHC i83 User Manual...
- Page 45 If you are working in Southwest Nevada, along the high line of Montana or in North or South Dakota, OPUS-RS probably will not succeed, and you will need to collect at least 2-hours of data for submission to OPUS-STATIC. CHC i83 User Manual...
- Page 46 # FIXED AMB: 162 / :95% ARP HEIGHT: 0.0083 OVERALL RMS: 0.011(m) REF FRAME: NAD_83(2011)(EPOCH:2010.0000) IGS08(EPOCH:2014.2452) -2184137.494(m) 0.003(m) -2184138.362(m) 0.003(m) -3839941.381(m) 0.001(m) -3839940.177(m) 0.001(m) 4585410.516(m) 0.005(m) 4585410.529(m) 0.005(m) LAT: 46 15 35.23578 0.005(m) 46 15 35.25052 0.005(m) CHC i83 User Manual...
- Page 47 Survey style: OPUS-Static, OPUS-Rapid Static, OPUS-Projects. d. Consider FGDC Standards: http://www.fgdc.gov/standards/projects/FGDC-standards-projects/accuracy B. Are there passive marks available for control? Will CORS, passive or a combination control the survey? b. Are local passive marks recoverable, undisturbed, sufficient quality, stable and GPS friendly? CHC i83 User Manual...
- Page 48 NGS project ID: 1. Turn ON OPUS-Projects support. On the ‘Configuration’ tab, set ‘Show Advanced Settings’ to “Support OPUS-Projects” or “Advanced”: 2. Add the NGS registered OPUS-Projects ‘Project Identifier’ supplied by your project administrator: Click the “+” button CHC i83 User Manual...
- Page 49 OPUS always returns an email. Always. But missing solutions is a common issue. If you are not getting solutions or an error message back, the missing solutions have been trapped in your email SPAM filter or you have entered your email address incorrectly on the submission form. CHC i83 User Manual...
- Page 50 In many areas a single offline CORS station without data will make OPUS-RS impossible. #4 Daily vs. Hourly CORS Availability If you click a CORS station pin on the NGS CORS map, you will get a station summary which includes an ‘Availability’ note. There are two availably types: Daily CHC i83 User Manual...
- Page 51 We submit both occupations to OPUS Tuesday morning, the day after we collect the observations. OPUS returns the first solution, and it looks fantastic with 98% observations used and an ellipsoid height RMS error estimate of 0.011 meters. CHC i83 User Manual...
- Page 52 Have top quality leveling mounts. • Are bolted to stable masonry structures or well-engineered ground monuments. • Have booked coordinates that are within 2 cm of their apparent actual location. • Have state of the art choke ring antenna. CHC i83 User Manual...
- Page 53 The position trends are very stable and are within 1 cm horizontal and vertical of the published IGS08 positions. The average locations and all the error bars are fully contained in the green error bands. Coupled with continuous recent Data Availability this station appears to be a great CORS resource. CHC i83 User Manual...
- Page 54 ‘GPS suitable’ in the context of OPUS submissions. Let’s compare good and bad locations. Best Case Scenario The best possible site would have a clear view of the sky above 10° at all azimuths where there is a possibility of a GPS satellite being in the sky: CHC i83 User Manual...
- Page 55 However, in general, you should avoid the following scenarios. Semi-Trucks and Trains This bench mark is 3 feet north of the eastbound edge-of-pavement of I80 near Green River Wyoming: CHC i83 User Manual...
- Page 56 Trees (with or without leaves) directly above the antenna prevent the receiver from having a clear view of the sky. Even though this location has open water to the South, it is directly underneath large trees. Water can also be a source of significant multipath (see the next section). This is a location: CHC i83 User Manual...
- Page 57 It was set prior to the construction of the power line. This is a location. You should avoid locations that are under high voltage transmission lines and have large steel towers directly to the south. CHC i83 User Manual...
- Page 58 Here is a typical GPS Only Mission Planning example: Lower DOP is better than higher DOP. You can see that most of the day, DOP is excellent. Most OPUS submissions will be successful. However, starting at 5:30 pm there are large DOP spikes. CHC i83 User Manual...
- Page 59 SHMP (Slant Height Measurement Point) vertical offset to a metric vertical height. The process is described on page 69 Error! Bookmark not defined.in the ‘‘Slant Height’ to ‘Vertical Height’:’ section of this User Manual. CHC i83 User Manual...
- Page 60 There are two primary reasons: number of satellites and baseline length. Number of Satellites and Signals OPUS is GPS only. Modern GNSS RTK uses additional satellites (GLONASS, Galileo, BeiDou) and additional signals like GPS L2C, GPS L5 and GLONASS L3. CHC i83 User Manual...
- Page 61 Fresnel beam width reaches the receiver with no obstructions. How wide is the Fresnel beam along the path? Much wider than you think! Here is a beam-width chart for GPS L1 (1.575 GHz): CHC i83 User Manual...
- Page 62 Try another USB port, try another USB cable. The factory cable has purple plastic inside the cable housing. Use an external USB Hub (this fixes intermittent disk mounts.) Try another computer. Try turning off your PC, wait a minute and then turn it on again. Reinsert the USB cable. CHC i83 User Manual...
- Page 63 OEM Board (the GNSS Engine) UHF Radio Board All three are updated using a similar process via the Wi-Fi interface. 1. Charge the receiver to at least 50%. 2. First download the desired firmware files from https://igage.com/out/CHC/i83/firmware/index.htm: CHC i83 User Manual...
- Page 64 Click on the network icon in tool tray (1), then expand the list of available connections (2): Click on the device with GNSS-serial_number of your receiver: Click on Connect. No password will be required for the i83: CHC i83 User Manual...
- Page 65 5. Open a browser window and navigate to the address 192.168.1.1: Login Account admin and the Password password (lower case). Click Login. 6. Click on Firmware, then Firmware info to see the current firmware version: Main Board Firmware version: CHC i83 User Manual...
- Page 66 OEM Board Click on Hardware Version to see the Firmware: Main Board 7. To update the firmware click on Firmware Update Then click on Browse To update the OEM Board : click on GNSS Board Upgrade: CHC i83 User Manual...
- Page 67 Then click on Browse 8. Select the correct downloaded firmware file: 9. Click the Confirm button: CHC i83 User Manual...
- Page 68 Connect a PC, tablet or smartphone to the Wi-Fi web interface as shown in ‘Connecting to a PC or Smartphone via Wi-Fi’ section on page 18. Once connected, from the Main Menu: Click on Receiver Configuration: Receiver Reset then Clear Satellite Data Confirm. Front Panel Reset Click to move to the Main Menu: CHC i83 User Manual...
- Page 69 Ground Mark (GM) to the top of the Measure Up Plate, which is the same as the ARP and BAM. Place the Measure-Up Plate directly under the receiver with the embossed arrow facing up: CHC i83 User Manual...
- Page 70 Receiver Radius SHMP r (meters) h (meters) 0.1240 vertical height slant height r: Length of Measure-Up-Bar The SHMP is 0.000 m. Examples Measured Slant s Slant s Vertical (feet) v (m) 6.965 2.123 2.119 5.148 1.569 1.564 CHC i83 User Manual...
- Page 71 (iii) unauthorized attachments or modification. Service performed or attempted by anyone other than an authorized IMC or CHCNav service center. That the receiver will be free from any claim for infringement of any patent, trademark, copyright, or other proprietary right, including trade secrets.
- Page 72 The Purchaser shall always pay shipping to IMC, IMC will return warranty repairs by UPS ground, unless the Purchaser agrees to prepay expedited service costs. IMC will not pay for warranty returns to destination outside of the United States. The purchaser shall always pay any associated duty associated with warranty repairs. CHC i83 User Manual...
Need help?
Do you have a question about the CHC i83 and is the answer not in the manual?
Questions and answers