Advertisement
Quick Links
Advertisement

Subscribe to Our Youtube Channel
Summary of Contents for DMP TMSentry Panel
- Page 1 TMSentry™ Panel SYSTEM USER GUIDE...
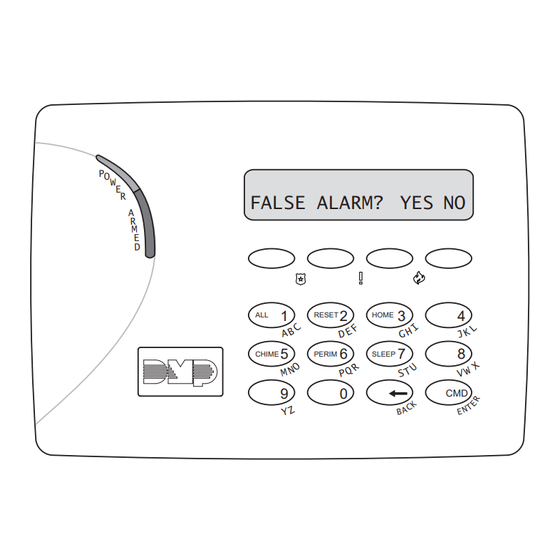
- Page 2 HOW TO HANDLE AN ALARM Enter your user code at the keypad. You will see: FALSE ALARM? YES NO or CANCEL VERIFY FALSE ALARM? YES NO RESET HOME CHIME PERIM SLEEP REAL ALARM Press NO or VERIFY to notify to the emergency monitoring station. Your system will remain armed.
- Page 3 TABLE OF CONTENTS Use Your Keypad ..........2 LCD Keypad .................2 Arm Your System ..........4 System Type ...............4 Arm Your System ...............4 Disarm Your System ..........5 Disarm Your System ............5 How to Handle an Alarm ..........5 User Menu .............. 6 Access User Menu .............6 Description of Each Option ...........6 Outputs On/Off ..............6...
- Page 4 USE YOUR KEYPAD LCD Keypad Power and Armed LEDs The DC Power and Armed LEDs indicate your system’s power and armed status. Select Keys Use the select keys to type and navigate in the keypad. 32-Character Power LED Display 2:52 Armed LED Select Keys Panic Keys...
- Page 5 Command (CMD) Use CMD to move forward through each section of the user menu. You can also press CMD to save information you have just entered. Back Arrow Use the back arrow to back up one step while in the user menu. You can also press the back arrow once to erase the last character you entered.
- Page 6 ARM YOUR SYSTEM System Type Your system is divided into up to six areas. Each area has been assigned a custom name, can be armed or disarmed, and can limit system control to only those users with proper authority. Arm Your System Press CMD on the keypad until ARM DISARM displays.
- Page 7 DISARM YOUR SYSTEM Disarm Your System Press CMD on the keypad until ARM DISARM displays. Select DISARM. The keypad displays ALL? NO YES. Select YES to disarm all areas. Select NO to disarm individual areas and select YES to disarm the area or NO to leave the area armed.
- Page 8 USER MENU Access User Menu The User Menu allows you to manage users and user codes, manage schedules, display system events, control outputs, and send service requests. Press the CMD key until MENU? NO YES displays. Select YES. The keypad displays ENTER CODE. Enter your user code. You can now scroll down through the list of system features available to you.
- Page 9 User Codes There are three characteristics associated with each user code that define its capabilities within the system. CHARACTERISTIC EXAMPLE User Number User Code 3848 User Name John Doe Authority Level Master User Number Users are numbered from 1 to 30. This number identifies them to the system and can be transmitted to the monitoring center when they arm or disarm the system.
- Page 10 USER AUTHORITY OPTION SCHEDULED LIMITED STANDARD MASTER ✔ ✔ ✔ ✔ Arm and Disarm ✔ ✔ ✔ ✔ Alarm Silence ✔ ✔ ✔ Outputs On/Off ✔ User Codes ✔ Schedules ✔ ✔ Extend ✔ Set Time ✔ ✔ ✔ ✔ Display Events ✔...
- Page 11 Adding User Codes Add up to 30 users. Press the CMD key until MENU? NO YES displays. Select YES. The keypad displays ENTER CODE. Enter the default master code, then press CMD until USER CODES? displays. Press any select key. The keypad displays ADD DEL CHG. Select ADD to add a new user code.
- Page 12 Changing Your Own User Code At USER CODES?, press any select key. The display changes to USER CODE? CODE NO: ******. Press any select key. The user code is erased and display changes to CODE NO. Type your new user code. Press CMD. Display will show USER XXXX CHNGD to confirm the change. Changing User Codes At USER CODES?, press any select key.
- Page 13 Schedules Permanent Schedules Permanent schedules are used for automatic arming and disarming and always occur at the same time until you change or delete them. Press the CMD key until MENU? NO YES displays. Select YES. The keypad displays ENTER CODE. Enter your user code. Press CMD to scroll to SCHEDULES? displays.
- Page 14 Output Schedules Add an Output Schedule At SCHEDULES?, press any select key. The keypad displays PRM EXT OUT. Select OUT. At the OUTPUT NO display, enter the output number you want to program. Press the CMD key. The keypad displays SUN MON TUE WED. Press the CMD key to display THU FRI SAT. Select the day you want to program.
- Page 15 Date and Time Change the Day, Date, or Time that is currently in the system. Press the CMD key until MENU? NO YES displays. Select YES. The keypad displays ENTER CODE. Enter your user code. Press CMD to scroll to TIME? and press any select key.
- Page 16 COMMON KEYPAD DISPLAYS Listed below are several keypad messages you may see on the display. Follow the instructions in the Possible Solutions column to correct the problem. In many cases, you need to call a service person to correct the problem. Displays not discussed here indicate your service representative should be called.
- Page 17 Information furnished is believed to be accurate and reliable. This information is subject to change without notice. Digital Monitoring Products, Inc. TMSentry User Guide...
- Page 18 I N T R U S I O N • F I R E • A C C E S S • N E T W O R K S DESIGNED, ENGINEERED, AND MANUFACTURED IN SPRINGFIELD, MISSOURI USING U.S. AND GLOBAL COMPONENTS. DMP.COM | LT-2867 | 24281...


Need help?
Do you have a question about the TMSentry Panel and is the answer not in the manual?
Questions and answers