
Related Manuals for Haier HOQ-F6QAN3GB/EE


Summary of Contents for Haier HOQ-F6QAN3GB/EE
- Page 1 Built-in Electric Oven USER GUIDE Model: HOQ-F6QAN3GB/EE HOQ-F6QAN3WB/EE HOQ-F6QAN3GG/EE HOQ-F6QAN3DG/EE Please read this instruction before using your Haier appliance.
- Page 2 CONTENTS SAFETY AND WARNINGS ..........1 INSTALLATION INSTRUCTIONS ........5 PRODUCT DIMENSIONS ..........7 FIRST USE ..............13 FUNCTION APPLICATION ..........15 COOKING GUIDE ............16 COOKING FUNCTIONS ..........19 AUTO PROGRAM FOR COOKING ........23 CARE AND CLEANING ...........38 TROUBLE SHOOTING ...........50 ALERT CODES ...............52...
- Page 3 SAFETY AND WARNINGS lectrical Shock Hazard Turn the oven off at the wall before replacing the oven lamp. Failure to follow this advice may result in electrical shock or death. ut Hazard Take care - some edges are sharp. Failure to use caution could result in injury or cuts. ire Hazard Do not place aluminium foil, dishes, trays, water or irreversibly damage the enamel;...
- Page 4 ot Surface Hazard Accessible parts may become hot when in use. To avoid burns and scalds, keep children away. Use oven mitts or other protection when handling hot surfaces such as oven shelves or dishes. Use care when opening the oven door. Let hot air or steam escape before removing or replacing food.
- Page 5 Do not leave children alone. Children should not be left alone or unattended in the area where the appliance is in use. They should never be allowed to sit or stand on any part of the appliance. Children of less than 8 years old must be kept away from the appliance unless continuously supervised.
- Page 6 Always keep oven vents unobstructed. Do not operate your appliance by means of an external timer or separate remote-control system. Caution: Hot air can blow from the vent at the top of the oven as part of the oven’s cooling system. Placement of oven shelves: always position shelves in the desired location while the oven is cool (before preheating).
- Page 7 INSTALLATION INSTRUCTIONS SAFETY AND WARNINGS lectrical Shock Hazard Always disconnect the appliance from the mains power supply before carrying out any maintenance or repairs. Connection to a good earth wiring system is essential and mandatory. Alterations to the domestic wiring Failure to follow this advice may result in electrical shock or death.
- Page 8 IMPORTANT SAFETY INSTRUCTIONS o avoid hazard, follow these instructions carefully before installing or using this appliance. Please make this information available to the person installing the appliance - doing so could reduce your installation costs. This appliance must be installed and connected to the mains installation instructions and in compliance with any applicable local building and electricity regulations.
- Page 9 PRODUCT DIMENSIONS Overall height of product Overall width of product Overall depth of product Height of chassis Width of chassis Depth of chassis Depth of oven frame and control panel Depth of oven door when fully open...
- Page 10 IMPORTANT! IFTING: Do not lift the oven by the door handle.Use the handles on the side of the chassis (if present). Remove all packaging and dispose of it responsibly. Recycle items that you can. Place the unpacked oven onto wooden blocks or similar supports to prevent damaging the lower edge of the oven.
- Page 11 The voltage corresponds to the value given on the rating plate. Mode code Volume Rated Power Rated Voltage Rated Frequency HOQ-F6QAN3GB/EE HOQ-F6QAN3WB/EE 3480W 220-240V~ 50/60Hz HOQ-F6QAN3GG/EE HOQ-F6QAN3DG/EE Connect the power wire to a terminal block of your home.
- Page 12 1.Position the oven in the prepared cavity. IMPORTANT! o not lift the oven by the door handle. 2.Open the oven door fully. 3.Use the supplied screws to secure the oven to the cabinetry. IMPORTANT! o not over-tighten the screws. Do not seal the oven into the cabinetry with silicone or glue. This removing the oven, or of damage caused by this removal.
- Page 13 Shelf positions...
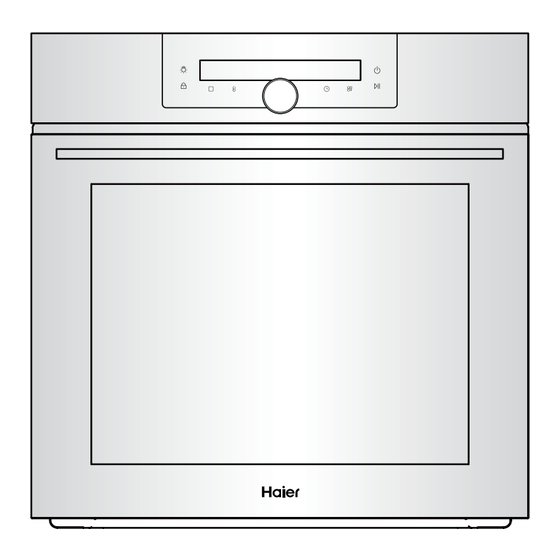
- Page 14 Cooking Functions Display ON/OFF Oven Lamp Auto Functions Childproof Lock Temperature Time Start / Pause Function Select Knob Intelligent Program Display Indicator Temperature/Time Display Temperature Duration Clock Time Childproof Lock Timer...
- Page 15 FIRST USE to set the clock in order to use the oven. Setting the Clock 2. Use to set the time. 3.Press Change the time 1.You can choose one of the 3 functions in cycles by touching continuously. Stop touching when the indicator appear.
- Page 16 Condition the oven for cooking or baking. Conditioning will burn off any manufacturing residues and ensure that you get the best results from the start. 1.Touch , use to select the Bake function. Each function has a preset temperature and so the oven will start heating at the Bake preset temperature of 180°C.
- Page 17 FUNCTION APPLICATION Tested in accordance with the EN 60350-1 for the purpose of energy consumption declaration and energy class. You can change the time settings by at any time. Touch repeatly to set the Cooking duration, Timer and Up time in circles.
- Page 18 Set timer To set a countdown. This function has no effect on the operation of the appliance. Choose and set the time. When the time ends, an acoustic signal sounds. The Timer can be also used when the appliance is turned off.
- Page 19 While the oven is heating the grill element may be on. Do not open the door until at least 3/4 of the way through cooking. Make sure cake pans do not touch each other or the sides of the oven. When baking double the recipe (especially cookies) you may need to increase the time by a couple of minutes.
- Page 20 GRILLING This is a healthier alternative to frying. Always grill with the oven door completely shut. If you use glass or ceramic pans, be sure they can withstand the high temperatures of the grill. To avoid piercing the meat and letting juices escape, use tongs or a spatula to turn the meat halfway through cooking.
- Page 21 COOKING FUNCTIONS IMPORTANT! epending on your model, you may only have some of these functions. Use all the functions with the oven door closed. Bake upper outer and lower elements Heat comes from both the upper and lower elements. The fan is not used in this function.
- Page 22 Fan Grill fan plus upper inner and outer elements This function uses the intense heat from the upper elements for top browning and the fan to ensure even cooking of foods. Meat, poultry and vegetables cook beautifully; food is crisp and brown on the outside while the inside remains moist and tender.
- Page 23 Pastry Bake fan plus lower element This function will PREHEAT for around 8 minutes to 180°C. The fan circulates heat from the lower element throughout the oven. Provides intense heat to the base of foods and allows gentle top-browning. Roast stage1:fan plus upper inner and outer elements stage2:upper inner and lower elements Searing:...
- Page 24 Classic Bake lower element only Heat comes from the lower element only, the fan is not used. This is the traditional baking function, suitable for recipes that were developed in older ovens. Bake on only one shelf at a time. The oven will be hotter at the top.
- Page 25 AUTO PROGRAM FOR COOKING delicious, also can help to clean your appliance easily. You can select intelligent program by turning to scroll all functions. Using Dough Proof Use this function to proof dough before baking it. You may proof the dough multiple times if required.
- Page 26 IMPORTANT! o not put dough in before the oven has cooled down. 4. If you set a duration for dough proof, when the dough proof A tone will sound and you can take the bowl out of oven. much larger in size). To check if your dough has proofed, gently If you don`t set a duration, you must monitor the proof status of dough and stop the proof by holding when the dough proof is...
- Page 27 Vacuum Cooking 1. Use this function to cook food in lower temperature than normal cooking. You can cook meat, vegetables or fruit to make them tender and juicy. Handle the food with special care for better quality. IMPORTANT FOR FOOD SAFETY: Use high quality raw materials that is as fresh as possible Always keep raw materials in correct conditions before you cook them.
- Page 28 Set the vacuum degree to the highest possible to make the cook faster and more even. To guarantee a safe closing of the vacuum bag, make sure that the area subject to the seal is clean. 2. General Guidance for Vacuum Cooking: You can add some oil and spices to the food depending on your taste.
- Page 29 Thickness of Amount of Temperature Time Shelf Food food food (g) (°C) (min) position Lamb/Game Lamb 105-115 medium Boar Rabbit 1.5cm boneless Poultry Chicken breast boneless Duck breast 140-160 boneless Turkey breast 75-85 boneless Low Temperature eggs Perfect to put on toast Regular size Yolk malleable, shapeable,still soft,...
- Page 30 Thickness of Amount of Temperature Time Shelf Food food food (g) (°C) (min) position Fish and Seafood Sea bream Scallops big size 100-110 Prawns big size 26-30 without shell 2.3 Vacuum Cooking: Vegetables Peel the vegetables where necessary. Some vegetables can change their colour when you peel them and cook in a vacuum bag.
- Page 31 Amount of Temperature Time Shelf Food Thickness of food food (g) (°C) (min) position Vegetables Potatoes slices of 1 cm Artichoke cut in quarter hearts 2.4 Vacuum Cooking: Fruits and sweets Peel the fruits, remove the seeds and cores where necessary. To keep the colour of the apples and pears, put them in water with lemon juice after you clean and cut them.
- Page 32 Pizza Mode This function will PREHEAT for around 18 minutes to 300°C. The fan circulates heat from the lower element throughout the entire oven. Excellent for cooking pizza as it crisps the base beautifully without overcooking the topping. For best results, pre-heat a pizza stone for at least 1 hour and bake on oven shelf position 1 or 2.
- Page 33 Replicates the conditions used in an air fryer. A healthier way of frying which crisps food while using less oil. For best results, coat food with 1—2 tablespoons of oil. For pre-packaged food: if the manufacturer’s cooking advice suggests using a function that isn’t fan-based, decrease temperature by 20°C (70°F).
- Page 34 The recommended setting temperature is 60-110°C. If necessary, cut it into equal chunks or thin slices. Place unpeeled fruit onto the dish with the sliced surfaces facing upwards. Ensure that neither fruit nor mushrooms overlap on the wire rack. Grate vegetables and then blanch them. Allow the blanched vegetables to drain off and distribute them evenly on the wire rack.
- Page 35 WARM, as this function alone will not bring cold food up to a high enough temperature to kill any harmful bacteria. Last Used Recipes Your Haier Oven can memory recipes you used in past 1 times automatically. Then you can cook easily by selecting the past 5 recipes.
- Page 36 3. Press to start the function, the display will show 00:20 and the remaining time will count down. 4. An acoustic signal sounds when the program is completed. 5. Wipe the internal surface of the appliance with a non-abrasive surface care sponge. You can use warm water or oven detergents to clean the cavity.
- Page 37 First Second Time in mins/ Shelf Level Level Food Status Shelves Funcation Amount of Position Code Code food P1-1 Rare 20/450g Beef Single Wire P1-2 Medium Roast 25/450g (Boneless) Rack P1-3 Well Done 35/450g P2-1 Rare 30/450g Prime RIB Single Wire P2-2 Medium Roast...
- Page 38 Sabbath setting This setting is designed for religious faiths that observe a ‘no work’ requirement on the Sabbath. While your oven is in Sabbath setting: The display and indicators will be unlit, the buttons will be unresponsive excluding power key and light key. No tones or beeps will sound.
- Page 39 Sound volume setting 1. Touch and hold together for 3s, the display will show 2 .Use to scroll to sound volume setting and the display will show show 3. Use to change the status of sound( 4. Press to save the setting and quit. The default setting of sound is Display brightness setting 1.
- Page 40 CARE AND CLEANING Manual cleaning ALWAYS NEVER the oven. to cool down to a safe temperature to touch, then turn its power supply off at cloths, scouring pads or steel wool. the wall. Some nylon scourers may also scratch. the ‘Safety and warnings’ section before you start cleaning your oven.
- Page 41 lways read the label to make sure that your stainless steel cleaner does not contain detergent and hot water, then wipe chlorine compounds as these are corrosive and may damage the appearance of your oven. stainless steel cleaner and polish. lways rub the stainless steel in the direction of the grain.
- Page 42 Clean with a solution of mild detergent and hot water. Pre-soak stubborn burnt-on stains in a solution of dishwasher powder and hot water. Except for the baking tray these parts are also dishwasher safe. Clean with a solution of mild detergent and hot water.
- Page 43 Removing the side racks IMPORTANT! cooled down completely before starting. Remove all shelves: Slide out all shelves and remove. For easier access we recommend removing the oven door. See Remove both side racks: a coin to loosen the screw if necessary. 1.
- Page 44 Replace the side rack: 1. Slide the rear prongs of the side rack into the holes at the rear of the oven. Fixing nut Side r ack Rear prongs separately) IMPORTANT! ompact ovens only: The sliding shelf supports cannot be used on shelf positions 3 and 4. 1.
- Page 45 To remove Grasp the slide and rotate the bottom up to release the the clips and remove. the slides to the top wire of a shelf position (shelf positions 1 & 2 only in compact ovens) both sides of each pair of slides. Slide in the shelves you need, making sure that: They slide between the two wires of a shelf position (unless a sliding shelf support is being use)
- Page 46 IMPORTANT! ake care, the oven door is heavy. To remove the door: 1.Holding the door on both sides, 1.Open the door fully. line up the holes in the base of Locate the two small metal locking the door with the hinges and slide levers on both door hinges either the door on.
- Page 47 Removing the door glass panes for cleaning. IMPORTANT! lways turn off the oven at the wall before lowering the upper element. Make sure the oven has cooled down completely before starting. Make sure you follow the precautions and instructions below very carefully.
- Page 48 To remove the inner pane 1. Touch the glass retainer tabs in on both sides of the door. 2. Pull the glass retainer up until the tabs relocate in the topmost hole. 3. Holding the top of the inner pane, gently pull the pane toward the top of the door until the pane is clear of the clamp at the bottom of the door and lift out.
- Page 49 After cleaning replace the door glass panes. When replacing the glass panes make sure that you replace the inner pane correctly as shown. The pane must to ensure that the oven operates safely and correctly. you take extra care not to bump the edges of the glass against any object or surface you do not force any of the panes into remove them and start the process again from the beginning.
- Page 50 Replace the inner pane Ensure the pane is the right way up (ie the logo should be readable at the bottom of the door) 4. Slide the pane into the notch at the bottom of the door. 5. Lower the pane onto the clamp at the top of the door. 6.
- Page 51 Replacing the oven light bulbs This product contains one or more light sources of energy efficien- cy class X. Note: Oven bulb replacement is not covered by your warranty. The light is located in the ceiling of the oven, center front. 240V, 50Hz and 25W.
- Page 52 TROUBLE SHOOTING Troubleshooting chart Repairer or Customer Care. PROBLEM POSSIBLE CAUSES WHAT TO DO General Check that the mains power supply (wall switch) is turned The oven does not No power. on, the fuse has not tripped work. and there is no power outage in your area.
- Page 53 PROBLEM POSSIBLE CAUSES WHAT TO DO General For safety reasons the I can feel hot air cooling fans will continue blowing out of the to run even when you have This is normal. vents after I have turned the oven off. The fans turned the oven off.
- Page 54 ALERT CODES If there is a problem, the oven will: automatically suspend all oven functions. display an alert code. IMPORTANT! o not turn off the mains power supply to the oven (wall switch) if you get an alert code, unless the instructions in the chart following which are needed to cool the oven’s components.
- Page 55 WARRANTY AND SERVICE Before you call for service or assistance ... Check the things you can do yourself. Refer to the installation instructions and your user guide and check that: 1. Your product is correctly installed. 2. You are familiar with its normal operation. Waste management and environmental protection This appliance is labelled in accordance with European Directive 2012/19/EU regarding electric and electronic appliances (WEEE).
- Page 56 SAVING AND RESPECTING THE ENVIRONMENT Where possible, avoid pre-heating the oven and always try to fill Open the oven door as infrequently as possible, because heat from the cavity disperses every time it is opened. For a signifi- cant energy saving, switch off the oven between 5 and 10 minutes before the planned end of the cooking time, and use the residual heat that the oven continues to generate.
Need help?
Do you have a question about the HOQ-F6QAN3GB/EE and is the answer not in the manual?
Questions and answers