Dymo Rhino 6000+ Manual
- Quick start manual (68 pages) ,
- Quick start manual (21 pages)
Advertisement
Registering Your Device
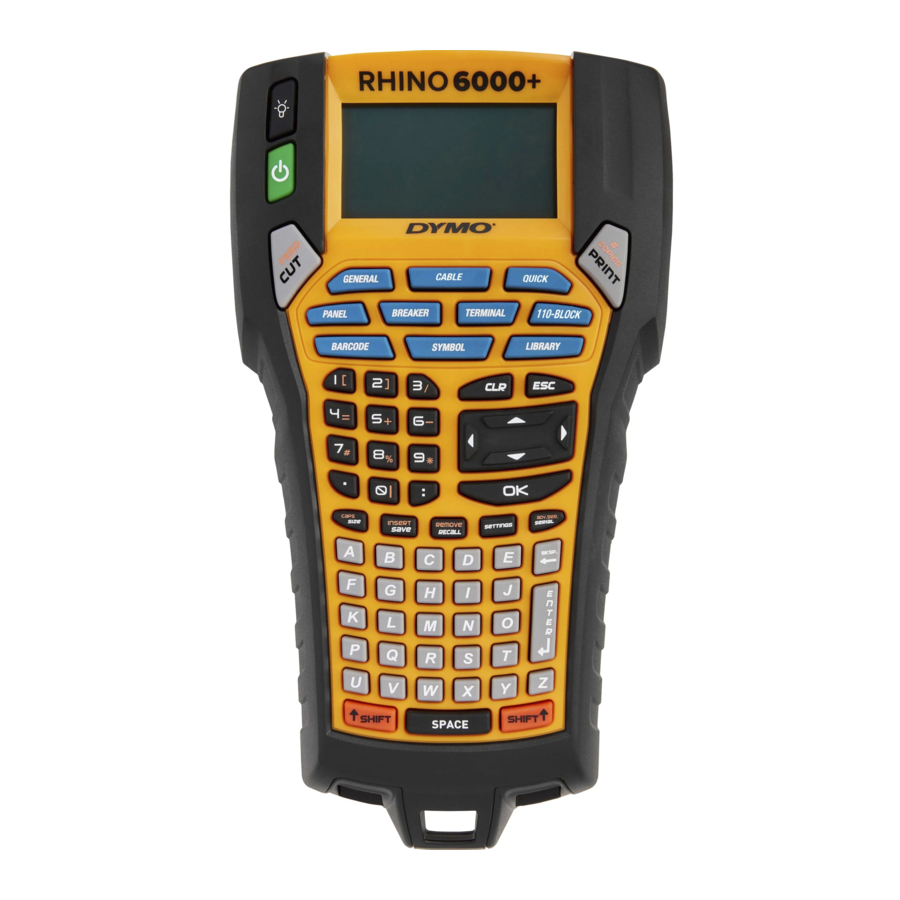
Visit www.dymo.com/register to register your label printer online. During the registration process, you will need the serial number, which is located inside the label compartment cover.
Connecting the power
To charge the battery the first time you use the printer, insert the battery and plug in the power adapter. Charging the battery the first time takes approximately 8 hours. Recharging the battery will take approximately 3.5 hours.
To insert the battery
- Remove the battery compartment cover.
- Insert the battery into the battery compartment.

- Replace the battery compartment cover.

The label printer can operate using the rechargeable battery or the AC power adapter.
Inserting the label cartridge
Your printer uses DYMO IND label cartridges. Visit www.dymo.com for information about purchasing additional label cartridges.

To insert the label cartridge
- Lift the label cartridge cover to open the label compartment.
- Make sure the label and ribbon are taut across the mouth of the cartridge and that the label passes between the guideposts. If necessary, turn the spool clockwise to tighten the ribbon.
- Insert the cartridge and press gently until the cartridge is eased into place.
- Make sure the two blue clips lock the cartridge in place. Refer to the label on the cartridge.
- Close the label cartridge cover.
To remove the label cartridge, press the eject button. The label cartridge is automatically lifted for easy removal.
Printing your first label with the unit
The first time you turn on the printer, you are asked to select your language and units of measure. You are also asked to select the width of the tape cartridge currently inserted in the printer.
To print your first label
- Press
![]() to turn on the power.
to turn on the power. - Enter some text for your label using the alphanumeric keys.
- Press PRINT.
- Press CUT and remove the label.
- Remove the backing from the label to expose the adhesive, and then attach the label.
![]()

Using the Device with Your Computer
Your label printer can be used as a standalone label printer or you can print labels directly from your computer using the latest version of DYMO ID software.
Download the latest version of DYMO ID software from the DYMO Web site at support.dymo.com.
Electrical Rating
| Printer | Input: 9V, 2.0A |
| Power adapter | Input: 100-240V 50/60Hz 0.6A Output: 9V, 2.0A |
What to do if your product is defective
DYMO offers you the following service options:
- DYMO Website: In most situations a visit to www.dymo.com will give you the right assistance. In the Customer Support area, you will find information about your DYMO product, such as Frequently Asked Questions and solutions to known problems. The User Guide also gives you additional information.
- DYMO Help Desk: You can also contact the DYMO Help Desk where an associate will help you to determine the exact nature of the problem and advise you what to do next:
US/CAN 1 877-724-8324
Intl +44 203 564 8354
Documents / ResourcesDownload manual
Here you can download full pdf version of manual, it may contain additional safety instructions, warranty information, FCC rules, etc.
Advertisement


Need help?
Do you have a question about the Rhino 6000+ and is the answer not in the manual?
Questions and answers