Graco EVO, EVO Plus / Max, 27F400, 27F401, 27F402 Manual
- Instruction manual (94 pages) ,
- Instructions manual (84 pages) ,
- Owner's manual (30 pages)
- Also fits for
- Evo plus
- Evo max
- 27f400
- 27f401
- 27f402
Advertisement
Before You Spray
Models
| Model | Name | Voltage |
| 27F400 | EVO | 120V |
| 27F401 | EVO Plus | 120V |
| 27F402 | EVO Max | 120V |
Online Resources
| Visit Our Website: | graco.com/homeowner |
| Operational Videos: | graco.com/homeeducationcenter |
| Parts Online: | graco.com/homeownerparts |

Operational Videos
http://graco.com/HomeEducationCenter
Important User Information
This sprayer is designed to provide superior spray performance with water-based and oil-based (mineral spirit-type) architectural paints and coatings. This user information is intended to help you understand the types of materials that can be used with your sprayer.
Please read the information on the material container label to determine if it can be used with your sprayer. Ask for a Safety Data Sheet (SDS) from your supplier. The container label and SDS will explain the contents of the material and the specific precautions related to it.
Paints, coatings and clean-up materials generally fit into one of the following 3 basic categories:
WATER-BASED: The container label should indicate that the material can be cleaned up with soap and water. Your sprayer is compatible with this type of material. Your sprayer is NOT compatible with harsh cleaners such as chlorine bleach.
OIL-BASED: The container label should indicate that the material is COMBUSTIBILE and can be cleaned up with mineral spirits or paint thinner. The SDS must indicate that the flash point of the material is above 100°F. Your sprayer is compatible with this type of material. Use oil-based material outdoors or in a well-ventilated indoor area with a flow of fresh air. See the safety warnings in this manual.
FLAMMABLE: This type of material contains flammable solvents such as xylene, toluene, naphtha, MEK, lacquer thinner, acetone, denatured alcohol, and turpentine. The container label should indicate that this material is FLAMMABLE. This type of material is NOT compatible with your sprayer and CANNOT be used
NOTICE
Your sprayer is NOT compatible with harsh cleaners such as chlorine bleach. Using these cleaners will cause damage to the sprayer.
Safety Symbols
The following safety symbols appear throughout this manual and on warning labels. Read the table below to understand what each symbol means.
| Symbol | Meaning |
 | Electric Shock Hazard |
 | Equipment Misuse Hazard |
 | Fire and Explosion Hazard |
 | Toxic Fluid of Fumes Hazard |
 | Do Not Use Flammable Materials |
 | Eliminate Ignition Sources |
 | Ground Equipment |
 | Ventilate Work Area |
 | Wear Personal Protective Equipment |
 Safety Alert Symbol
This symbol indicates: Attention! Become Alert! Look for this symbol throughout the manual to indicate important safety messages.
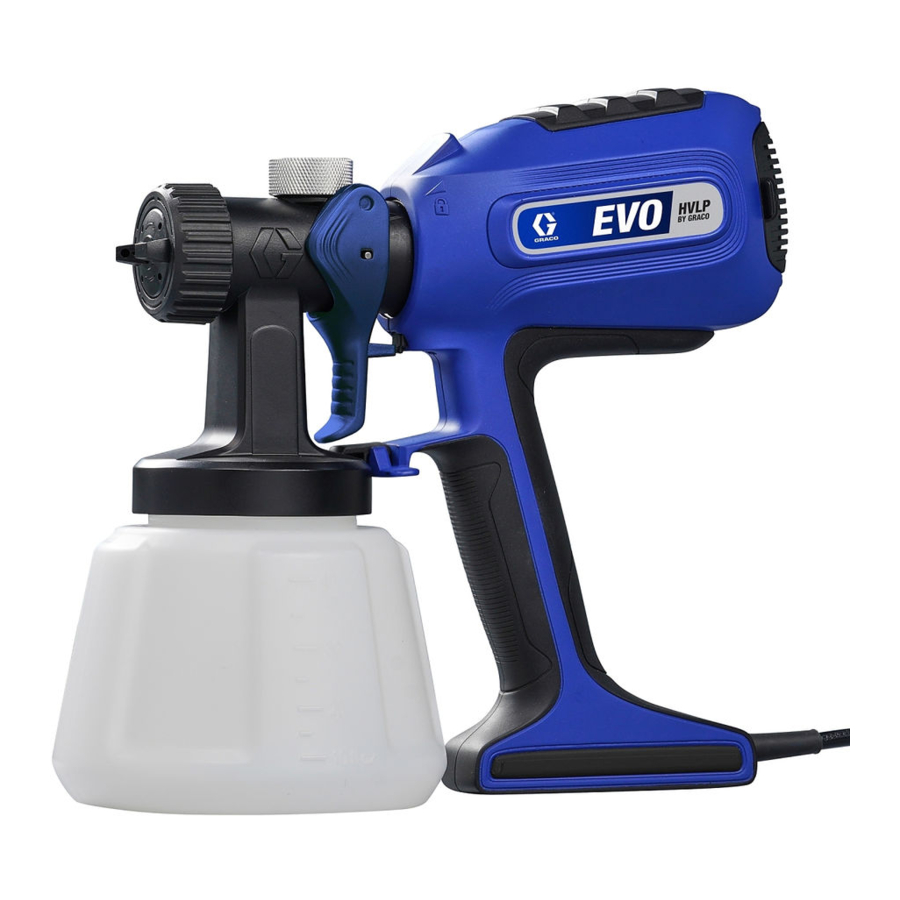
Know Your Product
EVO and EVO Plus

| A | Turbine |
| B | Vent Cover |
| C | Flow Control Knob |
| D | Spray Head |
| E | Cup |
| F | Lock |
| G | Suction Tube |
| H | Power Cord |
| J | Trigger |
| K | Union Nut |
| L | Nozzle |
| M | Air Cap |
EVO Max

| A | Turbine |
| B | Vent Cover |
| C | Flow Control Knob |
| D | Spray Head |
| E | Max Cup |
| F | Lock |
| G | Suction Tube |
| H | Power Cord |
| J | Trigger |
| K | Union Nut |
| L | Nozzle |
| M | Air Cap |
| N | Power Switch |
| P | Handle |
| Q | Hose |
Know Your Controls
 | Flow Control The Flow Control Knob allows you to adjust the amount of fluid that is coming from your sprayer. |
 | Nozzles Different size Nozzles are key to spraying different materials effectively. Changing to the smaller Nozzles while using thinner materials means that you can achieve a good spray pattern without heavily restricting the flow. See, Spray Nozzle. |
 | Trigger The EVO and EVO Plus have a two-stage trigger. The first stage engages the turbine and second stage allows for the transportation of the material. When spraying make sure to fully squeeze the trigger. The EVO Max has an ON/OFF switch. When the switch is ON the turbine is ON. To spray, squeeze the trigger. |
 | Air Cap The Air Cap is installed over the Nozzle and is the key to creating the spray pattern. All models come with the wide air cap installed. The narrow Air Cap is included with the EVO Max. The Air Cap produces three fan patterns: vertical, horizontal, and round. |
Setup
EVO and EVO Plus
- Unscrew Cup from Spray Head. Make sure the Suction Tube is installed.
NOTE: For spraying upwards, place the end of the Suction Tube pointing backward. For spraying downwards, place the end of the Suction Tube pointing forward.

- Place the included strainer on the Cup. Pour paint through the strainer until paint is level with the top hash mark.
NOTE: If the paint stops draining, but the Cup is not full, use a stir stick to scrape the captured paint at the bottom of the strainer until the paint resumes draining.

- Firmly tighten the Cup to the Spray Head.
NOTE: For easy install, place the Cup on a level surface, then screw the Spray Head onto the Cup - Attach the Spray Head to the Turbine. Place the Turbine at a 90 degree angle to the Spray Head. Connect the Spray Head and Turbine, then turn clockwise until it clicks into place. The Turbine should be in line with the Spray Head.


EVO Max
- Follow steps 1-3 in setup EVO and EVO Plus to prepare the Spray Head.
- Attach the Hose to the Turbine and the Handle. The Hose will click into place when installed correctly.

- Attach the Spray Head to the Handle. Turn the handle 90 degrees and attach it to the Spray Head. Rotate the handle 90 degrees until it clicks into place. The Handle should be in line with the Spray Head.


Startup
- Point the sprayer into a waste pail and squeeze the trigger for five to ten seconds. Material will begin to spray. If the sprayer does not spray after five to ten seconds, stop and check that the Cup is tightly secured to the Spray Head. If the sprayer still does not spray, repeat Setup.


You are now ready to spray!
Spraying

Use only water-based or oil-based (mineral spirit-type) materials with a flash point greater than 100°F (38°C).
Do not use materials which state "FLAMMABLE" on the packaging. For more information about your material, request a Safety Data Sheet (SDS) from distributor or retailer.
When spraying oil-based material, use outdoors or in a well-ventilated indoor area with a flow of fresh air.
Keep spray area well-ventilated. Keep a good supply of fresh air moving through the area

- Point the sprayer at a piece of scrap material and squeeze the trigger to test the spray pattern. Adjust the following to achieve the desired spray pattern:
- Flow: Turn Flow Control Knob to reduce the amount of material coming out from the sprayer.
- Distance from surface.
- Hand speed.
- Air Cap orientation, see Air Cap Orientation.
Air Cap Orientation

Spray Nozzle

Recommended Nozzle size for the material:
- Paint: 2 (black) or 3 mm (white)
- Stain: 1 (red) or 1.5 mm (teal)
Change the Nozzle
The sprayer is shipped with the 3 mm Nozzle installed. To change to a smaller Nozzle, follow the steps below.
- Unplug the sprayer to prevent accidental triggering.
- Unscrew the Union Nut and remove the Air Cap.

- Remove the Nozzle by pulling on the outside edge of the Nozzle face.

- Install replacement Nozzle by aligning the notch in the Nozzle with the ridge on the Spray Head.

- Place Air Cap on top of the Nozzle and reinstall the Union Nut. Hand tighten the Union Nut.

- Before resuming spraying, spray a test sample onto a piece of scrap of material in order to ensure the desired pattern is achieved.


Spray Pattern Quality
A good spray pattern is evenly distributed without voids or runs. Adjust sprayer Flow Control, hand speed, and distance from the wall to get a good spray pattern.
If tails persist, material may need to be thinned. If material needs to be thinned, follow manufacturers recommendations.

Spray Angle
Use a piece of scrap cardboard to practice these basic spraying techniques before you begin spraying the surface.
- Hold sprayer 7-10 inches (18-25 cm) from surface and aim straight at surface. Tilting the sprayer to direct the spray angle causes an uneven finish.

- Flex wrist to keep sprayer pointed straight. Fanning sprayer to direct spray at angle causes uneven finish.

NOTE: How fast you move the sprayer will affect spray application. If material is pulsating, you are moving too fast. If material drips, you are moving too slow. See Troubleshooting.
Aim the Unit
Aim the sprayer at the bottom edge of the previous stroke, overlapping each stroke by 50%.

Airm Sprayer here to overlap stroke by 50%
Pull Trigger after starting stroke.
Release Trigger before end of stroke.
Triggering Timing

Pull Trigger after starting stroke. Release Trigger before end of stroke. Sprayer must be moving when Trigger is pulled and released.
Clear the Nozzle

After spraying for long periods of time, dried paint will start to buildup on the Nozzle. To insure best performance, wipe the front of your sprayer with a wet rag to remove dried paint.

After removing buildup, spray into waste pail for a few seconds to ensure good flow and continue spraying.
Cup Refills
Use only water-based or oil-based (mineral spirit-type) materials with a flash point greater than 100°F (38°C).
Do not use materials which state "FLAMMABLE" on the packaging. For more information about your material, request a Safety Data Sheet (SDS) from distributor or retailer.
When spraying oil-based material, use outdoors or in a well-ventilated indoor area with a flow of fresh air.
Keep spray area well-ventilated. Keep a good supply of fresh air moving through the area
- Unplug the sprayer to prevent accidental triggering while disconnecting the Spray Head and Turbine.
- Disconnect the Spray Head from the Turbine and Handle.
- For the and Plus, to disconnect the Spray Head, push down on the back tab and rotate the Turbine counterclockwise. Pull the Turbine straight back from the Spray Head and set aside.
- For the Max, to disconnect the handle from the Spray Head, push down on the lock tab and rotate the handle counterclockwise. Pull the handle straight back from the Spray Head and set aside.

- Refill the Cup following, Setup.

Pause in Spraying
Paint will dry quickly and cause clogs in the sprayer. Follow these steps whenever you pause spraying for five minutes to two hours.
- Unplug Power Cord.

- Wipe front of sprayer with a wet rag before resuming spraying.


Cleanup
Use only water-based or oil-based (mineral spirit-type) materials with flash point greater than 100°F (38°C). Do not use materials which state "FLAMMABLE" on the packaging. For more information about your material, request a Safety Data Sheet (SDS) from distributor or retailer.
Clean in a well-ventilated area. Keep a good supply of fresh air moving through the area.

To avoid serious injury or damage to equipment, do not expose the sprayer electronics to cleaning fluids. Keep sprayer at least 10 in. (25 cm) above the rim of the container when cleaning
Fluid Compatibility
Oil or water-based materials
If spraying water-based materials, use water for cleanup. If spraying oil-based materials, use non-flammable mineral spirits for cleanup.
- Switching between water-based and oil-based materials can cause clogging issues in the sprayer. Always clean sprayer thoroughly with appropriate cleaning fluid.
- Flush the sprayer with non-flammable mineral spirits prior to using oil-based materials.
Clean the Product
Cleaning your sprayer properly and after every spray job is of the utmost importance! Proper care and maintenance will help your paint sprayer last and work for you trouble free.
- Unplug the Power Cord.
- Remove the Turbine (Handle if using the EVO Max) from the Spray Head.

- Unscrew the Cup from the Spray Head.

- Pour excess material back into the can. Clean the cup with warm water.
![]()


Clean the Spray Head
- Unscrew the Union Nut from the Spray Head. Remove the Air Cap and Nozzle and set aside.

- Attach the Power Flush adapter to the Spray Head. Screw the Union Nut back onto the Spray Head.

- Attach the Power Flush adapter to a faucet or garden hose. Align the Spray Head with the provided Power Flush adapter and push until it clicks into place.

- Once installed, turn on the water and run for 20 seconds or until the water runs clear.

- Turn off the water and detach the Spray Head from the Power Flush adapter by pulling on the collar of the adapter.
- Using a wet rag, wipe down the Suction Tube.

- Store sprayer with Spray Head removed from Cup to ensure all parts are dry.


Clean Nozzle and Air Cap
- Using the included cleaning brush, scrub the Nozzles and Air Cap using warm water until they are free of material.
- If the Air Cap is covered with overspray, use the included cleaning brush to remove the unwanted material.


NOTICE
Failure to clean the Nozzle and Air Cap after each use may cause operational problems.
Repair
Replace the Outer Gasket
- Unplug Power Cord.
- Starting with a clean Spray Head, see Clean the Product. Remove the Suction Tube from the Spray Head.
- Remove the damaged outer gasket and dispose of properly.

- Place the new outer gasket over the top of the Suction Tube so that it is centered. Push the inner edge of the gasket into the channel. Roll the gasket so that it is fully seated in the channel.

- Insert the Suction Tube back into the Spray Head. Once the Suction Tube is back in place. Gently push the gasket back into place with a finger.

- Follow Setup and begin spraying.


Replace the Inner Gasket
- Unplug Power Cord.
- Starting with a clean Spray Head, see Clean the Product. Remove the Suction Tube from the Sprayer Head.
- Remove the damaged inner gasket and dispose of properly.

- Slide the new inner gasket over the top of the Suction Tube and push down until it is seated in the pocket.

- Follow steps 3-4 in Replace the Outer Gasket.


Storage
NOTICE
Failure to store the sprayer properly will result in operational problems the next time you spray.
- Do not store the sprayer full of water.
- Do not allow water to freeze in sprayer.
- Store sprayer indoors in a cool, dry location.
- Never store sprayer with material in the sprayer or Cup.
- Clean the sprayer and Cup assembly. See Cleanup.
- When storing the sprayer, leave the Spray Head detached from the Cup to allow parts to dry.
Troubleshooting

Check everything in this Troubleshooting Table before you bring the sprayer to an authorized service center.

QUESTIONS?
888-541-9788
graco.com/HomeownerSupport

| Problem | Cause | Solution |
| Sprayer makes sound but no material is sprayed when Trigger is pulled | Nozzle is clogged | See Clear the Nozzle. |
| Suction Tube is clogged | Remove the Cup from the Spray Head and follow Cleanup. | |
| Cup is not tight | Make certain that the Cup is tight. If the Cup is not tight it can not build pressure needed to spray. | |
| No or low material in the Cup | Refill cup. See, Cup Refills. | |
| Cup gaskets are damaged | See, Cleanup. | |
Material Leaking | Material buildup on Air Cap and Nozzle | Clear the Nozzle. |
| Cup is not tight | Make certain that the Cup is tight. If the Cup is not tight, paint may leak into the threads. | |
| Nozzle loose | Make certain that the Union Nut is tight. If the Union Nut is not tight, paint will leak behind the Nozzle. | |
Spray pattern has dripping/sagging | Operator is moving too slowly while spraying | Move sprayer faster when spraying. |
| Sprayer is too close to target surface | Move sprayer away from surface. See Spraying. | |
| Holding Trigger while changing spray direction | Release Trigger when changing directions. See Spraying. | |
| Material Flow is set too high | Reduce flow until the desired pattern is achieved or reduce the Nozzle size to achieve desired pattern. See Spraying. | |
Spray pattern is pulsating | Material in Cup is running out | See, Cup Refills. |
Spray pattern is very light and splotchy | Operator is moving too fast | Slow speed of movement. |
| Nozzle is clogged | Increase the flow using the Flow Control Knob. | |
| Material flow setting too low | Increase the Nozzle size, see Spray Nozzle. |
Technical Specifications
| EVO HVLP Sprayer | ||
| U.S. | Metric | |
| Weight | ||
| EVO | 2.7 lb. (18 in. cord) | 1.2 kg (45 cm cord) |
| EVO Plus | 3.2 lb. (18 in. cord) | 1.4 kg (45 cm cord) |
| EVO Max | 5.3 lb. (18 in. cord) | 2.4 kg (45 cm cord) |
| Dimensions: | ||
| Length EVO | 11.8 in. | cm |
| Length EVO Plus | 12.0 in. | 30.4 cm |
| Length EVO Max | 93.9 in. | 238.5 cm |
| Width EVO/EVO Plus | 6.1 in. | 15.5 cm |
| Width EVO Max | 5.8 in. | 14.7 cm |
| Height EVO/EVO Plus | in. | 27.9 cm |
| Height EVO Max | 13.2 in. | 33.5 cm |
| Storage Temperature Range ❖ | 32° to 113°F | 0° to 45°C |
| Operating Temperature Range ✓ | 40° to 90°F | 4° to 32°C |
| Storage Humidity Range | 0% to 95% relative humidity, non-condensing | |
| Maximum Nozzle Size | 0.039 in. | 3.0 mm |
| Wetted materials on all models: | Brass, polypropylene, nylon, acetal, foamed rubber | |
❖ Damage to plastic parts may result if impact occurs in low temperature conditions.
✓ Changes in paint viscosity at very low or very high temperatures can affect sprayer performance.
California Proposition 65
CALIFORNIA RESIDENTS
Cancer and reproductive harm – www.P65warnings.ca.gov.
General Warnings
The following warnings apply throughout this manual. Read, understand, and follow the warnings before using this equipment. Failure to follow these warnings can result in serious injury.

FIRE AND EXPLOSION HAZARD
Flammable fumes, such as solvent and paint fumes, in work area can ignite or explode. To help prevent fire and explosion:

- Do not spray or clean with materials having flash points lower than 100°F (38°C). Use only non-flammable or water-based materials, or non-flammable paint thinners. For complete information about your material, request the Safety Data Sheets (SDSs) from the material distributor or retailer.
![]()
- Do not spray combustible materials near an open flame or sources of ignition such as cigarettes, motors, and electrical equipment.
![]()
- Verify that all containers and collection systems are grounded to prevent static discharge. Do not use pail liners unless they are anti-static or conductive.
![]()
- Stop operation immediately if static sparking occurs or you feel a shock. Do not use equipment until you identify and correct the problem.
- Do not use a paint or a solvent containing halogenated hydrocarbons.
- Keep spray area well-ventilated. Keep a good supply of fresh air moving through the area.
![]()
- Sprayer generates sparks. Keep pump assembly in a well-ventilated when spraying, flushing, cleaning, or servicing.
- Do not smoke in the spray area or spray where sparks or flame is present.
- Do not operate light switches, engines, or similar spark producing products in the spray area.
- Keep area clean and free of paint or solvent containers, rags, and other flammable materials.
- Know the contents of the paints and solvents being sprayed. Read all Safety Data Sheets (SDSs) and container labels provided with the paints and solvents. Follow the paint and solvent manufacturer's safety instructions.
- Keep a working fire extinguisher in the work area


ELECTRIC SHOCK HAZARD
Improper setup, or usage of the system can cause electric shock.
- Turn off and disconnect power cord before servicing equipment.
- Do not expose to rain. Store indoors
EQUIPMENT MISUSE HAZARD
Misuse can cause death or serious injury.

- Always wear appropriate gloves, eye protection, and a respirator or mask when painting.
- Do not operate or spray near children. Keep children away from equipment at all times.
- Do not overreach or stand on an unstable support. Keep effective footing and balance at all times.
- Stay alert and watch what you are doing.
- Do not operate the unit when fatigued or under the influence of drugs or alcohol.
- Do not use the hose as a strength member to pull or lift the equipment.
- Do not alter or modify equipment. Alterations or modifications may void agency approvals and create safety hazards.
- Make sure all equipment is rated and approved for the environment in which you are using it.
TOXIC FLUID OR FUMES HAZARD
Toxic fluids or fumes can cause serious injury or death if splashed in the eyes or on skin, inhaled, or swallowed.

- Read Safety Data Sheets (SDSs) to know the specific hazards of the fluids you are using.
- Store hazardous fluid in approved containers, and dispose of it according to applicable guidelines

PERSONAL PROTECTIVE EQUIPMENT
Wear appropriate protective equipment when in the work area to help prevent serious injury, including eye injury, hearing loss, inhalation of toxic fumes, and burns. Protective equipment includes but is not limited to:
- Protective eyewear, and hearing protection.
- Respirators, protective clothing, and gloves as recommended by the fluid and solvent manufacturer
Graco Limited Warranty
To find a Graco authorized service center, please call 1-888-541-9788 or visit us online at www.graco.com. If the claimed defect is verified, Graco will repair or replace the product free of charge.
For the latest information about Graco products, visit www.graco.com.
TO PLACE AN ORDER, contact your Graco distributor or call 1-888-541-9788 to identify the nearest distributor.
Graco Headquarters: Minneapolis
International Offices: Belgium, China, Japan, Korea
GRACO INC. AND SUBSIDIARIES • P.O. BOX 1441 • MINNEAPOLIS MN 55440-1441 • USA
www.graco.com
Documents / Resources
References
Education Center | Graco
![www.p65warnings.ca.gov]() http://www.p65warnings.ca.gov
http://www.p65warnings.ca.govGraco Inc.
Graco Products & Support for Homeowners
Magnum and Truecoat Repair Manuals & Replacement Parts | Graco
Homeowner Equipment Support – Magnum, Truecoat Product Lines | Graco

Download manual
Here you can download full pdf version of manual, it may contain additional safety instructions, warranty information, FCC rules, etc.
Download Graco EVO, EVO Plus / Max, 27F400, 27F401, 27F402 Manual
Advertisement


Need help?
Do you have a question about the EVO and is the answer not in the manual?
Questions and answers