XGIMI MoGo 2 Pro (XK04T) Manual
- User manual (55 pages) ,
- Manual (12 pages) ,
- User manual (13 pages)
Advertisement
Overview
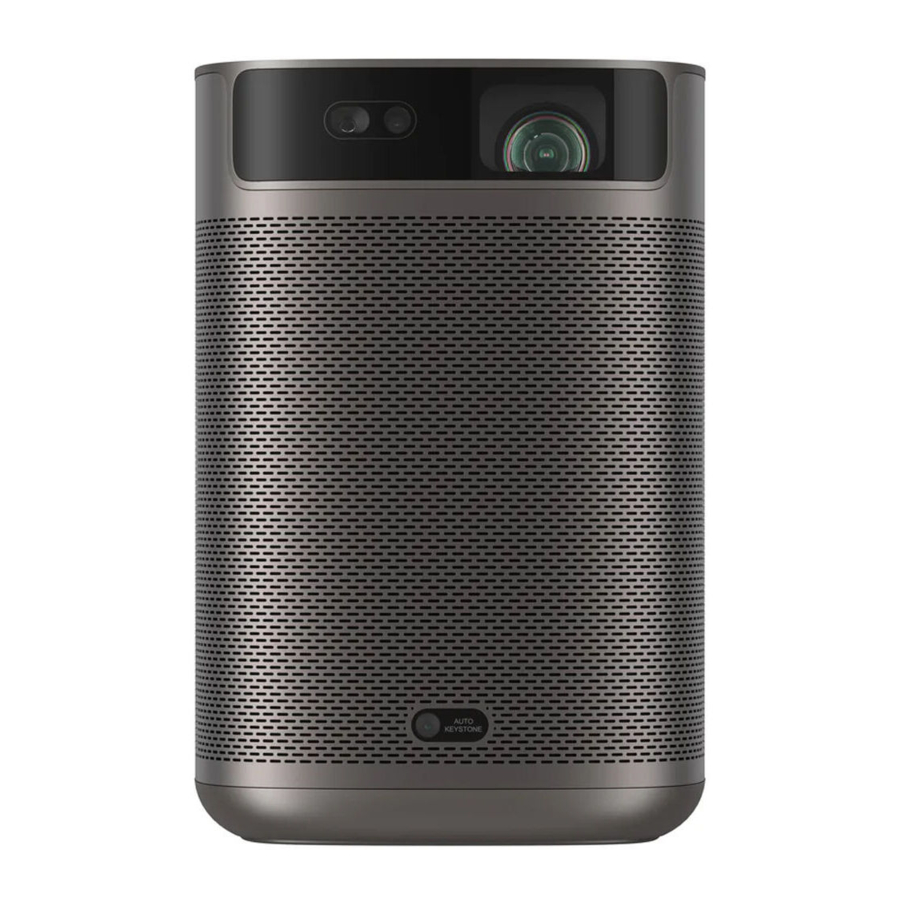
Front view

- – ToF Autofocus
- – Lens
- – Auto Keystone Correction
 Note: To prevent auto keystone correction failure, avoid blocking the sensor
Rear view

Note:
- The type - C port only supports power supply.
- Using a non XGIMI standard adapter may have a certain impact on the brightness and volume. For the best experience it is recommended to use the XGIMI standard adapter.
Remote control

- – Power
- – Focus
- – Google Assistant
- – Navigation
- – Return
- – Settings/ Menu
- – Home page
- – Volume
Getting Started
Power on/off
- Connect the device to a power source and press "
![]() " to turn on the device.
" to turn on the device. - When the device is on, press "
![]() " to turn the device off.
" to turn the device off.
![]()
 " to turn on the device.
Remote control pairing
- Place the remote control within 10cm of the device, press "
![]() "and "
"and "![]() " simultaneously, an indicator light will begin flashing as the remote control enters pairing mode. Release the buttons as soon as flashing begins, and the connection is successful when a "Ding" is heard.
" simultaneously, an indicator light will begin flashing as the remote control enters pairing mode. Release the buttons as soon as flashing begins, and the connection is successful when a "Ding" is heard.
![]()
- If pairing fails, repeat the above steps after 30s.
 "and "
 " simultaneously, an indicator light will begin flashing as the remote control enters pairing mode. Release the buttons as soon as flashing begins, and the connection is successful when a "Ding" is heard.
Remote control functions
Focus adjustment function
- Short press the button "
![]() " to trigger autofocus.
" to trigger autofocus. - Long press the "
![]() " button to trigger manual focus.
" button to trigger manual focus.
 " to trigger autofocus.
Shortcut button
To access the shortcut button function, briefly press the " ".
".
Intelligent Screen Adaption technology
When the automatic keystone function is enabled, the frame will be adjusted automatically if you move the device to another location.

When the automatic obstacle avoidance function is enabled, the frame will automatically avoid any obstacles that block projection area. When the automatic screen alignment function is enabled, the frame will automatically adjust to an aspect ratio of 16:9 or 16:10

Press the button "![]() " on the remote control to enter the keystone correction page. Select Auto Keystone Correction to enable the automatic keystone correction function. Select "Manual Keystone Correction" to manually adjust the four points and size of the projection area.
" on the remote control to enter the keystone correction page. Select Auto Keystone Correction to enable the automatic keystone correction function. Select "Manual Keystone Correction" to manually adjust the four points and size of the projection area.

Google assistant
Google Assistant can be activated by pressing the " " on the remote control.
Using your voice, you can quickly access entertainment, control smart devices and answers on screen.
Setting
Adjust device and image settings at any interface by pressing the button "![]() " on the remote control.
" on the remote control.
Specific functions for various settings are as follows:
| Clear Apps - Remove apps from the device |
| Keystone Correction - Adjust the keystone for the projected image |
| Image mode - Adjust image parameters under the video or signal source |
| Sound settings - Adjust the devices voice output channel |
| 3D Video Setup - 3D settings for video and signal sources |
| Sleep Timer - Automatically shut down the device after a preset time |
| All settings – Settings for other related functions |
Note: 3D mode and image mode settings can only be adjusted via the video play or signal source channel. Frame ratio and HDMI version settings can only be adjusted via the HDMI channel.
Chromecast built-in
- Cast your favorite entertainment apps – movies & TV shows, music, games, sports and more – from your Android, iOS device, Mac Windows computer, or Chromebook to the device. Find Chromecast – enabled apps at g.co/castapps.
- Quickly cast video and audio contents to the TV trough
![]() of mobile application supported.
of mobile application supported. - Screen casting will not be interrupted due to calling or message sending, and the mobile phone battery consumption is minimal.
- The whole frame of Android phones or Chrome browser on PC can be cast to the TV.
 of mobile application supported.
 Note: Screen casting is optimized for selected services only. Streaming quality for other content might vary. Supported operating systems and devices: Android TM2.3 Gingerbread and higher. iOS7 and higher, Windows7 and higher, Mac OS.10.7 and higher and Chrome OS (version 38 or higher).
System upgrade
Online upgrade – the online upgrade can be made through system setting.

Please refer to the information on the exterior bottom of the enclosure for electrical and safety information before installing or operating the apparatus.
Warning for remote controller & portal device
- There is a risk of explosion if the battery is replaced with the wrong type of battery.
- Disposal of a battery into fire, mechanically crushing or cutting the battery, may result in an explosion.
- Do not leave battery in an environment with extremely high temperature that may result in an explosion or the leakage of flammable liquid or gas.
- Do not put battery in an environment with extremely low pressure that may result in an explosion or the leakage of flammable liquid or gas.
Correct use of the device
- Do not face lens into eyes injury to the eyes can be caused by the strong protector light.
- Do not block the air inlet/ outlet of the device to avoid damage to internal electronic devices arising from normal heat dissipation failure of the device.
- Do not wipe the lens directly with cleaning tools including paper and cloth etc. To avoid damage to lens: please clean up the dust on the lens surface through clean air blowing.
- Do not wash the device with chemicals, detergents, or any liquid in order to avoid corrosion of circuit board by rainwater, moisture and mineral – containing liquids.
- Keep the device and its components and accessories out of reach of children.
- Ensure that the device is used in a dry and ventilated environment.
- Do not store the device in overheated places, because extreme temperatures will shorten the life of electronic devices. Permissible environ meant for storage and use of the device in an environment of 0 – 40 Celsius.
- Do not put the device into any heating equipment (such as dryer and microwave oven etc..) to drying.
- Do not extrude the device firmly or place barriers on it or its back to avoid damage to the device.
- Do not throw, strike, or sharply vibrate the device to avoid damage to the internal circuit board.
- Do not try to disassemble and assemble the device yourself. Please contact after-sales service of XGIMI for any problem.
- Do not repair any product on your own. In the case of normal operation failure of the device or any component, you shall consult after-sales service of XGIMI promptly or return it to the factory for repair.
- Operations I the 5.15-5.35 GHz band are restricted to indoor usage only.
- In the installation and operation of the device, for distance between radiator and body should be at least 20 cm.
- As with any bright source, do not stare into the direct beam, RG2 IEC 62471-5:2015.
- Use careful with the earphone maybe excessive sound pressure from earphones and headphones can cause hearing loss.
- Adapter plug is used as the disconnect device, so the disconnect device shall remain readily operable.
![]()
![]()


Wireless Specification
- Bluetooth version: 5.2
- Bluetooth transmitter frequency range: 2400 MHz – 2483.5 MHz
- Bluetooth transmitter power: -/= 17 dBm (EIRP)
- Wi-Fi network IEEE 802.11 a/b/g/n/ac (2.4 GHz/ 5 GHz)
- 2.4 G Wi-Fi transmitter frequency range: 2412 – 2472 MHz (2.4 GHz ISM Band, USA 11 Channels, Europe, and others 13 Channels)
- 2.4 G Wi-Fi transmitter power: -/= 17 dBm (EIRP)
- 5 G Wi-Fi transmitter frequency range: 5.15 – 5.35 GHz, 5.470 – 5.725 GHz, 5.725 – 5.850 GHz
- 5 G Wi-Fi transmitter power: 5.15 – 5.25 GHz < 22 dBm (EIRP), 5.25 – 5.35 GHz & 5.470 – 5.725 GHz < 19 dBm (EIRP), 5.725 – 5.825 GHz < 13 dBm (EIRP)
* Note: This power is for EU only
Documents / Resources
References
Download manual
Here you can download full pdf version of manual, it may contain additional safety instructions, warranty information, FCC rules, etc.
Advertisement


Need help?
Do you have a question about the MoGo 2 Pro and is the answer not in the manual?
Questions and answers