
DJI PHANTOM 4 ADVANCED, PHANTOM 4 ADVANCED+ Manual
- User manual (36 pages)
Advertisement
Using this manual
Legends


 Hints and Tips
Read Before the First Flight
Read the following documents before using the PHANTOMTM 4 Advanced / Advanced+:
- In the Box
- Phantom 4 Advanced / Advanced+ User Manual
- Phantom 4 Advanced / Advanced+ Quick Start Guide
- Phantom 4 Series Disclaimer and Safety Guidelines
- Phantom 4 Series Intelligent Flight Battery Safety Guidelines
We recommend that you watch all tutorial videos on the official DJITM website and read the Disclaimer before you fly. Prepare for your first flight by reviewing the Phantom 4 Advanced / Advanced+ Quick Start Guide and refer to the User Manual for more details.
Watch the Tutorial Videos
Please watch the tutorial videos at the link below, which demonstrates how to use Phantom 4 Advanced / Advanced+ safely: http://www.dji.com/product/phantom-4-advanced/info#video

Download the DJI GO 4 App
Ensure to use the DJI GOTM 4 app during flight. Scan the QR code on the right to download the latest version.
The Android version of the DJI GO 4 app is compatible with Android 4.4 or later. The iOS version of the DJI GO 4 app is compatible with iOS 9.0 or later.

Download the DJI Assistant 2
http://www.dji.com/phantom-4-advanced/info#downloads
Product Profile
This section introduces the Phantom 4 Advanced / Advanced+ and lists the components of the aircraft and remote controller.
Introduction
The DJI Phantom 4 Advanced / Advanced+ is an extremely smart flying camera able to intelligently avoid obstacles during flight. Its brand new camera offers unprecedentedly image quality for the Phantom, with greater clarity, lower noise, higher resolution photos and videos.
Features Highlights
Upgraded TapFlyTM and ActiveTrackTM commands in the DJI GO 4 app, the Phantom 4 Advanced / Advanced+ flies anywhere visible on-screen with a tap and tracks moving subjects effortlessly.
Camera and Gimbal: The Phantom 4 Advanced / Advanced+, shoots at 4K at up to 60 frames per second and captures 20 megapixel photos that look crisper and cleaner than ever thanks to the new 1-inch CMOS sensor. Its mechanical shutter and auto focus create an even better aerial shooting experience.
Flight Controller: The flight controller has been updated to provide a safer, more reliable flight experience. A new flight recorder stores critical data from each flight. A system of visual sensors enhance hovering precision when flying indoors or in environments where GPS is unavailable. Dual IMUs and compasses design provides redundancy.
HD Video Downlink: The low-latency long range (up to 4.3mi (7km)) HD downlink is powered by an enhanced version of DJI LIGHTBRIDGETM.
Remote Controller: The Phantom 4 Advanced+ remote controller includes a 5.5 inch high luminance monitor with integrated DJI GO for full control.
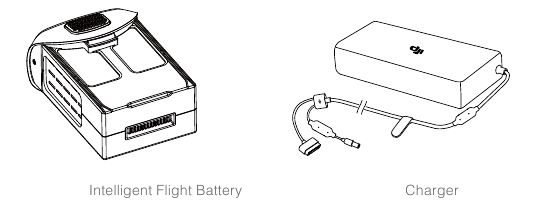
Intelligent Flight Battery: The new 5870 mAh DJI Intelligent Flight Battery features upgraded battery cells and an advanced power management system to provide up to 30 minutes* of flight.
Installing the Aircraft
Preparing the Aircraft
- Remove the gimbal clamp from the camera as shown below:
*At sea level in calm environments when flying in ATTI mode, The flight time will vary due to different flight patterns, weather conditions and altitudes.

- Attaching the Propellers
Mount the propellers with black propeller rings to the motors with black dots. Mount the propellers with sliver propeller rings to the motors without black dots. Press the propeller down onto the mounting plate and rotate in the lock direction until it is secured.


- Battery Installation
Slide battery into the battery compartment according to the arrow's direction as shown below.
![]()
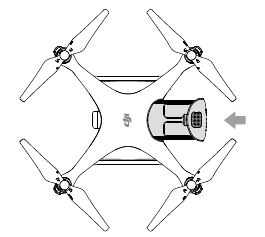
 Make sure that you hear a click sound indicates the battery is firmly installed. Failure to do so may affect the flight safety of your aircraft.
Preparing the Remote Controller
Tilt the mobile device holder or the display device on the remote controller to the desired position, then adjust the antennas so they are facing outward.
If using the Phantom 4 Advanced, follow the steps below to secure tablet or mobile device to the mobile device holder.

- Press the button on the top right side of the mobile device holder to release the clamp, then adjust the clamp to fit the size of your mobile device.
- Secure your mobile device in the clamp by pressing down, and connect your mobile device to the remote controller using a USB cable.
- Plug one end of the cable into the mobile device, and the other end into the USB port on the back of the remote controller.
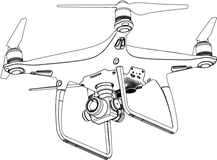
Aircraft Diagram

- GPS
- Propellers
- Motors
- Front LEDs
- Gimbal and Camera
- Forward Vision System
- Intelligent Flight Battery
- Aircraft Status Indicator
- Camera / Linking Status Indicator and Link Button
- Micro USB Port
- Camera Micro SD Card Slot
- Downward Vision System
Remote Controller Diagram
Phantom 4 Advanced+ (Model: GL300E)

- Antennas
Relays aircraft control and video signal. - Display Screen
Display device with Android system to run DJI GO 4 app. - Control Stick
Controls the orientation and movement of the aircraft. - Return Home (RTH) Button
Press and hold the button to initiate
Return to Home (RTH). - Battery Level LEDs
Displays the battery level of the Remote Controller. - Status LED
Displays the Remote Controller's system status. - Power Button
Used to turn the Remote Controller on and off. - RTH LED
Circular LED around the RTH button displays RTH status. - Speaker
Audio output.

- Camera Settings Dial
Turn the dial to adjust camera settings. (Only functions when the Remote Controller is connected to a mobile device running the DJI GO 4 app.) - [11] Intelligent Flight Pause Button
Press once to allow the aircraft to exit from TapFly, ActiveTrack and other intelligent flight modes. - Shutter Button
Two-stage button, press to take a photo. - Sleep/Wake Button
Press to sleep/wake the screen, press and hold to restart. - Microphone
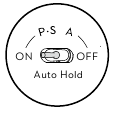
- Flight Mode Switch
Switch between P-mode, S-mode, and A-mode. - Video Recording Button
Press to start recording video. Press again to stop recording. - Gimbal Dial
Use this dial to control the tilt of the gimbal. - Micro USB Port
Upgrading the aircraft by connecting to the remote controller using the USB OTG cable. - Micro SD Card Slot
Provide extra storage space for the display device, maximum supporting 128 GB. - HDMI Port
Output HDMI video signal. - USB Port
USB device support.

- C1 Button
Customizable through the DJI GO 4 app. - C2 Button
Customizable through the DJI GO 4 app. - Power Port
Connect to the Charger to charge the battery of the Remote Controller.
Phantom 4 Advanced (Model: GL300C)

- Antennas
Relays aircraft control and video signal. - Mobile Device Holder
Securely mounts your mobile device to the remote controller. - Control Stick
Controls the orientation and movement of the aircraft. - Return Home (RTH) Button
Press and hold the button to initiate Return to Home (RTH). - Battery Level LEDs
Displays the battery level of the remote controller. - Status LED
Displays the remote controller's system status. - Power Button
Used to turn the remote controller on and off. - RTH LED
Circular LED around the RTH button displays RTH status.

- Camera Settings Dial
Turn the dial to adjust camera settings. (Only functions when the remote controller is connected to a mobile device running the DJI GO 4 app.) - Intelligent Flight Pause Button
Press once to allow the aircraft to exit from TapFly, ActiveTrack and other intelligent flight modes. - Shutter Button
Two-stage button, press to take a photo. - Flight Mode Switch
Switch between P-mode, S-mode, and A-mode. - Video Recording Button
Press to start recording video. Press again to stop recording. - Gimbal Dial
Use this dial to control the tilt of the gimbal. - Micro USB Port
Reserved port. - USB Port
Connection to mobile device for DJI GO 4 app.

- C1 Button
Customizable through the DJI GO 4 app. - C2 Button
Customizable through the DJI GO 4 app. - Power Port
Connect to the Charger to charge the battery of the remote controller.
Aircraft
This section introduces the Flight Controller, Vision System, and the Intelligent Flight Battery.
Flight Controller
The Phantom 4 Advanced / Advanced+ flight controller features several important upgrades. Safety modes include Failsafe and Return-to-Home. These features ensure the safe return of your aircraft if the control signal is lost. The flight controller can also save critical flight data from each flight to the on-board storage device. The new flight controller also provides increased stability and a new air braking feature.
Flight Mode
Three flight modes are available. The details of each flight mode are found below:
P-mode (Positioning): P-mode works best when the GPS signal is strong. The aircraft utilizes GPS, stereo Vision System to stabilize, avoid obstacles or track moving subjects. Advanced features such as TapFly and ActiveTrack are enabled in this mode.
When the Forward Vision System is enabled and lighting conditions are sufficient, the maximum flight attitude angle is 25° with a maximum flight speed of 31 mph (50 kph). When forward obstacle sensing are disabled, the maximum flight attitude angle is 35° and the maximum flight speed is 36 mph (58 kph).
When the GPS signal is weak and lighting conditions are too dark for the Forward and Downward Vision Systems, the aircraft will only use its barometer for positioning to control altitude.
Note: P-mode requires larger stick movements to achieve high speeds.
S-mode (Sport): The handling gain values of the aircraft are adjusted to enhance aircraft maneuverability. The maximum flight speed of the aircraft is increased to 45mph (72kph). Note that Obstacle Sensing systems are disabled in this mode.
A-mode (Attitude): When neither the GPS nor the Vision System is available, the aircraft will only use its barometer for positioning to control the altitude.
- The Vision System is disabled in S-mode (Sport), which means the aircraft will not be able to automatically avoid obstacles in its flight path. Be vigilant and stay clear of nearby obstacles.
- The aircraft's maximum speed and braking distance are significantly increased in S-mode (Sport). A minimum braking distance of 164 feet (50 meters) is required in windless conditions.
- The aircraft's responsiveness is significantly increased in S-mode (Sport), which means a small stick movement on the remote controller will translate into a large travel distance of the aircraft. Be vigilant and maintain adequate maneuvering space during flight.
- The aircraft's descent speed is significantly increased in S-mode (Sport). A minimum braking distance of 164 feet (50 meters) is required in windless conditions.
- Use the Flight Controller mode switch to change the flight mode of the aircraft.
Flight Status Indicator
The Phantom 4 Advanced / Advanced+ has Front LEDs and Aircraft Status Indicators. The positions of these LEDs are shown in the figure below:

The Front LEDs show the orientation of the aircraft. The Front LEDs glow solid red when the aircraft is turned on to indicate the front (or nose) of the aircraft. The Aircraft Status Indicators communicate the system status of the flight controller. Refer to the table below for more information about the Aircraft Status Indicators.
Aircraft Status Indicator Description

Return-to-Home (RTH)
Return-to-Home (RTH) function brings the aircraft back to the last recorded Home Point. There are three types of RTH: Smart RTH, Low Battery RTH, and Failsafe RTH. This section describes these three scenarios in detail.
 | GPS | Description |
| Home Point |  | If a strong GPS signal was acquired before takeoff, the Home Point is the location from which the aircraft launched. The GPS signal strength is indicated by the GPS icon ( Less than 4 bars is considered a weak GPS signal). The aircraft status indicator will blink rapidly when the home point is recorded. |
- The aircraft can sense and avoid obstacles when the Forward Vision System is enabled and lighting conditions are sufficient. The aircraft will automatically climb up to avoid obstacles and descend slowly as it returns to the home point. To ensure the aircraft returns home forwards, it cannot rotate or fly left and right during RTH while the Forward Vision System is enabled.
Failsafe RTH
The Forward Vision System allows the aircraft to create a real-time map of its flight route as it flies. If the Home Point was successfully recorded and the compass is functioning normally, Failsafe RTH will be automatically activated if the remote controller signal is lost for more than three seconds. The aircraft will plan its return route and retrace its original flight route home. The aircraft will hover for 10 seconds at its current location. When it regains signal connection it will wait for pilot commands. The Return-toHome process may be interrupted and the pilot given control of the aircraft if the remote controller signal connection is re-established.
Failsafe Illustration

- Aircraft cannot return to the Home Point when GPS signal is weak or unavailable.
- Aircraft automatically descends and lands if RTH is triggered when the aircraft flies within a 65 feet (20 meters) radius of the Home Point. Aircraft will stop ascending and immediately return to the Home Point if you move the left stick if the aircraft reaches 65 feet (20 meters) altitudes or beyond during Failsafe.
- The aircraft cannot avoid obstruction during Failsafe RTH if Forward Vision System is disabled. It is important to set a suitable Failsafe altitude before each flight. Launch the DJI GO 4 app, enter "Camera" and tap
![]() to set the Failsafe Altitude.
to set the Failsafe Altitude. - User cannot control the aircraft while the aircraft is ascending to 65 feet (20 meters) from the current altitude. However, user can press RTH button once to exit ascending and regain control.
 to set the Failsafe Altitude.
Smart RTH
Use the RTH button on the remote controller or tap the RTH button in the DJI GO 4 app and follow the onscreen instructions when GPS is available to initiate Smart RTH. The aircraft will then automatically return to the last recorded Home Point. Use the remote controller to control the aircraft's speed or altitude to avoid a collision during the Smart RTH process. As the aircraft returns, it will use the primary camera to identify obstacles as far as 300m in front, allowing it to plan a safe route home. Press and hold the Smart RTH button once to start the process, and press the Smart RTH button again to terminate the procedure and regain full control of the aircraft.
Low Battery RTH
The low battery level failsafe is triggered when the DJI Intelligent Flight Battery is depleted to a point that may affect the safe return of the aircraft. Users are advised to return home or land the aircraft immediately when prompted. The DJI GO 4 app will display a notice when a low battery warning is triggered. The aircraft will automatically return to the Home Point if no action is taken after a ten-second countdown. The user can cancel the RTH procedure by pressing the RTH button on the remote controller. The thresholds for these warnings are automatically determined based on the aircraft's current altitude and distance from the Home Point.
The aircraft will land automatically if the current battery level can only support the aircraft long enough to descend from its current altitude. The user can still use the remote controller to alter the aircraft's orientation during the landing process.
The Battery Level Indicator is displayed in the DJI GO 4 app, and is described below:

| Battery Level Warning | Remark | Aircraft Status Indicator | DJI GO 4 App | Flight Instructions |
| Low battery level warning | Battery power is low. Land the aircraft. | Aircraft status indicator blinks RED slowly. | Tap "Go-home" to have the aircraft return to the Home point and land automatically, or "Cancel" to resume normal flight. If no action is taken, the aircraft will automatically go home and land after 10 seconds. Remote controller will sound an alarm. | Fly the aircraft back and land it as soon as possible, then stop the motors and replace the battery. |
| Critical Low battery level warning | The aircraft must land immediately. | Aircraft status indicator blinks RED quickly. | The DJI GO 4 app display will flash red and the aircraft will start to descend. The remote controller will sound an alarm. | Allow the aircraft to descend and land automatically. |
| Estimated remaining flight time | Estimated remaining flight based on current battery level. | N/A | N/A | N/A |
- When the Critical low battery level warning is triggered and the aircraft begins to land automatically, push the left stick upward to make the aircraft hover at its current altitude, giving you an opportunity to navigate to a more appropriate landing location.
- The colored zones and markers on the battery level indicator bar reflect the estimated remaining flight time. They are automatically adjusted according to the aircraft's current location and status.
Precision Landing
The Phantom 4 Advanced / Advanced+ automatically scans and attempts to match the terrain features underneath during Return to Home. When current terrain matches home point terrain, the Phantom 4 Advanced / Advanced+ will start landing immediately to achieve precision landing. The DJI GO 4 app will show a terrain feature mismatch prompt if matching fails.
- Precision Landing performance is subject to the following conditions:
- Home point is recorded upon take off, and cannot not be refreshed during flight.
- Aircraft must take off vertically. Take off altitude must be greater than 7 meters.
- Home point terrain features remain largely unchanged.
- Home point terrain with no distinctive features will affect the performance.
- Lighting conditions cannot be too light nor too dark.
- The following actions are available during landing:
- Pull throttle down to accelerate landing.
- Moving the control sticks in any other direction will stop Precision Landing. The Phantom 4 Advanced / Advanced+ will descend vertically and Landing Protection will remain active.
Failsafe Safety Notices
 | The aircraft cannot avoid obstruction during the Failsafe RTH when the Forward Vision System is disabled. Therefore, it is important to set a suitable Failsafe altitude before each flight. Launch the DJI GO 4 app, enter "Camera" and tap  to set the Failsafe Altitude. to set the Failsafe Altitude. |
 | If the aircraft is flying under 65 feet (20 meters) and Failsafe (including Smart RTH, Lower Battery RTH ) is triggered, the aircraft will first automatically ascend to 65 feet (20 meters) from the current altitude. You can only cancel the ascending by exiting the Failsafe. |
 | Aircraft automatically descends and lands if RTH is triggered when the aircraft flies within a 65 feet (20 meters) radius of the Home Point. Aircraft will stop ascending and immediately return to the Home Point if you move the left stick if the aircraft reaches 65 feet (20 meters) altitudes or beyond during Failsafe. |
 | Aircraft cannot return to the Home Point when GPS signal is weak or unavailable. |
 | If you move the left stick after the aircraft rises above 65 feet (20 meters) but below the pre-set Failsafe RTH altitude, the aircraft will stop ascending and immediately return to the Home Point. |
Obstacle Avoidance During RTH
Aircraft can now sense and actively attempt to avoid obstacles during RTH, provided that the lighting conditions are adequate for the Forward Vision System. Upon detecting an obstacle, the aircraft will act as follows:
- The aircraft will use the primary camera to identify obstacles as far as 984 feet (300 meters) in front, allowing it to plan a safe route home.
- The aircraft decelerates when an obstacle is sensed at 49 feet (15 meters) ahead.
- The aircraft stops and hover then start ascending vertically to avoid the obstacle. Eventually, the aircraft will stop climbing when it is at least 16 feet (5 meters) above the detected obstacle.
- Failsafe RTH procedure resume, the aircraft will continue flying to the Home Point at the current altitude.

- The Obstacle Sensing function is disabled during RTH descent. Proceed with care.
- To ensure the aircraft returns home forwards, it cannot rotate during RTH while the Forward Vision System is enabled.
- The aircraft cannot avoid obstacles above, beside, or behind the aircraft.
Landing Protection Function
Landing Protection will activate during auto landing.
- Landing Protection determines whether the ground is suitable for landing. If so, the Phantom 4 Advanced / Advanced+ will land gently.
- If Landing Protection determines that the ground is not suitable for landing, the Phantom 4 Advanced / Advanced+ will hover and wait for pilot confirmation. The aircraft will hover if it detects the ground is not appropriate for landing even with a critically low battery warning. Only when the battery level decreases to 0% will the aircraft land. Users retain control of aircraft flight orientation.
- If Landing Protection is inactive, the DJI GO 4 app will display a landing prompt when the Phantom 4 Advanced / Advanced+ descends below 0.3 meters. Tap to confirm or pull down the control stick for 2 seconds to land when the environment is appropriate for landing.
- Landing Protection will not be active in the following circumstances:
- When the user is controlling the pitch/roll/throttle sticks (Landing ground detection will re-activate when control sticks are not in use)
- When the positioning system is not fully functional (e.g. drift position error)
- When the downward vision system needs re-calibration
- When light conditions are not sufficient for the downward vision system
- If an obstacle is within 1-meter of the aircraft, the aircraft will descend to 0.3m above the ground and hover. The aircraft will land upon with user confirmation.
Intelligent Flight Mode
TapFly
Introduction
With the TapFly feature, users can now tap on the mobile device screen to fly in the designated direction without using the remote controller. The aircraft will automatically avoid obstacles it sees or brake and hover provided that the lighting is appropriate (< 300 lux) nor too bright (> 10,000 lux).
Using TapFly
Ensure the aircraft is in P-mode, then follow the steps below to use TapFly:
- Take off and ensure the aircraft is flying at least 6 feet (2 meters) above the ground.


- Launch the DJI GO 4 app and tap
![]() , then tap
, then tap ![]() , read and understand the prompts.
, read and understand the prompts.

- Tap once on the target direction and wait for
![]() icon to appear. Tap again to confirm the selection and the aircraft will automatically fly towards the target direction.
icon to appear. Tap again to confirm the selection and the aircraft will automatically fly towards the target direction.

 , then tap
  , read and understand the prompts.
 icon to appear. Tap again to confirm the selection and the aircraft will automatically fly towards the target direction.
- DO NOT guide the aircraft to fly towards people, animals, small and fine objects (e.g. tree branches and power lines) or transparent objects (e.g. glass or water).
- Watch for the obstacles in the flight path and stay clear of them.
- There may be deviations between the expected and the actual flight path of TapFly selection.
- The selectable range for the target direction is limited. You cannot make a TapFly selection close to
- the upper or lower edge of the screen.
- TapFly Mode may not work properly when the aircraft is flying over water or snow covered areas.
- Be extra cautions when flying in dark (< 300 lux ) or bright (>10,000 lux) environments.
After confirming the TapFly selection, the aircraft will fly in the direction marked by the can still use the control stick to control the movement of the aircraft during the flight.

The aircraft will automatically adjust its speed when it senses an obstacle in front or if it is flying too close to the ground. However, this feature should not be relied upon for navigation between obstacles. Failsafe procedures will override TapFly. If the GPS signal weakens, the aircraft will exit autonomous flight and return to home.
TapFly includes following functions:
| TapFly Forward Mode | Free Mode |
 |  |
| The aircraft will fly towards the target. Forward Vision System is active. | The aircraft will fly towards the target. The remote controller can be used to maneuver the yaw of the aircraft freely. Obstacle Sensing is disabled in this mode, use it in an unobstructed environment. |
Exit TapFly
Use the following methods to exit TapFly:
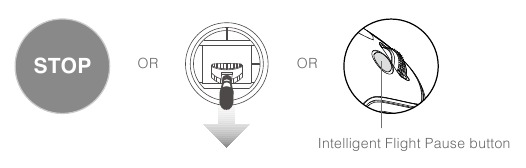
- Tap "STOP" button on the screen.
- Pull back the pitch stick on the remote controller and hold for more than 3s.
- Press the Intelligent Flight Pause button on the remote controller.
Aircraft will stop and hover after exiting from TapFly. Tap a new target direction to continue flying or begin manual flight.
ActiveTrack
Introduction
ActiveTrack allows you to mark and track a moving object on your mobile device screen. The aircraft will automatically avoid obstacles in its flight path. No external tracking device is required.
The Phantom 4 Advanced / Advanced+ can automatically identify and trace people, bikes and other vehicles, and use different tracking strategies for each.
Using ActiveTrack
Ensure the aircraft is in P-mode, then follow the steps below to use ActiveTrack:
- Take off and hover at least 6 feet (2 meters) above the ground.


- Launch the DJI GO 4 app and tap
![]() , then tap
, then tap ![]() , read and understand the prompts.
, read and understand the prompts.

- Tap on the subject you want to track then tap to confirm selection. If the subject is not automatically recognized, drag a box around it. The box
![]() will turn green when tracking is in progress. If the box turns red, the object could not be identified and you should try again.
will turn green when tracking is in progress. If the box turns red, the object could not be identified and you should try again.

 , then tap
  , read and understand the prompts.
 will turn green when tracking is in progress. If the box turns red, the object could not be identified and you should try again.
- DO NOT select an area containing people, animals, small, fine objects (e.g. tree branches and power lines) or transparent objects (e.g. glass or water surface).
- Stay clear of obstacles near the flight path, particularly when the aircraft is flying backward.
- Be extra vigilant when using ActiveTrack in any of the following situations:
- The tracked subject is not moving on a level plane.
- The tracked subject changes shape drastically while moving.
- The tracked subject could be blocked or out of sight for a long time.
ActiveTrack includes following functions:
| Trace | Spotlight | Profile |
 |  |  |
| The aircraft tracks the subject at a constant distance. Use the roll stick on the remote controller or the slider in DJI GO to circle the subject. | Aircraft will not trace a subject automatically, but it keeps the camera pointing at the subject during flight. The remote controller can be used to maneuver the aircraft, but yaw is disabled. Using the left stick and gimbal dial will adjust subject framing. | The aircraft tracks the subject at constant angle and distance from the side. Use the roll stick on the remote control to circle the subject. |
- DO NOT select an area containing people, animals, small, fine objects (e.g. tree branches and power lines) or transparent objects (e.g. glass or water).
- Stay clear of obstacles near the flight path, particularly when the aircraft is flying backward.
- Be extra vigilant when using ActiveTrack in any of the following situations:
- The tracked subject is not moving on a level plane.
- The tracked subject changes shape drastically while moving.
- The tracked subject could be blocked or out of sight for a long time.
- The tracked subject is moving on a snowy surface.
- Available light is low (< 300 lux) or high (> 10,000 lux).
- The tracked subject has a similar color or pattern as its surrounding environment.
- You must follow local privacy laws and regulations when using ActiveTrack.
- Aircraft will not be able to avoid obstacles while in Profile or Spotlight Mode. Use these modes in open areas.
- The aircraft will sense and avoid obstacles on its flight path.
- If the aircraft loses track of the subject, because it is moving too fast or obscured, re-select the subject to resume tracking.
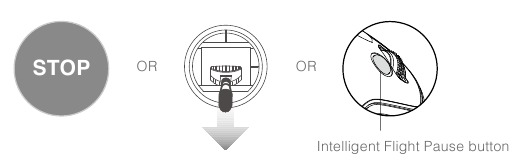
Exiting ActiveTrack
Use the following methods to exit ActiveTrack:

- Tap the "STOP" button on the screen.
- Press the Intelligent Flight Pause button on the remote controller.
After exiting ActiveTrack, the aircraft will hover in place, at which point you may choose to fly manually, track another subject, or return to home.
Draw
Introduction
Using Draw, the aircraft will fly along the flight path drawn on-screen. As it flies it will automatically brake and hover when it sees obstacles provided that the lighting is appropriate - no darker than 300 lux nor brighter than 10,000 lux.
Using Draw
Ensure the aircraft is in P-mode, then follow the steps below to use Draw:
- Take off and hover at least 6 feet (2 meters) above the ground.


- Launch the DJI GO 4 app and tap
![]() , then tap
, then tap ![]() , read and understand the prompts.
, read and understand the prompts.

 , then tap
  , read and understand the prompts.
- Draw a line on the screen to create a path. Tap
![]() and the aircraft will fly along the path.
and the aircraft will fly along the path.

 and the aircraft will fly along the path.

- DO NOT fly the aircraft towards people, animals, or small/fine objects (e.g. tree branches and power lines) or transparent objects (e.g. glass or water).
- There may be some deviation between the expected and the actual flight path.
After confirming the flight path, the aircraft will fly along the path on-screen. Note: Control sticks can be used to control aircraft movement during the flight.

The aircraft will automatically adjust its speed when it senses an obstacle in front or if it is flying too close to the ground. However, this feature should not be relied upon for navigation between obstacles.
Failsafe procedures will override Draw. If the GPS signal weakens, the aircraft will exit autonomous flight and return to home.
Exit Draw
Use the following methods to exit Draw:
- Tap the "STOP" button on the screen.
- Pull back the pitch stick on the remote controller and hold for more than 3s.
- Press the Intelligent Flight Pause button on the remote controller.
Aircraft will stop and hover after exiting from Draw. Draw a new flight path to continue flying or begin manual flight.
Gesture Mode
In Gesture Mode, the Phantom 4 Advanced / Advanced+'s Vision System recognizes gestures, allowing it to follow and capture selfies without a phone or a controller. Follow the steps below to use Gesture Mode:
| Modes | Prompts | Front LEDs | Remarks |
|  |  Slow Red Flashing | Ensure the forward vision system is active and there is enough light. Tap the icon and move in front of the camera for the Phantom 4 Advanced / Advanced+ to recognize you. |
|  |  Red Flashes Twice | Raise your arms and wave to the Phantom 4 Advanced / Advanced+, the Front LEDs will blink red twice once it confirms the shooting distance. |
|  |  Fast Red Flashing | Put your fingers in front on your face as shown. |
- Gesture Mode can only be used in Photo Mode.
- Fly the aircraft 2 meters or higher above the ground then move in front of the camera to be recognized. Front LED Indicators will blink red rapidly if the Phantom 4 Advanced / Advanced+ fails to recognize a subject.
- Enabling GPS on your phone will allow the Phantom 4 Advanced / Advanced+ to follow with more accuracy while flying in Gesture Mode.
Tripod Mode
Tap the icon in the DJI GO 4 app to enable Tripod Mode. In Tripod Mode, the maximum flight speed is limited to 5.6 mph (9 kph) and the braking distance is reduced to 6.6 ft (2 m). Responsiveness to stick movements is also reduced for smoother more controlled movements.
- Only use Tripod Mode where the GPS signal is strong or light conditions are ideal for the vision system. If GPS signal is lost and the vision system cannot function, it will automatically switch to Atti mode. In this case, flight speed will increase and the aircraft cannot hover in place. Use Tripod Mode carefully.
Terrain Follow Mode
The Downward Vision System is utilized in Terrain Follow Mode to maintain a height above ground between 1 and 10 meters. This mode is designed for use on grassland sloped at no more than 20°. Enable the Terrain Follow Mode by tapping the Intelligent Flight Mode icon in the DJI GO 4 app. When this mode is enabled, the aircraft's current height will be recorded. The aircraft will maintain the recorded height during flight and ascend when the slope rises. However, the aircraft will not descend in downward slopes.
- It is important that you only fly in conditions where the Vision Position System can function correctly; otherwise the Terrain Follow Mode will not work.
Vision System
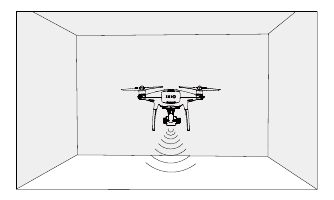
The main components of the Vision System are located on the front and bottom of the Phantom 4 Advanced / Advanced+, including [1] [2] two stereo vision sensors and [3] two ultrasonic sensors. The Vision System uses ultrasound and image data to help the aircraft maintain its current position, enabling precision hovering indoors or in environments where a GPS signal is not available. The Vision System constantly scans for obstacles, allowing the Phantom 4 Advanced / Advanced+ to avoid them by going over, around, or hovering.

Detection Range
The detection range of the Vision System is depicted as follow. Note that the aircraft cannot sense and avoid the obstacles that are not within the detection range.

Calibrating Sensors
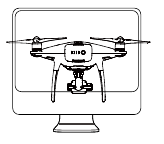
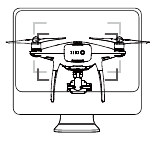
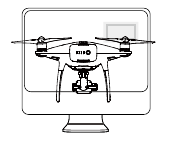
Vision Systems cameras installed on the aircraft are calibrated on delivery. However these cameras are vulnerable to excessive impact and will require occasional calibration via DJI ASSISTANTTM 2 or the DJI GO 4 app. Follow the steps below to calibrate the camera.
- Point the aircraft toward the screen
![]()
- Align the boxes
![]()
- Pan and tilt the aircraft
![]()
Quick Calibration
Use quick calibration when the DJI GO 4 app notify that vision sensor calibration is required. Tap through "Aircraft Status" -> "Vision Sensors" to start quick calibration.
- Quick calibration is quick fix to vision sensor issues. Connecting the aircraft to a computer to carry out a full calibration using DJI Assistant 2 is recommended when possible. Only calibrate when lighting conditions are adequate and on textured surfaces i.e. grass.
- Do not calibrate the aircraft on highly reflective surfaces such as Marble or ceramics.
Using Vision Positioning
Vision Positioning is activated automatically when the aircraft is turned on. No further action is required. Vision Positioning is typically used in indoor environments, where GPS is unavailable. Using the sensors that are built into the Vision System, the aircraft can hover precisely even without GPS.
Follow the steps below to use Vision Positioning:
- Toggle the flight mode switch to P-mode.
- Place the aircraft on a flat surface. Note that the Vision System cannot work properly on surfaces without clear pattern variations.
- Turn on the aircraft. The aircraft status indicator will flash green two times, which indicates the Vision Positioning is ready. Gently push the left stick up to lift off and the aircraft will hover in place.
Assisted Braking from Obstacle Sensing
Powered by the Obstacle Sensing, the aircraft will now be able to actively brake when obstacles are detected around the aircraft. Note that Obstacle Sensing function works best when lighting is adequate and the obstacle is clearly marked or textured. The aircraft must fly at no more than 31mph (50kph) to allow sufficient braking distance.

- The performance of your Vision System is affected by the surface being flown over. Ultrasonic sensors may not be able to accurately measure distances when operating above soundabsorbing materials and the camera may not function correctly in suboptimal environments. The aircraft will switch from P-mode to A-mode automatically if neither GPS nor Vision System are available. Operate the aircraft with great caution in the following situations:
- Flying over monochrome surfaces (e.g. pure black, pure white, pure red, pure green).
- Flying over a highly reflective surfaces.
- Flying at high speeds of over 31mph (50kph) at 2 meters or over 11mph (18kph) at 1 meter.
- Flying over water or transparent surfaces.
- Flying over moving surfaces or objects.
- Flying in an area where the lighting changes frequently or drastically.
- Flying over extremely dark (lux < 10) or bright (lux > 100,000) surfaces.
- Flying over surfaces that can absorb sound waves (e.g. thick carpet).
- Flying over surfaces without clear patterns or texture.
- Flying over surfaces with identical repeating patterns or textures (e.g. tiling).
- Flying over inclined surfaces that will deflect sound waves away from the aircraft.
- Keep sensors clean at all times. Dirt or other debris may adversely affect their effectiveness.
- Vision Positioning is only effective when the aircraft is at altitudes of 0.3 to 10 meters.
- The Vision Positioning may not function properly when the aircraft is flying over water.
- The Vision System may not be able to recognize pattern on the ground in low light conditions (less than 100 lux).
- Do not use other ultrasonic devices with frequency of 40 KHz when Vision System is in operation.
- Keep animals away from the aircraft when Vision Positioning is activated. The sonar sensor emits high frequency sounds that are audible to some animals.
Flight Recorder
Flight data is automatically recorded to the internal storage of the aircraft. This includes flight telemetry, aircraft status information, and other parameters. To access this data, connect the aircraft to the PC through the Micro USB port and launch the DJI 2.
Attaching and Detaching the Propellers
Use only DJI approved propellers with your Phantom 4 Advanced / Advanced+. The grey and black ring on the propeller indicate where they should be attached and in which direction whey should spin.
| Propellers | Silver Ring | Black Ring |
| Figure |  |  |
| Attach On | Motors without black dots | Motors with black dots |
| Legends |  Lock: Turn the propellers in the indicated direction to mount and tighten. Lock: Turn the propellers in the indicated direction to mount and tighten. Unlock: Turn the propellers in the indicated direction to loosen and remove. Unlock: Turn the propellers in the indicated direction to loosen and remove. | |
Attaching the Propellers

- Be sure to remove the warning stickers from the motors before attaching the propellers.
- Mount the propellers with black propeller rings to the motors with black dots. Mount the propellers with sliver propeller rings to the motors without black dots. Press the propeller down onto the mounting plate and rotate in the lock direction until it is secured in its position.
Detaching the Propellers
Press the propellers down into the motor mount and rotate in the unlock direction.
- Be aware of the sharp edges of the propellers. Handle with care.
- Use only the DJI approved propellers. Do not mix propeller types.
- Check that the propellers and motors are installed correctly and firmly before every flight.
- Ensure that all propellers are in good condition before each flight. DO NOT use aged, chipped, or broken propellers.
- To avoid injury, STAND CLEAR of and DO NOT touch propellers or motors when they are spinning. ONLY use original DJI propellers for a better and safer flight experience.
DJI Intelligent Flight Battery
The DJI Intelligent Flight Battery has a capacity of 5870 mAh, a voltage of 15.2 V, and a smart charge/ discharge functionality. It should only be charged using an appropriate DJI approved charger.
The Intelligent Flight Battery must be fully charged before using it for the first time.
Be aware that the output power of the supplied Phantom 4 Advanced / Advanced+ charger is 100W.
DJI Intelligent Flight Battery Functions
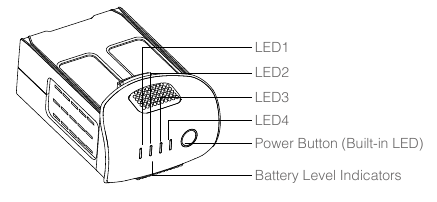
- Battery Level Display: The LED indicators display the current battery level.
- Auto-Discharging Function: To prevent swelling, the battery automatically discharges to below 65% of total power when it is idle for more than ten days. It takes around two days to discharge the battery to 65%. It is normal to feel moderate heat being emitted from the battery during the discharge process. Discharge thresholds can be set in the DJI GO 4 app.
- Balanced Charging: Automatically balances the voltage of each battery cell when charging.
- Overcharge Protection: Charging automatically stops when the battery is fully charged.
- Temperature Detection: The battery will only charge when the temperature is between 5°C (41°F) and 40°C (104°F).
- Over Current Protection: The battery stops charging when a high amperage (more than 8 A) is detected.
- Over Discharge Protection: To prevent over-discharge damage, discharging automatically stops when the battery voltage reaches 12 V.
- Short Circuit Protection: Automatically cuts the power supply when a short circuit is detected.
- Battery Cell Damage Protection: The DJI GO 4 app displays a warning message when a damaged battery cell is detected.
- Sleep Mode: To save power, the battery enter sleep mode after 20 minutes of inactivity.
- Communication: Information pertaining to the battery's voltage, capacity, current, etc. is transmitted to the aircraft's main controller.
Refer to Phantom 4 Advanced / Advanced+ Intelligent Flight Battery Safety Guidelines before use. Users take full responsibility for all operations and usage.
Using the Battery
Turning ON/OFF
Turning On: Press the Power Button once, then press again and hold for 2 seconds to turn on. The Power LED will turn green and the Battery Level Indicators will display the current battery level.
Turning Off: Press the Power Button once, then press again and hold for 2 seconds to turn off. The battery power LED will flash when powering off the Phantom to allow automatically stopping of a recording during the event recording wasn't stopped.
Checking the Battery Level
The Battery Level Indicators display how much power remains. When the battery is turned off, press the Power Button once. The Battery Level Indicators will light up to display the current battery level. See below for details.
The Battery Level Indicators will also show the current battery level during charging and discharging. The indicators are defined below.
 : LED is on.
 : LED is off.
 : LED is flashing.
| Battery Level Indicators | ||||
| LED1 | LED2 | LED3 | LED4 | Battery Level |
| | | | 87.5%~100% |
| | | | 75%~87.5% |
| | | | 62.5%~75% |
| | | | 50%~62.5% |
| | | | 37.5%~50% |
| | | | 25%~37.5% |
| | | | 12.5%~25% |
| | | | 0%~12.5% |
| | | | =0% |
Low Temperature Notice:
- Battery capacity is significantly reduced when flying in low temperature (< 0°C) environments.
- It is not recommended that the battery be used in extremely low temperature (< -10°C) environments. Battery voltage should reach the appropriate level when operating environment with temperatures between -10°C and 5°C.
- End the flight as soon as the DJI GO 4 app displays the "Low Battery Level Warning" in low temperature environments.
- Keep the battery indoors to warm it before flying in low temperature environments.
- To ensure optimal performance of the battery, keep the battery temperature above 20°C.
- The charger will stop charging the battery if the battery cell's temperature is not within the operating range (0°C ~ 40°C ).
In cold environments, insert the battery into the battery compartment and turn on the aircraft for approximately 1-2 minutes to warm up before taking off.
Charging the Intelligent Flight Battery
- Connect the Battery Charger to a power source (100-240 V 50/60 Hz).
- Connect the Intelligent Flight Battery to the Battery Charger to start charging. If the battery level is above 95%, turn on the battery before charging.
- The Battery Level Indicator will display the current battery level as it is charging.
- The Intelligent Flight Battery is fully charged when the Battery Level Indicators are all off.
- Air-cool the Intelligent Flight Battery after each flight. Allow its temperature to drop to room temperature before storing it for an extended period.
- Always turn off the battery before inserting it or removing it from the Phantom 4 Advanced / Advanced+. Never insert or remove a battery when it is turned on.


| Battery Level Indicators While Charging | ||||
| LED1 | LED2 | LED3 | LED4 | Battery Level |
| | | | 0%~25% |
| | | | 25%~50% |
| | | | 50%~75% |
| | | | 75%~100% |
| | | | Fully Charged |
Battery Protection LED Display
The table below shows battery protection mechanisms and corresponding LED patterns.
| Battery Level Indicators while Charging | |||||
| LED1 | LED2 | LED3 | LED4 | Blinking Pattern | Battery Protection Item |
| | | | LED2 blinks twice per second | Over current detected |
| | | | LED2 blinks three times per second | Short circuit detected |
| | | | LED3 blinks twice per second | Over charge detected |
| | | | LED3 blinks three times per second | Over-voltage charger detected |
| | | | LED4 blinks twice per second | Charging temperature is too low |
| | | | LED4 blinks three times per second | Charging temperature is too high |
After these issues are resolved, press the Power Button to turn off the Battery Level Indicator. Unplug the Intelligent Flight Battery from the charger and plug it back in to resume charging. Note that you do not need to unplug and plug in the charger in the event of a room temperature error; the charger will resume charging when the temperature is within the allowable range.
DJI does not take any responsibility for damage caused by third-party chargers.
How to discharge your Intelligent Flight Battery:
Slow: Place the Intelligent Flight Battery into the Phantom 4's Advanced / Advanced+ Battery Compartment and turn it on. Leave it on until there is less than 8% of power left, or until the battery can no longer be turned on. Launch the DJI GO 4 app to check battery levels.
Rapid: Fly the Phantom 4 Advanced / Advanced+ outdoors until there is less than 8% of power left, or until the battery can no longer be turned on.
Remote Controller
This section describes the features of the remote controller and includes instructions for controlling the aircraft and the camera.

Remote Controller Profile
The Phantom 4 Advanced / Advanced+ remote controller is a multi-function wireless communication device that integrates the video downlink system and the aircraft remote control system, which operate at 2.4 GHz. The remote controller features a number of camera control functions, including photo/video capture as well as gimbal control. The battery level is displayed via LED indicators on the front panel of the remote controller.
- Compliance Version: The remote controller is compliant with local compliance and regulations.
- Operating Mode: Control can be set to Mode 1 or Mode 2, or to a custom mode.
- Mode 1: The right stick serves as the throttle.
- Mode 2: The left stick serves as the throttle.
To prevent transmission interference, do not operate more than three aircrafts in the same area.
Using the Remote Controller
Turning the Remote Controller On and Off
The Phantom 4 Advanced / Advanced+ remote controller is powered by a 2S rechargeable battery that has a capacity of 6000 mAh. The battery level is indicated via the Battery Level LEDs on the front panel. Follow the steps below to turn on your remote controller:

- When the remote controller is turned off, press the Power Button once. The Battery Level LEDs will display the current battery level.
- Press and hold the Power Button to turn on the remote controller.
- The remote controller will beep when it is turned on. The Status LED will rapidly blink green, indicating that the remote controller is linking to the aircraft. The Status LEDs will glow solid green when linking is complete.
- Repeat Step 2 to turn off the remote controller.
Charging the Remote Controller
Charge the remote controller using the included charger.
Documents / ResourcesDownload manual
Here you can download full pdf version of manual, it may contain additional safety instructions, warranty information, FCC rules, etc.
Advertisement


Need help?
Do you have a question about the PHANTOM 4 ADVANCED and is the answer not in the manual?
Questions and answers