Advertisement
Overview

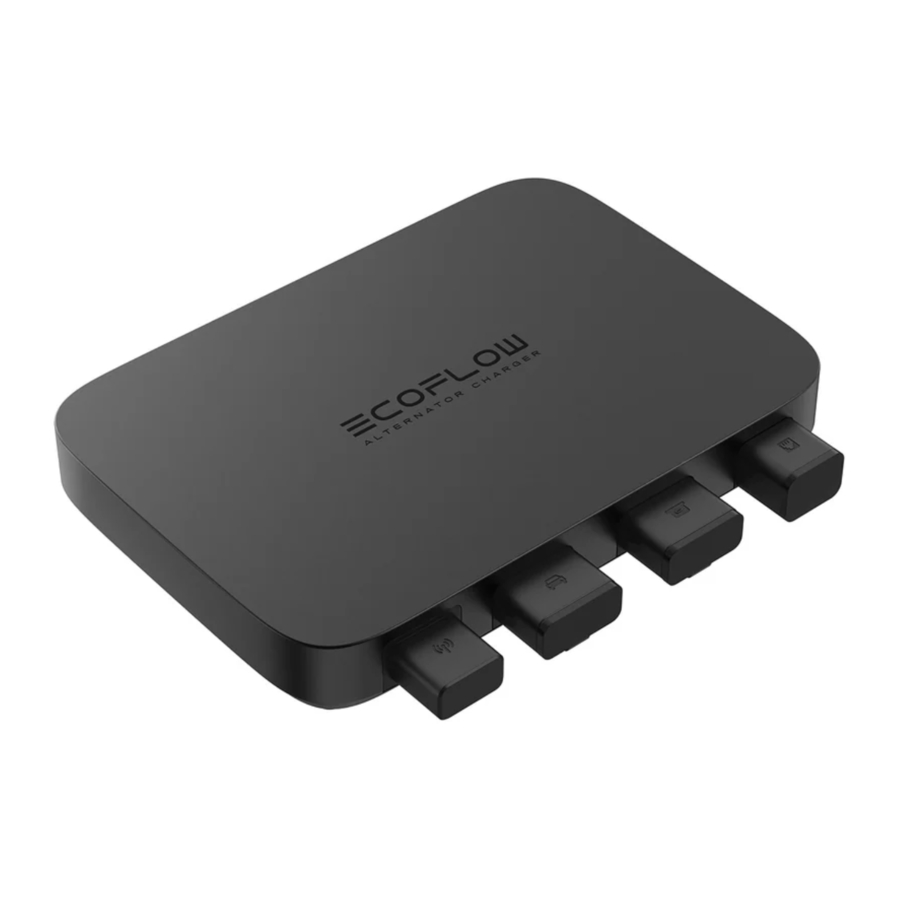
| 1 Antenna | Communicates with EcoFlow app via Bluetooth or Wi-Fi. |
| 2 Vehicle Battery Port | Connected to the vehicle starter battery or RV house battery via the Input Cable. |
| 3 Portable Power Station Port | Connected to the portable power station or extra battery via the XT150 Output Cable. |
| 4 COM Communication Port (RJ45) | Preset port. Stay tuned. |
| 5 Power Button | Short press once to power on. Long press for 3s to power off. |
| 6 LED Indicator | Indicates the operating mode and state. Refer to the table below for details. |
LED Indication
| Color | State | Indication |
| Green | Solid | In Charge Mode. |
| Breathing | Charge Mode in standby. | |
| Blue | Solid | In Battery Maintenance Mode. |
| Breathing | Battery Maintenance Mode in standby. | |
| Whit | Solid | In Reverse Charge Mode. |
| Breathing | Reverse Charge Mode in standby. | |
| Red | Solid | Error alarm. Check app interfaces for details. |
| Yellow | Solid | Unbinding from EcoFlow account. |
| Breathing | Binding to EcoFlow account. |
Wire Up Your Charger

- It's recommended that the wiring is performed by a professional. Wear personal protective equipment (including protective goggles and gloves) during wiring and installation.
- When wiring, avoid high temperature, sharp, and friction-prone areas, and securely fasten the cables to avoid cable wear or loose connections caused by cable movement.
- Always observe the safety instructions of the battery during wiring.
- It's recommended to complete wiring before starting the vehicle and turning on the charger.
- Power off the charger and disconnect it before changing the wiring each time.
Wiring Steps


- Alternator Charger
- Input Cable
- XT150 Output Cable
- Fuse Cable
- Vehicle Starter Battery or RV House Battery
- Portable Power Station or Extra Battery
- Connect the ring terminal of the Fuse Cable to the positive (+) terminal on the vehicle starter battery or RV house battery.
- As shown in the illustration, connect the other end of the Fuse Cable and the positive (red) terminal of the Input Cable to a torque of 3 to 4 N*m. Make sure the ring terminal, washers and nut are in the correct order and apply the torque as required. Insufficient torque will lead to a loose connection and cable melting, while a torque higher than 6 N*m will break the fuse.
- Ground the negative (black) terminal of the Input Cable to the chassis of the vehicle or directly to the RV house battery's negative (-) terminal if you are connecting it to an RV.
- Connect the Input Cable to the Vehicle Battery Port on the charger.
- Connect the Output Cable from the Portable Power Station Port of the charger to the extra battery port of the power station or extra battery.
Make sure that the Input Cable, Fuse Cable, and Output Cable are connected firmly as loose connections can cause cable melting.
Compatibility
Vehicle Starter Battery or RV House Battery
Please make sure the vehicle starter battery or RV house battery is undamaged and rechargeable. The battery's nominal voltage should be 12V or 24V.
 Are there any requirements for car models?
The overall voltage of some older or special car models is relatively low and the charger may fail to work as a result. In this case, use the EcoFlow app to adjust the start voltage of the charger.
Portable Power Station or Extra Battery
The 800W Alternator Charger is connected to the extra battery port (XT150) of the EcoFlow portable power station or extra battery via the XT150 Output Cable. Please make sure your EcoFlow portable power station or extra battery has a port of this kind.
Environmental Requirements
To make sure the charger can operate normally, the location where the charger is placed or installed should meet the following requirements:
- Be near to the portable power station or extra battery as the Output Cable is only 1m long and its length cannot be extended.
- Has adequate connection space around the ports.
- Be dry and tidy with a moderate temperature and away from heat sources.
- Be away from flammable substances as the charger produces heat when it's in use.
- Be well-ventilated and not covered by blankets or anything that will hinder ventilation.
- Be away from children and pets.
Install Your Charger (Optional)
For smooth rides, you can place the charger on the power station. For bumpy rides, it's recommended to install the charger securely.
 - Step 1")
Do not flush mount the product to ensure proper ventilation.
Method 1
You can use the included self-tapping screws to install the charger on the body or frame of your vehicle.
 - Step 2")
- Use the installation board to locate the drilling positions and mark them with a marker.
- Drill 2 holes of 5 mm diameter.
- Fix the installation board to the back of the charger with three M5 screws.
- Insert the self-tapping screws through the installation board and into the holes.
Method 2
You can use the included M6 bolts and nuts to install the charger on a board.
 - Step 3")
- Use the installation board to locate the drilling positions and mark them with a marker.
- Drill 2 holes of 6 mm diameter.
- Fix the installation board to the back of the charger with three M5 screws.
- Insert the M6 bolts through the installation board and into the holes. Then tighten the M6 nuts.
Getting Started
Power On/Off

- Power On: Short press once
- Power Off: Long press for 3s
To ensure that the charger will operate normally, please complete the wiring as instructed first, and then power on the power station or extra battery before you start your vehicle.
When you power on the charger for the first time, it will enter Charge Mode. In daily use, when you power it on, it will enter the same mode as it was powered off last time.
To make sure the charger will operate normally, please upgrade your portable power station or extra battery's firmware to the latest version before use.
Bind Your Charger
EcoFlow offers a companion app for device management. By binding the charger to your EcoFlow account via the app, you can:
- Check the charger's status
- Change operating mode
- Adjust output power
- Adjust start voltage
Binding Steps
- Download the EcoFlow App at:https://download.ecoflow.com/app
- Visit the EcoFlow app and log into your EcoFlow account. If you don't have an account, create one first.
- Tap the "Add Device" button or the "+" icon in the top right corner to search for new EcoFlow devices.
- Turn on Bluetooth on your phone and bind the device to your EcoFlow account.
- Connect to the Internet (optional).
After connecting the charger to the Internet, you can manage the charger from afar. If Internet connection is not available, you can manage the charger via Bluetooth.
Unable to discover your charger via Bluetooth?
Follow the instructions in the "How to Unbind" section to reset the charger's Bluetooth and then try to bind again.
How to Unbind
You can unbind via the app or the Power Button on the charger. To unbind via the button, follow these steps:

- Power off the portable power station or extra battery.
- Long press the Power Button for 3s to power off the charger.
- Wait for several seconds and then long press the Power Button for 5s. When the LED indicator turns solid yellow, unbinding begins. When the indicator turns into another color, unbinding is complete.
How to Switch Mode and State

You need to go to the device detail page on the app and tap on a mode icon to change mode.

To switch between working or standby state, tap the toggle button.
Charge Mode

- Power Flow: Alternator → Vehicle Starter Battery or RV House Battery → Alternator Charger → Portable Power Station or Extra Battery
- Maximum Power: 800W
With the portable power station or extra battery powered on, when your vehicle is in motion, the charger can use the alternator's redundant power to charge the portable power station or extra battery.
In Charge Mode, the actual output power is influenced by the motion state and the model of the vehicle.
To prevent the vehicle starter battery or RV house battery from overdischarging, in Charge Mode, the charger will measure the voltage of the battery. If the measured value is lower than the charger's start voltage, the charger will stop working.
If the charger remains idle in Charge Mode for over 48h, it will automatically power off.
For your driving safety, in Charge Mode, if the vehicle is in motion, it is recommended not to change the operating mode.
Battery Maintenance Mode

- Power Flow: Portable Power Station or Extra Battery → Alternator Charger → Vehicle Starter Battery
- Default Maximum Power: 100W
After powering on the portable power station or extra battery, you can use the charger to keep your starter battery charged at an optimal level over an extended period of time. It helps extend the lifespan of the battery and ensures that it is ready for use when needed.
Reverse Charge Mode

- Power Flow: Portable Power Station or Extra Battery → Alternator Charger → Vehicle Starter Battery or RV House Battery
- Maximum Power: 800W
With the portable power station or extra battery powered on, the charger will charge the vehicle starter battery or RV house battery with a maximum power of 800W.
How to Unplug Cables

To unplug the Input Cable or Output Cable, follow these steps:
- Power off the portable power station or extra battery.
- Power off the charger.
- Use the included cable puller to unplug the cable.
Troubleshooting
LED indicator is red
- Check app interfaces for error details.
Wiring is complete but charger won't power on
- Ensure correct polarity connection between the charger and the vehicle starter battery or RV house battery.
- Verify that all terminals of the cables are connected firmly.
- Verify that the nominal voltage of the vehicle starter battery or RV house battery is 12V or 24V.
- Check whether the negative terminal of the Input Cable is connected to the negative terminal of the starter battery. If yes, connect the negative terminal of the Input Cable to the chassis and try to power on the charger again.
In Charge Mode, the charger is working but the power station or extra battery won't charge.
- Upgrade the firmware of your portable power station or extra battery to the latest version in the app.
- Check whether you've set a charge limit for your power station in the app.
Output power doesn't reach the maximum
- Check whether you've set the output power of the charger in the app.
- The alternator's output may be low. Boost its output (e.g. by pressing the accelerator) and then try again.
In Charge Mode, the output power fluctuates dramatically
- The reason could be that a battery sensor module is connected to the negative terminal of the starter battery. Connect the negative terminal of the Input Cable to the chassis and try again.
Power station or extra battery turns off after putting the charger into standby state.
- Upgrade the firmware of your portable power station or extra battery to the latest version in the app.
The connected WAVE 2 add-on battery won't charge
Once a WAVE 2 add-on battery is connected, the charger will initiate the device recognition process. Please wait for around 1 minute. When recognition is finished, charging will begin.
If the problem persists, please contact technical support.
Maintenance
- Inspect the cables every month and ensure that the terminals are tight. Look out for cracks, abrasions, and corrosion on the cables. If you notice any of this, stop using the cables immediately and follow the instructions in the "Cable Replacement" section.
- Use dry, soft, and clean cloth or paper towels to clean the charger.
Cable Replacement
For continued protection against risk of fire, or electric shock, replace only with same type and ratings of fuse.
- To replace the Output Cable, purchase new cables from EcoFlow's official sales channels.
- To replace the Input Cable, Fuse Cable, or Fuse, consult EcoFlow's official customer service for purchase suggestions and ask a professional for replacement.
Input Cable Fuse Cable Fuse Size: 6 AWG Size: 6 AWG Rated Current: 125A
What's in the Box

- EcoFlow Alternator Charger
Cables
- Input Cable (5m)
- XT150 Output Cable (1m)
- Fuse Cable
Installation Kits
- Installation Board
- M5 Screw ×3
- ST5.5 Screw ×2
- M6 Bolt×2
- M6 Nut ×2
Others
- Cable Puller
- Quick Start Guide & Safety Instructions & Warranty Card
Specifications
| Model | EF-FC-301-1 |
| Net Weight | Approximately 2.3 kg |
| Dimensions (W × D × H) | 242×194×35 mm (9.5×7.6×1.4 inch) |
| Wi-Fi | Frequency: 2412MHz-2472MHz Maximum output power: 18.22dBm |
| Bluetooth | Frequency: 2402MHz-2480MHz Maximum output power: 7.89dBm |
| Charge Mode | Input: 12V/24V⎓(11V-31V⎓), 76A Max. Output: 40V-60V⎓, 800W Max. |
| Battery Maintenance Mode | Input: 40V-60V⎓, 3A Max. Output: 13.8V/27.6V⎓, 100W Max. |
| Reverse Charge Mode | Input: 40V-60V , 21A Max. , 21A Max.Output: 13.8V/27.6V⎓, 800W Max. |
| Rated Current of Fuse | 125A |
| Protection Type | Reverse polarity protection/Overcurrent protection/Short circuit protection/Overvoltage and undervoltage protection (Provided with integral protection against overloads) |
| Operating Temperature | –20℃ to 60℃(–4℉ to 140℉) |
| Storage Temperature | –30℃ to 70℃(–22℉ to 158℉) |
| Operating Humidity | ≤95% |
| Storage Humidity | ≤95% |
Safety Instructions
Wiring and Installation
- 1. It's recommended that the wiring is performed by a professional.
- Wear personal protective equipment (including protective goggles and gloves) during wiring and installation.
- It's recommended to complete wiring before starting the vehicle and turning on the charger.
- Connect the fuse cable and the positive terminal of the input cable to a torque of 3 to 4 N*m. Insufficient torque will lead to a loose connection and cable melting. A torque higher than 6 N*m will break the fuse.
- Follow these steps when connecting the input cable:
- Connect the ring terminal of the fuse cable to the positive terminal on the vehicle starter battery or RV house battery.
- Connect the other end of the fuse cable to the positive terminal of the input cable.
- Ground the negative terminal of the input cable to the chassis of the vehicle or directly to the RV house battery's negative terminal (if you are connecting it to an RV).
- Connect the input cable to the vehicle battery port on the charger.
- Make sure that the input cable, fuse cable, and output cable are connected firmly as loose connections can cause cable melting.
- Avoid reversing the polarity of the positive and negative connections when connecting the input cable and the fuse cable to the vehicle starter battery or RV house battery.
- When wiring, avoid high temperature, sharp, and friction-prone areas, and securely fasten the cables to avoid cable wear or loose connections caused by cable movement.
- Refer to the specifications of the vehicle starter battery or RV house battery and make sure that its nominal voltage is 12V or 24V. Always observe the safety instructions of the battery during use.
- Do not use the charger with damaged or non-rechargeable batteries.
- Power off the charger and disconnect it before changing the wiring each time.
- Make sure the screws are tightened to the specified torque during installation (M5: 3 N*m; ST5.5: 4 N*m; M6: 9 N*m).
![]()
To reduce the risk of fire, use only battery packs that include the battery management system and all necessary protection for the battery pack integral to the pack.- Do not flush mount the product to ensure proper ventilation.

Environmental Requirements
- Install and use the charger in a dry and tidy environment with a moderate temperature.
- Keep the charger away from heat sources and wet environments.
- Keep the charger away from flammable substances as the charger produces heat when it's in use.
- Use the charger in an area with good ventilation and pay attention not to cover the charger with blankets or anything that will hinder ventilation.
- Do not wet the charger, or soak it in water or any other liquids.
- Keep children and pets away from the charger.
Daily Use
- Power off the charger before plugging or unplugging cables.
- Inspect the cables every month and ensure that the terminals are tight. Look out for cracks, abrasions, and corrosion on the cables. If you notice any of this, stop using the cables immediately and follow the instructions in the "Cable Replacement" section.
- Avoid prolonged contact with the charger when it is in use.
- Use dry, soft, and clean cloth or paper towels to clean the charger.
- Contact EcoFlow's official customer service if the charger needs repair.
- Do not disassemble the charger yourself. Otherwise, the charger may be damaged and the warranty will be voided.
In Case of Emergency
- In case of emergency, take precautions against electric shock (wear insulating gloves, for instance) before touching the charger.
- If the charger gets wet, stop using it immediately and refrain from further operation or powering it on. Place the charger in a secure, waterproof, and well-ventilated area, then contact EcoFlow's official customer service for assistance.
- If the charger falls into water, place it in a secure, waterproof, and wellventilated area, and keep it away from contact until it is completely dry. The dried charger should not be used again and must be properly disposed of according to local laws and regulations.
- If the charger catches fire, we recommend that you use the fire extinguishers in the following order: water or water mist, sand, fire blanket, dry powder, and finally a carbon dioxide fire extinguisher.
- If the charger is overturned and severely damaged, wear insulating gloves to turn it off, and then place the charger in an open area far from flammable materials and people, and dispose of it according to local laws and regulations.
Documents / Resources
References
Download manual
Here you can download full pdf version of manual, it may contain additional safety instructions, warranty information, FCC rules, etc.
Advertisement


Need help?
Do you have a question about the Alternator Charger and is the answer not in the manual?
Questions and answers