Xerox C315, C325, C410, B410 Manual
- User manual (382 pages) ,
- Manual (38 pages) ,
- Quick reference manual (18 pages)
Advertisement
- 1 Overview
- 2 Enabling User Selectable Accessibility Features
-
3
Configuring Accessibility Settings
- 3.1 Adjusting the Voice Guidance Speech Rate
- 3.2 Adjusting the Default Headphone Volume
- 3.3 Adjusting the Default Internal Speaker Volume
- 3.4 Enabling Spoken Passwords or Personal Identification Numbers
- 3.5 Changing the Keyboard Type
- 3.6 Configuring the Fax Speaker Settings
- 3.7 Enabling an Audible Alert When Loading Paper into the ADF Tray
- 3.8 Adjusting the Duplicate Key Strike Interval
- 3.9 Adjusting the Initial Delay Before Key Repeat
- 3.10 Adjusting the Key Repeat Rate
- 3.11 Enabling Two-Sided Copying
- 3.12 Changing the Display Language
- 3.13 Extending the Inactivity Timeout
- 4 Documents / Resources
Overview
 Note: The Print drivers are compatible with Assistive Technologies, including Screen readers for Windows and iOS.
Supported Models
- Xerox C315 Color Multifunction Printer
- Xerox C325 Color Multifunction Printer
- Xerox C410 Color Printer
- Xerox B410 Printer
Note: Feature support varies depending on the printer model.
Contacting Customer Support
Technical support using telephone is available in the United States and Canada only, call: 1-800-ASK-XEROX. Following are the contact details:
- Office Multifunction Printer
- 1-800-821-2797 (US)
- 1-800-275-9376 (Canada)
- Small to Medium Printers
- 1-800-835-6100 (US and Canada), 8:00 AM to 8:00 PM Eastern Time, Monday to Friday
To contact technical support in other countries or regions, send an email, or chat, go to http://support.xerox.com.
Locating the Unit for Accessibility
For information on the floor space requirements for the printer, refer to the Selecting a Location for the Printer section in the User Guide.
Note: For some printers, you are required to use a table or a stand to meet the height requirements. For more information, refer to the User Guide.
Ensure that:
- The height of the control panel is between 610 and 1016 mm (24 and 48 in.).
- The control panel is visible from a point 1016 mm (40 in.) above the floor.
- The clearance for the following areas is extended to:
- Front: 1220 mm (48 in.)
Note: If the printer is installed in a confined space, then extend the clearance to 1520 mm (60 in.).
- Right or left side: 760 mm (30 in.)
Note: The clearance depends on how the supplies are replaced.
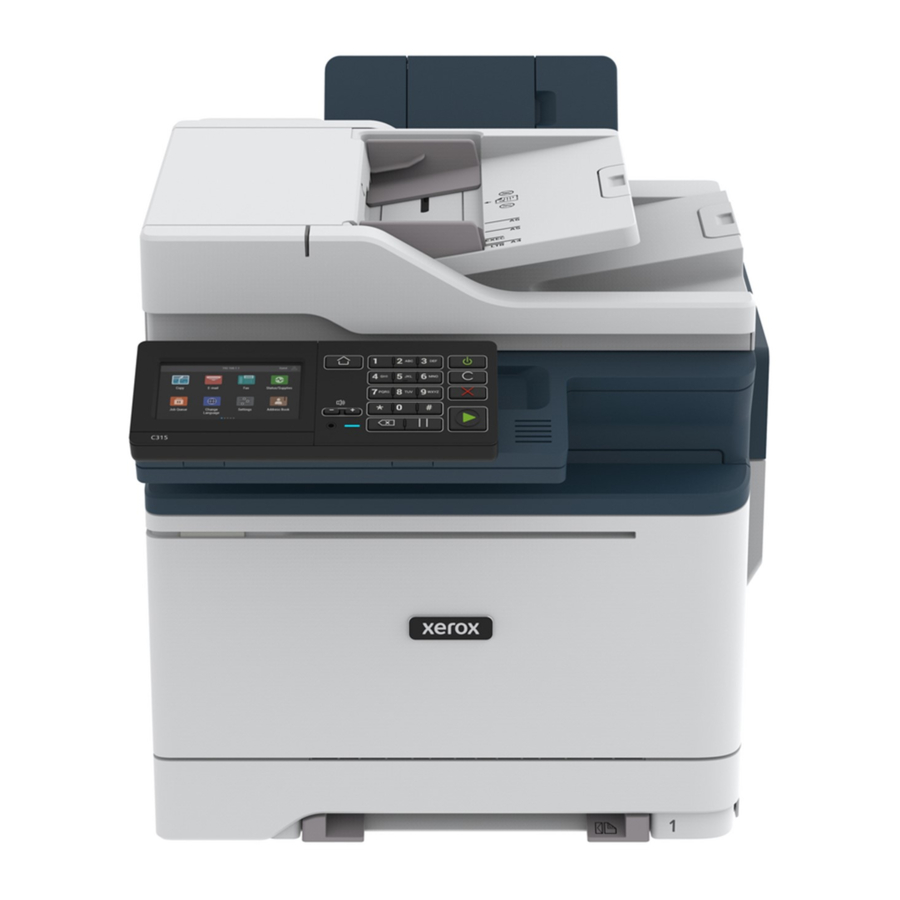
Using the Control Panel

Control Panel of Xerox C315 Color Multifunction Printer
Note: The Control Panel shown here is for Xerox C315 Color Multifunction Printer. According to the printer model, your printer can have a touch-screen only control panel.
| ITEM | PARTS OF THE CONTROL PANEL | FUNCTION |
| 1 | Display |
|
| 2 | Home button | Go to the home screen. Note: This button has a raised icon of a house. |
| 3 | Keypad | Enter numbers or symbols in an input field. Note: The 5 key has one tactile bump. |
| 4 | Power button |
Note: This button has a raised icon of a line partially within a broken circle. |
| 5 | Clear all or Reset button | Reset the settings of a function, such as copying, faxing, or scanning to the default level. Note: This button has a raised icon of the letter C. |
| 6 | Stop or Cancel button | Stop the current job. Note: This button has a raised icon of the letter X. |
| 7 | Start button | Start a job, depending on which mode is selected. Note: This button has a raised icon of a circle. |
| 8 | Pause button | Place a dial pause in a fax number. Note: This button has a raised icon of parallel lines. |
| 9 | Backspace button | Move the cursor backward and delete a character in an input field. Note: This button has a raised icon of a left-pointing arrow. |
| 10 | Indicator light | Check the printer status. Note: This option is available only in some printer models. |
| 11 | Volume buttons | Adjust the volume of the headset or speaker. Your printer can have a headset or a speaker port. |

Control Panel of Xerox C325 Color Multifunction Printer
The Control Panel shown here is for Xerox C325 Color Multifunction Printer.
| ITEM | PARTS OF THE CONTROL PANEL | FUNCTION |
| 1 | Wireless Connection Status | This button provides the status of the network connectivity. |
| 2 | User Profile | Touching the User Profile button on the control panel touch screen allows you to log in and identify yourself to the printer. To access printer features, log in with your user credentials. If you do not know your user name or password, contact your system administrator. |
| 3 | Power Button | Turn on or turn off the printer. Set the printer to Sleep mode. |
| 4 | Status Indicator | This light pulses blue or amber to indicate the printer status. Blue:
Pulses amber to indicate an error condition or warning that requires your attention or the attention of your system administrator. For example, this color can indicate an out-of-toner condition, a paper jam, or that the printer is out of paper for the current job. |
| 5 | Touch Screen Display | The screen displays information and provides access to the printer functions and apps, such as Status/Supplies, Job Queue, Settings, and USB Drive. |
| 6 | On-screen keypad | Enter numbers or symbols in an input field. |
| 7 | Stop or Cancel button | Stop the current printer task. |
Making a Quick Copy Using the Control Panel
- Load an original document into the Automatic Document Feeder (ADF) tray or on the scanner glass.
Note:
- When loading a document into the ADF tray, adjust the paper guides.
- For multiple copies, use the keypad to enter the number.
- From the control panel, press Start button.
Note: This option is available only in some printer models.
Enabling User Selectable Accessibility Features
Enabling Magnification Mode
Note: This option is available only in some printer models.
- From the keyboard, press and hold the5 key until you hear a voice message.
- Press Tab key and select Magnification mode.
- Press Tab key and select OK.
For more information on navigating a magnified screen, refer to Navigating the Screen Using Gestures.
Using Voice Guidance
ACTIVATING VOICE GUIDANCE
Note: This option is available only in some printer models.
From the Control Panel
Note: This option is available only in Xerox C315 Color Multifunction Printer.
- Press and hold the 5 key until you hear a voice message.
- Select OK.
From the Keyboard
Note: Keyboard is the preferred method for using accessibility features.
- Press and hold the 5 key until you hear a voice message.
- Press Tab to navigate the focus cursor to the OK button, then press Enter.
Note:
- Voice Guidance is also activated when you insert headphones into the headphone jack.
- To adjust the volume, use the volume buttons at the bottom part of the control panel.
- Voice Guidance has limited language support in some printer models.
NAVIGATING THE SCREEN USING GESTURES FOR ZOOM AND PAN
Note:
- The gestures are applicable only when Voice Guidance is activated.
- A physical keyboard is required to type characters and adjust certain settings. For more information, refer to Performing a Task Using the Keyboard.
- This option is available only in some printer models.
Note: Keyboard is the preferred method for using accessibility features.
Note: If the gesture does not work, then apply more pressure.
| GESTURE | FUNCTION |
| Triple-tap using one finger | Zoom in or zoom out text or images. |
| Pan | Access parts of the zoomed image that are beyond the limits of the screen. Note: This gesture requires the use of two fingers to drag across a zoomed image. |
USING THE KEYBOARD ON THE DISPLAY
Do one or more of the following:
- Drag a finger over the key to announce the character.
- Lift the finger to enter or type the character in the field.
- Press Backspace to delete characters.
- To hear the content in the input field, press Tab, then press Shift + Tab.
Using the Keyboard
To enable keyboard navigation on the printer, plug a supported USB keyboard into the USB port and press the Tab key to initiate the focus cursor.
NAVIGATING THE SCREEN USING THE KEYBOARD
Note:
- Xerox recommends a standard USB keyboard.
- Keyboard navigation is compatible with Voice Guidance.
| PARTS OF THE KEYBOARD | FUNCTION |
| Tab | Move the focus cursor to the next item on the screen. Note: Use the Tab key as the primary method for navigating the screen with a keyboard. |
| Shift + Tab | Move the focus cursor to the previous item on the screen. |
| Enter |
|
| Up arrow | Move the focus cursor to the previous item within a list. |
| Down arrow | Move the focus cursor to the next item within a list. |
| Left arrow | Move the focus cursor to the item on the left. |
| Right arrow | Move the focus cursor to the item on the right. |
| Home |
|
| Esc |
|
| Page down |
|
| Page up |
|
| F7 | Mute the volume. |
| F6 | Repeat the last spoken prompt. |
| F2 | Open the job queue. |
| F3 | Start a job, depending on which mode is selected. |
| Space | Move to the next page. |
| Alt + Shift + L | Launch the login window. |
| Alt + Shift + N | Open or close the notification center. |
| Alt + Esc | Return to the home screen. |
Performing a Task Using the Keyboard
The following tasks are examples of tasks initiated from the home screen.
MAKING COPIES
Note: This option is available only in some printer models.
- Load an original document into the ADF tray or on the scanner glass.
![information]() Note: When you load a document into the ADF tray, adjust the paper guides.
Note: When you load a document into the ADF tray, adjust the paper guides. - From the keyboard, press Tab to navigate the focus cursor to the Copy icon, then press Enter.
- Enter the number of copies.
- Press Tab to navigate the focus cursor to the Copy button, then press Enter.
SENDING FAXES
Note: This option is available only in some printer models.
- Load an original document into the ADF tray or on the scanner glass.
![information]() Note: When you load a document into the ADF tray, adjust the paper guides.
Note: When you load a document into the ADF tray, adjust the paper guides. - From the keyboard, press Tab to navigate the focus cursor to the Fax icon, then press Enter twice.
- Enter the recipient fax number.
- Press Tab to navigate the focus cursor to the Fax button, then press Enter.
SENDING EMAILS
Note: This option is available only in some printer models.
- Load an original document into the ADF tray or on the scanner glass.
![information]() Note: When you load a document into the ADF tray, adjust the paper guides.
Note: When you load a document into the ADF tray, adjust the paper guides. - From the keyboard, press Tab to navigate the focus cursor to the Email icon, then press Enter twice.
- Type the recipient email address.
- Press Tab to navigate the focus cursor to the Send button, then press Enter.
Configuring Accessibility Settings
Note: The following tasks and settings can be performed with the connected keyboard or touch screen or assistance of your administrator.
Adjusting the Voice Guidance Speech Rate
- From the home screen, select Settings > Device > Accessibility > Speech Rate.
- Select the speech rate.
Note: This option is available only in some printer models.
Adjusting the Default Headphone Volume
- From the control panel, select Settings > Device > Accessibility.
- Adjust the headphone volume.
Note:
- The volume resets to the default value after the session is logged out or when the printer wakes from Sleep or Hibernate mode.
- Volume can be adjusted using the control panel volume buttons for Xerox C315 Color Multifunction Printer.
Adjusting the Default Internal Speaker Volume
Note: This option is available only in some printer models.
- From the control panel, select Settings > Device > Preferences > Device Sounds.
- Adjust the volume.
Note:
- If Mute All Sounds is enabled, then audible alerts are turned off. This setting also slows the printer performance.
- The volume resets to the default value after the session is logged out or when the printer wakes from Sleep or Hibernate mode.
Enabling Spoken Passwords or Personal Identification Numbers
- From the home screen, select Settings > Device > Accessibility > Speak Passwords/PINs.
- Enable the setting.
Note: This option is available only in some printer models.
Changing the Keyboard Type
- From the home screen, select Settings > Device > Preferences > Keyboard > Keyboard Type.
- Select a keyboard type.
Note: Match the keyboard type with the display language. For more information, refer to Changing the Display Language.
Configuring the Fax Speaker Settings
- From the home screen, select Settings > Fax > Fax Setup > Speaker Settings.
- Do the following:
- Set the Speaker Mode to Always On.
- Set the Speaker Volume to High.
- Activate the Ringer Volume.
Note: This option is available only in some printer models.
Enabling an Audible Alert When Loading Paper into the ADF Tray
- From the home screen, select Settings > Device > Notifications.
- Enable the ADF Loaded Beep setting.
Note: This option is available only in some printer models.
Adjusting the Duplicate Key Strike Interval
- From the home screen, select Settings > Device > Accessibility > Duplicate Key Strike Interval.
- Enter the value.
Adjusting the Initial Delay Before Key Repeat
- From the home screen, select Settings > Device > Accessibility > Key Repeat Initial Delay.
- Enter the value.
Adjusting the Key Repeat Rate
- From the home screen, select Settings > Device > Accessibility > Key Repeat Rate.
- Enter the value.
Enabling Two-Sided Copying
- From the home screen, select Settings > Copy > Sides.
- Select 2 sided to 2 sided or 2 sided to 1 sided.
Note: This option is available only in some printer models.
Changing the Display Language
- From the home screen, select Settings > Device > Preferences > Display Language.
- Select a display language.
Extending the Inactivity Timeout
- From the home screen, select Settings > Device > Accessibility.
- Enable the Prolong Screen Timeout setting.
Note:
- When enabled, the timeouts are automatically extended to 10 times the current setting.
- When Voice Guidance is activated, the timeouts are automatically extended to 10 times the current setting.
- When the timeout expires, a notification screen appears to allow for additional extension.
Documents / Resources
References
Download manual
Here you can download full pdf version of manual, it may contain additional safety instructions, warranty information, FCC rules, etc.
Advertisement


Need help?
Do you have a question about the C315 and is the answer not in the manual?
Questions and answers