Table of Contents
Advertisement
Advertisement
Table of Contents

Related Manuals for Rollei 70


Summary of Contents for Rollei 70
- Page 1 Rollei Prego 70 Hinweise zum Gebrauch Instructions for use Istruzíoní per l’uso...
- Page 2 Gratulation zum Kauf der Rollei Prego Bitte beachten Thank you for buying a Rollei Prego 70. Um die vielfältigen Möglichkeiten Die Rollei Prego 70 löst nicht aus, 70. Please read these instructions care- › dieser Kamera optimal nutzen zu kön-...
- Page 3 Please note Grazie per aver acquistato una Rollei Note The shutter of your Rollei Prego 70 will Prego 70. Vi preghiamo di leggere L’otturatore della Rollei Prego 70 non not work... attentamente queste istruzioni prima funziona… › › if no batteries are loaded or if the...
-
Page 4: Table Of Contents
INHALTSVERZEICHNIS CONTENTS Vorbereitung Spezielle Aufnahmefunktionen Getting ready › › › Allgemeines Anti-Rotaugen-Blitz General › › › Bezeichnung der Teile Blitz aus Components › › › LCD-Monitor Tageslicht-Aufhellblitz LCD panel › › › Dioptrienkorrektur Aufhellblitz u. Gegenlichtkorr. Eyesight correction › › Anbringen d. - Page 5 INDICE Advanced functions Preparazione Funzioni Avanzate › › Preflash per riduzione effetto Anti-red-eye flash Cenni generali › › › “occhi rossi” Flash OFF Componenti › › › Flash escluso Daylight fill flash Display LCD › › › Flash di rischiaramento luce diurna Fill-in/Backlight compensation Correzione diottrica ›...
-
Page 6: Bezeichnung Der Teile
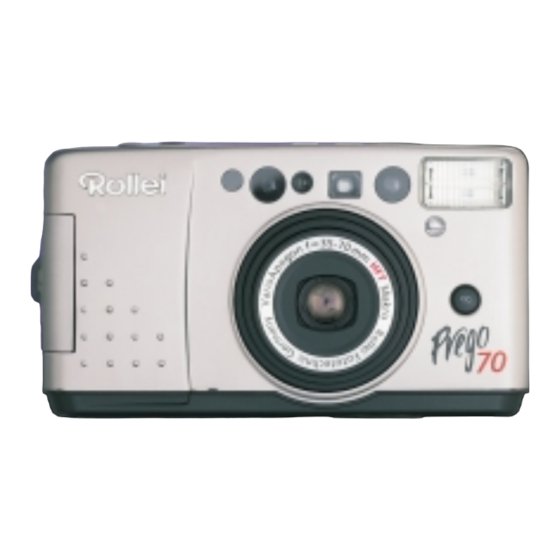
BEZEICHNUNG DER TEILE Selbstauslöser-/ Autofokusfenster Zoom-Tasten (Tele/Wide) Anti-Rotaugen-LED Sucherfenster Auslöser Blitz Belichtungssensor LCD-Monitor Datentaste date Selbstauslösertaste selftimer Blitzfunktionstaste flash Kameraschalter on/off IR-Fernauslösesensor Trageschlaufenöse Batteriefachdeckel Unendlich-Taste Objektiv... - Page 7 BEZEICHNUNG DER TEILE Autofokus-Kontroll-LED (grün) Blitz-Kontroll-LED (rot) Panorama-Schalter Rückspultaste Stativgewinde Dioptrienkorrektur Suchereinblick Filmfenster Rückwandentriegelung...
- Page 8 COMPONENTS Autofocus window Self-timer-LED Zoom-buttons (Tele/Wide) Viewfinder window Anti-red-eye-LED Shutter release Built-in-flash Exposure sensor LCD-panel date button selftimer button flash button Master switch on/off IR remote-control sensor Wrist-strip eyelet Battery-chambercover Infinity button Lens...
- Page 9 COMPONENTS Autofocus indicator (green) Flash indicator (red) Panorama switch Rewind button Tripod socket Eyesight correction Viewfinder window Film gate Back cover latch...
- Page 10 COMPONENTI LED dell’ autoscatto/ Tasto-zoom (Tele/Wide) Finestrella dell’ aotofocus “occhi rossi” Finestra dell’ mirino Pulsante di scatto Flash dell’otturatore Display-LCD date Tasto per Tasto dell’ autoscatto selftimer Tasto del modo flash on/off Copriobiettivo Sensore dell’ esposimetro Occhiello per cinghia di trasporto Coperchio del vano batterie Tasto per messa a fuoco all’infinito...
- Page 11 COMPONENTI Spia autofocus (verde) Spia flash (rosso) Interruttore per modo panoramico Tasto di riavvolgimento Attaco per stativo Correzione diottrica Oculare del mirino Finestra della pellicola Sblocco del dorso...
-
Page 12: Lcd-Monitor
LCD-MONITOR LCD-MONITOR Batteriekontrolle Anti-Rotaugen-Funktion Battery check Intervallbelichtung INT Langzeitbelichtung/Flash off Interval timer Makrofunktion Gegenlichtkorrektur Macro mode Selbstauslöser Datum/Titel-Einbelichtung Self-timer Doppel-Selbstauslöser Brennweiteneinheit (mm) Double self-timer 2s-Auslöseverzögerung Minuten (m), Sekunden (s) 2-sec-delay Fernauslöserfunktion Rückwand offen-Symbol Remote-control function Monat Filmtransportsymbol / Month Bildzählwerk Rückspulanzeige / Exp. - Page 13 LCD-MONITOR Anti-red-eye-function Batterij-controle Anti-rode-ogen-funktie Time exposure/Flash off Interval-opnamen Lange tijden/Flash off Backlight compensation Makro-functie Tegenlichtcorrectie Date / caption imprinting Zelfontspanner Datum/titel-meefotograferen Affichages des focales (mm)/ Dubbele-zelfontspanner Aanduiding brandpuntafstand (mm) Minutes (m), Secondes (s) 2s-ontspan-vertraging Minuten (m), seconden (s) „Back open“ icon Afstandsbedienings-functie Symbool Achterwand open Film-advance icon /...
-
Page 14: Dioptrienkorrektur
EYESIGHT CORRECTION DIOPTRIENKORREKTUR Dioptrienkorrektur Anbringen der Trageschlaufe Eyesight correction Zur Anpassung das Suchers bei Kurz- To correct the eyepiece power for oder Weitsichtigkeit. short- or far-sightedness. » » Am Rädchen drehen, bis das Turn dial until viewfinder image Sucherbild scharf erscheint. appears sharp. - Page 15 CORREZIONE DIOTTRICA Attaching the wrist strap Correzione diottrica Attaco della cinghia di trasporto Correzione diottrica per adattamento alla capacità visiva. » Girare la ghiera finchè l’immagine nel mirino non appare nitida.
-
Page 16: Batterieeinlegen
» Nur Lithium-Batterien des Typs Batteriezustand. CR 2 verwenden. Nach 3 Min. ohne Betätigung schaltet Bitte beachten » die Rollei Prego automatisch ab, um Batterie nur bei ausgeschalteter Ka- Energie zu sparen. mera wechseln. › » Bei längerem Nichtgebrauch der Bei Kälte oder auf Reisen... - Page 17 INSERIMENTO DELLE BATTERIE Checking battery power Inserimento delle batterie Controllo della carica delle » 1. No symbol / sufficient battery power. Aprire il vano batterie. batterie » 2. Symbol appears/battery weak. Inserire nuove batterie rispettando- 1. Nessun simbolo – la carica è suffi- Keep spares ready.
-
Page 18: Filmeinlegen
FILMEINLEGEN LOADING FILM Filmeinlegen Bitte beachten Loading film › 1. Entriegelungsknopf nach unten Mit DX-codierten Filmen stellt die 1. Push release button down and open schieben, Rückwand aufklappen. Kamera die Empfindlichkeit im Be- camera back. 2. Filmpatrone in das Filmfach legen. reich von ISO 50–3200 automa- 2. - Page 19 CARICAMENTE DELLA PELLICOLA Please note Caricamente della pellicola Note › › If DX-coded film is used, the camera 1. Premere il pulsante di sblocco e Con pellicole a codifica DX la will automatically set the film speed aprire il dorso della fotocamera. fotocamera regola automaticamen- within a range of ISO 50/18 to 2.
-
Page 20: Kurzanleitung
KURZANLEITUNG BRIEF INSTRUCTION » Kurzanleitung Brief instruction Durch den Sucher Motiv anvisieren » » ON/OFF Taste betätigen, das Ob- und mit den Zoomtasten den ge- Set master switch to ON. The lens jektiv fährt in seine 35mm-Weit- wünschten Bildausschnitt wählen. moves to its 38mm wide-angle po- »... - Page 21 BREVI ISTRUZIONI » » Per aumentare l’ingrandimento con Brevi istruzioni Look through the viewfinder and » soggetti lontani o in riprese frame your picture using the zoom Aprire il copriobiettivo facendolo ravvicinate, premere (teleobiettivo) button. scattare. L’obiettivo assume la » (1), oppure (grandangolare) (2).
-
Page 22: Kamerahaltung
KAMERAHALTUNG HOLDING THE CAMERA PROPERLY Kamerahaltung Bitte beachten Holding the camera properly » » » Kamera ruhig und fest mit beiden Objektiv, Autofokus- und Belich- Hold the camera steady with both Händen halten, besonders bei Tele, tungssensor-Fenster sowie den hands to avoid camera shake, um nicht zu verwackeln. - Page 23 COME DEVE ESSERE TENUTA LA FOTOCAMERA Please note Come deve essere tenuta la Note » » Make sure not to cover up the lens, fotocamera Bisogna fare attenzione che » autofocus and exposure-meter Tenere la fotocamera ben ferma l’obiettivo, finestrelle windows nor the flash with your con entrambe le mani per evitare dell’esposimetro e dell’autofocus,...
-
Page 24: Fotografieren
» › » Den Auslöser leicht drücken. Wenn Die Rollei Prego 70 ist mit einer Lightly press the shutter release. die grüne LED aufleuchtet, ist die Dioptrienkorrektur zur individuellen The focus has been set when the Entfernung eingestellt. - Page 25 PROCEDURA DI RIPRESA Please note Procedura di ripresa Note » » » Always switch the camera offs after Guardando attraverso il mirino, Dopo l’uso, chiudere sempre il use to prevent accidental expo- dirigere il campo di misurazione AF copriobiettivo per evitare esposizioni sure.
- Page 26 › › Nach leichtem Drücken des Auslö- Bitte beachten Lightly press the shutter release » sers leuchtet die rote LED auf, wenn Besonders mit längeren Brennwei- and wait for the red LED to light; the der Blitz bereit ist. ten (Tele) darauf achten, die Kame- flash is then ready to fire.
- Page 27 › Please note Premere leggermente il pulsante di Note » » Hold the camera very steady and scatto e attendere che il LED rosso Tenere la fotocamera ben ferma e squeeze the shutter release very si accenda; il flash è allora pronto a premere delicatamente il pulsante gently above all when using a long scattare.
-
Page 28: Schärfespeicher
SCHÄRFESPEICHER FOCUS LOCK Schärfespeicher Focus lock 3. Auslöser leicht gedrückt halten und Der Schärfespeicher erlaubt es, auf gewünschten Bildausschnitt be- With this function you may focus on Objekte scharfzustellen, die nicht in stimmen. (C) off-center subjects (A). Proceed as » der Bildmitte liegen (A). - Page 29 BLOCCO DELLA MESSA A FUOCO Blocco della messa a fuoco 3. Keep shutter release lightly 3. Mantenere leggermente premuto il depressed and recompose (C). Grazie a questa funzione è possibile pulsante di scatto e stabilire » Hold camera steady and press mettere a fuoco soggetti che non si l’inquadratura definitiva ( C ).
-
Page 30: Sucherinformationen
SUCHERINFORMATIONEN VIEWFINDER DISPLAY Viewfinder display Two LEDs light up when the shutter grün / green/ verde release is lightly pressed. Parallax marks for close-ups " Autofocus area for close-ups " rot / red/ rosso Sucherinformationen Autofocus LED (green) › Bei leicht gedrücktem Auslöser leuch- The green LED lights at subject ten zwei Kontroll-LEDs auf. - Page 31 DISPLAY NEL MIRINO Display nel mirino Due LED si accendono quando si preme leggermente il pulsante di scatto. Parallasse per riprese ravvicinate " Area AF per riprese ravvicinate Flash LED (red) LED Autofocus (verde) LED flash (rosso) › › › The red LED lights when the flash is Il LED verde si accende quando la Il LED rosso si accende quando il...
-
Page 32: Filmrückspulen
FILMRÜCKSPULEN REWINDING THE FILM Automatisches Rückspulen Bitte beachten Automatic rewind › » › Der voll belichtete Film wird auto- Kamera während des Filmrück- After the last frame, the film is matisch zurückgespult. spulens nicht ausschalten. rewound automatically. › » › Wenn der Film vollständig zurück- Teilbelichtete Filme können durch The motor stops when rewinding is... - Page 33 RIAVVOLGIMENTE AUTOMATICO Please note Riavvolgimente automatico Note » › » Do not switch the camera off during Una volta impressionato l’ultimo Non chiudere il copriobiettivo dur- rewinding. fotogramma, la pellicola si riavvolge ante il riavvolgimento. » » Partially exposed films may be automaticamente Volendo riavvolgere una pellicola ›...
-
Page 34: Datums-/Titeleinbelichtung
DATUM-/TITELEINBELICHTUNG IMPRINTING DATE / CAPTION Keine Einbelichtung Jahr Monat Tag Monat Tag Jahr No Imprinting Year month day Month day year anno mese giorno mese giorno anno Datum-/Titeleinbelichtung Änderung der Datums-/Zeitein- Imprinting the date or a caption » Mit der DATE-Taste wird die Datums- stellung To activate the imprint function, »... - Page 35 STAMPA DELLA DATA O DI UN TITOLO Tag Monat Jahr Tag Stunde Minute Bildtitel Day month year Day hour minute Caption giorno mese anno giorno ora minuto Titulo Changing the date or time Stampa della data o di un titolo Cambio della data o dell’ora »...
- Page 36 WAHL EINES BILDTITELS SELECTING A CAPTION TITEL CP-1 I LOVE YOU CP-2 A HAPPY BIRTHDAY CP-3 THANK YOU CP-4 CONGRATULATIONS CP-5 A HAPPY NEW YEAR CP-6 MERRY X-MAS I LOVE YOU CP-7 HELLO! Wahl eines Bildtitels Bitte beachten Selecting a caption ›...
- Page 37 SELEZIONE DI UN TITOLO MERRY X-MAS Please note Selezione di un titolo Note › › Date/time or caption can only be Quando nel display appare CP, Possono essere stampati solo data, imprinted separately. premere il tasto zoom per selezionare ora oppure titolo. ›...
-
Page 38: Wahl Der Blitzfunktion
Nach einer Aufnahme mit der Blitz- Press the FLASH button to select funktion gewählt. funktion Fill-in & Gegenlichtkorrektur a flash mode. kehrt die Rollei Prego 70 zur Nor- mal-Funktion zurück › Bei länger gedrückter FLASH-Ta- ste wechseln die Blitzfunktionen schnell in obiger Folge. - Page 39 SELEZIONE DI UN MODO FLASH AUFHELLBLITZ FILL-IN / GEGENLICHTKORREKTUR AUFHELLBLITZ / ROT- AUGEN-REDUZ. FILL FLASH FILL-IN / EXPOSURE COMPENSATION FILL-IN / ANTI RED-EYE PREFLASH LAMPO DI RISCHIARAMENTO FILL-IN / CORREZIONE AUTOMATICA DEL FILL-IN / FLASH AUTOMATICO PER CONTROLUCE RIDURRE L’EFFETTO “OCCHI ROSSI” Please note Selezione di un modo flash Note...
-
Page 40: Selbstauslöserfunktionen
WAHL DER SELBSTAUSLÖSERFUNKTION SELECTING A SELF-TIMER MODE AUS(NORMAL) SELBSTAUSLÖSER DOPPEL-SELBSTAUSLÖSER OFF (DEFAULT) SELF-TIMER DOUBLE SELF-TIMER OFF (VALORE STANDARD) AUTOSCATTO DOPPIO AUTOSCATTO Wahl der Selbstauslöserfunktion Bitte beachten Selecting a self-timer mode › » Mit der SELF-Taste wird die IR-Fernauslöser als Zubehör im Press the SELF button to select a... - Page 41 SELEZIONE DI UN MODO AUTOSCATTO 2 S AUSLÖSEVERZÖGERUNG IR-FERNAUSLÖSUNG INTERVALLAUFNAHMEN 2 SEC. DELAY IR-REMOTE CONTROL INTERVAL TIMER RITARDO DELLO SCATTO DI 2 SEC. SCATTO IR A DISTANZA RIPRESE INTERVALLATE Please note Selezione di un modo autoscatto Nota › › The IR remote control is available Premere il tasto SELF per selezionare...
- Page 42 AUTO ANTI-ROTAUGEN-BLITZ AUTO ANTI-RED-EYE FLASH flash » AUTO Anti-Rotaugen-Blitz AUTO Anti-red-eye flash Durch das Aufleuchten der Anti- Der „Rotaugen“-Effekt tritt vor allem Rotaugen-LED wird der Rotaugen- "Red-eye" occurs primarily in bei Portraitaufnahmen mit wenig Effekt deutlich reduziert, weil die portraiture at low light levels. Umgebungslicht auf.
- Page 43 FLASH AUTOMATICO PER RIDURRE L’EFFETTO “OCCHI ROSSI” » » AUTO Flash automatico per ri- You can noticeably reduce red-eye Il pre-flash riduce effettivamente with the anti-red-eye LED. The LED durre l’effetto “occhi rossi” l’effetto “occhi rossi”, in quanto causes the pupils to close before L’effetto “occhi rossi”...
-
Page 44: Flash Off
OFF BLITZ AUSGESCHALTET FLASH OFF flash Blitz ausgeschaltet Flash off Auch in diesem Fall die Kamera auf Zum Fotografieren nur mit vorhande- einer festen Unterlage abstützen oder Switching the flash off may come in nem Licht oder wenn Blitzen verboten ein Stativ benutzen, um nicht zu ver- handy if you wish to shoot with available oder störend ist, kann der Blitz abge-... - Page 45 FLASH ESCLUSO Flash escluso Here also, use a tripod or other firm Anche in questo caso è bene usare support to avoid camera shake. Press L’esclusione del flash può essere utile uno stativo o una base stabile per flash button twice. quando si desidera riprendere evitare immagini mosse.
-
Page 46: Daylight Fill Flash
FILL-IN TAGESLICHT-AUFHELLBLITZ FILL-IN FORCED DAYLIGHT FLASH flash FILL-IN Tageslicht-Aufhellblitz Bitte beachten FILL-IN Forced daylight flash Wenn das Hauptmotiv im Schatten Bei aktiviertem Aufhellblitz wird der When your main subject is in the shade liegt und die Umgebungshelligkeit zu Blitz unabhängig von Motiv- und Hinter- and the ambient light too stark für die automatische Blitzzu- grundhelligkeit immer ausgelöst. - Page 47 FLASH DI RISCHIARAMENTO IN LUCE DIURNA Please note FILL-IN Flash di rischiaramento Nota With the fill-flash mode activated, the in luce diurna Se è attivato il modo flash di flash will always fire, regardless of Quando il soggetto è in ombra e la luce rischiaramento, il flash scatta sempre subject and background brightness.
-
Page 48: Fill-In/Backlight Compensation
FILL-IN AUFHELLBLITZ U. GEGENLICHTKORREKTUR FILL-FLASH / BACKLIGHT COMPENSATION flash FILL-IN AUFHELLBLITZ u. Bitte beachten FILL-flash with backlight » Gegenlichtkorrektur Darauf achten, daß die Sonne nicht compensation Wenn das Hauptmotiv vor hellem Hin- direkt in das Objektiv scheint. Backlight compensation will improve »... - Page 49 FILL-IN CORREZIONE AUTOMATICA DEL CONTROLUCE Please note FILL-IN Correzione automatica Note » » Make sure direct sunlight does not del controluce Evitare che la luce del sole colpisca strike the front lens. La correzione del controluce migliora direttamente l’obiettivo. » »...
-
Page 50: Fill-In/Anti-Red-Eye Preflash
FILL-IN AUFHELLBLITZ UND ROTAUGENREDUZIERUNG FILL-IN FLASH AND REDEYE REDUCTION flash Fill-in Aufhellblitz und Rotaugen- Bitte beachten Fill-in flash and redeye reduction » This mode is recommended for reduzierung Bei wenig Umgebungslicht Stativ portraiture in dim light for balanced Für Portraitaufnahmen bei dunkler verwenden. - Page 51 Please note » Use a tripod to avoid camera shake » Press flash-button 5 times.
-
Page 52: Self-Timer
SELBSTAUSLÖSER SELF-TIMER selftimer › Selbstauslöser Self-timer Der Selbstauslöser läuft 10 s, die Mit Hilfe des Selbstauslöser kommt Selbstauslöser-LED blinkt erst 7 s This lets you get into the picture der Fotograf selbst ins Bild. lang und blinkt dann schnell die yourself. - Page 53 AUTOSCATTO › › Autoscatto The delay is 10 s; the self-timer LED Il ritardo è di 10 sec; il LED lights for 7 s and blinks the remaining Permette al fotografo di riprendere se dell’autoscatto si accende per 7 3 s before exposure. stesso.
-
Page 54: Double Self-Timer
» » Doppel-Selbstauslöser-Funktion fernung zielen. To activate the double self-timer, » mit zweimaligem Druck der SELF- Rollei Prego 70 auf einer festen press the SELF button twice, then Taste aktivieren und auslösen. Unterlage abstützen oder ein Stativ the shutter release. - Page 55 DOPPIO AUTOSCATTO Please note Doppio autoscatto Note › › Make sure the AF area coincides In questo modo, una seconda ripresa Accertarsi che l’area AF coincida with your main subject or another automatica avrà luogo dopo 2 secondi con il soggetto principale o con detail at a suitable distance when dalla prima.
-
Page 56: 2-Second Delay
2 SEKUNDEN AUSLÖSEVERZÖGERUNG 2-SECOND-DELAY selftimer 2 Sekunden Auslöseverzögerung 2-second-delay Eventuelle Kameravibrationen durch Auslösen mit 2 s Verzögerung verrin- Drücken des Auslösers sind dann wie- This mode will help you avoid camera gert die Verwacklungsgefahr bei Lang- der abgeklungen. shake with time exposure or close-ups zeit- oder Nahaufnahmen vom Stativ. - Page 57 SCATTO RITARDATO DI DUE SECONDI Scatto ritardato di due secondi permette che si esaurisca l’effetto delle Questo modo è utile per le esposizioni vibrazioni causate dall’azionamento del prolungate o per le riprese ravvicinate, pulsante di scatto. con fotocamera su stativo, dato che...
-
Page 58: Interval Timer
INTERVALLBELICHTUNG INTERVAL TIMER selftimer » Intervallbelichtung Interval timer Die erste Aufnahme erfolgt durch In dieser Funktion steuert ein Intervall- normales Auslösen. Nach der Auf- In this mode, a preset number of Timer eine bestimmte Zahl von Belich- nahme fährt das Objektiv in seine exposures will be taken at preset tungen in vorwählbaren, festen Zeit- Grundstellung zurück. - Page 59 RIPRESE INTERVALLATE 3… » » Riprese intervallate Se si ripreme il tasto SELF, si The first picture is taken as you press the shutter release. After questo modo, un determinato interrompe una sequenza interval- exposure, the lens resets to its rest numero di esposizioni viene realizzato lata in corso.
-
Page 60: Close-Ups
(telephoto), the green LED will blink die grüne LED langsam. Mit Drücken ser ist blockiert. slowly. As you press the shutter release, des Auslösers schaltet die Rollei Prego the camera automatically switches to 70 automatisch auf MAKRO-Funktion MACRO mode, and the green symbol... - Page 61 RIPRESE RAVVICINATE (MODO MACRO) Please note Riprese ravvicinate (Modo MACRO) Nota › › If your subject is less than 0.55 m Se il soggetto si trova a distanze Se il soggetto si trova a una distanza away, the green LED will blink comprese tra 0.55 m e 1 m (grandan- inferiore a 0.55 m, il LED verde rapidly, and the shutter stays locked.
-
Page 62: Panoramic Pictures
PANORAMA-AUFNAHMEN PANORAMIC PICTURES Panorama-Aufnahmen Bitte beachten Panoramic pictures » Für Motive mit besonders ausgepräg- Bei der Abgabe des Films auf Pan- Panoramic pictures with an aspect ter horizontaler oder vertikaler Aus- orama-Aufnahmen hinweisen. ratio of about 1:3 are especially suitable ›... - Page 63 IMMAGINI PANORAMICHE Please note Immagini panoramiche Note » » When taking your film to be Le riprese panoramiche con rapporto Quando si consegna la pellicola al processed, inform the lab that it di circa 1:3 sono particolarmente laboratorio di sviluppo, bisogna far contains panoramic pictures.
-
Page 64: Infinity Focus
UNENDLICH-EINSTELLUNG (LANDSCHAFT) INFINITY FOCUS selftimer Unendlich-Einstellung (Land- IR-Fernauslöser (Zubehör) Infinity focus schaft) Der separat erhältliche IR-Fernauslöser Use this mode to photograph distant Die Unendlich-Einstellung eignet sich erlaubt Brennweiteneinstellung und or featureless subjects, such as clouds, besonders, um entfernte bzw. kontur- Auslösen aus bis zu 5 m Entfernung. -
Page 65: Ir Remote Control
MESSA A FUOCO ALL’INFINITO IR Remote control Messa a fuoco all’infinito Telecomando IR (accessario (optional accessory) Utilizzare questo modo per riprendere opzionale) The optional IR remote control permits soggetti lontani o indefiniti quali nuvole, Il telecomando IR permette regolazioni zooming and releasing the shutter from fuoco, fumo o per riprendere attraverso zoom e scatti da una distanza che può... -
Page 66: Camera Care And Storage
Lösungsmittel oder direktem Sonnenlicht. cal solvent. › » verwenden. Die Rollei Prego 70 funktioniert in To dust the lens, use a blower » Zum Reinigen des Objektivs Staub einem Temperaturbereich von - brush. To remove obstinate stains, mit Pustepinsel entfernen. Hartnäk- 10 C –... - Page 67 › Your Rollei Prego 70 will function esente da peluria, senza ricorrere vettura parcheggiata oppure alla perfectly in temperatures from 10 C ad alcool o altri solventi chimici luce diretta del sole.
-
Page 68: General Information
ALLGEMEINE HINWEISE GENERAL INFORMATION Allgemeine Hinweise General information Batterien möglichst warm halten, » » Darauf achten, daß Objektiv und z.B. in einer Tasche am Körper. Keep lens and meter window clean. » » Meßfenster nicht verschmutzt wer- Kamera nicht direkt aus extremer Should you encounter any problem, den. - Page 69 INFORMAZIONI GENERALI » Informazioni generali Do not take the camera from the la fotocamera e le batterie di scorta, » cold directly into a heated room. Mantenere puliti l’obiettivo e la ad esempio in una tasca interna del Condensation might form inside he finestrella dell’esposimetro.
-
Page 70: Troubleshooting
FEHLERSUCHE TROUBLESHOOTING Fehlersuche Troubleshooting Wenn es Probleme gibt, zuerst folgen- If you do encounter problems, first de Punkte kontrollieren: check the following points: Die Kamera löst nicht aus. Motiv und Bildausschnitt stim- Shutter remains locked. › › Ist die Batterie richtig eingelegt? men nicht überein Have the batteries been inserted »... - Page 71 RICERCA ED ELIMINAZIONE DEI GUASTI Ricerca ed eliminazione dei guasti Se si incontrano dei problemi, controllare in primo luogo i seguenti punti: Picture shows different L’otturatore risulta bloccato. La composizione dell’immagine › composition than viewfinder. Le batterie sono state inserite si presenta diversa da quella nel ›...
-
Page 72: Specifications
0,5 – 5 s Programmed AE; Arbeitsbereich (ISO 100) Operating range (ISO 100/21 ): Weitwinkel (35mm): EV 5,9 – 17,6 Wide-angle (35 mm): EV 5.9 - 17.6 Tele (70mm): EV 7,8 – 17,6 Telephoto (70 mm): EV 7.8 - 17.6... - Page 73 Telefoto (70 mm): 0,65 – 2,10 m programma AE,Gamma di Macro: 0,50 – 1,00 m funzionamento (ISO 100/21 ) Tempo di ricarica: ca. 0,5 – 5 sec. Grandangolare (35 mm): EV 5,9 – 17,6 Telefoto (70 mm): EV 7,8 – 17,6...
- Page 74 180 g (ohne Batterie) Shooting modes: Intervallbelichtung Interval timer Unendlich-Einstellung Infinity focus Selbstauslöserfunktion: Technische Änderungen vorbehalten. Self-timer: Einzel-/Doppelselbstauslöser- Alle Angaben entsprechend Rollei- Single/double self-timer Funktion, Standard-Tests. 2-sec. delay 2 s Auslöseverzögerung IR remote control: IR-Fernauslöser: (optional accessory) (Sonderzubehör) Cue light:...
- Page 75 180 g (without batteries) Modi di ripresa: 180 g. Riprese a intervalli Subject to change without notice. Messa a fuoco all’infinito All data according to Rollei test Autoscatto: Ci si riserva il diritto di apportare standards. singulo/doppio modifiche tecniche senza preavviso.
- Page 76 Rollei Fototechnic GmbH P.O Box 3245 D-38022 Braunschweig http://www.rollei.de Germany D, GB, PA / 3-99 •...
Need help?
Do you have a question about the 70 and is the answer not in the manual?
Questions and answers