Advertisement
Installation and Removal Steps
Installation
Before starting any electrical work on your vehicle, always make sure to disconnect the Negative (ground) battery cable.
This is security installation; please refer to the illustration and detailed step-by-step installation:
- Using the radio sleeve, insert into the DIN sized opening of the vehicle or if you are using an installation kit, insert into the installation kit.
![]()
- Using a flat-head screw driver, bend the tabs around the sleeve to secure into the opening

- Find a location behind the radio where the back strap will be attached to the vehicle.

- The rear chassis bolt will be attached to the unit and through the back strap to secure.


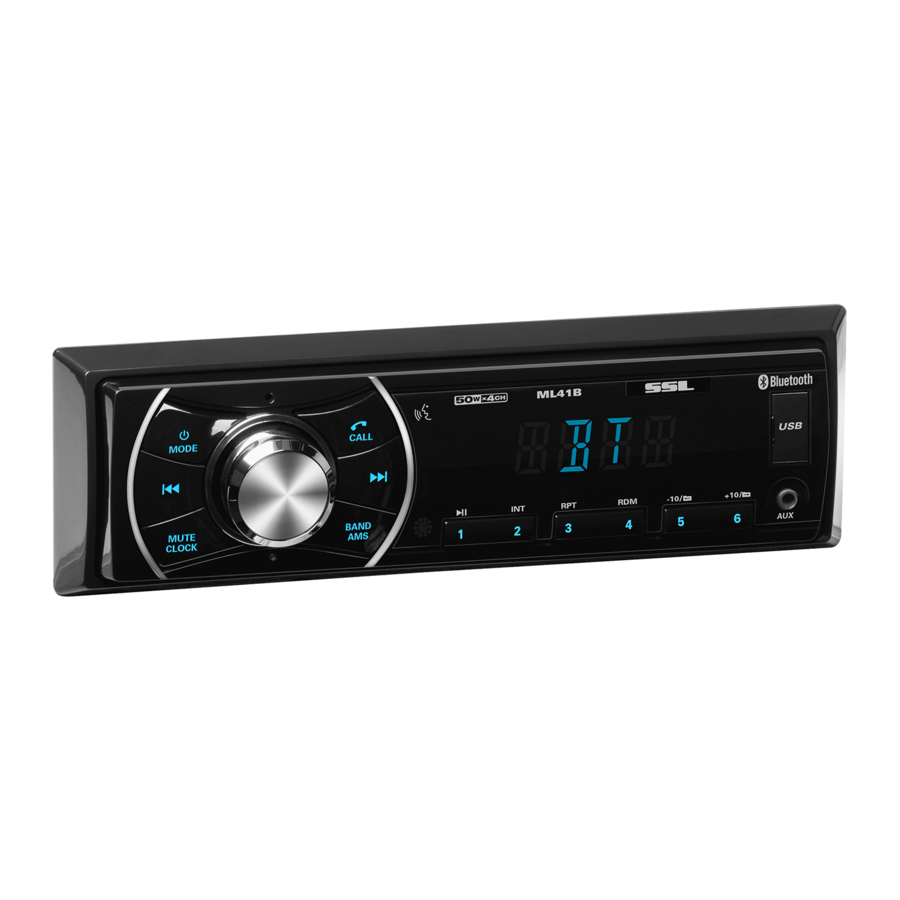
Front Panel

Key Description
- SD port
![]() PREV
PREV - Mute/Light
- Volume, Power, EQ
- Microphone
- Source
![]() NEXT
NEXT- Display screen
- USB Port
- Clock
- Reset
- Band/Scan
- IR (Remote Receiver)
- Preset 1 / Play, Pause
- Preset 2 / Intro
- Preset 3 / Repeat
- Preset 4 / Random Play
- Preset 5 / Answer
- Preset 6 / End Call
- AUX Input
 PREV
PREV  NEXT
NEXTWiring Diagram
MODEL NO.: ML41B
FM/MP3 PLAYER
12V 10A NEGATIVE GROUND
FREQUENCY RANGE:
FM 87.5MHz-107.9MHz
FOR TECHNICAL ASSISTANCE CALL: 888-38-STORM

SEE INSTALLATION MANUAL FOR WIRING CONFIGURATIONS FAILURE TO WIRE CORRECTLY MAY CAUSE PERMANENT DAMAGE TO UNIT, AND WILL VOID ANY WARRANTY 4 ~ 8 OHM SPEAKER IMPEDANCE ONLY

WIRING DIAGRAM
| 1 | Battery 12V (YELLOW) |
| 2 | Ground (BLACK) |
| 3 | Remote AMP Wire (BLUE) |
| 4 | ACC power (RED) |
| 5 | Right Front speaker (+)(GRAY) |
| 6 | Right Front speaker (-)(GRAY/BLACK) |
| 7 | Left Front speaker (+)(WHITE) |
| 8 | Left Front speaker (-)(WHITE/BLACK) |
| 9 | Right Rear speaker (+)(PURPLE) |
| 10 | Right Rear speaker (-)(PURPLE/BLACK) |
| 11 | Left Rear speaker (+)(GREEN) |
| 12 | Left Rear speaker (-)(GREEN/BLACK) |
Remote Control Battery
- Press and hold the small lock and pun to remove the battery holder.
![]()
- Put the battery into slot in the right way as illustrated.
![]()
- Insert the battery holder into remote control.
![]()
- Please note battery polarity when re-interesting.


Remote Functions

![]() Power On/Off
Power On/Off - MODE
- MUTE
- Preset 1 / PAUSE/PLAY
- Preset 2 / INT
- Preset 3 / RPT
- Preset 4 / RDM
- Preset 5 / FOLDER-
- Preset 6 / FOLDER+
- LOUD
- VOL+
- EQ
- PREV / Previous Folder
- NEXT / Next Folder
- SEL
- AMS
- VOL-
- BAND
- SCAN
- CLOCK
- Light On/Off
 Power On/Off
 Basic Operation
Power On/Off
In standby status, long press to powerit off, short press into power it on.
Mode
When powered ON. press MODE button to cyde through the Sources:
FM→USB→SD→AUX→BT→FM
(Note: SD and/or USB will not displayif Media is not present)
Default Source: FM
Volume
In the state of power on. rotary encoder to let the volume up/down. By remote. short press VOL- button to minus volume, short press VOL+ button to plus volume.
Volume Range 0~40
Audio Adjustments
Volume "SEL"
When the unit is ON, to access Audio settings, press the volume knob:
BASS > TREBLE > BALANCE > FADER > LOUD > EQ > ST > DX > USA > VOL
(Note: With ST/DX/USA when it's in FM)
BASS: To adjust, select bass, and rotate volume left or right: -7 ~ +7
TREBLE: To adjust and rotate volume left or right: -7 ~ +7
BALANCE: To adjust and rotate volume leftorright: L7 ~ R7
FADER: To adjust and rotate volume left or right: F7 ~ B7
LOUD Rotate left or right to turn it on or off.
Default OFF
ST: Turn it left or right to turn it ST or MONO.
Default ST
DX:(Distance):Turn it left or right to turn it DX or LOCAL
Default: DX
Tuner Region: Rotate left or right to choose USA or European.
Default: USA
EQ
To select.and cycle through EQ rotate volume: POP > JAZZ > CLAS > ROCK > COU > NORM
Mute
Press the MUTE button to completely mute the audio output.
Button Illumination
To turn OFF. press and hold MUTE for 2 seconds
Tot urn ON, press and hold MUTE for 2 seconds
By remote, short press LIGHT button to turn ON/OFFbutton light.
Clock Function
Press CLOCK to display clock
If there is no operation within 3 seconds (10 seconds when in standby state), Press and Hold (2 seconds) to remove clock from display
Hour/Minute adjust method: in clock mode, Press and Hold "CLK" for 2 seconds.
Press CLK to change between hour and minute. when it's in this mode. the "00" will flash, to change rotate Volume. Rotating Left will decarease the time, while rotating Right will increase the time.
To store the time, press and Hold "CLK"
FM Tuner
Automatic Scan
Press and Hold "BAND" for 2 seconds
(Remote) Press "SCAN" button
To cancel scan press "BAND", or by remote "SCAN"
FM Bands (FM 1, FM 2, FM 3)
Press "BAND" to cycle through FM 1. FM 2, FM 3. etc....
Each Band can store up to 6 Presets, for a total of 18 FM presets.
Manual/Auto tuning
Press or to tune manually.
Press and Hold either to search in its respective direction. It will autornaticaltv stop once the first signal is received.
USB/SD Playback
Play/Pause
Press the  to pause the music.
- The music will automatically start paving from the mediawhen it is instered.
- If the USB/SD source is changed, it will pause the music that is currently playing and resume once the USB/SD source is chosen again.
Scan
To SCAN, Press 2/INT to start scanningthe tracks on the media.
Each track will play for 10 seconds.
To cancel Scan mode, press 2/INT
Repeat
To REPEAT a track, press the RPT button. The repeat icon witl flash on the display.
To cancel the REPEAT function, press the RPT button once more.
Random
Press 4/RDM to enter Random mode.
To cancel Random mode, press 4/RDM
Folders
Press 5/  for Previous Folders
Press 6/  to Advance Folders
Direct Track Access
Press and Hold  , use the volume knob to rotate and select the track. The track will only be able to be selected in the current folder.
Bluetooth
Bluetooth Pairing
On your device(phone), go to the Bluetooth Settings and search for: "SSL ML41B"
Answering Calls
To answer an incoming call. on the unit Press  on the unit.
When using the remote, Press 
Ending/lgnore a Call
To End/lgnore a call, Press  on the unit.
While using the remote. Press 
Redial
While in the Bluetooth mode, Press to redial the last number.
Private Call
During a call to transferto the mobile device, Press 
The audio will mute for the duration of the call.
To re-direct the callback to the unit. press to transfer from the mobile device.
Disconnect/connect mobile phone Bluetooth
Short press  to stop Bluetooth function, short press again to connect Bluetooth.
(Only for the matched mobile phone Bluetooth)
Bluetooth Audio Streaming
While in Bluetooth mode, press  to start playing music from your mobile device*
(*Note: your device must support A2DP, for music playback)
To control tracks, use  the
the  buttons.
AUX-ln Mode
AUX
Change the MODE to AUX. A 3.5mm cable is required from the device to the unit.
(Note: Power, Mode, Volume, Loud, Mute are the only functions that function in Aux Mode)
Specifications
| Bluetooth | Bluetooth V2.1 |
| Bluetooth Supported Profiles | A2DP, HFP |
| Maximum RF Transmit Power | Class II |
| Maximum Power | 40W x 4 @ 4 Ω |
| Speaker Impedance | 4-8Ω |
| Frequency response | 40Hz-18KHz |
| Signal-to-noise ratio | > 65dB (FM Mode) |
| Volume control | Bass +9 dB @ 100 Hz |
| Treble ± 9dB @ 10 KHz | |
| Tuning Range | 87.5 MHz - 107.9 MHZ |
| Usable Sensitivity | <25 dB |
| Separation | <33 dB |
| T.H.D. | > 0.7% (Stereo) |
| Signal Selectivity | > 60 dB |
| Power Requirements | +12 V DC (Negative Ground) |
| Dimensions Approx. | 7.2" x 2.1" x 3.7" (w/h/d) |
| Approx. Mounting Dimensions | 7.4" x 2.3" x 5.2" (w/h/d) |
| Mass | Approx. 0.8 lbs |
Troubleshooting
If any issues should arise that are not covered below, please contact our technical service department.
| Faults | Causes | Solutions |
| Bluetooth | Bluetooth cannot be used | Check if Bluetooth on mobile device is turned on, and is paired and connected. |
Does not play MP3 from mobile device | Bluetooth not connected. Compatibility issue | Please see above for Bluetooth. Checkto see if your mobile device iscompatible with audio streaming (A2DP) |
Will not power on | It is not powered on | If the vehicle power is properly installed, turn the key to the ACC position. |
| Fuse is burnt. | Replace the fuse with same type and rating. Check all connections and make sure they are properly terminated. | |
No sound | Audio is muted | Adjust the volume to your required level. |
| Wires are improperly connected. | Check the wiring diagram and make sure wires are properly connected. | |
Failure of reading USB/SD | Poor contact | Please pull out the device and re-insert it. The unit will only play MP3 files |
Noises and sound distortion | Speakers | Check speakers |
| Speaker cables are shorted. | Properly connect wires. | |
Failure of Radio | Antenna not working | Check your vehicle for a powered antenna connection |
| Weak signal | Change the "DX" or "Local" settings | |
Stop working | CPU can not work normally | Turn off the power and power it on again. |
| Files are damaged. | Skip this file and please select next file, |
Safety Instruction
- This unit is designed to work with a +12 V DC, Negative Ground electrical system.
- When replacing the fuse, always replace with the same type and fuse rating.
![shock hazard]()
![burn hazard]()
To avoid electric shock caused by short circuit, or any unnecessary damage and fire, please prevent the product from a wet environment and water.


SOUND STORM LABORATORIES
3451 Lunar court, Oxnard CA 93030
TECHNICAL ASSISTANCE
www.soundstormlab.com/customer-support
888-387-8676 US Toll-free
805-751-4855 Customer Service
Documents / Resources
References
Download manual
Here you can download full pdf version of manual, it may contain additional safety instructions, warranty information, FCC rules, etc.
Advertisement


Need help?
Do you have a question about the ML41B and is the answer not in the manual?
Questions and answers