Table of Contents
Advertisement
Advertisement
Table of Contents

Related Manuals for Ssl SDC26B


Summary of Contents for Ssl SDC26B
-
Page 2: Table Of Contents
CONTENTS Precautions..............................1 How to Handle Discs ..........................1 Lithium Battery Cell Warnings ........................ 1 Installation ..............................2 Prepare Radio ............................2 Mount Radio ............................2-3 Wiring Connections ..........................3 Removal of the Main Unit ........................4 Control Panel Button Locations ........................5 General Operation ............................ -
Page 3: Precautions
PRECAUTIONS How to Handle Discs • Handle a disc by its edges. Do not touch the playing side. • Before inserting a disc, wipe the disc outward from the disc center with a clean, soft, dry and lint-free cloth. Do not use solvents or thinners such a petrol/benzene or cleaners. -
Page 4: Installation
INSTALLATION Prepare Radio Before you begin, disconnect the battery negative terminal. Remove the transport screws. Remove chassis from the mounting sleeve. BRACKET KEY PLASTIC TRIM OUT BRACKET KEY If you want to remove the chassis from the mounting sleeve, remove the plastic trim out from both sides. -
Page 5: Wiring Connections
INSTALLATION (CONT.) INSTALLATION DASH BOARD DIAGRAM HEX NUT METAL MOUNTING STRAP CONSOLE PLAIN WASHER MOUNTING SLEEVE TAPPING SCREW HEX BOLT - Only use speakers with 4 ohms impedance. - Do not attach the control panel to the chassis before wiring is complete. - The maximum current of the auto antenna is 200mA. -
Page 6: Removal Of The Main Unit
INSTALLATION (CONT.) Removal of the Main Unit Remove the metal strap from the main unit. Remove the plastic trim out from the main unit. Insert a bracket key into the left and right side of the main unit and draw the unit out of the mounting sleeve. -
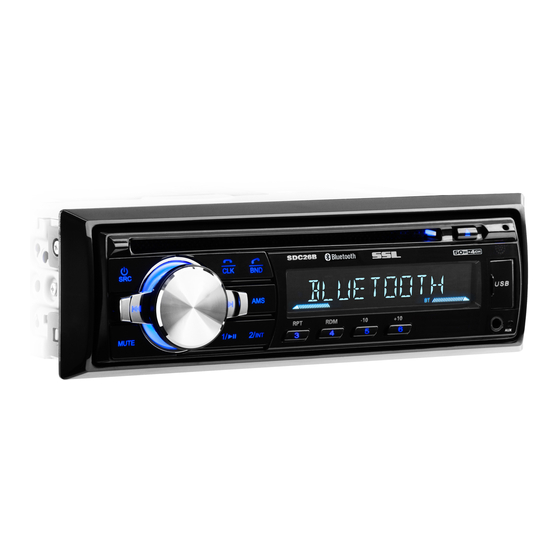
Page 7: Control Panel Button Locations
CONTROL PANEL BUTTON LOCATIONS 2 13 11 4 3 17 16 POWER/SRC (source) button SEL (select/menu) button and VOL (volume) knob BAND button and button AMS (automatic music search) button >|| or 1 button INT (intro) or 2 button RPT (repeat) or 3 button RDM (random) or 4 button -10 or 5 button +10 or 6 button... -
Page 8: General Operation
GENERAL OPERATION Turn Unit On/Off Press the power ( ) button to turn the unit on or off. Adjust Volume (VOL) Rotate the VOL knob on the front panel or press the VOL+/- buttons on the remote control to Adjust Menu Options (SEL) •... -
Page 9: Radio Operation
RADIO OPERATION Switch Between US and EU Frequency In radio mode, press and hold the VOL button to switch between US (USA) and EU (Europe) frequency. The system will change the frequency setting in about 3 seconds. Change Bands (BAND) Press the BAND button to switch between the F1 (FM1), F2 (FM2), F3 (FM3), A1 (AM1) and A2 (AM2) bands. -
Page 10: Disc/Usb/Card Operation
DISC/USB/CARD OPERATION Insert Disc/USB/SD • To play on a disc, insert a disc with the label surface up Label Up into the disc slot. Playback will begin automatically. • To play on a USB device, open the USB port cover and insert the USB storage device into the USB port. -
Page 11: Bluetooth Operation
To begin pairing, enable BT mode on your mobile phone. When the phone the car audio system, the SSL name will be displayed. Choose the SSL from the device list to pair and connect with the car audio system. Upon the BT logo will stop... -
Page 12: Remote Control
REMOTE CONTROL Remove Insulating Sheet The remote control comes with an insulating sheet attached to the underside of the remote control, as illustrated on the right. The remote control will not work until the insulating sheet is removed. Replace Lithium Battery Cell When the lithium cell battery becomes weak, replace it as illustrated on the right. -
Page 13: Button Names And Locations
REMOTE CONTROL (CONT.) Button Names and Locations Power button BAND or button >|| or 1 button + 10 or 6 button INT (intro) or 2 button MUTE or DEL button - 10 or 5 button RPT (repeat) or 3 button AMS (automatic music search) or 9 button LOUD (loudness) or 8 button CLK (clock) or... -
Page 14: Troubleshooting
TROUBLESHOOTING Symptom Cause Solution No Power Car ignition not on Switch ignition key to “ACC” Fuse blown Replace fuse Disc cannot be loaded Another disc is already in the Eject disc and insert new player Disc cannot be read Disc was inserted upside Insert disc with label facing down upward... -
Page 15: Specifications
SPECIFICATIONS General Power Supply Requirement ................... DC 12V Current Consumption ....................10A MAX Maximum Power Output ...................50W x 4CH Radio USA/Europe............... 87.5 MHz - 107.9 MHz/87.5 - 108.0 MHz Usable Sensitivity ......................30 dBu I.F. Frequency ......................10.7 MHz USA/Europe..............530 KHz - 1710 KHz/522 - 1620 KHz Usable Sensitivity ......................20 dBu I.F.
Need help?
Do you have a question about the SDC26B and is the answer not in the manual?
Questions and answers