Table of Contents
Advertisement
Advertisement
Table of Contents

Related Manuals for Ssl SD704M


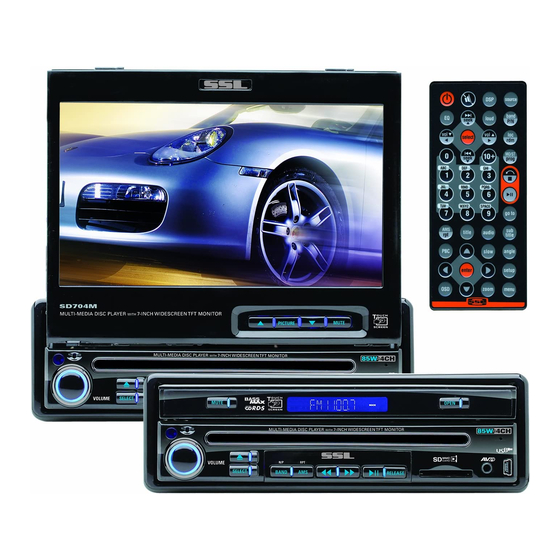
Summary of Contents for Ssl SD704M
-
Page 2: Table Of Contents
SD704M 1. WELCOME 2. WARNING 3. NOTE 4. Features 5. Basic Operation 6. Panel Arrangement 7. Panel Button Control Instruction 8. Main Menu Touch Operation 9. OSD Setup 10. Adjust Mode 11. Remote Control Function 12. Disc Play Touch Operation 13. -
Page 3: Welcome
INSTRUCTIONS WELCOME Thank you for enjoying series of digital car A/V product. To properly use this product, please go through this instruction manual for installation and operation, put it in a safe place for future use! WARNING 1. Please keep the disc slot clean, wipe it off when there is some dirt on it. You should wipe off any dirt on the disc before you place it into the unit. -
Page 4: Note
INSTRUCTIONS INSTRUCTIONS 3.NOTE 23.ACCESSORY ● This unit can play the following disc Accessory Quantity User Manual Wire USB Cable Keys 2PCS Remote controller Warranty card 2PCS... -
Page 5: Features
INSTRUCTIONS INSTRUCTIONS 22.SPECIFICATIONS: 4.FEATURES DVD PLAYER Power supply DC 12V 1. MPEG-4 Decoder Technology Power range 10.8-16.0V DC 2. Compatible with MP4 (AVI/5.X), DVD (DVD-R/DVD-RW), VCD, Max operate current SVCD, CD-RW, WMA, MP3, JPG Dimensions 155X182X53MM 3. Supporting Multiple Subtitles, Angles, Languages Ground system Negative ground 4. -
Page 6: Basic Operation
INSTRUCTIONS INSTRUCTIONS 21.WIRING DIAGRAM 5.BASIC OPERATION This player is equipped with ISO standard connector, please follow below instruction: 1. SOURCE ON/OFF Press SRC button on panel or SOURCE button on remote control quickly to power on. Red - ACC ON (+12V) Grey/Grey black - Right front speaker (+/-) ●... -
Page 7: Panel Arrangement
INSTRUCTIONS INSTRUCTIONS 20.TROUBLE SHOOTING 6.PANEL ARRANGEMENT PROBLEM CAUSE SOLUTION Check whether power fuse Change fuse same as the old one blew or not Can not power on Some factor cause MPU wrong Press RESET button on the panel by pen operation point, then, power on Wrong connection between... -
Page 8: Panel Button Control Instruction
INSTRUCTIONS INSTRUCTIONS 7.PANEL BUTTON CONTROL INSTRUCTION OTHER PLAY MODE 1.Power On/Off/Function MODE button AUX IN: 2.Disc Out button AUX IN OPERATION 3.SELECT Button 4.BAND/SYS /P.N button 1) Press “Source” button on remote control or touch “AUX” on the touch screen, to switch to AUX mode. - Page 9 INSTRUCTIONS INSTRUCTIONS 10. CD Program Play OUTLOOK AND BASIC FUNCTION In CD mode, you can set the sequence of playing by the program function, the operation is as follows: 1. Power On/Off/Function MODE button When CD is playing, press ST/PROG button, then the display shows: Press this button for short moment to turn on power,and long press it to turn off power.
- Page 10 INSTRUCTIONS INSTRUCTIONS 9. Disc load slot 18.CD/MP3 BASIC OPERATION Opening for disc to enter or retreat. Slide in CD/MP3 disc, unit will play it automatically. If disc is in slot, press DVD touch button on main menu can to play. 10.
- Page 11 INSTRUCTIONS INSTRUCTIONS 15. VCD Program Playing In VCD mode, you can set playing sequence of songs by program play function. The program playing operation steps are as follows: In VCD mode, press ST/PTOG button, display will show: 18. TFT Display Screen Extend/Retreat PROG Press this button to extend the TFT screen from the device or retreat it back.
-
Page 12: Main Menu Touch Operation
INSTRUCTIONS INSTRUCTIONS 8.MAIN MENU TOUCH OPERATION 8. OSD In playing mode, short press OSD on remote control to show all information of present disc. 9. Number Buttons OSD SET In VCD mode, press 0-9 number button to input song. For example, you want to choose 13th song, press 10+ button, and then press 3 button once to play 13th song. -
Page 13: Osd Setup
INSTRUCTIONS INSTRUCTIONS 9.OSD SETUP Exit Minute Hour RDS: ON LEFT RIGHT Radio frequency setting Back-up Camera left/right selection Note: Touch corresponding function, it will display in yellow words reminding, RDS on/off optional and blue back ground reminding. Time setting Note: There are 3 buttons automatically changed according to your setting change in radio state when you activate or exit RDS;... -
Page 14: Adjust Mode
INSTRUCTIONS INSTRUCTIONS 10.ADJUST MODE(pic A) Sharp: press button to adjust sharp sound high and low Back main menu Volume: press Bass: press button to Adjust front and button to adjust volume adjust bass level rear speaker Adjust left and right speaker Exit setup EQ mode From POP... -
Page 15: Remote Control Function
INSTRUCTIONS INSTRUCTIONS 11.REMOTE CONTROL FUNCTION 4. SOURCE Button Press this button to choose audio sources. 5. EQ Button Press this button to choose POP, ROCK, CLASS, off. 6. SEEK + ( ) / SEEK - ( ) Button Press this button to manual turning, speed or quick back, previous song and next song. - Page 16 INSTRUCTIONS INSTRUCTIONS 15. 0 - 10 + Button 24. ANGLE Button Press this button to choose desired song, In DVD mode, press this button to change section, preset stations. play angle. * Decimal numbers, for example the 19th song, press 1,9 button; 25.
-
Page 17: Disc Play Touch Operation
INSTRUCTIONS INSTRUCTIONS 12.DISC PLAY TOUCH OPERATION... -
Page 18: Cd/Mp3 Operation Interface
INSTRUCTIONS INSTRUCTIONS 13.CD/MP3 OPERATION INTERFACE Press this button to exit balance left &right speaker,re-press this button Next song to resume balance left & right speaker function. Browse/Broadcast Previous song Repeat select,includes single song repeat and Play/Pause directory repeat Audio selection, sound effect choice VOL BAS BAL FAD... -
Page 19: Rds User Operation
INSTRUCTIONS INSTRUCTIONS 14.RDS USER OPERATION Short press on this button to decrease radio frequency; Press PTY, when PTY is on, it means there longer press on this button to is strong RDS signals output. seek radio channels frequency decreased direction. Press this button to choose radio channels' name, please refer to details Short press on this button to... - Page 20 INSTRUCTIONS INSTRUCTIONS 1. EON (RDS Mark) Indicate main unit is on auto tracking RDS mode. 2. AF (RDS Auto Tracking Mark) Indicate radio is auto tracking RDS channel. 3. TA (RDS Signal Increasing Output) Indicate RDS channel have signal increasing output. 4.
-
Page 21: Radio Operation
INSTRUCTIONS INSTRUCTIONS 14. MENU Select 15.RADIO OPERATION In playing mode, press PBC button on remote control to back to the menu, display will show chapter and section in disc. Work with button on remote control or touch 1. Band Selection button on display to choose your desired song. -
Page 22: Dvd Basic Operation
INSTRUCTIONS INSTRUCTIONS 8. OSD In playing mode, short press OSD on remote control to show all information of present disc. 9. Repeatedly Play In play mode, press AMS/RPT button on remote control to start up follow repeat function. Repeat (chapter) Repeat (section) Repeat (off) 10.
Need help?
Do you have a question about the SD704M and is the answer not in the manual?
Questions and answers