ESCORT Beltronics GT-1 - Radar Detector Manual
- Quick reference (2 pages)
Advertisement
Introduction
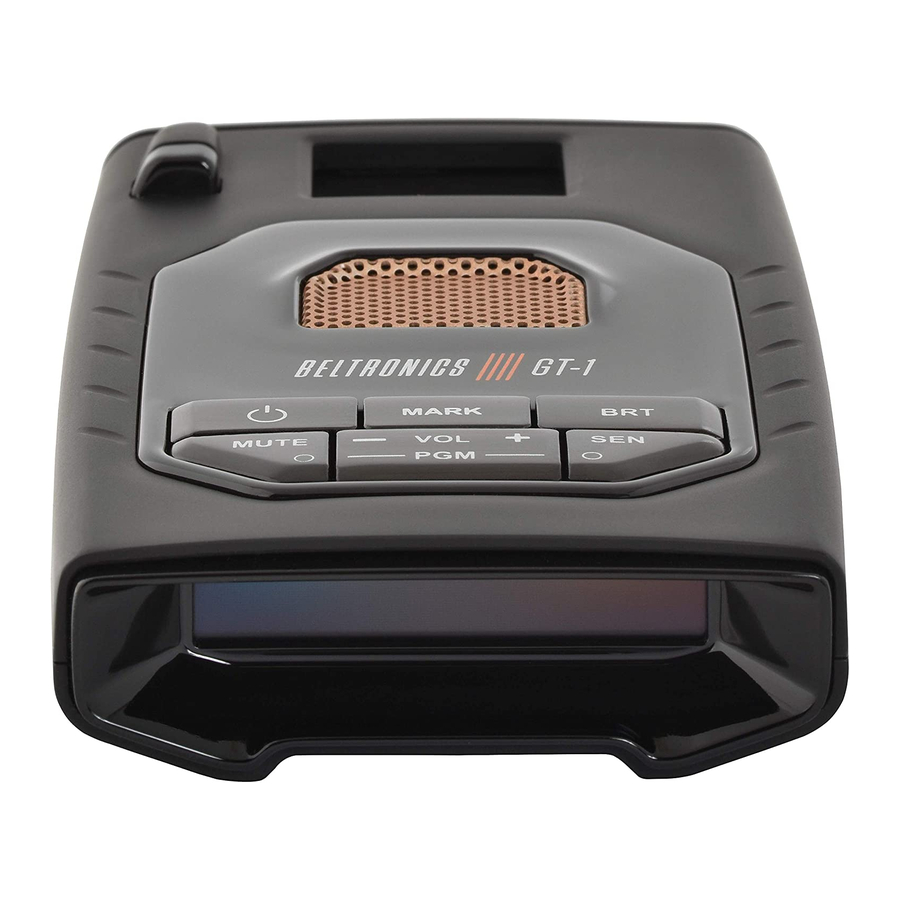
You've purchased the all-new Beltronics GT-1 which is the one of the most advanced highperformance radar and laser detector on the market. The Beltronics GT-1 provides long-range warning on all radar and laser bands.

Beltronics GT-1 features a new multi-color OLED display. Brilliant graphics illuminate intuitive icons that identify the type of threat at a glance.
Images shown above appear when GT-1 is connected to your phone and ESCORT Live App.
Beltronics GT-1 Features
The Beltronics GT-1 introduces the following state-of-the-art performance and features:
- Long-range K and Ka-band radar performance, including instant-on radar guns.
- Highway, AutoScan, and Auto No X settings.
- Exclusive Threat Mode tracks and displays up to 4 radar signals simultaneously.
- Exclusive Tech Mode provides actual numeric frequency for any radar signal and alert bar.
- The Beltronics GT-1 with built in Bluetooth ® technology gives you access to ESCORT's award-winning App, ESCORT Live. Features when connected to ESCORT Live:
- Our exclusive real-time ticket protection network, which warns you of upcoming alerts received by other users in the area.
- Our DEFENDER Database, which warns you of verified speed traps, speed cameras, and red light cameras.
- Our most popular GPS-powered features, including speed-limit data for over-speed alerts, live traffic data for your current location, and manual lock-out to help eliminate false alerts.
![]()

Registration
Follow these steps to register your Beltronics GT-1. You will need the detector's serial number to complete the registration.
- Visit www.Beltronics.com and click Product Registration.
- Click the "Registration for all devices" link.
- Follow the onscreen instructions to register your device.
Be sure to write down the username and password you create, as you will need this information to access the ESCORT Live ticket protection App. (You will also receive an e-mail with this information, once you have registered your device.)
NOTE: GT-1 comes with 1-year free premium subscription to ESCORT Live™.
ESCORT Live
For iPhone:

- Ensure Beltronics GT-1 power is ON.
- Open the App Store on your iPhone and search for ESCORT Live Radar.
![]()
- Follow the onscreen instructions to download ESCORT Live Radar and then open the App.
- When prompted, enter the username and password you created when registering your product at Beltronics.com.
- Press the Settings button
![]() then select Devices.
then select Devices. - You should see GT-1 listed with Not Connected underneath. Press the GT-1 device entry and when prompted select Pair.
![]()
- The Bluetooth icon on the GT-1 display will appear to confirm that it is paired to your iPhone.

 then select Devices.
For Android based smartphones:

- Ensure Beltronics GT-1 power is ON.
- On your smartphone go to Bluetooth® Settings and make sure that Bluetooth® is ON.
- Press Scan for devices and wait for the device list to populate, GT-1 should appear under Available devices.
- Press the GT-1 device entry.
- The Bluetooth icon on the Beltronics GT-1 display will appear to confirm that it is paired to your smartphone.
- Open Google Play on your smartphone and search for Escort Live Radar.
![]()
- Follow the onscreen instructions to download Escort Live Radar and then open the App.
- When prompted, enter the username and password you created when registering your product at Beltronics.com
- Open the App, walk through the tutorial, and you're ready to hit the road!

Installation
Beltronics GT-1 comes with a versatile EZ Mag Mount™. To mount the detector in your vehicle:

- Remove backing from StickyCup mount.
- Firmly press StickyCup onto windshield and flip locking clamp to secure.
- Slide the detector onto the mounting bracket until it's fully engaged. The magnet inside holds the detector in place.
- To adjust view, loosen thumb wheel and adjust angle of mounting bracket. Tighten thumb wheel to secure.
- To remove detector, simply pull the detector device off the mount bracket.
- To remove mount from windshield, release locking clamp and pull tab on top of StickyCup.
StickyCup Care Instructions:
To clean your StickyCup, simply rinse under warm water, gently wipe off any debris and allow to air dry.

For optimum detection performance, we recommend the following:
- Using the EZ Mag Mount, mount your Beltronics GT-1 level, and high enough on your front windshield to provide a clear view of the road from the front and rear.

- Mount Beltronics GT-1 away from windshield wipers, other solid objects, and heavily tinted areas that might obstruct the radar antenna or laser lens.


Controls & Features
Using GT-1

- Plug small end of SmartCord into modular jack on GT-1 and large end of SmartCord into your car's lighter/accessory socket.
- GT-1 should power on automatically. If not, press the device's power button.
![]()

NOTE: You can easily access and customize all of your Settings and Preferences by pressing and holding the MUTE and SEN buttons. See Settings and Preferences for details.
Using SmartCord

- Mute Button: Press to mute an alert.
- Alert Light: Lights red when receiving an alert.
- Power Light: Lights green when receiving power.


Actual speed and live alerts will not be shown on your Beltronics GT-1 if your smart phone does not have good GPS reception.
Settings & Preferences
Press and hold the MUTE and SEN buttons to access Programming. To exit Programming, simply wait a few seconds without pressing a button. The unit will display Completed to confirm your selections.
| Press MUTE to go from one category to the next | Press VOLUME + or – to change your setting within a category | |
| User Mode | Advanced* Novice | Access and customize all Settings and Preferences in Advanced Mode NOTE: Switch back to Advance mode to view all Preferences |
| Pilot | Scan Bar* Full Word | Scanning Bar with Full Word Full Word: AutoScan, Auto NoX, or Highway |
| Display Color | Copper*/Blue/Green/Red | Set color to match your vehicle's dash display |
| Meter Mode | Standard* Tech Threat Basic | Single band with bar graph of signal strength Single band with numeric frequency Multiple bands with bar graph of signal strengths Simple messages replace bands: Caution (if traveling below cruise alert limit) Slow Down (if traveling above cruise alert limit) |
| Tones | Standard* Mild | Standard Beltronics alert tones Mild doorbell chime alert tones |
| AutoMute | On* / Off | Automatically reduces audio during alert |
| Language | English*/Espanol | Language for voice and text |
| Voice | On* / Off | Voice announcements |
| Band Enables | Default* | Default Settings for North America |
| Modified | Customize the bands you want to monitor |
| Press SEN to go from one band category to the next | Press VOLUME + or – to change your setting within a category | ||||
| X Band K Band | On* / Off On*/ Off | Freq: 24.050-24.250 GHz NOTE: When K Band is off, you can select separate segments of the band to turn on or off. | |||
| KN1 KN2 KN3 KN4 Ka Band | On* / Off On* / Off On* / Off On* / Off On* / Off | Freq: 24.050 - 24.110 GHz Freq: 24.110 - 24.175 GHz Freq: 24.175 - 24.250 GHz Freq: 23.950 - 24.050 GHz Freq: 33.400-36.000 GHz NOTE: When Ka Band is off, you can select separate segments of the band to turn on and off. | |||
| KaN1 KaN2 KaN3 KaN4 KaN5 Laser TSR | On* / Off On* / Off On* / Off On* / Off On* / Off On* / Off On* / Off | Freq: 33.392 - 33.704 GHz Freq: 33.704 - 33.896 GHz Freq: 33.886 - 34.198 GHz Freq: 34.184 - 34.592 GHz Freq: 34.592 - 34.808 GHz | KaN6 KaN7 KaN8 KaN9 KaN10 | On* / Off On* / Off On* / Off On* / Off On* / Off | Freq: 34.806 - 35.166 GHz Freq: 35.143 - 35.383 GHz Freq: 35.378 - 35.618 GHz Freq: 35.595 - 35.835 GHz Freq: 35.830 - 35.998 GHz |
| Automatically rejects traffic flow sensors-monitoring false alarms | |||||
| Additional Preference options within ESCORT Live App when connected to Beltronics GT-1 | |||||
| Cruise Alert | Off / 20-160 mph 20 mph* | Offers double beep alert tones below specified speed | |||
| Speed Display | On* Off | Displays current speed Displays battery voltage | |||
| Units | English*/Metric | Units for distance and speed | |||
| *Default Setting | |||||
Notes for Settings & Preferences
For descriptions of features and functions available when connected to ESCORT Live, visit Beltronics.com and download the Beltronics GT-1 Owner's Manual.
To restore Beltronics GT-1 to its original factory settings, press and hold MUTE and SEN while powering on detector. Restored message will display, acknowledging the reset.
Software Updates
Beltronics GT-1 is easily updated using our exclusive detector software tools found on our web site. Firmware, or the operating software for the detector, can be updated using these tools.
In order to have access to these updates, please register your Beltronics GT-1 at www. Beltronics. com. Once registered, you will receive email notifications that updates are now available for your firmware. To handle your software updates you need to connect your Beltronics GT-1 to a computer.
You can connect Beltronics GT-1 to a computer via Micro USB/USB A cable (not included).
ESCORT Live Compatible
Contact Us
866.468.0322 • Beltronics.com
Beltronics USA, Inc.
5442 West Chester Road, West Chester OH 45069
Documents / Resources
References
Beltronics Radar Detectors :: Performance Rules
![www.apple.com]() App Store - Apple
App Store - Apple![play.google.com]() Google Play
Google PlayBeltronics Radar Detectors :: Performance Rules
Download manual
Here you can download full pdf version of manual, it may contain additional safety instructions, warranty information, FCC rules, etc.
Advertisement


Need help?
Do you have a question about the Beltronics GT-1 and is the answer not in the manual?
Questions and answers