ESCORT Solo S2 - Radar Detector Manual
- Owner's manual (16 pages) ,
- Brochure (4 pages)
Advertisement
Introduction
Your new Solo S2 is the most advanced cordless radar, laser and safety detector available. The Solo S2 includes full X, K, SuperWide Ka, and Safety Warning System radar capability, front and rear laser detection, digital signal processing (DSP) for superior range and reduced false alarms, our patented Mute and AutoMute, audible and visual band alerts, and all the performance you'd expect from ESCORT.
In addition, the Solo S2 introduces a new level of revolutionary cordless performance and innovative features:
- New long-range cordless performance for both radar and laser
- New AutoPower feature maximizes battery life
- New brilliant high-resolution LCD display with LED backlight
- Advanced EZ-Programming lets you customize up to 10 features
- Exclusive AutoSensitivity mode virtually eliminates false alarms, plus Highway and City settings
- ExpertMeter tracks and displays up to 8 radar signals simultaneously
- Detects and displays up to 64 Safety Warning System messages
- Compatible with Laser Shifter™ ZR3
If you've used a radar detector before, a review of the Quick Reference Guide, and the EZ-Programming information on will briefly explain the new features. If this is your first detector, please read the manual in detail to get the most out of your Solo S2's outstanding performance and innovative features. Please drive safely.
Solo S2 Quick Reference Card
There are 10 user-selectable options so you can customize your Solo S2 for your own preferences.
The buttons labeled VOL and M (Mode) are also used to enter the Program Mode, REVIEW your current program settings, and to CHANGE any settings as desired. The words PGM, RVW, and CHG are located on the front of the detector, and are highlighted in blue graphics.
How to use EZ-Programming
- To enter Program Mode, press and hold one of the VOL buttons and the M button down for 2 seconds. (The unit will beep twice, and will display the word "Program").
- Then press the RVW button to review the current settings. (You can either tap the button to change from item to item, or hold the button to scroll through the items).
- Press the CHG button to change any setting. (You can either tap the button to change from setting to setting, or hold the button to scroll through all the options).
- To leave Program Mode, simply wait 8 seconds without pressing any button. (The unit will display Complete, beep 4 times, and return to normal operation).
Solo S2's Factory Settings
To reset Solo S2 to its original factory settings, press and hold the Mute and M (Mode) buttons while turning Solo S2 on. Solo S2's display will provide a "Reset" message, accompanied by an audible alert, acknowledging the reset.
An example of EZ-Programming:
Here is how you would turn Solo S2's AutoMute feature off.
- Enter the Program Mode by holding one of the VOL buttons and the M button down for 2 seconds. Solo S2 will beep twice and display Program.
- Then hold the RVW button down. Solo S2 will scroll through the categories, starting with Contrast (Contr), then Pilot Light (Pilot), then Auto Power (aPwr), then Power-on sequence (PwrOn), then Signal Strength Meter (Meter), and then AutoMute (aMute).
- Release the RVW button when Solo S2 shows the AutoMute item. Since the factory setting is for AutoMute to be on, Solo S2 will display aMute ON.
If you accidentally don't release the RVW button in time, simply press the other VOL button to scroll back to the desired category. - Press the CHG button to change from aMute ON to aMute OFF.
- To complete the Programming, simply wait 8 seconds without pressing any button. Solo S2 will display Complete, beep 4 times, and return to normal operation.
EZ-Programming Details


Quick Reference Guide
To begin using the Solo S2, just follow these simple steps:
- Install (2) AA batteries (included) in the battery compartment. (Please note polarity)
- Mount your Solo S2 on the windshield using the supplied windshield mount.
- Press the Power button (PWR) located on the left side of the front panel.
- Adjust the volume (VOL) by pressing the up and down buttons located to the right of the display.
Please read the manual to fully understand Solo S2's operation and features.

Installation
Battery Installation
Remove the battery door, located on the bottom of the detector, and install (2) AA batteries (supplied). Be sure to note the correct polarity for each battery (see legends inside battery compartment).

Optional 12-volt SmartCord
To power Solo S2 using 12-volts, simply remove the power connector plug, and insert the small end of the optional SmartCord, (telephone-type connector) into the modular jack on Solo S2's right side. Plug the lighter plug adapter into your vehicle's lighter socket or accessory socket.
The optional SmartCord allows you to operate the Solo S2 on 12 volts DC negative ground only. The lighter plug is a standard size and will work in most vehicles. Of course, your lighter socket must be clean and properly connected for proper operation.
NOTE: Depending on your vehicle, the lighter socket power may either be continuously on, or it may be switched on and off with your ignition switch. See the Accessories section for details on how to order the optional 12-volt SmartCord.
Mounting Location

ESCORT cannot anticipate the many ways Solo S2 can be mounted. It is important that you mount Solo S2 where it will not impair your view nor present a hazard in case of an accident.
Where to mount Solo S2
For optimum detection performance, we recommend the following:
- Using the supplied Windshield Mount, stick the suction cups to the windshield, and mount your Solo S2 level and high enough on your front windshield to provide a clear view of the road ahead.
- Mount Solo S2 away from windshield wipers, other solid objects, and heavily tinted areas that might obstruct the radar antenna or laser lens.
Windshield Mount
Solo S2's EasyMount windshield bracket is designed for unobtrusive and hassle-free mounting.
- Depress the adjustment button on the top of Solo S2 (above the word "RELEASE") and slide the EasyMount bracket into the slot until mount is locked into the position which best fits the angle of your windshield (there are four settings available). For extremely horizontal or extremely sloped windshields, the EasyMount bracket can be bent.
To ensure that the suction cups adhere to the windshield firmly, be sure to keep both your windshield and the suction cups clean. - To adjust Solo S2 on your windshield, use the EasyMount adjustment button located on the top of the Solo S2, and slide Solo S2 forward or backward to obtain a level horizontal position. When installed and adjusted properly, the back top edge of the Solo S2 should rest solidly against your windshield.

A few vehicles (including some Porsches) have windshields with a soft anti-lacerative coating on the inside surface. Use of suction cups will permanently mar this coating. Consult your dealership or the vehicle owner's manual to determine if your windshield has this coating.

User's Tip
You can leave the EasyMount bracket in place on your windshield, and easily remove Solo S2 by pressing the adjustment button and sliding Solo S2 off the mount. Again, be sure to position the bracket where it won't present a hazard in the event of an accident. Additional mounts are available.
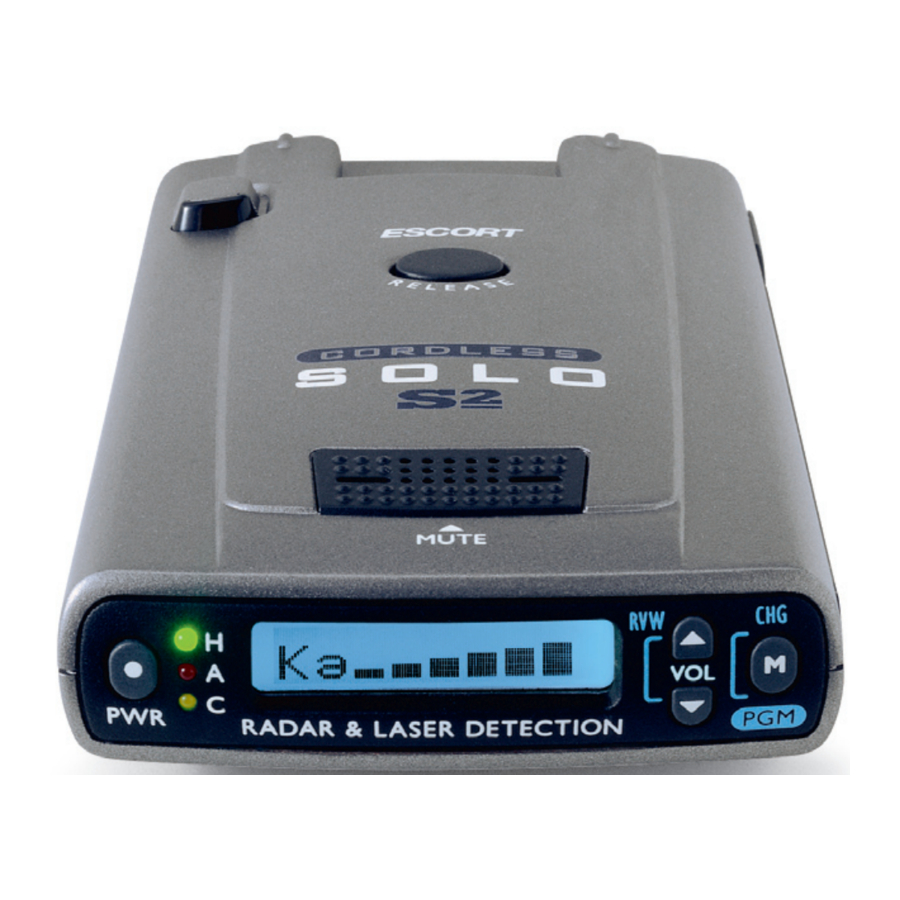
Controls and Features
Power
To turn Solo S2 on, simply press the power button (PWR) located on the left side of the front panel. To turn the detector off, press and hold the same power button for approximately two (2) seconds.
AutoPwr (programmable)
To conserve battery life, the Solo S2 will automatically go to "sleep" after the vehicle has stopped moving for 25 minutes. If the vehicle starts to move within the next 30 minutes, your Solo S2 will "wake up" and prompt you, (both visually and audibly) to see if you want it back on. If so, simply press any button on the Solo S2, and it will return to normal operation.
If you do not press a button within 15 seconds of the prompt, the detector will shut down completely. To turn the Solo S2 back on, simply press the PWR button.
Volume Control
To adjust the alert tone volume level, press and hold the up or down arrow buttons located to the right of the display. Once the desired volume level is achieved, simply release the button. This volume level will be stored in memory.
Power-On Indication / Alert
Once Solo S2's start-up sequence is complete, one of three LEDs (Green, yellow, red) located between the PWR button and the display will begin to blink. This indicates that Solo S2 is operational, and indicates which sensitivity mode (Highway, Auto, or City) the detector is in.
If you are using the optional SmartCord for 12volt power, you can select alternate power-on displays. See the EZ-Programming section for details.
The red LED (AutoSensitivity mode) will flash as an alert lamp when a signal is detected.
Mute
The Mute button, located on the top case of the Solo S2, allows you to silence the audio alert during a radar encounter.
To mute the audio for a single specific signal, briefly press the Mute button. After that radar encounter has passed, the mute will automatically reset and the audio will alert you to the next encounter.
AutoMute
Your Solo S2 has our patented AutoMute feature. After Solo S2 alerts you to a radar encounter at the volume you have selected, the AutoMute feature will automatically reduce the volume to a lower level.
This keeps you informed without the annoyance of a continuous full-volume alert.
If you prefer, you can turn the AutoMute feature off. See the EZ-Programming section for details.
SmartMute
Once a specific signal has been muted, ESCORT's exclusive SmartMute™ feature will intelligently prioritize any additional signals by band. If a new signal is detected, and it is a higher priority band than the muted one, Solo S2 will alert you at the preset volume you selected.
Battery Status / Voltage
The Mute button is also a battery status button. Simply press the Mute button at any time (without a signal present) and a battery status icon will appear, showing you the remaining life of the batteries. Each segment of this battery icon represents approximately 25% of the battery life. When using the optional SmartCord for 12-volt operation, pressing the Mute button will provide the vehicles voltage.
Low Battery Warning
Once the batteries reach a specific voltage level, (approximately 1.7 volts) the Solo S2 will provide a low-battery warning. This warning consists of an audible alert, along with a corresponding message.
Mode Switch
The Mode switch selects the Solo S2's sensitivity. We recommend the Auto (AutoSensitivity) mode for most driving.
Solo S2's AutoSensitivity mode provides longrange warning, while virtually eliminating false alarms. In this mode, the Solo S2's internal computer continuously analyzes all incoming signals and intelligently determines which signals are real threats.
You can also select conventional Highway and City sensitivity modes. When driving in urban areas where annoying X-band intrusion alarms and door openers are common, City Mode can be engaged to lower X-band sensitivity and reduce X-band alerts. Full sensitivity is maintained on all other bands. You can customize Solo S2's City mode sensitivity. See the EZ-Programming section for details.
Brightness Control
The Solo S2 provides four levels of brightness including automatic, minimum, medium, maximum and full dark mode. The Solo S2 is shipped using the automatic setting, which will adjust the brightness automatically based on the ambient light in your vehicle. You may also select one of the fixed brightness levels (min, med, max) in the EZ-Programming section.
For more discreet operation, the Solo S2 also has a dark mode. In this mode, the display will not provide any visual alerts when it detects a signal. Only an audible alert will be heard. However, the display will operate normally when accessing the program mode. See the EZ-Programming section for details.
NOTE: When using the optional 12-volt SmartCord while the Solo S2 is in dark mode, all visual alerts will be indicated on the SmartCord itself.
Audible Alerts
For Radar signals:
Solo S2 uses a Geiger-counter-like sound to indicate the signal strength and type of radar signal being encountered. When you encounter radar, a distinct Audible Alert will sound and increase in rate as the signal gets closer. When the signal is very strong, the Audible Alerts will blend into a solid tone. This allows you to judge the distance from the signal source without taking your eyes from the road. Each band has a distinct tone for easy identification. X-band = beep tone, K-band = raspy brap tone, Ka-band = double-brap tone.
For Laser signals:
Since Laser signals are a possible threat no matter how weak, Solo S2 alerts you to all laser signals with a full laser alert.
For Safety signals:
Solo S2 will alert you to these signals with a double-beep tone, and a corresponding text message.
Signal Strength Meter
Solo S2's alphanumeric graphic display provides an intuitive display of signal strength and text messages. Solo S2's standard bar-graph signal strength meter only displays information on a single radar signal. If there are multiple signals present, Solo S2's internal computer determines which is the most important threat to show on the bar-graph meter.
When Solo S2 detects radar, it displays the band (X, K, or Ka), and a precise bar graph of the signal strength. When Solo S2 detects a laser signal, the display will show "LASER."
NOTE: If you are operating Solo S2 in Dark Mode, the display will not light when a signal is detected— only the audio alert will be heard.
ExpertMeter
Solo S2's ExpertMeter option is an advanced display for experienced detector users. Please use Solo S2 for a few weeks to get familiar with its other features before using ExpertMeter.
To use the ExpertMeter instead of the standard bar graph meter, select ExpertMeter in Solo S2's EZProgramming.
Solo S2's ExpertMeter simultaneously tracks up to 8 radar signals. It shows you detailed information on up to 2 Ka-band, 2 K-band, and 4 X-band signals. ExpertMeter can help you spot a change in your normal driving environment; for example, a traffic radar unit being operated in an area where there are normally other signals present. The ExpertMeter is actually a miniature spectrum analyzer. It shows what band each signal is and its signal strength.

Above is the ExpertMeter Display if Solo S2 was detecting 2 strong Ka-band, 2 strong K-band, and 4 strong X-band signals.
As you can see, there are vertical lines after each band designator. Each line shows a signal being detected. The height of each line shows the relative signal strength of that signal.
NOTE: If you use ExpertMeter, the brief signal shown in the power-on sequence when you turn on your Solo S2 will also be in ExpertMeter: an X with a single vertical line.
A few more examples will help you better see how the ExpertMeter works.

Here ExpertMeter shows 1 strong K-band signal, and three X-band signals, two strong and one weak.

Here ExpertMeter shows 1 weak Ka-band signal, and three weak X-band signals.

On very weak signals, there will not be a vertical line at all. This shows a very weak X-band signal.
ExpertMeter Details
The band designators (X, K, Ka) will stay on the display for a few seconds after the signal has passed. This allows you to see what the unit detected, even on very brief signals.
However, the vertical lines representing individual signals continuously change (several times a second) to give you a continuous instantaneous view of all radar signals present.
EZ-Programming
There are 10 user-selectable options so you can customize your Solo S2 for your own preferences. The Mode button ("M") and the "VOL" buttons (up or down arrows) are used to enter the programming, REVIEW your current program settings, and to CHANGE any settings as desired. The letters "PGM" (program), RVW (review), and CHG (change) are located on the front of the detector, and are highlighted in blue graphics.
How to use EZ-Programming
- To enter Program Mode, press and hold either of the "VOL" (up or down) buttons, and the "M" (mode) down for 2 seconds. The unit will beep twice, and will display the word "Program."
- Then press the RVW button to review the current settings. You can either tap the button to change from item to item, or press and hold the button to scroll through the items.
- Press the CHG button to change any setting. You can either tap the button to change from setting to setting, or hold the button to scroll through all the options.
![]() To leave the Program Mode, simply wait 8 seconds without pressing any button. The unit will display Complete, beep 4 times, and return to normal operation.
To leave the Program Mode, simply wait 8 seconds without pressing any button. The unit will display Complete, beep 4 times, and return to normal operation.
To quickly reset Solo S2 to the factory program settings, press and hold the Mute and M (Mode) buttons while turning Solo S2 on.
Example of EZ-Programming
Here is how you would turn Solo S2's AutoMute feature off.
- Enter the Program Mode by holding one of the VOL buttons and "M" (mode) button down for 2 seconds. Solo S2 will beep twice and display "Program."
- Then hold the RVW button down. Solo S2 will scroll through the categories, starting with Contrast, Pilot options, Auto-Power, Power-On sequence, Signal Strength Meter, AutoMute, Tones, City sensitivity, Brightness, and Bands.
- Release the RVW button when Solo S2 shows the AutoMute item. Since the factory setting is for AutoMute to be on, Solo S2 will display "aMute ON." (If you accidentally go to the next category, press the opposite "VOL" button to go back.)
- Press the CHG button to change from "aMuteON" to "aMuteOFF."
- To complete the Programming, simply wait 8 seconds without pressing any button. Solo S2 will display Complete, beep 4 times, and return to normal operation.
Overview of EZ-Programming

Details of EZ-Programming
Display Contrast
 (Contrast adjustment)
In this setting, Solo S2 allows you to scroll though 5 levels of contrast adjustment for optimum viewing.
Pilot Light (12-volt power only)
 (Full description)
In this setting, Solo S2 will display "Highway," "City," or "Auto" as its power-on indication. (factory default)
 (Letter)
In this setting, Solo S2 will display "H" for Highway, "C" for City, and "A" for Auto.
 (Letter with scanning dot)
In this setting, Solo S2 will display "H" for Highway, "C" for City, and "A" for Auto. Also, a single dot will continuously scroll across the display.
 (Symbol)
In this setting, Solo S2 will display "+" for Highway, "." for Auto, and "–" for City.
 (Symbol with scanning dot)
In this setting, Solo S2 will display "+" for Highway, "." for Auto, and "–" for City. Also, a single dot will continuously scroll across the display.
 (Scanning symbol)
In this setting, Solo S2 will display "+" for Highway, "." for Auto, and "–" for City. Each will continuously scroll across the display.
Auto Power
 (Standard)
In this setting, Solo S2 maximizes battery life by intelligently shutting down once your vehicle has become motionless for approximately 25 minutes. After this time, the Solo S2 will go into a "sleep" mode for approximately 30 minutes. However, if the Solo S2 senses movement within this "sleep" time, the Solo S2 will wake up and prompt you (both audibly and visually) to see if you would like to return to an active mode. If yes, simply press any button.
If not, the Solo S2 will shut off completely, maximizing battery life.

In this setting, Solo S2 will shut off completely after no signals are detected for approximately 45 minutes.

In this setting, Solo S2 requires that you turn it on and off manually using the PWR button.
Power-on Sequence
 (Standard)
In this setting, each time you turn on Solo S2, it will display "Solo S2," "LASER," "Ka-band," "K-band," "X-band," followed by a brief X-band alert. (factory default) If one or more bands are disabled, a message will appear alerting you if one or more bands are disabled, (ie. "X OFF").
 (Fast power-on)
In this setting, Solo S2 will provide a single X-band tone if all bands are enabled. If any bands have been disabled, a double X-band tone and corresponding message (i.e. "X OFF"), will alert you that one or more bands have been turned off.
NOTE: If the batteries need to be replaced, a lowbattery alert will be provided during both power-on sequences.
Signal Strength
 (Standard meter)
In this setting, the meter displays the band of the received signal, and a bar graph shows the relative signal strength. (factory default)
 (Expert Meter)
In this setting, the meter simultaneously tracks multiple radar signals. It can display up to 2 Ka band, 2 K band, and 4 X band signals at the same time.
NOTE: The ExpertMeter feature is explained in more detail.
AutoMute
 (AutoMute on)
In this setting, Solo S2's audio alerts will initially be at the volume you set, but after a few seconds, Solo S2 will automatically reduce the volume level, to keep you informed, but not annoyed. (factory default)
 (AutoMute off)
With AutoMute off, Solo S2's audio alerts will remain at the volume you set for the duration of the radar encounter.
Audio Tones
 (Standard tones)
This setting uses more pleasing tones. (factory default)
 (Loud tones)
This setting uses tones that are more piercing. This setting is recommended for louder vehicles.
City Mode Sensitivity
 (Standard)
In this setting, when you put Solo S2 in the City mode, X-band sensitivity is significantly reduced, to reduce annoyance from X-band intrusion alarms and motion sensors. (factory default)
 (Low X-band sensitivity)
In this setting, when you put Solo S2 in the City mode, X-band sensitivity is reduced more than the standard setting. This will reduce X band alarms from other sources even further, but also significantly reduces range to X-band traffic radar.
 (No X-band sensitivity)
In this setting, when you put Solo S2 in the City mode, Solo S2 will not respond to any X band signals.
Only choose this setting if you are absolutely certain that there are no X band traffic radar units where you drive.
NOTE: These settings only apply when Solo S2 is operated in City mode. X-band sensitivity is not affected when used in "Auto," or "Highway" modes.
Brightness
 (Automatically adjusts)
In this setting, the Solo S2's display and pilot lights will adjust automatically based on the vehicles interior brightness.(factory default)
 (Minimum)
In this setting, each time you turn on Solo S2, the display will be at the lowest brightness.
 (Medium)
In this setting, each time you turn on Solo S2, the display will be at the medium brightness.
 (Maximum)
In this setting, each time you turn on Solo S2, the display will be at the maximum brightness.
 (Dark)
In this setting, Solo S2's display will be totally dark, even during an alert. Only the audible alert will tell you of detected signals.
Bands ON/OFF

In this setting, all radar and laser frequencies are monitored. This is the factory setting, and it is highly recommended that you use your Solo S2 in this mode.
 (X-band detection on – factory default)
 (K-band detection on – factory default)
 (Ka-band detection on – factory default)
 (Laser detection on – factory default)
 (Safety Warning Systems detection off – factory default)
 (VG2 detection off – factory default) If the VG2 band (Radar detector detector) is turned on, VG2 units will be detected with an audible and visual alert. Once detected, Solo S2's internal oscillator will shut down for a period of time, making it undetectable. Solo S2's oscillator will then periodically turn back on to see if the VG2 unit is still present. If not, Solo S2 will return to normal operation.
NOTE: With VG2 detection on, other radar detectors could be detected as well.

If you live in an area where a specific band (e.g. SWS) is not currently used, you can turn that specific band off.
NOTE: DO NOT TURN ANY BANDS OFF UNLESS YOU ARE ABSOLUTELY SURE THAT BAND IS NOT USED IN YOUR AREA.
To disable, or turn a specific band off, enter program mode and scroll to the "BandsALL" category using the "REVIEW" button. Using the "CHANGE" button, select the specific band you wish to disable, or turn off, (e.g. "SWS ON"). Once you have selected the specific band, press the topmounted Mute button to turn the band on/off.
NOTE: If you have turned off a band, Solo S2 will warn you with an audible alert, and associated text message stating which band is turned off, (e.g. "SWS OFF"). This warning is displayed during the start up sequence (standard or fast).
Interpreting Alerts
Although Solo S2 has a comprehensive warning system and this handbook is as complete as we can make it, only experience will teach you what to expect from your Solo S2 and how to interpret what it tells you. The specific type of radar being used, the type of trans-mission (continuous or instant-on) and the location of the radar source affect the radar alerts you receive. The following examples will give you an introduction to understanding Solo S2's warning system for radar, laser and safety alerts.
| Alert | Explanation |
|
|
|
|
|
|
|
|
|
|
|
|
|
|
|
|
|
Since the characteristics of these alerts may be similar to some of the preceding examples, over confidence in an unfamiliar area can be dangerous. Likewise, if an alert in a commonly traveled area is suddenly stronger or on a different band than usual, speed radar may be set up nearby. |
Technical Details
How Radar Works
Traffic radar, which consists of microwaves, travels in straight lines and is easily reflected by objects such as cars, trucks, even guardrails and overpasses. Radar works by directing its microwave beam down the road. As your vehicle travels into range, the microwave beam bounces off your car, and the radar antenna looks for the reflections. Using the Doppler Principle, the radar equipment then calculates your speed by comparing the frequency of the reflection of your car to the original frequency of the beam sent out.
Traffic radar has limitations, the most significant of these being that it typically can monitor only one target at a time. If there is more than one vehicle within range, it is up to the radar operator to decide which target is producing the strongest reflection. Since the strength of the reflection is affected by both the size of the vehicle and its proximity to the antenna, it is difficult for the radar operator to determine if the signal is from a sports car nearby or a semi-truck several hundred feet away.
Radar range also depends on the power of the radar equipment itself. The strength of the radar unit's beam diminishes with distance. The farther the radar has to travel, the less energy it has for speed detection.
Because intrusion alarms and motion sensors often operate on the same frequency as X-Band radar, your Solo S2 will occasionally receive nonpolice radar signals. Since these X-Band transmitters are usually contained inside of a building, or aimed toward the ground, they will generally produce much weaker readings than will a true radar encounter. As you become familiar with the sources of these pseudo alarms in your daily driving, they will serve as confirmation that your Solo S2's radar detection abilities are fully operational.
How Laser (Lidar) Works
Laser speed detection is actually LIDAR (Light Detection and Ranging). LIDAR guns project a beam of invisible infrared light. The signal is a series of very short infrared light energy pulses, which move, in a straight line, reflecting off your car and returning to the gun. LIDAR uses these light pulses to measure the distance to a vehicle. Speed is then calculated by measuring how quickly these pulses are reflected given the known speed of light. LIDAR (or laser) is a newer technology and is not as widespread as conventional radar. Therefore, you may not encounter laser on a daily basis. And, unlike radar detection, laser detection is not prone to false alarms. Because LIDAR transmits a much narrower beam than does radar, it is much more accurate in its ability to distinguish between targets and is also more difficult to detect. AS A RESULT, EVEN THE BRIEFEST LASER ALERT SHOULD BE TAKEN SERIOUSLY.
There are limitations to LIDAR equipment. LIDAR is much more sensitive to weather conditions than RADAR, and a LIDAR gun's range will be decreased by anything affecting visibility such as rain, fog, or smoke. A LIDAR gun cannot operate through glass and it must be stationary in order to get an accurate reading. Because LIDAR must have a clear line of sight and is subject to cosine error (an inaccuracy, which increases as the angle between the gun and the vehicle, increases) police typically use LIDAR equipment parallel to the road or from an overpass. LIDAR can be used day or night.
How Safety Radar Works
Safety Warning System, or SWS, uses a modified K-band radar signal. The SWS safety radar system has 64 possible messages (60 currently allocated). The SWS messages your Solo S2 can display are listed on the facing page.
From the factory, your Solo S2 is programmed with SWS decoding OFF. If SWS is used in your area, your Solo S2 will display the safety messages associated with the signal. If you wish to detect this system, use the EZ-Programming feature to turn Solo S2's SWS decoding ON.
NOTE: some of the safety messages have been condensed, so that each message can be displayed on one or two screens on Solo S2's display.
Since Safety radar technology is relatively new, and the number of transmitters in operation is not yet widespread, you will not receive Safety signals on a daily basis. Do not be surprised if you encounter emergency vehicles, road hazards and railroad crossings that are unequipped with these transmitters. As Safety transmitters become more prevalent (the number of operating transmitters is growing every day), these Safety radar signals will become more common.
SWS Safety Radar Text Messages

Troubleshooting
| Problem | Solution |
|
|
|
|
|
|
|
|
Solo S2's display is not working |
|
|
|
Solo S2 bounces or sags on windshield |
|
Solo S2's power-on sequence reoccurs while you are driving |
|
|
|
Solo S2 will not turn on |
|
Solo S2 feels very warm |
|
Explanation of Displays
| No display | Solo S2 is in the Dark mode, and is programmed for Full Dark |
 | One of the many pilot programming messages |
 | One of the many Safety Radar messages |
 | Solo S2 has detected a Safety Radar Signal, but the signal isn't yet strong enough to decode the specific safety message |
 | Solo S2 has been programmed in the ExpertMeter Mode |
 | Solo S2 has detected a VG2 unit (radar detector detector) |
Service
Service Procedure
If your Solo S2 ever needs service, please follow these simple steps:
- Check the troubleshooting section of this manual. It may have a solution to your problem.
- Call us at 1-800-543-1608. We may be able to solve your problem over the phone. If the problem requires that you send your Solo S2 to the factory for repair, we will provide you with a Service Order Number, which must be included on the outside of your shipping box.
Enclose The Following Information With Your Solo S2:
- Your Service Order Number
- Your name and return address
- Your daytime telephone number
- A description of the problem you are experiencing.
Accessories
The following accessories and replacement parts are available for Solo S2: Two versions of the 12-volt SmartCord are available: One SmartCord plugs into your lighter socket and has a coiled cord, and the other Directwire SmartCord module that you wire into your electrical system, with an 8 foot straight cord to route to your Solo S2.

- Optional 12-volt Coiled SmartCord • $29.95
- Optional 12-volt Direct-wire SmartCord • $29.95
- Solo S2 Travel Case • $19.95
- Optional Laser Shifter ZR3
Specifications
Features and Specifications
Operating Bands
- X-band 10.525 GHz ±25 MHz
- K-band 24.150 GHz ±100 MHz
- Ka-band 34.700 GHz ±1300 MHz
- Laser 904nm, 33 MHz bandwidth
Radar Receiver / Detector Type
- Superheterodyne, GaAs FET VCO
- Scanning Frequency Discriminator
- Digital Signal Processing (DSP)
Laser Detection
- Quantum Limited Video Receiver
- Multiple Laser Sensor Diodes
Display Type
- Graphic LCD Display With LED Backlight
- Standard Bar Graph or ExpertMeter
- 5-Brightness Levels Including Automatic and Dark
Power Requirement
- 3 Volts DC, (2) "AA" batteries
- Optional 12-Volt SmartCord
Programmable Features
- Contrast Adjust
- Pilot Light
- Auto Power
- Power-On Sequence
- Signal Strength Meter
- AutoMute
- Audio Tones
- City Mode Sensitivity
- Display Brightness
- Radar / Laser Bands
- SWS and VG2 Alert
Sensitivity Control
- Highway, AutoSensitivity and City
SmartMute
SmartShield VG2 Immunity
Dimensions (Inches)
1.25 (h) x 2.85 (w) x 5.32 (l)
Documents / ResourcesDownload manual
Here you can download full pdf version of manual, it may contain additional safety instructions, warranty information, FCC rules, etc.
Advertisement


Need help?
Do you have a question about the Solo S2 and is the answer not in the manual?
Questions and answers