Advertisement
Important Installation Warning
Please read this guide in detail to get the most out of your new ZR5's performance and features.
Please drive safely.
 Please Note
This product may be limited or prohibited in some jurisdictions. Check applicable laws before using.
ZR5 requires professional installation. A select group of car specialists can install ZR5 for you. Visit EscortRadar.com to find an authorized installer near you.
Attempting to install ZR5 without expertise in automotive electronic installations can cause personal injury during the installation, or damage the ZR5 and your vehicle. If your vehicle is damaged during installation, its safety systems may be compromised, which could cause personal injury or property damage.
What's Included

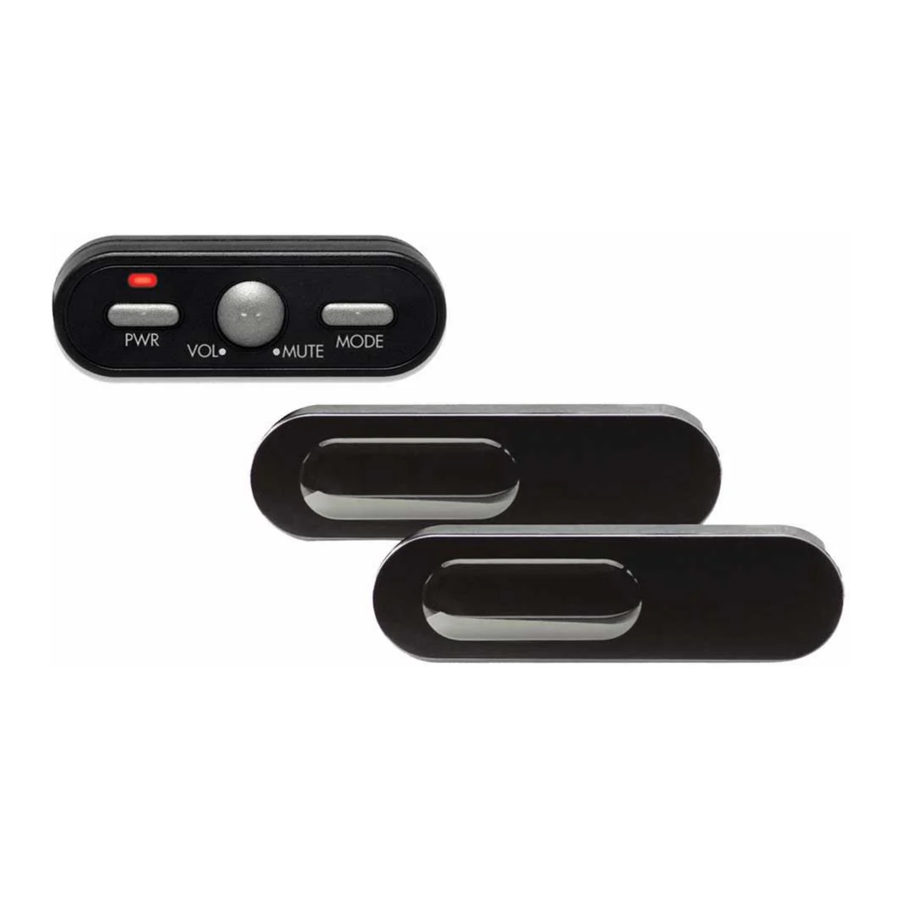
Controls and Features

Alert Indications
The Controller's LED will flash red when alerting. Since Laser signals are a possible threat no matter how weak, ZR5 alerts you with a full continuous audible alert along with a voice notification. The voice will announce whether the laser signal is front or rear.
If shifting is disabled, when ZR5 receives a laser signal it will say "alert" instead of "shifting".
Power
Press the PWR button to turn ZR5 on. To turn ZR5 off, press and hold PWR until you hear "Powering Down".
Volume and Mute
Press and hold the VOL/MUTE button to adjust the alert volume level. The volume will gradually increase. To decrease the volume, release the VOL button and quickly press and hold the VOL button again. Once you've reached your preferred audio level release the button. Your preferred audio level will be stored in memory, even after the detector is turned off.
Both the ZR5 mute button, and the mute button on the connected detector, will mute an alert. Subsequent alerts will audibly alert normally.
To temporarily disable shifting for 30 seconds; while receiving a laser alert double tap the mute button of the ZR5 or the connected detector. After 30 seconds elapse, ZR5 will announce that shifting is enabled again.
Mode
Press the MODE button to switch between "shifting" and "receive-only" modes. When using "receive-only" mode ZR5 will only alert to laser signals without shifting.
Interface Installation
- Install the Interface under the dash using supplied zip-ties.


When using optional Rear ShifterMax sensors ensure DIP switches 3 and 4 are moved down to the REAR position.
Note:
Do not mount Interface inside vehicle's engine compartment!
- Connect black wire (-) to ground, and red-striped wire (+) to a switched 12-volt supply. If ZR5 is left "on" then it will automatically power on and off with the ignition.
- ShifterMax Bridge Box, Display Controller Module, and optional radar detector all plug into the Interface.
- It is recommended that after the Interface is installed and connected to power, all other components are plugged in and tested for proper operation before completing the installation.
Sensor Installation
Positioning Sensors
Install each sensor halfway between the side and the center of the vehicle.

For optimal performance, sensors need to be facing straight forward (or backward, if installing optional rear sensors), not at an angle. Make sure that each sensor is parallel with the road (using supplied bubble level).
Note
Vehicle must be positioned on a flat surface in order to position sensors parallel with the road. Make sure that sensors have an unobstructed "view" of the road so the unit can function properly. Do not install sensors behind a solid surface, which would block laser transmission/reception.

- Snap mounting bracket onto sensor and install the included bolts but do not tighten them. If the bolts do not thread into the sensor then you have the bracket on backwards.
- Apply the double sided tape to the underside of the sensor's mounting bracket. Check front alignment and mount the sensor to a solid surface of the vehicle.
- Use the supplied bubble level to ensure the sensor is parallel to the road and tighten the sensor's mounting bracket bolts.
- Repeat for additional sensor(s).
Securing Connectors with Shrink Tube
Once you've installed all components properly and tested to ensure all parts are working properly, use cable ties to fasten sensor cables to a solid surface, keeping them away from heat and any moving parts. It is advisable to use the supplied heat shrink tubes to protect connectors against water, moisture, dust, etc.
Additional ShifterMax Sensors
Additional Laser ShifterMax sensors, with included mounting hardware, are sold separately in pairs.

Controller Shifter

- Determine the best location for the Controller. An optimal location is easily visible and accessible from the driver's position and does not interfere with normal driving. Avoid locations that require reaching through or around the steering wheel.
- Clean the mounting surface thoroughly.
- Mount the Controller using the pre-applied adhesive.
- Route the cable to the Interface and plug into the port labeled "Controller".
Bridge Box

- The Shifter Bridge Box is weatherproof. To limit the number of cables routed through the firewall, we recommend installing the Bridge Box inside of the engine compartment.
- Slide the included heat shrink onto the Bridge Box Interface cable then plug into the cable extending from the Bridge Box labeled "Interface" and route the cable toward the interior of the vehicle. Shrink the heat shrink onto the inline connector and secure the cable with zip-ties.
- Route the cable to the Interface and plug into the port labeled "Shifters".
Accessories
Contact Us:
800.433.3487
www.EscortRadar.com
Safety Precautions
ZR5 was designed to meet high performance and quality standards; however, there are certain precautions that must be considered before approaching installation and operation:
- Use only original ZR5 parts included with your unit. Do not plug any third-party components into your unit, and do not plug any supplied components into any third-party products, as this may cause failure and will void warranty.
- Special care must be taken during installation of outer sensors, as damaging factory-installed cables or connectors may cause damage or device malfunction and may void warranty.
- While outer sensors are specially designed and manufactured to be installed outside and to operate in harsh environments, the Interface and Controller must be installed and kept in a dry place, preferably somewhere inside the driver's cabin. Failures due to improper installation may void warranty.
- ZR5 cannot detect through glass or other transparent objects, and certain materials may absorb infrared light.
- Check your local laws before using ZR5, as transmitted light can interfere with other laser equipment.
Maintenance
Once ZR5 is installed, dirt and filth can accumulate on the front covers of the sensors, especially during the winter. To ensure peak performance, check front covers of sensors often and, if necessary, wipe clean with a cloth.

Never, under any circumstances, look at the sensors while powered on and operating. Do not view with optical instruments (like magnifiers).

Documents / Resources
References
![escortradar.com]() Accurate Driver Alert Systems, Drive Smarter! | ESCORT Radar
Accurate Driver Alert Systems, Drive Smarter! | ESCORT Radar![www.escortradar.com]() Accurate Driver Alert Systems, Drive Smarter! | ESCORT Radar
Accurate Driver Alert Systems, Drive Smarter! | ESCORT Radar

Download manual
Here you can download full pdf version of manual, it may contain additional safety instructions, warranty information, FCC rules, etc.
Advertisement


Need help?
Do you have a question about the ZR5 and is the answer not in the manual?
Questions and answers