Advertisement
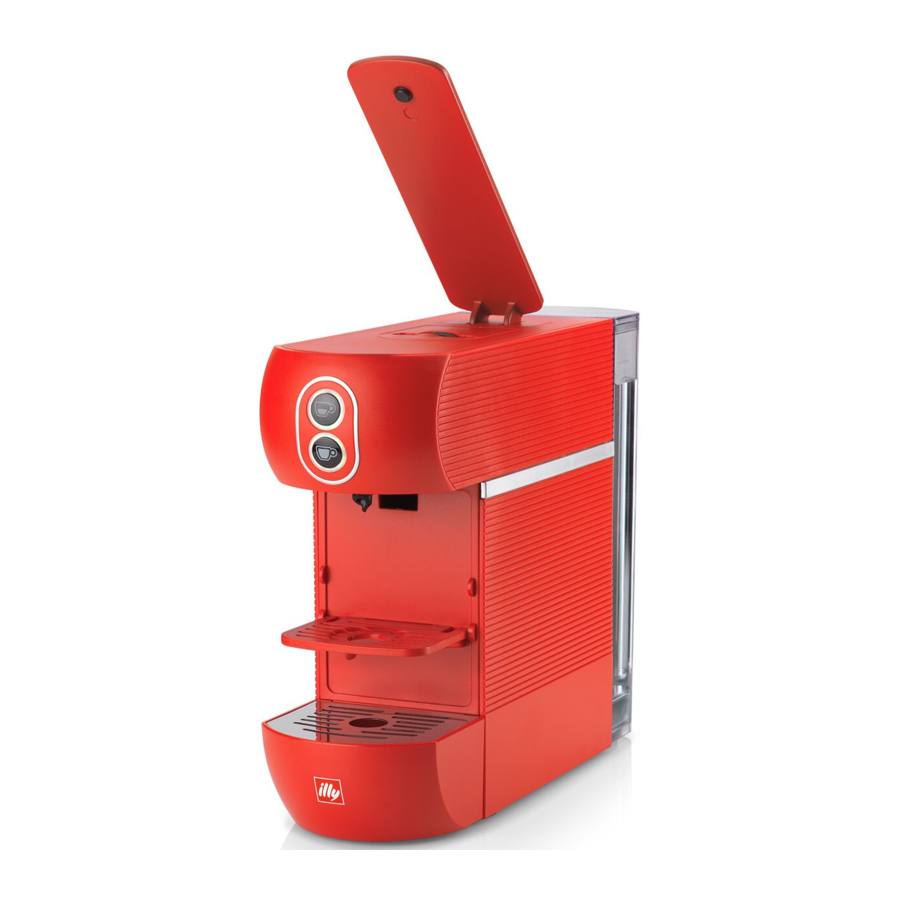
- 1 MACHINE PARTS
- 2 STARTING THE APPLIANCE/HEATING
- 3 RINSING OF INTERNAL CIRCUITS
- 4 MAKING COFFEE
- 5 PROGRAMMING THE COFFEE TEMPERATURE
- 6 PROGRAMMING THE DELIVERY VOLUME
- 7 MAINTENANCE
- 8 REPAIRS
- 9 CLEANING
- 10 DESCALING
- 11 PROBLEM - CAUSE - SOLUTION
- 12 GENERAL MACHINE OPERATING RULES
- 13 TECHNICAL SPECIFICATIONS
- 14 IMPORTANT SAFETY MEASURES
- 15 Documents / Resources
MACHINE PARTS

- E.S.E. COFFEE POD HOLDER OPEN/CLOSE LEVER
- BREW BUTTONS:
![]() ESPRESSO COFFEE
ESPRESSO COFFEE![]() LONG COFFEE
LONG COFFEE
- MAIN SWITCH
- DELIVERY SPOUT
- DRIP GRID
- DRIP TRAY WITH CONTAINER FOR USED E.S.E. PODS (PULL-OUT)
- POWER CABLE
- WATER TANK
- ESPRESSO CUP SUPPORT
 ESPRESSO COFFEE
 LONG COFFEE
STARTING THE APPLIANCE/HEATING
- Remove the cover of the tank.
To remove the tank, press it downwards while simultaneously pushing it outwards.
![]()
- Fill the tank up to the maximum level indicated (MAX).
![]()
- Insert the tank by tilting it slightly and placing it on the water valve. Press the upper part into the machine until a click is heard. Refit the cover.
![]()
![]()
Make sure that the tank is properly inserted to avoid water leaks. - Connect the machine by fitting the plug into the socket.
![]()
- Turn the machine ON using the main switch. The machine is ON when the main switch lights up.
![]()
- Buttons
![]() and
and ![]() flash intermittently; when they stop flashing and remain illuminated, the machine has reached the correct temperature and is ready for use.
flash intermittently; when they stop flashing and remain illuminated, the machine has reached the correct temperature and is ready for use.
![]()
When the machine is in the heating stage (delivery buttons flashing), it cannot deliver coffee.
![]()
Once the initial heating is complete, the machine will clean the system by dispensing a small amount of water. Do not place your hands near the coffee dispenser spout. Once this operation is complete, the machine is ready to dispense coffee.


Power saving function
- The machine is equipped with a system that allows it to switch to reduced energy consumption mode.
- If the machine remains switched ON without being used, it switches off automatically.
- To use the machine again, press the main switch and wait for the machine to heat up again.
RINSING OF INTERNAL CIRCUITS
After the first use, or if the coffee machine has not been used for a long time, rinse the internal circuits by applying the following procedure:
- Make sure that there are no E.S.E.pods inside the machine, and switch it ON using the main switch.
![]()
- Close the espresso cup holder and place a large empty cup under the dispenser spout.
![]()
- When buttons
![]() and
and ![]() are illuminated and unblinking, the machine is ready to be used.
are illuminated and unblinking, the machine is ready to be used.
![]()
- Press the
![]() button; the machine will dispense water; press the
button; the machine will dispense water; press the ![]() button again. The rinsing operation is completed when at least three cups of water have been delivered.
button again. The rinsing operation is completed when at least three cups of water have been delivered.
![]()


Using cups
- Lower the support to prepare an espresso coffee correctly, and to use espresso cups.
![]()
- To use large cups, close the support and place the cup directly on the drip tray.
![]()


MAKING COFFEE
- It is recommended to use E.S.E. illy pods. The machine is optimised for extracting coffee from E.S.E. illy pods.
![]()
- Wait until buttons
![]() and
and ![]() are illuminated and unblinking.
are illuminated and unblinking.
![]()
- Lift the lever and insert the E.S.E. illy pod into the slot with the logo facing the lever. Check that the entire pod, with the exception of the tab, is inserted into the slot.
![]()
Before inserting the E.S.E. pod, slowly lift the lever as far as it will go in order to expel the used E.S.E. pod. To ensure correct hygiene and maintain high product quality, it is advisable to expel the E.S.E. pod immediately after the coffee is delivered.
To insert E.S.E. pods, the lever must be raised until it stays up on its own. To expel the E.S.E. pods, the lever must be fully raised. - Close the lever completely.
![]()
- Place the cup on the support under the dispenser spout.
![]()
- To dispense an espresso coffee, press the
![]() button. To dispense a long coffee, press the
button. To dispense a long coffee, press the ![]() button. If there is some difficulty in closing it, re-open the lever and close it again.
button. If there is some difficulty in closing it, re-open the lever and close it again.
![]()


After delivering 10 successive cups of coffee, wait for at least 2 minutes before preparing another coffee.
The machine is designed for single deliveries with a maximum duration of 75 seconds.
Hint
- To prepare a good cup of espresso coffee, use thick, ready-warmed espresso cups if possible, to prevent the coffee from cooling down too quickly. Espresso cups can be warmed by dispensing hot water from the dispenser nozzle into the cup.
- Use E.S.E. illy pods for espresso coffee, pressing the
![]() button. Use E.S.E. illy pods for long espresso coffee, pressing the
button. Use E.S.E. illy pods for long espresso coffee, pressing the ![]() button.
button.
After making a cup of coffee, the used E.S.E. pod must be expelled as follows:
- Lift the opening/closing lever fully (the E.S.E. pod will fall into the relative container).
![]()
![]()
in the interests of hygiene, it is advisable to remove the E.S.E. pod at the end of each delivery and dispense a small amount of water to remove any residue.
The specific E.S.E. pod container can hold up to 9 used E.S.E. pods. Empty this container on a regular basis. - If you want to make another coffee, fit a new E.S.E. pod and repeat the procedure, otherwise close the lever.

The used E.S.E. pod drawer can hold a maximum of 9 E.S.E. pods, so it is advisable to empty it regularly to prevent the E.S.E. pods from getting stuck.
- To perform this operation, remove the tray and separate it from the E.S.E. pod drawer by pushing it downwards; be aware that there may be liquid in the tray.
![]()
- Empty the drawer and rinse and dry the components before replacing them in their housings.
![]()


PROGRAMMING THE COFFEE TEMPERATURE
- Turn the machine OFF using the main switch.
![]()
- With the machine off, press the
![]() button 5 times to access the temperature change function. The
button 5 times to access the temperature change function. The ![]() and
and ![]() buttons will begin to flash.
buttons will begin to flash.
![]()
- Press the
![]() button to increase the temperature by 3 degrees. Press the
button to increase the temperature by 3 degrees. Press the ![]() button to decrease the temperature by 3 degrees.
button to decrease the temperature by 3 degrees.
![]()
PLEASE NOTE: The factory-set temperature can be increased and/or reduced by 3°C or 6°C. - After 5 seconds without any other action being carried out, both
![]() and
and ![]() buttons will flash for 2 seconds, after which the machine will exit the temperature change function.
buttons will flash for 2 seconds, after which the machine will exit the temperature change function.
![]()
- The new set temperature will then be stored for subsequent dispensing.
![]()


Coffee temperature set indicator:
Both  and and  buttons flash. buttons flash. | The set temperature corresponds to the factory temperature. |
Only the  button flashes slowly (0.5 secs). button flashes slowly (0.5 secs). | The set temperature has been increased by 3°C compared to the factory settings. |
Only the  button flashes quickly (0.2 secs). button flashes quickly (0.2 secs). | The set temperature has been increased by 6°C compared to the factory settings. |
Only the  button flashes slowly (0.5 secs). button flashes slowly (0.5 secs). | The set temperature has been decreased by 3°C compared to the factory settings. |
| Only the button flashes quickly (0.2 secs). | The set temperature has been decreased by 6°C compared to the factory settings. |
PROGRAMMING THE DELIVERY VOLUME
Follow the instructions given in the "starting the appliance/heating" paragraph.
Adjusting the volume of an espresso coffee:
Press and hold the ![]() button. The machine will start delivering coffee. Once the desired quantity is reached, release the
button. The machine will start delivering coffee. Once the desired quantity is reached, release the ![]() button. The machine will then stop dispensing coffee and the amount will be stored for subsequent deliveries.
button. The machine will then stop dispensing coffee and the amount will be stored for subsequent deliveries.

Adjusting the volume of a long espresso coffee:
Press and hold the ![]() button. The machine will start delivering coffee. Once the desired quantity is reached, release the
button. The machine will start delivering coffee. Once the desired quantity is reached, release the ![]() button. The machine will then stop dispensing coffee and the amount will be stored for subsequent deliveries.
button. The machine will then stop dispensing coffee and the amount will be stored for subsequent deliveries.

The factory-set volumes and temperatures are optimised for the best extraction of illy espresso ![]() and illy long espresso
and illy long espresso ![]() coffee.
coffee.
MAINTENANCE
If the machine is not going to be used for a long time, dispense a small amount of water, turn it OFF, unplug it from the power supply and empty the tank.
Store the appliance in a dry place, away from dust and out of reach of children.
It is advisable to store the appliance in its original packaging.
Store the machine at a temperature not lower than 5°C to prevent any residues of water from freezing and damaging the appliance.
REPAIRS
In the event of faults, malfunctions or a damaged power cable, do not attempt to repair the appliance yourself but contact qualified personnel. Never attempt to operate a defective or damaged machine. Only authorised service centres may carry out interventions and repairs. The manufacturer declines any and all responsibility for damage to things and/or persons that may occur as a result of adaptations, modifications or repairs that are improvised or not carried out by qualified personnel.
CLEANING
Performing correct and regular maintenance of the coffee machine ensures better performance over time and a longer lifespan.
Disconnect the switches and remove the plug from the socket before performing any cleaning operation.
Never immerse the appliance in water. Clean it exclusively with a damp cloth using non-abrasive detergents and dry it immediately.
The components (grille, drip tray, E.S.E. pod drawer and water tank) can be washed by hand using non-abrasive detergents or in a medium temperature dishwasher.
DESCALING
Limescale accumulation is a normal result of machine use. The machine has an automatic programme that helps optimise cleaning and removes scale deposits from the interior.
If the descaling procedure is not carried out, scale may cause malfunctions that are not covered by the warranty.
If the dispensing buttons flash in alternation, the machine must be descaled.
PLEASE NOTE:
- Make sure that there are no E.S.E. pods inside the machine.
- If there is a voltage drop or the machine is switched off, the cycle continues from where it was stopped when switched on again.
- Do not lift the lever when descaling or rinsing.
Descaling procedure:
- Turn the machine OFF using the main switch.
![]()
- Fill the tank with 0.6 lt of fresh water and add the descaling solution. Make sure that the descaling solution has fully dissolved in the water in the tank.
![]()
- Place a container of at least 0.6 lt under the dispenser.
![]()
- Turn the machine off by pressing the
![]() button for 5 seconds. The
button for 5 seconds. The ![]() button flashes.
button flashes.
![]()
- The
![]() button flashes. The machine begins dispensing water in an alternating cycle. The
button flashes. The machine begins dispensing water in an alternating cycle. The ![]() button flashes.
button flashes.
![]()
- At the end of the descaling cycle, the button
![]() is steady on while the button
is steady on while the button ![]() is flashing. Remove the container and empty it.
is flashing. Remove the container and empty it.
![]()
- Remove the tank, rinse it and fill with fresh water. Reinsert the tank with fresh water into the machine.
![]()
- Place a container of at least 0.6 lt under the dispenser.
![]()
- Press the
![]() button to start the rinse cycle. The
button to start the rinse cycle. The ![]() button is steady on while the
button is steady on while the ![]() button flashes.
button flashes.
![]()
- The machine automatically interrupts the rinsing cycle. The
![]() and
and ![]() buttons flash simultaneously.
buttons flash simultaneously.
Remove the container and empty it.
Wait until the![]() and
and ![]() buttons are steady on. The machine is now ready for use.
buttons are steady on. The machine is now ready for use.
![]()


PROBLEM - CAUSE - SOLUTION
| Problem | Cause | Remedy |
| The machine does not turn on. | The plug is not inserted correctly. | Make sure that the plug is inserted in a socket supplying voltage and that the main switch is pressed. |
| Faulty components. | Contact the service centre. | |
| The machine brews coffee slowly. | Internal components clogged with scale. | Descale the machine as described in the specific paragraph. |
| The machine switches ON but does not brew coffee. | The water tank is empty or fitted incorrectly. | Make sure that the water tank is correctly inserted in its housing and that it contains sufficient water. |
| Open/close lever not fully closed. | Make sure that the open/close lever is fully closed. | |
| Faulty pump. | Check that the pump delivers water: after pressing the  button, a vibration should be felt. This indicates that the pump is working correctly. button, a vibration should be felt. This indicates that the pump is working correctly.If no vibration is felt, contact the service centre. If the vibration is felt but the machine does not start to deliver coffee, repeat the operation 2/3 times at intervals of a few minutes. If the machine still does not deliver coffee at the end of this procedure, contact the service centre. | |
| Hydraulic components clogged with scale. | Perform descaling. If the problem persists, contact the service centre. | |
| The machine has turned OFF automatically. | This is not a defect. | It is a programmed power saving mode: the machine is designed to turn OFF automatically. |
| The machine vibrates a great deal and is noisy. | Insufficient water level in the tank. | Strong vibrations are caused by the pump that is unable to draw water correctly. Restore the correct water level in the tank. |
| The E.S.E. pod cannot be inserted in the coffee machine. | The E.S.E. pod is not compatible. | Make sure you are using a compatible E.S.E. pod. |
| The E.S.E. pod is not inserted correctly. | Insert the E.S.E. pod, ensuring it is facing the right way. | |
| Used E.S.E. pod holder full. | Check whether the used E.S.E. pod holder contains too many used E.S.E. pods and cannot accept any more. Empty it if necessary. | |
| If the defect persists, contact the service centre. | ||
| The E.S.E. pod is not retained in the brewing unit and falls directly into the used E.S.E. pod container. | Open/close lever not fully open. | Open the open/close lever completely, recover the unused E.S.E. pod from the used E.S.E. pod container and insert it again. If the defect persists, contact the service centre. |
| After inserting the E.S.E. pod into the brewing unit, the open/close lever cannot be closed. | The E.S.E. pod is not aligned with the brewing unit. | Open the open/close lever again and then re-close it completely. If the defect persists, contact the service centre. |
| Used E.S.E. pod holder full. | Check whether the used E.S.E. pod holder contains too many used E.S.E. pods and cannot accept any more. Empty it if necessary. | |
| The coffee delivered by the machine is cold. | The E.S.E. pod was inserted before the and buttons came ON steady. | Insert the E.S.E. pod when the and buttons come ON steady. |
| Faulty boiler. | Contact the service centre. | |
| The E.S.E. pod is not expelled correctly. | The E.S.E. pod is jammed in the brewing unit. | Re-close the open/close lever and then open it slowly again. |
Press the  button and while water is being dispensed, slowly open the open/close lever. button and while water is being dispensed, slowly open the open/close lever. | ||
| Used E.S.E. pod holder full. | Check whether the used E.S.E. pod holder contains too many used E.S.E. pods, preventing the E.S.E. pods from being expelled. Empty it if necessary. | |
| If the defect persists, contact the service centre. | ||
| Single drops fall from the spout at the end of delivery. | This is not a defect. | A few drops falling at the end of delivery is normal. |
| The delivery of coffee does not stop even if you press the delivery button. | Faulty components. | Disconnect the plug from the socket and contact the service centre |
| The coffee delivered has a sour taste. | The machine was not rinsed correctly after descaling. | Rinse the machine again. |
| Using E.S.E. pods after the best-before date. | Check the best-before date on the E.S.E. pods. | |
GENERAL MACHINE OPERATING RULES
Before using this coffee machine, read the manual carefully and keep it safely for future reference.
The use and maintenance manual ensures that the appliance is used safely in an informed manner and also describes all its functions. Bear in mind that good and especially safe operation of the machine also depends on knowledge of the appliance and correct maintenance over time.
The manufacturer declines any and all responsibility in the event of incorrect use in relation to the information provided, as well as adaptations, modifications or repairs that are improvised or not performed by qualified personnel. Such incorrect use will render the warranty provided for the device null and void.
If faults or manufacturing defects are found on the appliance, contact the point of sale where the it was purchased together with the receipt.
TECHNICAL SPECIFICATIONS
Mod. 626
Power supply voltage: 220-240 V / 50-60 Hz
Pump: 48 W / 230 V CL. F NSF BAR 20
Appliance power: 800 W
Length of power cable: 1 m
Tank capacity: 1l Power saving function
Safety devices
Safety thermal fuse
IMPORTANT SAFETY MEASURES
- Place the coffee machine on a flat, dray and stable surface suitable for withstanding weight and heat away from sources of water and heat.
- Do not place it on top of other household appliances (washing machines, dishwashers, refrigerators, etc.).
- Never set it up or leave it outside.
Avoid risks of electrical shocks and fires:
- Connect the coffee machine exclusively to a suitable mains connections complete with an earth/ground connection. Check that the voltage shown on the appliance's ID plate matches the power supply voltage.
- Never use an appliance if the cable or plug is damaged, after a machine malfunction or after damage of any kind. Contact authorised service centres to check, repair or verify correct operation.
- If the power cable is damaged, it must only be replaced by the manufacturer or an authorised service centre.
- Never pass the power cable around corners or over sharp edges. Keep it away from sources of heat and moisture.
- To avoid damage, never place the coffee machine next to or on warm shelves (heaters, cooking tops, gas burners, etc.).
- If the appliance is not to be used for long periods, disconnect it from the power supply.
- To avoid damage, disconnect the coffee machine by pulling on the plug and not on the power cable; never carry the appliance by holding it with the power cable.
- Never touch the power cable with wet hands.
- Do not expose the machine to jets of water or immerse partially or completely in water. Water in the presence of electricity is a source of danger and may cause electric shocks.
- Never implement any technical modifications to the coffee machine.
Always unplug the power cable from the power socket:
- Before removing or inserting the water tank.
- To fill the tank with water.
- When the appliance is not to be used for an extended period of time.
- If the machine is faulty.
- Before cleaning the appliance.
Avoid risks during operation:
- This coffee machine is intended to be used in domestic and similar applications, such as:
- in cooking areas reserved for personnel in shops, offices and other professional environments;
- on holiday farms;
- use by guests in hotels, motels and other residential venues;
- in contexts such as bed and breakfast accommodation.
- Exclusively use this coffee machine as described in these instructions.
- This appliance may be used by children over the age of 8 years if supervised by adults or instructed about safe use and provided they are aware of the risks entailed. Keep the appliance and the power cable out of reach of children.
- Make sure that no child is able to play with this coffee machine by leaving it within reach.
- This appliance can be used by people with reduced physical, sensory or mental capacities or with insufficient experience and/or skills provided they are supervised or instructed how to use the appliance safely and are aware of the risks entailed.
- Steam and hot water can cause scalds/burns! Never insert your fingers under the coffee dispenser while the machine is operating.
- Always re-close the lever and do not open it while the appliance is delivering coffee. Risk of scalds/burns.
- Do not insert your fingers inside the E.S.E. coffee pod holder. Risk of injury.
- Do not use damaged or deformed E.S.E. coffee pods. This could damage the appliance.
- Do not use the coffee machine without the drip tray to avoid leaks of liquid.
Avoid damaging the machine:
- Fill the tank exclusively with drinking water; never use sparkling water or other liquids.
- To prevent no-load operation of the pump and overheating, always make sure that the tank contains sufficient water before starting the appliance.
We accept no responsibility/liability for any damage caused by:
- Incorrect use that does not comply with the intended purposes;
- Repairs not performed by authorised service centres;
- Tampering with the power cable;
- Tampering with any machine component;
- The use of non-original spare parts and accessories;
In such cases, the warranty will be null and void
Documents / ResourcesDownload manual
Here you can download full pdf version of manual, it may contain additional safety instructions, warranty information, FCC rules, etc.
Advertisement


Need help?
Do you have a question about the ESE and is the answer not in the manual?
Questions and answers