Advertisement
PARTS & ACCESSORIES

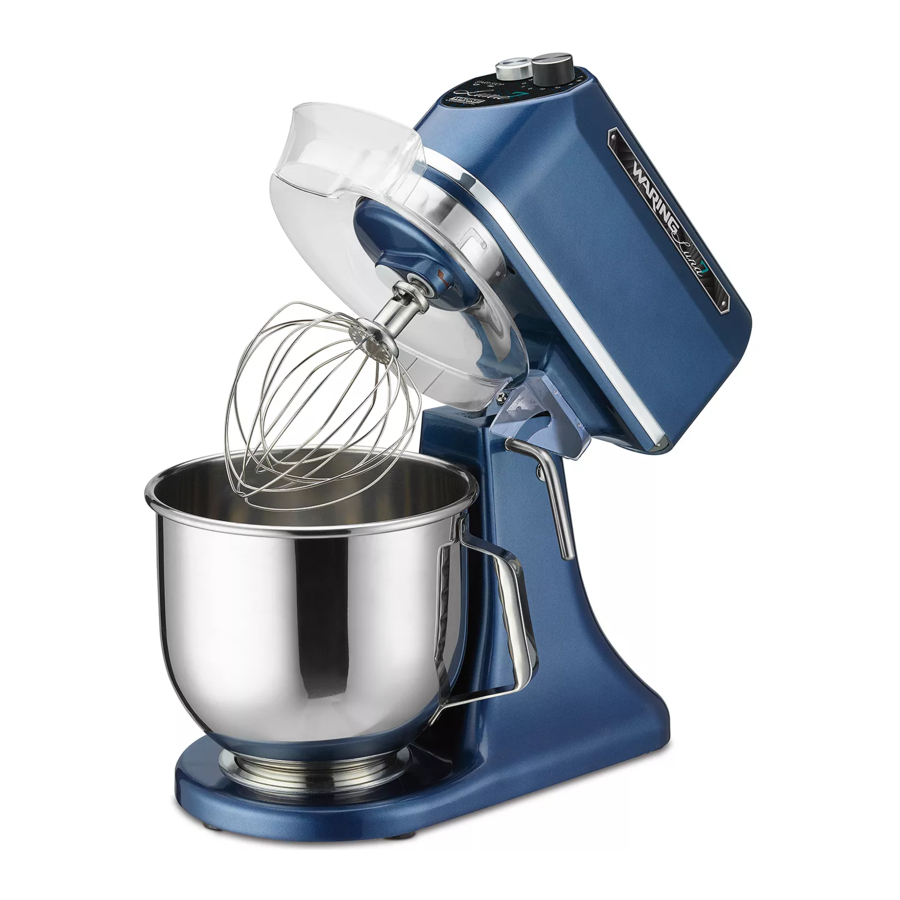
- Tilt-Back Head
Makes it easy to attach accessories and scrape sides of bowl. - 7-Quart Stainless Steel Bowl with Handle
Handle makes the bowl easy to hold, scrape and remove. Oversized bowl lets you mix larger quantities. - Head-Lift Release Lever
Securely locks stand mixer head into raised, tilt-back position and into lowered, mixing position. - Speed Control Dial
11 speeds for precision mixing. - START/STOP Button
- Chef's Whisk
Used for incorporating air into ingredients/mixtures. Most frequently used for whipping eggs, egg whites or heavy cream. The chef's whisk would be used in recipes for angel food cake, chiffon cake, meringue or dacquoise, and for whipping potatoes after they have been mashed using the flat mixing paddle. - Flat Mixing Paddle
Used for stirring, mixing, beating ingredients/mixtures. Most frequently used for mixing cookies, cakes, batters (use flat mixing paddle to start the batter for yeast breads, then switch to dough hook for a more evenly mixed dough), and frostings. It is also used for making pie crusts, biscuits, shortcakes, dough for pasta, combining ingredients for meatloaf or meatballs, and mashing potatoes. - Dough Hook
Used for the final mixing and kneading of yeast doughs for breads, rolls, pizza/focaccia, and yeast-raised coffee cakes. - Splash Guard with Feed Chute
Prevents spattering when mixing and adding ingredients. - Accessory Shaft
For use with chef's wisk, mixing paddle and dough hook. - Manual Reset Button
If overloaded, the unit will shut down to protect the motor. Unplug the unit from the wall and allow unit to sufficiently cool down. Once cooled down, plug back into the wall. The manual reset will need to be pushed in order to allow the machine to operate again. - Power Indicator Light (not shown)
- Finger Guard
Should be left in place at all times.
ASSEMBLY INSTRUCTIONS
- Raise Mixer Head – Rotate the head-lift release lever counterclockwise and raise the stand mixer head. Lock by rotating lever clockwise.
- Attach Accessory – Press flat mixing paddle, chef's whisk or dough hook firmly onto the accessory shaft. Turn counterclockwise until it locks. Turn clockwise to remove.
- Place Bowl on Base – Turn clockwise to secure.
- Lower Mixer Head – Rotate lever counterclockwise to loosen and fully lower the mixer head. Rotate lever clockwise to lock head into mixing position.
- To Attach Splash Guard – Before attaching an accessory, raise stand mixer head. Position tabs and slide splash guard onto mixer hub, then rotate to lock into position.
To remove: Raise the stand mixer head. Rotate, then slide splash guard down.
NOTE: You do not need to remove splash guard to change accessories.
OPERATING INSTRUCTIONS
To Turn Stand Mixer ON
- Turn control dial to desired speed – 1 through 11 (see speed control section below).
- Press the START/STOP button.
To Turn Stand Mixer OFF
- Press the START/STOP button – mixing process stops and unit shuts off.
CLEANING AND MAINTENANCE
Unplug your Waring Commercial Stand Mixer before cleaning.
Power Unit: Wipe with a damp cloth and dry. Never use abrasives or immerse in water.
Bowl: Wash by hand and dry thoroughly or put in dishwasher. Never use a wire brush, steel wool or bleach.
Mixing Attachments: These are made of stainless steel and are dishwasher safe.
Splash Guard with Feed Chute: Top rack dishwasher safe; you may also wash it by hand and dry it thoroughly.
NOTE: Any other servicing should be performed by an authorized service representative.
SUGGESTED SPEED CONTROL
| 1 |
| 7 |
|
| 2 |
| 8 |
|
| 3 |
| 9 |
|
| 4 |
| 10 |
|
| 5 |
| 11 |
|
| 6 |
|
MAXIMUM CAPACITIES FOR YOUR UNIT
The following maximum capacities are intended as a guideline only. Varying factors, such as the type of flour used, temperature of water used and other conditions may require the batch to be reduced.
Some helpful weights and measures follow: 2.0 lb. = 1 quart & 8.3 lb. = 1 gallon water
| Product Description | Accessory | Speed | Max. Capacity |
| Bread and roll dough (final weight) | Dough hook | 1st speed only | 4 lb. |
| Pizza dough (final weight) | Dough hook | 1st speed only | 3 lb. |
| Pie crust | Flat beater | 4–6 | 4 lb. |
| Mashed potatoes | Flat beater | 5–9 | 4 lb. |
| Cake batter | Flat beater | 6–9 | 6 qt. |
| Waffle or pancake batter | Flat beater | 6–9 | 6 qt. |
| Pound cake batter | Flat beater | All speeds | 6 qt. |
| Whipped egg whites | Chef's whisk | 11 | 1 dozen |
| Meringue | Chef's whisk | 11 | 1 dozen egg whites |
| Whipped cream | Chef's whisk | 10 | 2 qt. |
*NOTE: The mixer capacity depends on the moisture content of the dough. When mixing doughs (pizza, bread, or bagel), check your AR% (% Absorption Ratio) = Water weight divided by flour weight. The capacities listed above are based on flour at room temperature and 70°F water temperature. (1 gallon of water weighs 8.3 lb.).
 Maximum mixing time - 7 minutes.
 If high-gluten flour is used, reduce the batch size by 10%.
 If using chilled flour, water below 70°F, or ice, reduce batch size by 10%.
![]() 2nd speed should never be used on 50% AR or lower.
2nd speed should never be used on 50% AR or lower.
IMPORTANT SAFEGUARDS


When using an electrical appliance, especially when children are present, basic safety precautions should always be taken to reduce the risk of fire, electric shock and/or injury, including the following:
- READ ALL INSTRUCTIONS BEFORE USING.
- Switch off and unplug before fitting or removing tools and/or attachments, after use and before cleaning.
- Close supervision is necessary when any appliance is used by or near children or individuals with certain disabilities. Waring does not recommend the use of this appliance by children.
- Avoid contact with moving parts and fitted attachments. Keep hands, hair, clothing, as well as spatulas and other utensils, away from beaters during operation to reduce the risk of injury to persons and/or damage to the mixer.
![burn hazard]()
![shock hazard]()
The use of attachments not recommended or sold by Waring may cause fire, electric shock or injury.- Do not use more than one attachment at a time.
- Do not exceed the maximum capacities listed in this use and care instruction book.
- Do not use the stand mixer if it is damaged or if the cord is damaged. Have the stand mixer checked and serviced before resuming use.
- When using an attachment, make sure that you have read the safety instructions that come with the particular attachment.
- Do not use outdoors.
- Keep stainless steel bowl away from heat sources such as stovetops, ovens or microwaves.
![shock hazard]() To protect against the risk of electric shock, do not put the power unit in water or other liquids.
To protect against the risk of electric shock, do not put the power unit in water or other liquids.- Remove all attachments and accessories from stand mixer before washing.
- Do not let cord hang over edge of table or counter.
SAVE THESE INSTRUCTIONS
FOR COMMERCIAL USE ONLY
NOTE: The maximum rating is based on the attachment that draws the greatest power. Other recommended attachments may draw significantly less power.

RISK OF FIRE OR ELECTRIC SHOCK
DO NOT OPEN
TO REDUCE THE RISK OF FIRE OR ELECTRIC SHOCK,
DO NOT REMOVE COVER (OR BACK)
NO USER-SERVICEABLE PARTS INSIDE
REPAIR SHOULD BE DONE BY AUTHORIZED SERVICE PERSONNEL ONLY
RISK OF FIRE OR ELECTRIC SHOCK
The lightning flash with an arrowhead symbol within an equilateral triangle is intended to alert the user to the presence of uninsulated, dangerous voltage within the product's enclosure that may be of sufficient magnitude to constitute a risk of fire or electric shock to persons.
 The exclamation point within an equilateral triangle is intended to alert the user to the presence of important operating and maintenance (servicing) instructions in the literature accompanying the appliance.
GROUNDING INSTRUCTIONS
This appliance must be grounded while in use to protect the operator from electric shock. The appliance is equipped with a 3-conductor cord and a 3-prong, grounding-type plug to fit the proper grounding-type receptacle. The appliance has a plug that looks like the plug in drawing (1). An adapter, as in drawing (2), should be used for connecting the appliance plug to twoprong receptacles. The grounding lug, which extends from the adapter, must be connected to a permanent ground, such as a properly grounded outlet box as shown in drawing (3), using a metal screw.

SPECIAL CORD SET INSTRUCTIONS
A short power-supply cord is provided to reduce the risks resulting from becoming entangled in or tripping over a longer cord.
Longer extension cords are available and may be used if care is exercised in their use.
If a long extension cord is used, the marked electrical rating of the extension cord must be at least as great as the electrical rating of the appliance, and the longer cord should be arranged so that it will not drape over the countertop or tabletop where it can be pulled on by children or tripped over.
EXTENSION CORDS
Use only 3-wire extension cords that have 3-prong, grounding-type plugs and 3-pole cord connectors that accept the plug from the appliance. Use only extension cords that are intended for indoor use. Use only extension cords having an electrical rating not less than the rating of the appliance. Do not use damaged extension cords. Examine extension cord before using and replace if damaged. Do not abuse extension cord and do not yank on any cord to disconnect. Keep cord away from heat and sharp edges.
LIMITED ONE YEAR WARRANTY
(U.S. and CANADA Only)
Under this warranty, Waring will repair or replace any part which, upon our examination, is defective in materials or workmanship, provided the product is delivered prepaid to the Waring Service Center at 314 Ella T. Grasso Ave., Torrington, CT 06790, or any Factory Approved Service Center.
WARING COMMERCIAL
314 Ella T. Grasso Ave.
Torrington, CT 06790
Documents / ResourcesDownload manual
Here you can download full pdf version of manual, it may contain additional safety instructions, warranty information, FCC rules, etc.
Download WARING COMMERRCIAL Luna7 WSM7L - 7-Quart Planetary Mixer Manual
Advertisement


Need help?
Do you have a question about the COMMERCIAL Luna7 WSM7L and is the answer not in the manual?
Questions and answers