Table of Contents
Advertisement
Quick Links
Advertisement
Table of Contents

Related Manuals for Cantek MX370M


Summary of Contents for Cantek MX370M
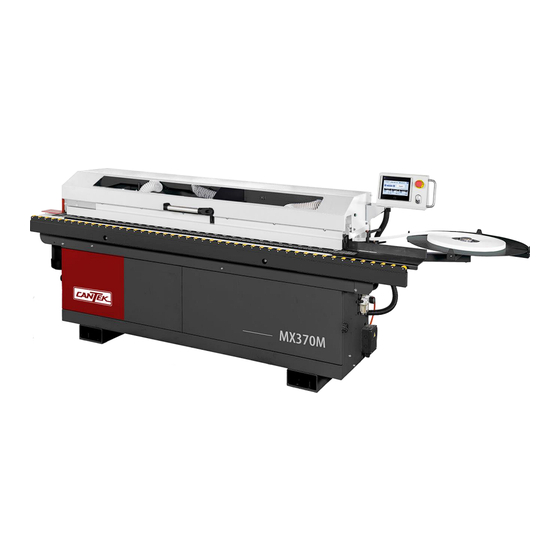
- Page 1 Operations & Parts Manual www.cantekamerica.com MX370M Edgebander Please ensure you have your serial number available when contacting us for parts or service. Cantek America Inc. | 1.888.982.2683 | Parts: sales@cantekamerica.com | Service: service@cantekamerica.com...
-
Page 2: Table Of Contents
MAX370M Table of Contents GENERAL INFORMATION ..................... 5 SAFETY PRECAUTIONS ......................7 MACHINE INFORMATION ....................10 Specification ..........................10 Machine structure ......................... 11 ..............................12 INSTALLATION ........................13 Install coil support frame ......................13 Connection of the pneumatic system ................... 13 Connection of the electric system .................... - Page 3 MAX370M 5.11 Flat scraping unit (optional – air cylinder type)................28 5.11.1 Cutting stoke adjustment ........................... 28 5.12 Flat scraping unit (optional – spring type) ..................29 5.12.1 Cutting stoke adjustment ........................... 29 5.13 Pre-milling unit (standard motor) ....................30 5.13.1 Usage tips ..............................
- Page 4 MAX370M 6.12.1 Replace fuses .............................. 45 6.12.2 Reset motor circuit breaker ........................45 TROUBLESHOOTING ......................46 Alarm message ..........................46 Motor ............................. 47 Panel feeder ........................... 47 Working temperature ........................47 Glue spindle ........................... 47 End trimmer & Corner rounder ..................... 48 Flush trimmer ..........................
- Page 5 MAX370M Revision Date Version Description...
-
Page 6: General Information
MAX370M 1. General Information All of content in this manual book was applied by supplier, ensure you understand every step during operation. If you need more information or service, please contact your local agent for help. Provide the following information (solve your problem faster): ... - Page 7 MAX370M Location of machine The machine is delivered with a thermal shrined nylon protection for transport, some parts of the machine are detached. Locate the machine in a suitable place, considering the overall dimensions of the machine, space needed for stacking, loading and offloading work-pieces leaving sufficient space for the operator. The machine base must be lay on a solid surface and well leveled.
-
Page 8: Safety Precautions
MAX370M 2. Safety Precautions 1. Read instruction manual before operating the machine for your safety. People who operate the machine must read and understand how to use the safety measures, and execute the regulation stated in this manual. Learn the application and limitations of the machine. - Page 9 MAX370M conditions that may affect its operation. A guard or other part that is damaged should be properly repaired or replaced. 14. Disposing of wasted material. Disposing waste material and waster lubricating oil shall obey the local regulation and be careful.
- Page 10 MAX370M 28. The maximum rotation speed marked on the saw blade must not be exceeded. 29. The machine shall not be loaded with more than work piece at a time. 30. During making wooden cases, it will emit harmful dust. User must install exhaust system for the extraction of harmful dust.
-
Page 11: Machine Information
MAX370M 3. Machine Information 3.1 Specification Model MAX370M Conveyor speed 7 M/min. Panel thickness 12 - 45 mm Edge thickness 0.4 - 3 mm Min. panel width 90 mm Min panel length (12-30mm) 170 mm / (30-45mm) 220mm Working table height 856 mm Extensible support width 560 mm... -
Page 12: Machine Structure
MAX370M 3.2 Machine structure Control Panel / Touch Panel Feeding system and Guillotine shear Coil support with support frame End trimming + Corner rounding unit RFL system 10 Flush trimming unit Electrical box 11 Radius scraper Dust collection hole 12 Buffing unit Pre-milling unit Glue Pot &... - Page 13 MAX370M...
-
Page 14: Installation
MAX370M 4. Installation 4.1 Install coil support frame Coil support frame is separated from main machine before shipping. Please install support frame when you ready to test. Put frame A against main machine and locked by Screw D. Put coil support plate on the frame A and secured by set screw and double nuts. 4.2 Connection of the pneumatic system This RFL system (Regulator, Filter, Lubrication) is situated below the feeding motor. -
Page 15: Connection Of The Electric System
MAX370M Regulator Lubrication Filter 4.3 Connection of the electric system Please look up the electrical scheme enclosed. ATTENSION: The electrical connections of the machine must be exclusively carried out by qualified and authorized personnel able to choose the most suitable section of electric wires. Therefore, you need to know the total power installed and the total current needed to choose the section of the cables. -
Page 16: Connection Of The Dust Suction System
MAX370M Check conveyor direction 1. Turn on the machine, press “Conveyer” on the control panel. 2. Ensure conveyor move forward. If the direction is incorrect, press emergency stop bottom immediately and move to step 3 to swap wirings. 3. Turn off power and exchange two wires (choose random 2 wirings from L1, L2, L3 to swap are equivalent to R, S, T). -
Page 17: Operation
MAX370M 5. Operation 5.1 Control panel (touch screen) An optimized program is installed into PLC which is useful to check functions and relative information. 5.1.1 Feature description Button ON Light on Button OFF A. Enable / disable working functions (Enable= Green, Disable= Grey) Click button to enable functions, press ON button to start machine. - Page 18 MAX370M a. Machine service – Operator and technician mode. - Corner rounding function Disable corner rounding if there’s problem on it. Press i to get further information. C. General Setting Time & Date, brightness, language setting. Press for 10 seconds to reset total working hours, total workpiece length, total workpiece number.
- Page 19 MAX370M D. Alarm message Each source message is decoded for display in the alarm summary. You can use this field for diagnostic purpose. For example, to ascertain which alarms are associated with a particular source, or how source data is passed between server and client. Press ...
-
Page 20: Edge Feeding
MAX370M G. Zeroing Zeroing refers to an axis initialization run during which the correct actual position is determined by means of a reference signal. This procedure is referred to as homing, referencing or calibration. H. Conveyor Enable conveyor motor. I. Glue Heating Heat up the glue pot to set temperature. -
Page 21: Pressure Beam
MAX370M 5.3 Pressure beam The position of the pressure beam can be read precisely on the digital counter. -
Page 22: Usage Tips
MAX370M 5.3.1 Usage tips 1. Loosen screw (A), and then loosen screw (B) before adjust the indicator (see the picture). 2. To avoid thread gap, ensure you turn the counter from small number to large number. For example, if the panel is 18mm and you start from 25mm, turn the counter less than 18mm (such as 16mm), then return to 18mm. -
Page 23: Guillotine
MAX370M 5.4.2 Adjustment of glue amount for current usage Turn the handle A clockwise to reduce glue amount; turn the handle A counterclockwise to increase glue amount. 5.5 Guillotine An automatic cylinder device used to cut edges. 5.5.1 Air pressure check – edge feeding Air pressure (RE04) should be 4.5 ����... -
Page 24: Pressure Roller
MAX370M 5.6 Pressure roller Iron roller at 90° and rubber contact roller form the contact zone. Depending on the edge thickness, the contact pressure can be adjusted manually by inserting the edge material. Need to double check pressure roller works properly when you replace edges. 5.6.1 Adjustment 1. - Page 25 MAX370M Right limit sensor: Right limit sensor would light on when the corner rounding unit reaches to this position. Front rounding sensor: Corner rounding unit moves accelerate forward against the bottom of the panel. When the unit pass the panel and ready to move upward, front rounding sensor would light off and the unit goes up.
-
Page 26: Auto Test (For Touch Panel)
MAX370M 5.7.2 Auto test (for touch panel) Lift up the pressure beam to 46mm. Press main menu -> press Cornerrounder test. Press Auto Test Under the normal conditions, every pointer in the diagram should point to green area. Green area means cylinder speed is correctly adjusted. Orange area means too fast, and red area means too slow. -
Page 27: Flush Trimming Unit
MAX370M Each valve regulator corresponds to specific cylinder speed adjustment. Figure 8.3.5 Figure 8.3.6 Forward Backward Down Adjust specific valve regulator as below sheet to ensure speed is in the suitable range. That is, ensure every pointer points to the green area. Pointer Action Too fast (Orange Area) - Page 28 MAX370M 5.8.2 Adjust the flush trimming copy disc CAUTION: put extra attention with the setting description here. The values provided here are recommended and should be tested by using sample panels. Note this setting was carried out in factory before delivery. ...
-
Page 29: Radius Scraping Unit
MAX370M 5.9 Radius scraping unit The radius surface receives a light scraping, removing any remaining from the trimming process and ensuring a smooth “finish”. The fine adjustment is manual. 5.9.1 General setting 1. Check the thickness of edge coils. 2. Turn knobs clockwise to increase trimming amount (2.0 mm as default), turn counterclockwise to decrease trimming amount. -
Page 30: Flat Scraping Unit (Optional - Spring Type)
MAX370M 3. Lock screw A and the corresponding screw on upper flat scrap. 5.12 Flat scraping unit (optional – spring type) Remove residual glue on the workpiece caused by squeeze-out. 5.12.1 Cutting stoke adjustment 1. Loose screw A for lower flat scrap. (Upper flat scrap is on the corresponding position.) 2. -
Page 31: Pre-Milling Unit (Standard Motor)
MAX370M 5.13 Pre-milling unit (standard motor) Two counter rotating, activation controlled and individually adjustable units with spiral cutters, that ensure first class edge processing before the workpiece is glued to the edge. After entering the exact dimensions, the pre-milling unit executes a perfect edge cut on your panels. 5.13.1 Usage tips a. - Page 32 MAX370M b. Turn the screws clockwise to decrease trimming amount; turn counterclockwise to increase trimming amount. c. Fasten the nuts. Rear pre-milling Front pre-milling...
-
Page 33: Maintenance
MAX370M 6. Maintenance 6.1 Maintenance schedule Daily Weekly Monthly ● Clean off sawdust on machine ● Glue Pot Capacity Check ● Visual check on damaged wires ● Visual check on damaged end-trimmer saws Visual check on damaged flush-trimmer ● blades Visual check on damaged radius-trimmer ●... - Page 34 MAX370M Press main menu button Press cutter button Adjust the edge feeding length (1) Adjust the edge feeding length on the front end Press the button(A), and key in the number. If customer wants to decrease the edge feeding length, increase the number of the distance by the same degree. For example, if the extra edge length on the front side is 20mm, and customer wants to modify it to 15mm, that is, customer needs to increase the distance by 5mm.
-
Page 35: Clean Glue Pot
MAX370M ※Note: Button(C) represents edge feeding timing. Front feeding length is not in proper. 1. Check sensor that is located behind the conveyor. Clean wood-stick or dust, if necessary. 2. Change the edge infeed parameters from touch screen and test. 6.3 Clean glue pot 6.3.1 Usage tips 1. - Page 36 MAX370M direction. And the chain(H) could thus been removed (Fig 6.3.D). After above procedures, customer could take the glue pot away. ※ Note: When assembling the glue pot back, ensure the pin(I) is inserted into the groove and thus the glue pot would be placed in the right position (Fig 6.3.E). Fig.
-
Page 37: Disassemble Glue Pot And Clean
MAX370M Fig. 6.3.E 6.3.3 Disassemble glue pot and clean ※Ensure glue shaft tilt to the right side to avoid glue leakage when you reassemble it.※ 1. Loosen 4 screws on Fig. 6.2.B. 2. Pull out heating element and glue upper set on Fig. 6.2.C 3. -
Page 38: Replace Glue Pot
MAX370M Glue upper set Heating element Fig. 6.2.C 6.3.4 Replace glue pot Follow 6.3.2 to remove old glue pot, and reverse assemble procedure to put new one. 6.4 Clean pressure roller Clean residue glue on pressure rollers with proper solvent, such as cleaning naphtha or WD40. -
Page 39: Flush Trimming Unit
MAX370M 6.5 Flush trimming unit 6.5.1 Clean back plates and wheels Clean residue glue on back plates and wheels with proper solvent, such as cleaning naphtha or WD40. 6.5.2 Replace blades Turn the machine off and make sure it cannot be turned on again. Remove the dust collecting hose. -
Page 40: Replace Belt
MAX370M 6.5.3 Replace belt 1. Loosen screw A (2 screws), do not remove. 2. Turn screw B counterclockwise until you can pull the belt out. 3. Insert new belt that goes through all rollers. 4. Turn screw B clockwise to retighten the belt tension. 5. - Page 41 MAX370M Fig.6.6.A Fig.6.6.B Fig.6.6.C Fig.6.6.D...
-
Page 42: Buffing Unit Replacement
MAX370M 6.7 Buffing unit replacement Replace both buffing unit at the same time, that would stay better performance as production. 1. Hold the wheel and turn clockwise to remove the nut A and flange B. 2. Replace new one and reassemble. 6.8 Pre-milling unit Warning: Before changing any blades, please press emergency stop and wait till the blades are all stop! -
Page 43: End Trimming & Corner Rounding Unit
MAX370M 6.9 End trimming & Corner rounding unit Warning: Before changing any blades, please press emergency stop and wait till the blades are all stop! 6.9.1 Replace cutter Connector 2. Take off screw B then 1. Loosen handle A and remove motor set. -
Page 44: Lubrication
MAX370M 6.10 Lubrication 6.10.1 Conveyor rail 1. Turn on the conveyor, then use grease gun with grease to lubricate the rail. 2. If there is no grease gun, stop the conveyor, pull up the chain pad and brush grease on the feeding chain rail. -
Page 45: Conveyor Chain Tension
MAX370M 6.11 Conveyor chain tension If conveyor is too loose to touch the machine body, it may cause feeding problem. 6.11.1 Tighten chain tension Adjust screws on both sides of the machine body. 1 Loosen screws(A) to remove the black cover. 2 Loosen screws(B) in the front side and screw(C) in the back side to remove the cover of the conveyor chain. -
Page 46: Fuses And Motor Breaker
MAX370M 2mm gap 6.12 Fuses and motor breaker Warning: Before doing any maintenance, disconnect power source and air input. 6.12.1 Replace fuses Fuse specification listed on the machine. Fuses specification list 6.12.2 Reset motor circuit breaker Most typically, circuit breakers trip because a circuit is drawing too much current for the amperage rating of the circuit breaker and the wired it feed. -
Page 47: Troubleshooting
MAX370M 7. Troubleshooting Please disconnect power and air input before you do any action Review the troubleshooting procedures in this section if problem occurred on your machine. If you need spare parts or additional help with procedures, please gather serial number and manufacture date of your machine before sending requests to us. -
Page 48: Motor
MAX370M 7.2 Motor Symptom Possible Case Solution 1. EMG1/2 bottom pressed. 1. Release EMG bottom and reset machine. 2. Cover does not close. 2. Close machine cover. Machine does not 3. Inadequate air pressure. 3. Ensure air pressure is above 7kg/cm (100PSI) start 4. -
Page 49: End Trimmer & Corner Rounder
MAX370M 4. Gear connection shaft stuck. 4. Adjust motor reducer connection plate. 1. Glue flow out of adjustment. 1. Adjust glue flow. 2. Glue not fully melted, temperature setting too 2. Adjust glue pot temperature according to glue low. manufacturer’s directions; confirm glue Glue spindle does 3. -
Page 50: Flush Trimmer
MAX370M 7.7 Flush trimmer Symptom Possible Case Solution Cutterhead does 1. Motor does not run. 1. Breaker trigger(QM4), refer to 6.12.2. not rotate 2. Belt is loose/damage/broken. 2. Check belt condition, replace if necessary. 1. Cutterhead does not properly adjusted. 1. - Page 51 QCE370M01 PART NAME SIZE ITEM PART NO. Q`TY NOTE Motor mounts group AB721994 Pressure wheel teeth group AB721947 Plastic bucket teeth group AB721811 Preheat set by the board AB720138 Motor Cord 0.5mm^2*4C IM722002 (CE, 380~415V) Motor Cord 20AWG*4C IM722022 S,(CSA, 220~240V)
- Page 52 QCE370M01 PART NAME SIZE ITEM PART NO. Q`TY NOTE Motor Cord 0.75mm^2*3C IM722032 S,(CE, 220~240V) IM722052 Motor Cord 16AWG*3C S,(CSA, 220~240V) Wave Tube NGN-12B-50 203475 700mm 203481 Nylon Box Connector N-MGN16-15B-ST Motor 380V 3~ 1HP MA721979 MA721979A Motor 220V 1~ 1 1/4HP Board adjustment group AB720184 M6*φ16*2t...
- Page 53 QCE350W22...
-
Page 54: Parts Name
QCE350W22 ITEM PART NO PARTS NAME SIZE Q`TY NOTE 0010 AB721010 Beam Seat Asm. 0020 WS080000 Spring Washer 0030 721802 Support Arm 0040 721323 Fixed Plate 0050 SM060500 Hex. Head Countersunk Screw M6x25 0060 SS069300 Set Screw M6*1*12 M6*φ16 0070 WF061620 Flat Washer 0080... - Page 55 QCE370M03 PART NAME ITEM PART NO. SIZE Q`TY NOTE AB722619 Edge of the height adjustment plate set The feed mechanism plate group AB720131A AB722614 Clutch cylinder group Feed rollers Group AB722602...
- Page 56 QCE370M03A...
- Page 57 QCE370M03A ITEM PART NO PARTS NAME SIZE Q`TY NOTE 0010 720862 Feeding Unit Upper Plate 0020 SR069300 Hex. Socket Screw M6*1*12 0030 AB722602-2 Infeed Rollers Asm. 0040 722607A 6061 0050 SR061400 Hex. Socket Screw M6*1*70 0060 722617 Quick Release Handle 42B-M6 0070 SR060400...
- Page 58 QCE340M04 PART NAME ITEM PART NO. SIZE Q`TY NOTE SC060500 Carriage bolts M6*1.0P*25L XX Cap Screw SR069300 M6*1.0P*12L WS060000 Spring Washer Guide plate 722606 721111 Class Screw Wheel 721108 SR0611003 Cap Screw M6*1.0P*55L Bush 722611 722617 Quick Release handle Pill Hex Socket Screws SJ060200 Spring plate 722612...
- Page 59 QCE370P05 QCE350M07 QCE370P05 PART NAME SIZE ITEM PART NO. Q`TY NOTE 722618 Fixed block Cutter group AB721101-8 721071 Lock nut Hex Nut NH061000 722124 Extension spring Cap Screw M6*1*20 SR060400 QCE350M07 PART NAME SIZE ITEM PART NO. Q`TY NOTE Disc ASM. AB722498 Fixing frame 722359...
- Page 60 QCE370M06...
- Page 61 QCE370M06 ITEM PART NO PARTS NAME SIZE Q`TY NOTE 0010 720838 Liner Slide Rail 240mm 0020 SR060400 Hex. Socket Screw M6*1*20 0030 NL081300 Nylon Nut M8*1.25 M8*φ18*t1.8 0040 WF081818 Flat Washer 0050 NH061000 0060 NL061000 Nylon Nut 0070 SR080700 Hex. Socket Screw M8*35 0080 SH060600...
- Page 62 QCE370M06 ITEM PART NO PARTS NAME SIZE Q`TY NOTE 0420 SR0830003 Hex. Socket Screw M8*1.25*150 0430 SS060400 Set Screw M6*1*20 0440 AB720224 E370M1 0460 722653 Reed Piece BS-25-S 0470 722652 Reed Switch KT-73R-S 0480 722659 0490 NH081304 M8*1.25*4t 0500 720332T 0510 SR060200 Hex.
- Page 63 QCE34006 PART NAME SIZE ITEM PART NO. Q`TY NOTE 721255 SPREAD GLUE SHAFT Ring 721246 φ46.5*φ3.0*0.6t 721247 Disc Washers Ring 721248 M25xφ35xt1 WF253510 Washer SPREAD GLUE BASE 722134 BB600500A Ball Bearing 6005ZZ Ring 721250 RR470000 C-Type Retaining Ring Ball Bearing 6005ZZ BB600502A 203198...
- Page 64 QCE340M06 ITEM PART NO PARTS NAME SIZE Q`TY NOTE 0010 AB722134-3 Glue Shaft Asm. 60MM 0020 SS069100 Set Screw M6*1*6 0030 722146 Sprocket V1.2 05B-12T...
- Page 65 QCE340M07 QCE340M08A QCE340M07 PARTS NAME SIZE ITEM PART NO Q`TY NOTE AB722137 Plastic bucket cover group Fixed Plate 721277 SR080200 Cap Screw M8*10L Heater 1200MM IC721275A 380V/S IC721275B Heater 1200MM 220V/S Plastic lids group AB722138A QCE340M08A PARTS NAME SIZE ITEM PART NO Q`TY NOTE...
- Page 66 QCE340M09...
- Page 67 QCE340M09 PARTS NAME SIZE ITEM PART NO Q`TY NOTE AB722627 Plastic shaft adjustment block group Spindle Connector Ring 721307 Cap Screw M6*10L SR060200 Ring 722625 Shaft 722624 KD050515 5*5*15L Reducer 721310 50HZ Reducer 721310A S.60HZ Fixed Plate 722626 Sunkhead Socket Screw M6*16L SM069400 Motor...
- Page 68 QCE340M10...
- Page 69 QCE340M10 PARTS NAME SIZE ITEM PART NO Q`TY NOTE Plate 721614 Cap Screw M8*1.25*100 SR082000 M8*φ23 Washer WF082320 Ring 721945 Set screw M6*1*12 SS069350 Spring Washer WS060000 Cap Screw M6*20L SR060400 Spring 722166 Lock Nut M8*1.25 NL081300 Hex Nut NH081300 Shaft 722165 Bearing...
- Page 70 QCE340M12 ITEM PART NO PARTS NAME SIZE Q`TY NOTE 0010 MA721216-OPT Motor 220/380V 3PH 0020 SR059400 Hex. Socket Screw M5*0.8*16 Front And Rear Trimming Shaft 0030 AB721224 Asm. 3/16"*φ10*t1 0040 WF551010 Flat Washer 0050 SR059400 Hex. Socket Screw M5*0.8*16 0060 721214A Notched Pulley 0070...
- Page 71 QCE340M13...
- Page 72 QCE340M13 ITEM PART NO PARTS NAME SIZE Q`TY NOTE 0010 NH081300 M8*13 M8xφ20 0020 WF082020 Flat Washer 0030 722067 Thread Rod φ8*90L 0040 721058 Compressed Spring 0050 NL081300 Nylon Nut M8*1.25 0060 NH061000 0070 WS060000 Spring Washer M6*φ16 0080 WF061620 Flat Washer 0090 SG059300...
- Page 73 QCE340M13 ITEM PART NO PARTS NAME SIZE Q`TY NOTE 0480 SR069400 Hex. Socket Screw M6*1*16 0500 722074 Idle Pulley Fixed Plate 0510 SM069300 Hex. Head Countersunk Screw M6x12 0520 NH101700 M10x1.5 0530 WS100000 Spring Washer M10*φ20*2 0540 WF102020 Flat Washer 0550 721047B Upper Trim Slide Bracket...
- Page 74 QCE340M15 ITEM PART NO PARTS NAME SIZE Q`TY NOTE 0010 721064 Digital Position Indicator 0020 SH069400 Hex. Head Screw M6*1*16 M6*φ16 0030 WF061620 Flat Washer 0040 721061 Fixed Plate 0050 721182 Hex Rod 0060 SS059200 Set Screw M5*0.8*8 0070 721063 Connecting Piece 0080 SM049200...
- Page 75 QCE340M15 ITEM PART NO PARTS NAME SIZE Q`TY NOTE 0100 NH081300 M8*13 0110 722068 Thread Rod M8*125L 0120 721060 Transfer Shaft φ10*φ15 0130 WW101503 Wave Washer 0150 721071 Lock Nut (I) GUK10xP0.75 0170 BL210402 Liner Bearing (C) LM12UU 0180 721048 Lower Trim Slide Bracket 6061 0190...
- Page 76 QCE340M16 ITEM PART NO PARTS NAME SIZE Q`TY NOTE 0010 AB722063 Motor Fixed Plate Asm. 0020 SR050400 Hex. Socket Screw M5*0.8*20 M5xφ20 t=2 0030 WF052020 Flat Washer 0040 721085 Flat Pulley 0050 721622-OPT Motor Fixed Housing S,3 PH 0060 MA721083-OPT Motor 3/4HP 220/380V 3...
- Page 77 QCE340M17B(AB722195B)
- Page 78 QCE340M17B(AB722195B) ITEM PART NO PARTS NAME SIZE Q`TY NOTE 0010 AB722195AA 0020 720004 Cylinder Fixing Plate 0030 AB722615B Pressure Cylinder (Asm.) 0040 SR040800 Hex. Socket Screw M4*0.7*40 0050 NH040700 M4*0.7 0060 720003 Cylinder Fixing Plate 0070 NL040700 Nylon Nut M4*0.7 0080 SS040600 M4*0.7*30...
- Page 79 QCE340M17DAH...
- Page 80 QCE340M17DAH ITEM PART NO PARTS NAME SIZE Q`TY NOTE 0010 SJ050200 Pan Head Socket Screw M5*0.8*10 0020 721659 Shaft Support Plate 0030 SS060500 Set Screw M6*1*25 0040 NH061000 0050 130397 Chrome Rod 0060 721654 Plate 0070 SS060200 Set Screw M6*10 0080 721656B R Scraper Fixed Plate...
- Page 81 QCE340M17DAH ITEM PART NO PARTS NAME SIZE Q`TY NOTE 0420 SS040500 Set Screw M4*0.7*25 0430 722258 Knob 0440 721935 Gear Rack Fixed Block 0450 WS060000 Spring Washer 0460 SR060400 Hex. Socket Screw M6*1*20 0470 721936 Thread Rod 0480 WS080000 Spring Washer M8*φ20*3mm 0490 WF082030...
- Page 82 QCE340M19 PARTS NAME SIZE ITEM PART NO Q`TY NOTE Motor MA721321A S/220V 1~ 1/4HP(0.18KW) 2P (clockwise) Motor MA721321B S/220V 1~ 1/4HP(0.18KW) 2P (counterclockwise) MA721321 Motor 1/6HP(0.12KW) 2P S/220/380V 3~ Cloth wheel AB721318B Cloth wheel AB721322B Motor Cord 0.75mm x 3C IM722036 S/1PH(CE) IM722006...
- Page 83 QCE370M20 ITEM PART NO. PART NAME SIZE Q`TY NOTE Fixed 722311 M6*φ16*t2.0 WF061620 Washer Hex Head Bolt SH0611403 M6*55L AB721943DAH Flat scraping group Under flat scraping group AB722327DAH SR060700 Countersunk Head Screw M6*35 Spring Washer WS060000 Fixed Plate 722327 Solenoid valve and regulator ASM. AB722277-2 A(CE) Solenoid valve and regulator ASM.
- Page 84 QCE370M21...
- Page 85 QCE370M21 PART NAME ITEM PART NO. SIZE Q`TY NOTE Control Panel Group AB723823-2R M3xφ8x1.0t WF030810 Washer Nylon Box Connector 998808 SR060200 Cap Screw M6*1*10 fixed seat 998807 NL030600 Locknut Cover 720317R 720129R Cover Class Screw 721111 AB720310 Solenoid Valve ASM. AC24V Solenoid Valve ASM.
- Page 86 QCE370M21 PART NAME ITEM PART NO. SIZE Q`TY NOTE Handle 205557 MS-737-1-A-330 SR100800 Cap Screw M10*1.5*40 M10xφ21xt2 Washer WF102120 NL101700 Nylon Nut M10*1.5 Pressure beam power switch group AB721956D AZD-1001T NH061000 Hex Nut Stop screw SS060800 M6*1.0*40 M5xφ12xt1 WF051210 Washer Cap Screw SR059300 M5*12...
- Page 87 QCE370M21 PART NAME ITEM PART NO. SIZE Q`TY NOTE Cap Screw SR060400 M6*1*20 M6*φ13 WF061320 Washer Nylon Nut NL061000 φ2.5"*36 721346 Hose terminate line 15CM L150000000000000 φ2.5"*80 721347 Hose Cover 721952VE 612030 Flap Pop Rivet 4-3 ∮3.2 x 8.9 BR000043 205109 Knob M6*φ13...
- Page 88 AB72010A ITEM PART NO PARTS NAME SIZE Q`TY NOTE 0010 SR080600 Hex. Socket Screw M8*1.25*30 0020 WS080000 Spring Washer M8*φ20*3mm 0030 WF082030 Flat Washer 0040 720108 Pre-milled Side Plate 0050 NH081300 M8*13 0060 SR081000 Hex. Socket Screw M8*1.25*50 0070 722166 Compressed Spring AB722162 0080...
- Page 89 AB72010A ITEM PART NO PARTS NAME SIZE Q`TY NOTE 0110 SJ060200 Pan Head Socket Screw M6*1*10 0120 SR080700 Hex. Socket Screw M8*35 0140 SH0805403 Hex. Head Screw M8*1.25*25 M8*φ30 0150 WF083030 Flat Washer 0160 720203 Motor Pulley S,50HZ 0170 720111 Motor Fixed Plate 0180 SR100500...
- Page 90 AB720131A AB720131A PART NAME SIZE ITEM PART NO. Q`TY NOTE SR069400 Cap Screw M6*1*16 Cap Screw M6*1*20 SR060400 M6*φ20 WF062020 Washer Cap Screw M6*1*70 SR061400 722607 Fixed block Spring Washer WS060000 722052 Spacer Ring plate 720131A SR069300 Cap Screw M6*1*12 Quick Release handle 722617 SS0894503...
- Page 91 AB720168A+AB721811 AB720168A ITEM PART NO PARTS NAME SIZE Q`TY NOTE 0010 720168A Air Tank 0020 720208 Bent Joint EPL10-03-PF 0030 720208-1 Bent Joint EPL10-03-PF AB721811 ITEM PART NO PARTS NAME SIZE Q`TY NOTE 0010 721812 Knob 0020 NH101700 M10x1.5 0030 SH0604403 Hex.
- Page 92 AB720173+AB720173A AB720173 ITEM PART NO PARTS NAME SIZE Q`TY NOTE 0010 AB720175 Preheating Plate Asm. 0070 720174 Heater Rod 220V 125W 11.8*L70 AB720173A ITEM PART NO PARTS NAME SIZE Q`TY NOTE 0010 AB720175 Preheating Plate Asm. 0070 720174A Heater Rod 380V 125W...
- Page 93 AB720184 ITEM PART NO PARTS NAME SIZE Q`TY NOTE 0020 721064 Digital Position Indicator 0030 721060 Transfer Shaft 0040 721071 Lock Nut (I) GUK10xP0.75 0050 720179 Adjustment Plate 0060 NH061000 0070 720182 Thread Rod 0080 720183 Adjustment Plate 0090 NL061000 Nylon Nut 0100 204278...
- Page 94 AB720175+AB720322A AB720175 ITEM PART NO PARTS NAME SIZE Q`TY NOTE 0010 720173 Preheating Plate 0020 720175 Preheating Back Plate Bracket 0030 SR069400 Hex. Socket Screw M6*1*16 0040 WS060000 Spring Washer M6*φ13*t1.5 0050 WF061315 Flat Washer 0060 SS069300 Set Screw M6*1*12 0080 SS059100 Set Screw...
- Page 95 AB720220 AB720224 AB720220 AB720220A ITEM PART NO PARTS NAME SIZE Q`TY NOTE 0010 720221A 0020 720220A Block 0030 SR080400 Hex. Socket Screw M8*1.25*20 0040 SR060400 Hex. Socket Screw M6*1*20...
- Page 96 AB720311 ITEM PART NO PARTS NAME SIZE Q`TY NOTE 0010 720311T ψ62*ψ8*25 0020 722051A Roller 0030 SR081100 Hex. Socket Screw M8*1.25*55 0040 722052A Spacer Ring 0050 NL081300 Nylon Nut M8*1.25 0060 722052 Spacer Ring 0070 SR080600 Hex. Socket Screw M8*1.25*30 0080 WS080000 Spring Washer...
- Page 97 AB720224+AB721364 AB720224 AB721364 ITEM PART NO PARTS NAME SIZE Q`TY NOTE 0010 720954A 0020 723717 Fluent shelf 0030 NH081300 M8*13 M8*φ23*t2.0 0040 WF082320 Flat Washer 0050 721200 Buffer Block 0060 SR081100 Hex. Socket Screw M8*1.25*55...
- Page 98 AB720312 AB720313 AB720312 AB720313...
- Page 99 AB720320 AB720322 AB720320 AB720322 ITEM PART NO. PART NAME SIZE Q`TY NOTE Extension Bracket 720322 SJ050800 Button Head Screw M5*0.8*40 Wheel 721424 NL050800 Nylon Nut M5*0.8 Hex Nut NH081300 M8*φ23*2t Washer WF082320 Buffer block 721200 SR081403 Cap Screw M8*1.25*70...
- Page 100 AB720327 AB720329 AB720327 AB720329...
- Page 101 AB720814...
- Page 102 AB720814 ITEM PART NO PARTS NAME SIZE Q`TY NOTE φ12*L128 0010 720807 Chrome Rod 0020 BL210402 Liner Bearing (C) LM12UU φ6*20 0030 PP062000 0040 SM050200 Hex. Head Countersunk Screw M5x10 0050 SS061400 Set Screw M6*1*70 φ14.5 φ11.5 L:26.5 0060 720806 Compressed Spring 0070 720812...
- Page 103 AB721010...
- Page 104 AB721010 ITEM PART NO PARTS NAME SIZE Q`TY NOTE 0010 721001 Digital Position Indicator 0020 SM089300 Hex. Head Countersunk Screw M8x12 0030 721014 Fixed Plate 0040 721015 0050 721010 Pressure Beam Bracket V1.1 0060 SH080600 Hex. Head Screw M8*1.25*30 0070 NH081300 M8*13 0080...
- Page 105 AB721097A AB721097A PART NAME SIZE ITEM PART NO. Q`TY NOTE 721097 QE-01 Threaded Through EPC4-1 722439 721373 Valve Silencer AB721620...
- Page 106 AB721831 ITEM PART NO PARTS NAME SIZE Q`TY NOTE ψ30*ψ8*8 0010 720819 Rubber Bearing 0020 721831 Fixed Plate 0030 201777 Spring Plungers With Ball M6x11 0040 721832 Plate 0050 SR069100 Hex. Socket Screw M6*1*6 0060 NH0610004 Nut (Thin) M6*1.0*3 0070 WS060000 Spring Washer 0080...
- Page 107 AB721943D ITEM PART NO PARTS NAME SIZE Q`TY NOTE M6*φ16 0010 WF061620 Flat Washer 0020 722318 Flat Scraping Movable Seat 6061 0030 SJ049100 Pan Head Socket Screw M4*0.7*6 0040 BL210402 Liner Bearing (C) LM12UU 0050 WS060000 Spring Washer 0060 SR061100 Hex.
- Page 108 AB721943D ITEM PART NO PARTS NAME SIZE Q`TY NOTE 0160 722324 Fixed Plate 0170 SH069400 Hex. Head Screw M6*1*16 φ10*φ20 0180 204263 Disc Washer 0190 722325 Adjust Bolt 0200 721071 Lock Nut (I) GUK10xP0.75 φ12*149L 0210 721975 Chrome Rod 0220 SH059200 Hex.
- Page 109 AB721943DAH ITEM PART NO PARTS NAME SIZE Q`TY NOTE M6*φ16 0010 WF061620 Flat Washer 0020 722318 Flat Scraping Movable Seat 6061 0030 SJ049100 Pan Head Socket Screw M4*0.7*6 0040 BL210402 Liner Bearing (C) LM12UU 0050 WS060000 Spring Washer...
- Page 110 AB721943DAH ITEM PART NO PARTS NAME SIZE Q`TY NOTE 0060 SR061100 Hex. Socket Screw M6x55 0070 AB722615B Pressure Cylinder (Asm.) 0080 721306 Knob 0090 722331 Fixed Plate M4*φ10*1.0t 0100 WF041010 Flat Washer 0110 SR040900 Hex. Socket Screw M4*0.7*45 0120 722330 Fixed Plate 0130 NL040700...
- Page 111 AB722063B...
- Page 112 AB722063B ITEM PART NO PARTS NAME SIZE Q`TY NOTE 0010 722063 Plate 0020 721638 Side Plate 0030 721619 Side Plate 0040 721920 Plate 0050 722062 Plate φ12*246L 0060 721197 Chrome Rod 0070 SJ059100 Pan Head Socket Screw M5*0.8*6 0080 SS069150 Set Screw M6x6mm 0090...
- Page 113 AB722134 ITEM PART NO PARTS NAME SIZE Q`TY NOTE 0010 721255 Spread Glue Shaft 0020 721246 Ring φ46.5*φ3.0*0.6t 0030 721247 Disc Washer 0040 721248 Ring M25xφ35xt1 0050 WF253510 Flat Washer 0060 722134 Spread Glue Base 0070 BB600500 Ball Bearing 6005 0080 721250 Separate Ring...
- Page 114 AB722134-1 ITEM PART NO PARTS NAME SIZE Q`TY NOTE 0010 721255 Spread Glue Shaft 0020 721246 Ring φ46.5*φ3.0*0.6t 0030 721247 Disc Washer 0040 721248 Ring M25xφ35xt1 0050 WF253510 Flat Washer 0060 722134 Spread Glue Base 0070 BB600500 Ball Bearing 6005 0080 721250 Separate Ring...
- Page 115 AB722134-3 ITEM PART NO PARTS NAME SIZE Q`TY NOTE 0010 AB724702 Upper R Scrape Asm. 0020 AB724769 Adjustment Seat Asm. 0030 AB724720 Adjustment Seat Asm. 0040 WS080000 Spring Washer 0050 SR080600 Hex. Socket Screw M8*1.25*30 M8xφ20 0060 WF082020 Flat Washer 0070 724754 Dust Port...
- Page 116 AB722135A ITEM PART NO PARTS NAME SIZE Q`TY NOTE 0010 722135A Glue Bucket 0020 SM060400 Hex. Head Countersunk Screw M6*20 M6xφ19 0030 WF061920 Flat Washer 0040 WS060000 Spring Washer 0050 SR060400 Hex. Socket Screw M6*1*20 0060 722136 Leakproof Gasket 0070 722629-1 Temperature Sensing Cord 0080...
- Page 117 AB722135C ITEM PART NO PARTS NAME SIZE Q`TY NOTE 0010 722135A Glue Bucket 0020 SM069400 Hex. Head Countersunk Screw M6x16 M6xφ19 0030 WF061920 Flat Washer 0040 WS060000 Spring Washer 0050 SR060400 Hex. Socket Screw M6*1*20 0060 722136 Leakproof Gasket 0070 722629-1 Temperature Sensing Cord K-TYPE 0.8M...
- Page 118 AB722135D ITEM PART NO PARTS NAME SIZE Q`TY NOTE 0010 722135A Glue Bucket 0020 SM069400 Hex. Head Countersunk Screw M6x16 M6xφ19 0030 WF061920 Flat Washer 0040 WS060000 Spring Washer 0050 SR060400 Hex. Socket Screw M6*1*20 0060 722136 Leakproof Gasket 0070 722629-1 Temperature Sensing Cord K-TYPE 0.8M...
- Page 119 AB722137...
- Page 120 AB722137 ITEM PART NO PARTS NAME SIZE Q`TY NOTE 0020 NH061000 0040 SH080600 Hex. Head Screw M8*1.25*30 0050 WS080000 Spring Washer 0060 SR059400 Hex. Socket Screw M5*0.8*16 0070 WS050000 Spring Washer M5*φ12 0080 WF051210 Flat Washer M6xφ20xt2 0090 WF062020 Flat Washer 0110 AB721273 Glue Bucket Adjust Block Asm.
- Page 121 AB722138A ITEM PART NO PARTS NAME SIZE Q`TY NOTE 0010 720338 Handle 0030 NA061000 Acorn Nut M6*1 0040 722138A Glue Bucket Guard 0050 SR080500 Hex. Socket Screw M8*1.25*25 0060 SR060200 Hex. Socket Screw M6*1*10 0070 WS080000 Spring Washer...
- Page 122 AB722195AA...
- Page 123 AB722195AA ITEM PART NO PARTS NAME SIZE Q`TY NOTE 0010 SJ050200 Pan Head Socket Screw M5*0.8*10 染黑 0020 721659 Shaft Support Plate 0030 SS060500 Set Screw M6*1*25 0040 NH061000 0050 130397 Chrome Rod 0060 721654 Plate M8xφ20 0070 WF082020 Flat Washer 0080 WS080000 Spring Washer...
- Page 124 AB722195AA ITEM PART NO PARTS NAME SIZE Q`TY NOTE 0420 721060 Transfer Shaft 0430 721056 Knob 0440 722258 Knob 0450 722259 Thread Rod φ15*φ6.2*0.5t 0460 206395 Disc Spring 0470 721935 Gear Rack Fixed Block 0480 SR080700 Hex. Socket Screw M8*35 0490 AC722280 R Scraper Block...
- Page 125 AB722327D ITEM PART NO PARTS NAME SIZE Q`TY NOTE M6*φ16 0010 WF061620 Flat Washer 0020 722318 Flat Scraping Movable Seat 6061 0030 SJ049100 Pan Head Socket Screw M4*0.7*6 0040 BL210402 Liner Bearing (C) LM12UU 0050 WS060000 Spring Washer 0060 SR061100 Hex.
- Page 126 AB722327D ITEM PART NO PARTS NAME SIZE Q`TY NOTE M4*φ10*1.0t 0100 WF041010 Flat Washer 0110 SR040800 Hex. Socket Screw M4*0.7*40 0120 722330 Fixed Plate 0130 NL040700 Nylon Nut M4*0.7 0140 722323B Scraper Seat 6061 0150 SS060200 Set Screw M6*10 0160 722324 Fixed Plate 0170...
- Page 127 AB722327DAH ITEM PART NO PARTS NAME SIZE Q`TY NOTE M6*φ16 0010 WF061620 Flat Washer 0020 722318 Flat Scraping Movable Seat 6061 0030 SJ049100 Pan Head Socket Screw M4*0.7*6 0040 BL210402 Liner Bearing (C) LM12UU 0050 WS060000 Spring Washer 0060 SR061100 Hex.
- Page 128 AB722327DAH ITEM PART NO PARTS NAME SIZE Q`TY NOTE 0110 SR040800 Hex. Socket Screw M4*0.7*40 0120 722330 Fixed Plate 0130 NL040700 Nylon Nut M4*0.7 0140 722323 Scraper Seat 6061 0150 SS060200 Set Screw M6*10 0160 722324 Fixed Plate 0170 SH069400 Hex.
- Page 129 AB722733A ITEM PART NO PARTS NAME SIZE Q`TY NOTE 0010 722733A Hydraulic Steady Speed Cylinder RB-ADA515MTC 0020 SR050200 Hex. Socket Screw M5*0.8*10 0030 722724 Fixed Plate 0040 SR059400 Hex. Socket Screw M5*0.8*16 0050 AC722734A 0060 NL050800 Nylon Nut M5*0.8...
- Page 130 AB722751-2 ITEM PART NO PARTS NAME SIZE Q`TY NOTE 0010 SR069300 Hex. Socket Screw M6*1*12 0020 720804 Cover 0030 720805 Adjustment Shaft 0040 AB720840 Thread Cylinder 0050 720803 Motor Fixed Plate 0060 722751B High Speed Motor MJ35B-350C S,380V 0070 721071 Lock Nut (I) GUK10xP0.75 0080...
- Page 131 AB722627-3...
- Page 132 AB722627-3 ITEM PART NO PARTS NAME SIZE Q`TY NOTE 0010 722133 Ring 0020 NH061000 0030 SH081840 Hex. Head Screw M8*1.25*90 M8*φ18*t1.8 0040 WF081818 Flat Washer 0050 WS080000 Spring Washer 0060 WS060000 Spring Washer 0070 NH081300 M8*13 0080 721300 Adapter 0090 200964 Bushing 0100...
- Page 133 AB723823 ITEM PART NO PARTS NAME SIZE Q`TY NOTE 0010 723823 Control Panel 0020 723824 Cover Pate 0030 994817 Emergency Button Switch R2PNR4-2B-R 0040 723068 Copper Slice 0050 998808 Hose's Strain Relief N-MGQ32-34B 0060 720013 Handle 1200-20-160-SR 0070 SP059200 Pan Head Screw (+) M5*0.8*8 0080 AB723826...
- Page 134 AC722280 ITEM PART NO PARTS NAME SIZE Q`TY NOTE 0010 722280A R Scraper Bracket 0020 722279 Scrape Slice M3*φ8 0030 WF030810 Flat Washer 0040 SS0392003 Set Screw M3*0.5*8 0050 WS030000 Spring Washer 0060 SR0392003 Hex. Socket Screw M3*0.7*8...
- Page 135 AC722280C ITEM PART NO PARTS NAME SIZE Q`TY NOTE 0010 722280A R Scraper Bracket 0020 722278C R Scraper Blade 1.5R 0030 722279 Scrape Slice 0040 SR0392003 Hex. Socket Screw M3*0.7*8 0050 SR0492003 Hex. Socket Screw M4*0.7*8 0060 SS0392003 Set Screw M3*0.5*8 0070 WS040000...
Need help?
Do you have a question about the MX370M and is the answer not in the manual?
Questions and answers
Need info about correct glue and lubricants used on model MAX370M
The Cantek MX370M manual recommends using cleaning naphtha or WD-40 as solvents for cleaning residue glue on pressure rollers, back plates, and wheels. It does not specify a particular glue to use.
This answer is automatically generated