Advertisement
Quick Links
HUIZHOU EPEVER TECHNOLOGY CO., LTD.
※ Thank you for selecting VS AU series solar charge controller.
Please read this manual carefully before using the product.
※ Do not install this product in humid, salt spray, corrosion,
greasy, flammable, explosive, dust accumulative, or other
severe environments.
VS AU series solar charge controller
1. Overview
The VS AU controller is a PWM charge controller with a built-in LCD that adopts the most
advanced digital technique. The multiple load control modes help it be widely used in the
solar home system, traffic signals, street lights, solar garden lamps, etc. The features are
listed below:
Adopt high-quality components of ST, IR, and Infineon, ensure product lifespan
Pass the UL and VDE certification, enabling the product is safer and more reliable
Work continuously at full load in -25℃ ~ 55℃
3-Stage intelligent PWM charging: Bulk, Boost/Equalize, Float
Support 3 battery types: Sealed, Gel, and Flooded
LCD dynamically displays the device's operating data and working condition
Double USB design, the power supply charge for electronic equipment
With humanized button settings, the operation will be more comfortable and convenient
Multiple load control modes
Energy statistics function
Battery temperature compensation function
Extensive Electronic protection
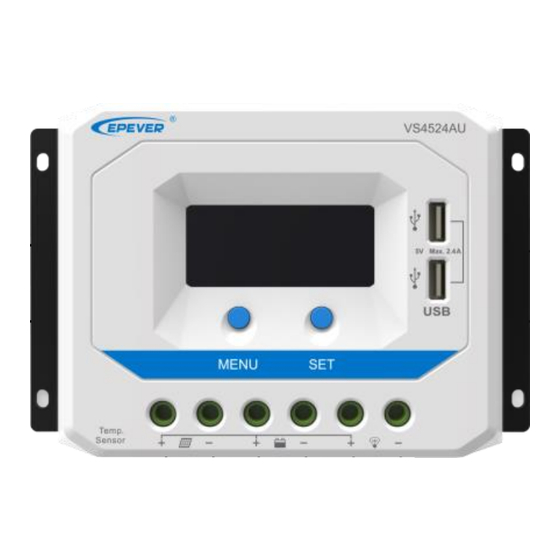
2. Product Features
①
②
③ ④
①
LCD
②
MENU Button
③
RTS Port
④
PV Terminals
※ USB output ports provide the power supply of 5VDC/2.4A and have short circuit
protection.
Optional Accessory:
Name: Remote Temperature Sensor
Model: RTS300R47K3.81A
Acquisition of battery temperature
temperature compensation of control parameters, the
standard length of the cable is 3m (length can be
customized). The RTS300R47K3.81A connects to the port
③ on the controller.
NOTE: Unplug the RTS, and the battery's temperature will be set to a fixed
value of 25º C.
3. Wiring
(1) Connect components to the charge controller in the sequence as shown above and pay
much attention to the "+" and "-." Please don't insert the fast-acting fuse or connect the
breaker during the installation. When disconnecting the system, the order will be reserved.
(2) The system voltage level will be identified after powering the controller. Check whether
the battery indicator is green ON. Otherwise, please refer to chapter 6.
(3)The battery's fast-acting fuse should be installed as close to the battery as possible.
The suggested distance is within 150mm.
⑤
⑥
⑤
Battery Terminals
⑥
Load Terminals
⑦
SET Button
⑧
USB Output Ports※
for
undertaking
1
Tel: +86-752-3889706
(4) The VS AU series is a positive ground controller. The positive poles of the solar, load,
or battery can be earth grounded as required.
NOTE: Please connect the inverter or other loads with a large start
current to the battery rather than to the controller's load terminal if the
inverter or the load is necessary.
4. Operation
4.1 Button Function
Button
MENU button
SET button
4.2 LCD Display
Note: The display screen can be viewed clearly when the angle between the
end-users horizontal sight and the display screen is within 90° . If the angle exceeds
90° , the information on the display screen cannot be viewed clearly.
Status Description
Item
PV array
⑧
⑦
Battery
Load
Browse interface
NOTE:
1)
When there is no operation, the interface will be an automatic cycle. However, the
following two interfaces will not be displayed.
2) Accumulative power clearing: Under the PV power interface, press the SET button
and hold on 5s until the value blinks. Press the SET button again to clear the value.
3) Switch the temperature unit: Under the battery temperature interface, press the SET
button and hold on 5s to switch.
Fault Indication
Status
Battery
over-discharged
Battery over
voltage
Website: www.epever.com
Function
Browse interface
Setting parameter
Load ON/OFF
Clear error
Enter into Set Mode
Save data
Icon
Status
Day
Night
No charging
Charging
PV Voltage, Current, Power
Battery capacity, In Charging
Battery voltage. current, temperature
Battery type
Load ON
Load OFF
Load Voltage, Current, Load mode
Icon
Description
Battery level shows empty, battery frame blink,
fault icon blink
Battery level shows full, battery frame blink, fault
icon blink
2
Advertisement

Related Manuals for Epever VS AU Series


Summary of Contents for Epever VS AU Series
- Page 1 Tel: +86-752-3889706 Website: www.epever.com (4) The VS AU series is a positive ground controller. The positive poles of the solar, load, or battery can be earth grounded as required. ※ Thank you for selecting VS AU series solar charge controller.
- Page 2 HUIZHOU EPEVER TECHNOLOGY CO., LTD. Tel: +86-752-3889706 Website: www.epever.com Overheating The temperature sensor is less than 75℃ Output is ON Battery Battery level shows current value, battery frame The load will be switched off when the load Overheating blink, fault icon blink short circuit (≥4 times rated current) happens.
Need help?
Do you have a question about the VS AU Series and is the answer not in the manual?
Questions and answers
At start up, will the factory setting allow operation on 24/7 with any futher setting?
Yes, the Epever VS AU Series solar charge controller will operate continuously on factory settings without further adjustments. It has a default battery type set to "Sealed" and automatically manages charging and discharging based on predefined voltage parameters. However, users may need to adjust settings if using a different battery type or specific system requirements.
This answer is automatically generated