Advertisement
i.
iii.
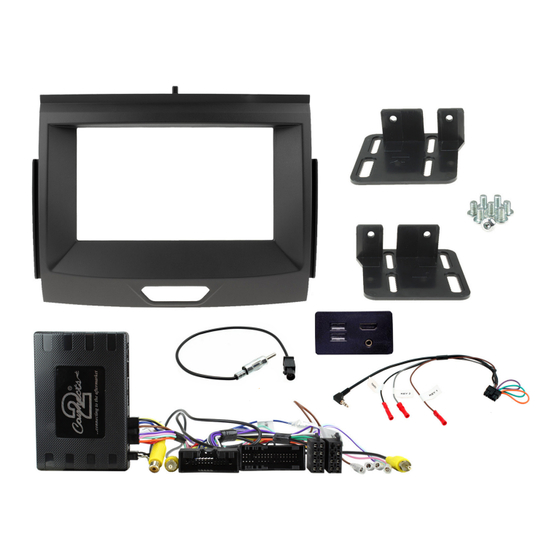
IN THE KIT
i.
Double DIN Fascia Panel
ii.
Brackets & Hex Screws (8)
iii.
Retention Interface & Harness
APPLICATION
Ford Ranger
2016 - 2022
For SYNC3 systems only.
FEATURES
• Allows for the installation of a double DIN aftermarket stereo
• Includes mounting brackets and fitting accessories
• Retains vehicles settings, steering wheel and phone button functionality
• Retains original fitted reverse camera feed
• Generates settings menus, parking sensor audio and graphics
• Provides outputs for Park Brake, Reverse Gear, Speed Pulse and Mute
The information provided in this document is subject to change without notice due to manufacturer changes and/or improvements to the product/s. This
instruction manual is based on documented data and research. The manufacturer of this product cannot be held responsible for any changes made to the
vehicle by the manufacturer or damages that may occur through the installation of this product in accordance with the steps outlined herein.
Double DIN Installation Kit
iv.
iv.
Audi Antenna Adapter
v.
USB Retention Lead
vi.
Universal Patch Lead
DISCLAIMER
for Ford SYNC3 vehicles
ii.
v.
Note: Application data is subject to change at any time
FP9129CT
vi.
V1 07/22
Advertisement
Table of Contents

Subscribe to Our Youtube Channel
Related Manuals for Aerpro FP9129CT


Summary of Contents for Aerpro FP9129CT
- Page 1 FP9129CT Double DIN Installation Kit for Ford SYNC3 vehicles iii. IN THE KIT Double DIN Fascia Panel Audi Antenna Adapter Brackets & Hex Screws (8) USB Retention Lead iii. Retention Interface & Harness Universal Patch Lead APPLICATION Note: Application data is subject to change at any time...
-
Page 2: Product Information
PRODUCT INFORMATION The new FP9129CT is a complete installation kit for the Ford Ranger which allows the user to update their in-car entertainment system to a new aftermarket unit whilst retaining a whole host of features and functions which would have previously had been lost with the factory unit. The interface which comes... - Page 3 OVERVIEW DIAGRAM - FASCIA ASSEMBLY FP9129CT_IG_v1...
-
Page 4: Wiring Diagram
WIRING DIAGRAM USB/HDMI/AUX Connections USB Hub Connector Connect to aftermarket stereo Install within the original location Fakra Antenna Connection FM DIN Connection Connect to black OEM Antenna connector from vehicle Connect to aftermarket stereo 24-Way/54-Way Connectors Flying Wires Connect 24-way to OEM radio connector from vehicle Purple/White - Reverse Gear ISO Connector Connect 54-way to SYNC3 connector from vehicle... -
Page 5: Prior To Installation
PRIOR TO INSTALLATION Read the manual prior to installation. Technical knowledge is necessary for installation. The place of installation must be free of moisture and away from heat sources. Please ensure that the correct tools are used during the installation to avoid damage to the vehicle or product. - Page 6 INSTALLATION GUIDE - FASCIA DASH DISASSEMBLY With the front panel removed, undo all the screws surrounding the main head unit and proceed to disconnect all of the wiring. FASCIA ASSEMBLY Take original fascia and flip over. Remove 16x screws (as seen in image) that hold the back trim in place.
- Page 7 INSTALLATION GUIDE - FASCIA FASCIA ASSEMBLY When happy with the fitment of the main fascia, re-attach the back panel utilizing all 16x previous screws. KIT ASSEMBLY Brackets should be placed onto either side of the head unit loosely, then dry fitted into the dashboard to gauge the correct depth.
- Page 8 INSTALLATION GUIDE - WIRING See wiring diagram on Pg.4 for more information Before installing the interface, the factory stereo must be removed and disconnected. To do this, please consult the vehicle owner’s manual/handbook or contact a fitting professional. For universal patch lead, prepare the wiring loops in accordance with the instruction manual supplied before installation. 1.
- Page 9 USER GUIDE STEERING WHEEL CONTROL FUNCTIONALITY The following diagram, though based on careful research, is an example only. Individual steering wheel control configurations may differ. TUNE Normal Mode Volume Up Volume Down Speech Mute Track Forward (Short Press) Hang Up (Long Press) Track Back (Short Press) Pick Up (Long Press) Track Back...
- Page 10 USER GUIDE CLIMATE CONTROL FUNCTIONALITY The climate control graphics have been replicated and will work like before on the new aftermarket head unit. The original climate controls are accessible by single pressing either of the original buttons on the lower climate panel, or by pressing the Volume Button (Fig.11).
- Page 11 USER GUIDE CONFIGURATION MENU Pressing the ‘Eject Button’ (Fig.8) on the climate control panel will enter the “Configuration Menu”. Here you are able to navigate through the various options and settings. VEHICLE SETTINGS Within this menu, you are able to alter vehicle settings that would have been lost if not for the interface.
- Page 12 USER GUIDE CONFIGURATION MENU Preferences Reverse Priority Select which image (Camera or Park Pilot) will be shown by default when reversing. (Note: this option is only available when “Camera Connected” is set to ‘Yes’) Climate Overlay Time Set the amount of time that the climate control overlays the current screen.
Need help?
Do you have a question about the FP9129CT and is the answer not in the manual?
Questions and answers