
Related Manuals for Synco G3 PRO


Summary of Contents for Synco G3 PRO
- Page 1 G3 PRO G3PRO Wireless Microphone User Manual Thank you for choosing SYNCO product. Please read this manual carefully before use and follow all instructions mentioned herein.
-
Page 2: Packing List
Caring For Your SYNCO Product · Please keep the product in a dry, clean, dust-free environment. · Keep corrosive chemicals, liquids and heat sources away from the product to prevent mechanical damage. · Use only a soft and dry cloth for cleaning the product. -
Page 3: Product Introduction
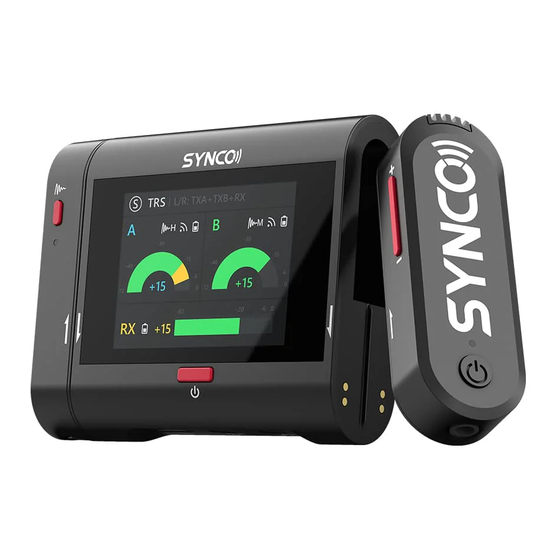
Product Introduction 1. TX Transmitter ① Built-In Mic ② Noise Cancellation Button ③ Volume Control Button ④ Switch Button ⑤ 3.5mm Mic-in Port ⑥ Pocket Clip ⑦ Contacts 2. RX Receiver ① Touchscreen ② Power Button/Back Button ③ Type C/Digital Output Port ④... -
Page 4: Basic Operations
3. TX Indicator Working Blue/green indicator on transmitter corresponds to the A/ Indicators B transmitter shown on the receiver screen Blue/green indicator flashes The transmitter waiting for connection Blue/green indicator keeps The transmitter successfully connected to the receiver Blue/green indicator lights Reset completed up and flashes at the same time... - Page 5 Method 2:Long press the switch button on the front of the transmitter for three seconds. * The TX power on successfully when the indicator keeps blue/green, and power off when the indicator off. * The TX automatically shuts down in 5 minutes without connection or recording.
-
Page 6: Function Operations
Function Operations 1. UI Introduction Power it on and the default display is the home page (microphone status display panel). Swipe down/up from the top/bottom of the screen to enter the microphone settings and the settings menu. - Page 7 ① Track Option ⑧ Transmitter Level Value ② Output Channel Options ⑨ Transmitter Gain Value ③ Transmitter A ⑩ Receiver ④ TransmitterB ⑪ Receiver Battery ⑤ Noise Cancellation Level ⑫ Receiver Gain Value ⑥ Transmitter Signal ⑬ Receiver Microphone Level Value ⑦...
- Page 8 2. Swipe the screen up or down to switch and select the menu. 3. Swipe the screen left or right to switch and select the parameter. 3. Option Information 1). Transmitter ① Mute. ② Gain control, with 15 levels for options. ③...
- Page 9 2). Receiver ① Mute ② Gain adjustment, with 15 levels for options. ① ② 3). Track Settings ① Swipe the screen left or right to select stereo/mono/safety channel mode. ② Stereo Mode: Swipe left or right to set track options. When the receiver is on, the default left channel is transmitter A+B, and the right channel is the receiver.
- Page 10 4). Monitor Volume Settings Gain control, with 15 levels for options. 5). Output Settings ① Select output mode: TRS / TRRS. ② Adjust TRRS / TRS output gain, with 15 levels for options. ③ Select USB output mode: Charge / Charge & Digital. ④...
- Page 11 2). Pairing Settings ① Automatic Pairing: Turn on the receiver and take out the transmitter. They will automatically pair. ② Manual Pairing: Transmitter: 1. Long press for 3 seconds to power off, then long press the power button for 8 seconds to enter pairing mode. Receiver: Swipe down to the settings page then swipe left/right to the pairing option.
-
Page 12: Specifications
Specifications TX Transmitter Wireless Transmission Digital 2.4GHz 2.4G RF Frequency Band Working Distance 820ft/250m(LOS area) 20dB RF Output Power Battery Capacity 260mAh, Lithium Battery Battery Charging Time Battery Life(Full Charge) Battery Life(Full Charge Twice by RX) Dimensions 62*22*20mm Material Weight Microphone Electronic Consider Microphone Form Factor... - Page 13 RX Receiver Digital 2.4GHz Wireless Transmission RF Frequency Band 2.4G 820ft/250m(LOS area) Working Distance Display Screen 2.0"(240*320) Number of Input Channels Number of Output Channels Monitoring 3.5mm In-Ear Monitoring Monitoring Volum 0-15 level Audio Output TXA+TXB/RX Audio Output Volum -40dB-0dB Low/Medium/High Level(Adjustable) Power Requirements 5V 1A...
-
Page 14: Warranty Period
Warranty Claim Procedure 1. If failure or any problem occurs to your product after purchase, please contact a local agent for assistance, or you can always contact SYNCO’s customer service through email at support@syncoaudio.com. 2. Please retain your sales receipt and warranty certificate as proof of... - Page 15 If any of these documents is missing, only sales return or chargeable service will be provided. 3. If the SYNCO product is out of the warranty coverage, the service and the parts cost will be charged. Guangzhou Zhiying Technology Co., Ltd Room 2401, 24 / F, South Tower, Lisheng Plaza, No.
Need help?
Do you have a question about the G3 PRO and is the answer not in the manual?
Questions and answers