Table of Contents
Advertisement
Advertisement
Chapters
Table of Contents
Troubleshooting

Related Manuals for Gateway Solo 2100


Summary of Contents for Gateway Solo 2100
- Page 1 User’s Guide...
-
Page 2: Table Of Contents
Swapping modules ............32 External Floppy Drive Adapter ..........33 Hard Disk Drive ............34 Memory ..............35 PCMCIA Cards ............37 Connections ............. 38 I R p o r t ............... 38 Gateway 2000 Solo™ mini-docking station ........39... - Page 3 Reformatting the Hard Disk Drive ..........71 Troubleshooting ............72 Start up .............. 72 General .............. 73 Frequently asked questions ..........74 Important Information ............76 Calling Gateway 2000 U.S..........77 Calling Gateway 2000 outside the U.S......... 77 Index ..........78...
-
Page 4: Legal Notices
In interference to radio communications. However, there is no event will Gateway 2000 be liable for direct, no guarantee that interference will not occur in a indirect, special, incidental, or consequential damages particular installation. - Page 5 Never expose the Gateway center. The replacement must be of the same type and Solo 2100 Multimedia Notebook to rain, snow, or voltage rating as the original cord. moisture. Avoid locations with high levels of dirt, dust, Vorsicht: Beschädigte Kabel ersetzen.
-
Page 6: Specifications
Gateway Solo™ 2100 Multimedia Notebook Specifications (Specifications are subject to change without notice or obligation.) Intel Pentium™ 100, 120, or 133MHz, TCP packaging Cache 256K pipelined burst level 2 EDO; 8MB minimum, expandable to 40MB Core logic Intel 82430MX (Mobile Triton I), PCI bus... - Page 7 User’s Guide AC adapter 19VDC, 45W output; auto voltage adjustment between 100 and 240V Modular drive bay Internal 1.44MB 3.5 floppy drive, 5 CD-ROM drive, or battery pack Hard disk drive Removable; accepts 2.5 , 12.5mm hard disk drive; 540MB, 810MB and 1.3GB Hard disk controller Enhanced IDE, on PCI bus...
-
Page 8: If You Don't Read Anything Else
Gateway Solo™ 2100 Multimedia Notebook If you don’t read anything else . . . Read this! Your Gateway Solo™ 2100 Multimedia Notebook provides all the power and multimedia capabilities of a full-size desktop system, yet allows you the convenience of a lightweight portable notebook. -
Page 9: System Overview
User’s Guide System Overview Outside the System....10 Inside the System ....12... -
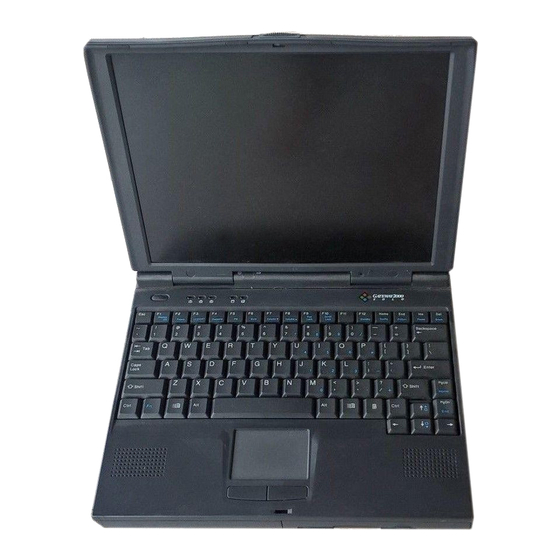
Page 10: Outside The System
Gateway Solo™ 2100 Multimedia Notebook Outside the System Take a quick tour of the system to familiarize yourself with the options a v a i l a b l e . Cover latch Modular option bay: Battery bay Floppy disk drive module installed. - Page 11 User’s Guide AC Connector: S e r i a l P o r t : Connect the AC Connect any serial adapter here. d e v i c e h e r e . F l o p p y / P a r a l l e l P o r t : 120-Pin Docking Station Port: Connect an external floppy Connect the optional mini-docking...
-
Page 12: Inside The System
Gateway Solo™ 2100 Multimedia Notebook Inside the System LCD color display: 11.3-inch DSTN, 1 1 . 3 - i n c h T F T , o r 1 2 . 1 - i n c h T F T... -
Page 13: Getting Started
User’s Guide Getting Started Connecting the AC Power .... 14 Powering Up the System ..... 15 LCD Display......17 Keyboard ......18 EZ Pad......22 Windows 95 Basics....24... -
Page 14: Connecting Ac Power
Gateway Solo™ 2100 Multimedia Notebook Connecting AC Power The first time you use the Gateway Solo™ 2100 Multimedia Notebook, use the AC adapter to fully charge the battery and provide the system with a constant supply of power. Caution: Replace the power cord if it becomes damaged. The replacement cord must be of the same type and voltage rating as the original cord. -
Page 15: Powering Up The System
User’s Guide Powering up the System à Slide the latch on the front face of the system to the right to release the See page 10. cover, and open up the system. The power button is located in the upper left corner on the notebook surface. - Page 16 Gateway Solo™ 2100 Multimedia Notebook To check/change the power button setting: 1 . Turn the system on. 2 . Press the F2 key when you see the message Press <F2> to access in the lower left corner of the display, before Windows 95 loads, SETUP to access the Setup menus.
-
Page 17: Lcd Display
User’s Guide LCD Display The Gateway Solo™ 2100 Multimedia Notebook features a built-in, backlit, color LCD display. This display is either an 11.3-inch DSTN, 11.3-inch TFT, or 12.1-inch TFT display. Each of these SVGA displays provides sharp, crisp resolution and crystal clear color. -
Page 18: Keyboard
Gateway Solo™ 2100 Multimedia Notebook Keyboard The Gateway Solo 2100 Multimedia Notebook features an 85-key keyboard. To provide the full functionality of a 101/102-key keyboard, many of these keys have been assigned alternate functions, including shortcut keys for ® Windows 95 and Popup Status Display menus. - Page 19 User’s Guide Press one of the following keys (with blue letters) together with the Fn key to get these specific functions. Key Combination Description Turns the LCD display off to reserve power. Press any key to à See page 17. rest o r e th e d i s p la y .
- Page 20 Gateway Solo™ 2100 Multimedia Notebook Key Combination Description In some programs this key combination sends you to the ending point of your text. Increases LCD brightness and displays the brightness meter for à See page 62. the Popup Status Display reflecting the changes. After four seconds, the icon disappears.
- Page 21 User’s Guide à Press the Fn and Pad Lock keys together, then press one of the following See page 19. keys to activate keys in the numeric keypad. Key Combination Description Pressing the 7 key produces a 7 when the Pad Lock function is enabled.
-
Page 22: Ez Pad Pointing Device
Gateway Solo™ 2100 Multimedia Notebook EZ Pad Pointing Device Like a mouse, the EZ Pad pointing device controls the movements of the cursor on the screen. Press a finger against the pad, then slide it in the direction you want the cursor to move. Use the mouse buttons or tap on the pad to select something. -
Page 23: Customizing The Ez Pad
User’s Guide Customizing the EZ Pad You can adjust mouse button configuration, drag, edge motion, cursor’s speed, rate, size and disable the pad tap. To customize the EZ Pad: 1 . Clicking on Start, Settings, and Control Panel. 2 . Double-click on the Mouse icon. 3 . -
Page 24: Windows 95
Gateway Solo™ 2100 Multimedia Notebook Windows 95 Once you initiate Windows 95, the first thing that appears on the display is the Welcome to Windows 95 screen. This screen provides a Windows tour, information about what’s new, the opportunity to register your software on- line, information about Windows products and useful tips. -
Page 25: Start Button
User’s Guide Start button The start button is located in the bottom left corner of the Windows 95 desktop and accesses the Start menu. Most programs and applications are launched via the Start menu. To access the menu, click on the Start button or press one of the keys. - Page 26 Gateway Solo™ 2100 Multimedia Notebook...
-
Page 27: Modularity/Connectivity
User’s Guide Modularity/Connectivity Batteries ......28 Modular Option Bay ....31 External Floppy Drive Adapter ..33 Hard Disk Drive ..... 34 Additional Memory ....35 PCMCIA Cards ...... 37 Connections ....... 38... -
Page 28: Batteries
Gateway Solo™ 2100 Multimedia Notebook Batteries à When you first receive your system, the battery is installed in the battery bay, See page 10. but will not have a full charge. The battery bay is located in the right front panel of the system. -
Page 29: Battery Status
User’s Guide When the battery level gets low: The system emits three beeps à See page 12. The battery charging power LED flashes The battery icon in the lower right of the task bar has a red ”X“ over it à... -
Page 30: Removing The Battery Pack
Gateway Solo™ 2100 Multimedia Notebook Removing the battery pack à See page 50. While the battery pack may not be charged by itself, battery packs can be ”warm-swapped“ in the battery bay. This means you can change battery packs while in Suspend mode without totally rebooting the system. -
Page 31: Modular Option Bay
User’s Guide Modular Option Bay The Gateway Solo™ 2100 Multimedia Notebook features a modular option bay located in the right front panel of the notebook. This bay accepts the modular CD-ROM drive, the modular internal floppy disk drive, or an op- tional additional battery pack. -
Page 32: Swapping Modules
Gateway Solo™ 2100 Multimedia Notebook Swapping modules The floppy disk drive module and the battery pack are ”hot-swappable“ in the modular option bay. This means that you can change between battery packs or from battery pack to floppy disk drive and back again without having to reboot the system. -
Page 33: External Floppy Drive Adapter
User’s Guide External Floppy Drive Adapter You can connect an optional external floppy disk drive to the floppy/parallel port on the back of the system. You can also connect the external drive to the floppy/parallel port on the optional mini-docking station. The connection requires the floppy drive cable that was provided with your external floppy disk drive, or the optional external floppy drive adapter for the modular floppy disk drive. -
Page 34: Hard Disk Drive
Gateway Solo™ 2100 Multimedia Notebook Hard Disk Drive You can remove the system’s hard disk drive (HDD) from the system for replacement, or to switch between optional additional hard drives. Figure 27. Hard Disk Drive (bottom view) To remove and replace the hard disk drive: 1 . -
Page 35: Memory
User’s Guide Memory The system ships with at least 8MB of RAM on board. The RAM capacity can be upgraded to 40MB by installing optional memory modules in the two expandable memory sockets, located on the underside of the system. These sockets accept 8MB or 16MB modules. - Page 36 Gateway Solo™ 2100 Multimedia Notebook à 6 . Turn the system over and remove the battery pack. See page 30. 7 . Locate the memory module access panel. 8 . Remove the screw and set it aside. 9 . Use your thumb to press against the edge of the expansion memory access panel and lift it away.
-
Page 37: Pcmcia Cards
User’s Guide PCMCIA Cards The system’s PC card slots are located behind the PC card door on the left side of the system. These slots accept two Type II PC cards or one Type III card. Since these are recessed slots, you can shut the door even when a PC card is installed. -
Page 38: Connections
The optional module (the receiver/transmitter) must be placed no farther away than three feet (one meter), with the module’s IR port directly facing the Gateway Solo 2100’s IR port. The other end connects to the remote system’s serial port. -
Page 39: Gateway 2000 Solo™ Mini-Docking Station
User’s Guide Gateway 2000 Solo™ mini-docking station The optional mini-docking station, or port replicator, duplicates many of the connectors and ports found on the system such as a line-out jack for audio, a MIDI/game port, PCMCIA slots, and an extra PS/2 port. Peripheral devices- —such as an external keyboard, mouse, or joystick—connect to the mini-... - Page 40 Gateway Solo™ 2100 Multimedia Notebook To connect the optional Gateway 2000 Solo™ mini-docking station: 1 . Save all work. 2 . Close the lid. 3 . Open the longer of the two port doors at the rear of the system. The port door will slide into the system leaving a flush mounting area.
-
Page 41: Using The System
User’s Guide Using the System Built-in Microphone/Speakers ..42 Recording a Meeting ....43 Loading a Screen Saver....44 Playing an Audio CD....45 Using a Modem..... 46... -
Page 42: Built-In Microphone/Stereo Speakers
Gateway Solo™ 2100 Multimedia Notebook Built-in Microphone/Stereo Speakers This system contains a built-in microphone and stereo speakers. Built-in microphone Stereo speakers Stereo speakers Figure 41. Locating the Built-in Speakers and Microphone There are several ways to control the volume. Click on Start, Settings, and Control Panel. Double click on the Multimedia icon. -
Page 43: Making An Audio Recording
User’s Guide Making an Audio Recording Use the built-in microphone, or connect an external microphone using the Mic port on the right side of the system to make an audio recording. Note: Remember, connecting an external microphone will disable the built- in microphone. -
Page 44: Loading A Screen Saver
Gateway Solo™ 2100 Multimedia Notebook Loading a Screen Saver Screen savers perform a valuable function for your system. The system will go into Screen Saver mode after the user-established time has passed. A screen saver keeps a moving picture on the screen to prevent ghosting. -
Page 45: Playing An Audio Cd
User’s Guide Playing an Audio CD The Gateway Solo™ 2100 Multimedia Notebook contains all the key features needed to enjoy your favorite audio CDs. Note: There must be power (either battery or AC) to the system before you can open the CD-ROM tray. -
Page 46: Using A Modem
Gateway Solo™ 2100 Multimedia Notebook Using a Modem Installing and using a modem with the Gateway Solo™ 2100 Multimedia Notebook is an easy process. If you have ordered the TelePath 28.8 data/fax modem with your notebook, the drivers for the modem have already been preloaded onto the system. - Page 47 Ok. The Select Device window appears. 6 . Select Gateway 2000 TelePath 28.8 XJACK PCMCIA, and click Ok . 7 . The modem is now enabled. Once your modem is connected you can talk to the world, or send and receive faxes on your system.
- Page 48 Gateway Solo™ 2100 Multimedia Notebook...
-
Page 49: Advanced Topics
User’s Guide Advanced Topics Power Saving Modes ....50 Setup Menus ....... 51 Popup Status Display ....62 Port/IRQ Configurations ....63 Zoomed Video ..... 64... -
Page 50: Power-Saving Modes
Gateway Solo™ 2100 Multimedia Notebook Power-Saving Modes If the system goes through long periods of inactivity, the system utilizes two power-saving modes. Standby mode à The system enters Standby mode if you do not use the keyboard or EZ Pad See page 59. -
Page 51: Setup Menus
User’s Guide Setup Menus The Gateway Solo™ 2100 Multimedia Notebook contains a series of Setup menus that control basic setup, security, and power settings. You can modify the options controlled by these screens to tailor the system’s functionality to best support the way you use it. -
Page 52: Main Menu
Gateway Solo™ 2100 Multimedia Notebook Main menu The Main menu controls a variety of basic setup options. Figure 44. Main Menu Figure 45. IDE Adapter 0 Master Sub-Menu Figure 46. IDE Adapter 1 Master Sub-Menu Figure 47. IDE Adapter 1 Slave Sub-Menu The following provides a brief overview of the options controlled through the Main menu. - Page 53 User’s Guide Diskette A: Selects the drive type. IDE Adapter 0 master: Note: Do not change these settings unless you are an advanced user! This sub-menu configures the IDE adapter (see Figure 45). Press Enter to access the sub-menu for this function. Press Esc when you have finished using the sub-menu, or wish to return to the Main menu.
-
Page 54: Advanced Menu
Gateway Solo™ 2100 Multimedia Notebook Advanced menu The Advanced menu contains operating system, system allocation (IRQ and register settings) and port assignment (COM and LPT) information. Caution: Setting the options on the menu to incorrect values may cause the system to malfunction. - Page 55 User’s Guide Option To Change Setting S e r i a l p o r t Select, use the Spacebar to access: COM1: 3F8h IRQ4; COM2: 2F8h IRQ3; COM3: 3E8h IRQ4; COM4: 3E8h IRQ3; Disabled I R p o r t Select, use the Spacebar to access: COM2: 2F8h IRQ3;...
-
Page 56: Security Menu
Gateway Solo™ 2100 Multimedia Notebook Security menu The Security menu contains options to set or change system passwords and set other system security precautions. Figure 50. Security Menu The following provides a brief overview of the options available through the Security menu. - Page 57 There is no easy way to erase a forgotten password. If you have not used the Backup password: function, you must send the system back to Gateway 2000 for a time-consuming repair. To backup the supervisor password: 1 . Make sure the floppy disk drive module is installed in the modular option bay.
- Page 58 Gateway Solo™ 2100 Multimedia Notebook To restore the supervisor password using the backup password diskette: à 1 . Make sure the floppy disk drive module is installed in the modular option See page 31. b a y . 2 . Power up the system.
-
Page 59: Power Menu
User’s Guide Power menu The Power menu contains the power management settings and system timeouts. Figure 51. Power Menu The following provides a brief overview of the options available through the Power menu. à Power button mode: See page 15. Sets power button functionality. - Page 60 Gateway Solo™ 2100 Multimedia Notebook à Suspend timeout: See page 50. The time that the system waits after the notebook is in Standby mode, before going into Suspend mode. The Power Management: function must be set to Customize before you can change this field. Use the Spacebar to choose 2, 4, 6, 8, 10...
-
Page 61: Exit Menu
User’s Guide Exit menu The Exit menu contains the options available once you have made changes to the Setup menus. Options available in this menu: Save changes & exit Exit without saving changes Load default values Load previous values Save changes. Figure 52. -
Page 62: Popup Status Display
Gateway Solo™ 2100 Multimedia Notebook Popup Status Display The Popup menu display feature is supported by the VGA controller chip and the system BIOS. The displays appear in the upper left corner of the display, and disappear after four seconds of inactivity. -
Page 63: Port/Irq Configurations
User’s Guide Port/IRQ Configurations The Gateway Solo™ 2100 Multimedia Notebook supports the use of multiple peripheral devices. However, you may periodically run into difficulties with port and IRQ allocations. Your system only has two available interrupts. You may need to disable the serial port, the IR port or both to gain system re- sources for a new peripheral. -
Page 64: Zoomed Video
Gateway Solo™ 2100 Multimedia Notebook Zoomed Video Zoomed video makes better use of your system resources. The video infor- mation for most PC cards goes through the CPU or system bus, taking up additional processing time. Zoomed video routes the video information directly to the video card, freeing up the processor for other tasks. -
Page 65: Accessories
User’s Guide Accessories... - Page 66 Have a personal hard drive and one for each major project. Modems — Modems are more than a convenience; they are almost a neces- sity if you want to stay connected to the world. Gateway 2000 carries the TelePath line of data/fax modems.
-
Page 67: Maintenance/Troubleshooting
User’s Guide Maintenance/Troubleshooting Care and Maintenance ....68 Virus Checking ..... 69 Hard Drive Utilities ....70 Reformatting the Hard Drive ..71 Troubleshooting ....72 Important Information ....76... -
Page 68: Care And Maintenance
Gateway Solo™ 2100 Multimedia Notebook Care and Maintenance The Gateway Solo™ 2100 Multimedia Notebook is a durable product. How- ever, when transporting the system, we recommend that you pack it into a computer carrying case or briefcase. Other ways to extend the life of your system: Don’t subject the system to excessive shock. -
Page 69: Virus Checking
User’s Guide Virus Checking Any computer system can pick up a ”virus.“ A virus is a hidden program that is usually attached to an executable file. When you start the file that contains the virus, it becomes active. Your system can ”catch“ a virus from shared disks or downloaded files. -
Page 70: Hard Drive Utilities
Gateway Solo™ 2100 Multimedia Notebook Hard Drive Utilities Some system tools in Windows 95 can help you preserve the life of your hard drive. Set up a maintenance schedule and perform these functions on a r e g u l a r b a s i s . -
Page 71: Reformatting The Hard Disk Drive
User’s Guide Reformatting the Hard Disk Drive If your system has been damaged, you might need to reformat your hard d i s k d r i v e . if the Fixed disk boot sector: option in the Security menu is set to Write à... -
Page 72: Troubleshooting
Gateway Solo™ 2100 Multimedia Notebook Troubleshooting Although the Gateway Solo™ 2100 Multimedia Notebook is designed for trouble-free performance, you may occasionally encounter minor problems. Most of these can be fixed by thoroughly double-checking connections and settings or by performing the procedures described below. -
Page 73: General
See page 57. a forgotten password. If you haven’t used the Backup password: option in the Security menu, you have to return your system to Gateway 2000 for a time- consuming repair. Call Gateway 2000 Customer Support. The screen looks a little dark. -
Page 74: Frequently Asked Questions
Gateway Solo™ 2100 Multimedia Notebook Frequently asked questions Why isn’t the PCMCIA controller or PC card recognized in Windows 95? 1 . Right click on the My Computer icon in the upper left corner of the d i s p l a y . - Page 75 User’s Guide Why can’t I print after the mini-docking station is disconnected from my system? 1 . Click Start, and Settings. 2 . Right click on the Printer icon for your printer. 3 . Make sure that Set as Default is selected. If Work Offline is selected, click o n i t t o d e s e l e c t i t .
-
Page 76: Important Information
If your computer is ever stolen, be sure to contact your local police and a Gateway 2000 representative at once. We can put a note on the account, so that if anyone calls in using the serial number for your notebook we can contact you immediately. -
Page 77: Calling Gateway 2000 U.s
Modem Required. The Gateway 2000 Web site contains a variety of information about Gateway 2000. Calling Gateway 2000 outside the U.S. Please refer to your Gateway 2000 Warranty Booklet for information and the contact numbers for Gateway 2000 outside the U.S. -
Page 78: Index
Gateway Solo™ 2100 Multimedia Notebook Index AC adapter 66 Caps Lock 73 Dimensions 7 auto 66 Care and Maintenance 5, 68 Disk defragmenter 70 s p e c i f i c a t i o n s 7 carrying case 68... - Page 79 User’s Guide FCC 4 Hard disk 66, 71, 72 Main menu 52, 72 Floppy disk drive module 31 timeout 60 Maintenance schedule 68, 69 Floppy drive access 58 troubleshooting 72 Memory 53 Fn key 19 Hard drive utilities 70 cache 53 Fn+Del 19 reformatting 71 Memory modules 35, 66...
- Page 80 Gateway Solo™ 2100 Multimedia Notebook Pad Lock 21, 73 Rear view 11 Task bar 25 key combination 19 Recording 43 Trademarks 4 Password playback 43 Troubleshooting 72, 73, 74, 75 backing up 57 Resume AC power 72 backup protection 8, 73...
Need help?
Do you have a question about the Solo 2100 and is the answer not in the manual?
Questions and answers