Table of Contents
Advertisement
Quick Links
R
GENMAX GENERATOR
INVERTER GENERATOR
USER'S MANUAL
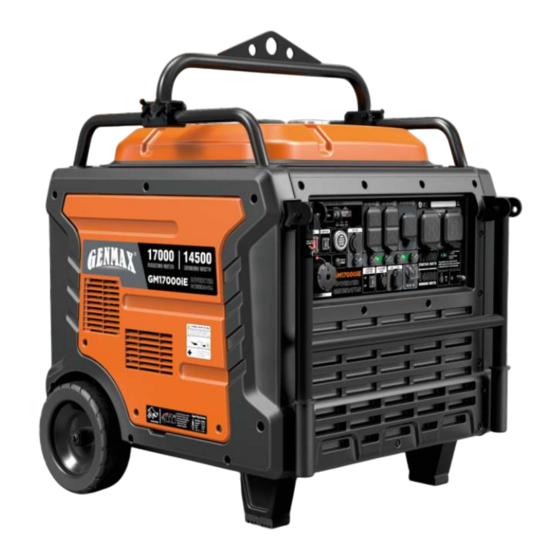
GM17000iE
GENERATOR POWER
17000
14500
GASOLINE INVERTER GENERATOR
WARNING: SAVE THIS MANUAL FOR FUTURE REFERENCE
This manual contains important information regarding safety. Operation,
maintenance and storage of this product. Before use, read carefully and
understand all cautions, warnings, instructions and product labels. Failure to do
so could result in serious personal injury and/or property damage.
Advertisement
Table of Contents

Related Manuals for GENMAX GM17000iE


Summary of Contents for GENMAX GM17000iE
- Page 1 GENMAX GENERATOR INVERTER GENERATOR USER'S MANUAL GM17000iE GENERATOR POWER 17000 14500 GASOLINE INVERTER GENERATOR WARNING: SAVE THIS MANUAL FOR FUTURE REFERENCE This manual contains important information regarding safety. Operation, maintenance and storage of this product. Before use, read carefully and understand all cautions, warnings, instructions and product labels.
- Page 2 DISCLAIMERS: All information, illustrations and specifications in this manual are based on the latest information available at the time of publishing. The illustrations used in this manual are intended as representative reference views only. Moreover, because of our continuous product improvement policy, we may modify information, illustrations and/or specifications to explain and/or exemplify a product, service or maintenance improvement.
- Page 3 DESCRIPTION OF FITTINGS Spark Plug Socket Wrench Dual-Purpose Screwdriver Funnel Phillips and slot blade Used in spark plug maintenance, screwdriver used for generator It's used to oil the generator. inspection, and installation. maintenance. Engine Oil NEMA L14-30P Bonding Plug Remote Control Key Insert the Bonding Plug into the output socket of the generator to Used to remotely start and stop...
-
Page 4: Limited Warranty
2. WHO GIVES THIS WARRANTY (WARRANTOR): CHONGQING DINKING POWER MACHINERY CO., LTD 3. WHO RECEIVES THIS WARRANTY(PURCHASER):The original purchaser (other than for purposes of resale) of the Genmax's inverter. 4. WHAT PRODUCTS ARE COVERED BY THIS WARRANTY: Any portable generator supplied or manufactured by Warrantor. -
Page 5: Table Of Contents
TABLE OF CONTENTS LIMITED WARRANTY SAFETY NAMES OF COMPONENTS CONTROL FUNCTIONS PREPARATIONS Adding Engine Oil........................14 Adding Gasoline..........................14 Connecting the Battery....................15 OPERATION Generator Location........................16 Starting the Generator........................16 Shutting Down the Generator.....................19 USING THE GENERATOR Service Environment of the Generator..................21 Generator Wiring........................21 Generator Grounding.........................22 Changing the Neutral Point......................23 Battery Charging........................23... -
Page 6: Safety
SAFETY Personal and property safeties of you and others are very vital. Please read the Safety Warning in the User's Manual and the decals of the generator set carefully.The Safety Warning can alert you to those potential hazards that could harm you and others. In front of each Safety Warning, there is one of four words "DANGER"... - Page 7 SAFETY CO Sentry Indicator Lights ● DO NOT run this product inside homes, garages, basements, crawlspaces, sheds, or other partially- enclosed spaces even if using fans or opening doors Carbon monoxide has accumulated around the and windows for ventilation. Carbon monoxide can generator.
- Page 8 SAFETY BEFORE USING THE GENERATOR ● The use of generators has laws and regulations, please comply with labor safety and health regulations, fire protection laws, electrical industry ● In order to operate the generator correctly, be familiar with the operation of the various components and laws, etc.
- Page 9 SAFETY ● Keep fuel away from sparks, open flames, heat, and ● Connect Parallel Kit only to terminals marked other ignition sources. "Parallel Outlets" on the front of the Generator. ● Check fuel lines, tank, cap, and fittings frequently for ●...
- Page 10 SAFETY SAFETY LABELS AND DECALS...
-
Page 11: Names Of Components
NAMES OF COMPONENTS airflow in unit to regulate engine ① Fuel Tank Cap: Open the fuel tank temperatures. cap and fill with proper amount of gasoline. ⑦ Right Outer Cover: Unscrew the bolts, remove the outer cover, and ② Transport Crossbeam Used for add or change the oil, maintain the transportation and handling. -
Page 12: Control Functions
CONTROL FUNCTIONS CONTROL PANEL FEATURES ⑬ The communication ① Main Switch: Manage battery power and shutdown. AUTO GEN START/SERIES: Tip: If you do not use the generator for more than 7 days interface for automatically starting and stopping the (168 hours), please press the main switch to the "OFF" generator. - Page 13 CONTROL FUNCTIONS OUTPUT DESCRIPTION OF THE AC SOCKET 240V ① 240V(Voltage)×50A(Current)=12000W(Output Power) Single socket output ATTENTION: ①②③ can A load output at the same time, but the total power output of the socket can not exceed the rated power of the generator, ②...
- Page 14 CONTROL FUNCTIONS DIGITAL DISPLAY CENTER ① : Represents single run time, goes from 0 ④ FREQUENCY: Frequency display. at each startup. ⑤ LOAD: Load power display. ② : Represents total operation time of the ⑥ POWER: Green light means normal operation. generator.
-
Page 15: Preparations
PREPARATIONS ADDING ENGINE OIL No oil is filled into this generator when being delivered. Do not start up the generator without filing sufficient oil. Recommended Engine Oil Type Your generator was functionally tested in the factory and may 10W-30 contain minimum residual oil. Additional oil is required to operate the unit. -
Page 16: Connecting The Battery
PREPARATIONS 1. Make sure the generator is on a solid, flat, level surface. 2. Unscrew the fuel cap and set it aside. 3. Slowly add gasoline to the fuel tank. Be careful not to overfill. 4. Replace the fuel cap and wipe up any spilled gasoline with a dry cloth then remove the cloth from the area. -
Page 17: Operation
OPERATION GENERATOR LOCATION ● NEVER operate the generator inside any building, garage, basement, crawlspace, shed, or enclosure, including the generator compartment of a recreational vehicle. ● NEVER operate or start the generator in the back of an SUV, camper, trailer, truck bed (regular sides, flat or other configuration), under staircases, stairwells, next to walls or buildings, or any other location that could limit airflow or trap exhaust. - Page 18 OPERATION 4. Press the LOW IDLE Switch to "OFF". 5. Press the Main Switch to "ON". 6. Choose the Starting Method a. Push Button Start Press the start button for 1-3 seconds, then release, to start the generator. b. Remote Start Push and hold the ON button on the remote start key fob for one second.
- Page 19 OPERATION COMMON PROBLEMS WITH STARTING THE GENERATOR: Start the generator to run normally without output ? 1. Check whether the green light of the GFCI socket is on. If the green light is not on, press the RESET button after the generator is started to make the green light on.
-
Page 20: Shutting Down The Generator
OPERATION Overload Indicator Note: The OVERLOAD light may turn on for a few seconds as a large device starts. This is normal for loads approaching the capacity of this generator. 1.The total combined load through the outlets on the generator must not exceed the running power of the unit. 2. -
Page 21: Important Notes
OPERATION If not used for a long time, please perform the following operations 3. Press the Main Switch to "OFF". Tip: If you do not use the generator for more than 7 days (168 hours), please press the main switch to the "OFF" position, which can prevent the battery from running out. -
Page 22: Using The Generator
USING THE GENERATOR SERVICE ENVIRONMENT OF THE GENERATOR • Applicable temperature: 23℉/-5℃ ~ 104℉/40℃; • Applicable humidity: below 95%; • Applicable altitude: regions below 1,500 m (It shall be used by reducing power in regions above 1,000 m). Standard atmospheric condition •... -
Page 23: Generator Grounding
USING THE GENERATOR Connection of AC power All electrical equipment shall be disconnected before inserting the plug. • Make sure that all electrical equipment, including wires and plugs, are in good condition before connecting to the generator; • Make sure that all loads driven by the generator are within rated load range; •... -
Page 24: Changing The Neutral Point
USING THE GENERATOR CHANGING THE NEUTRAL POINT This generator is "neutral floating" state, if you want to change to a "neutral bonded" state, insert the Bonding Plug into the output socket of the generator to change the neutral floating to neutral bonded status. NEMA L14-30P Bonding Plug BATTERY CHARGING... -
Page 25: Connecting Automatic Start/Stop Devices
USING THE GENERATOR CONNECTING AUTOMATIC START/STOP DEVICES This generator can be controlled to start and stop through an external intelligent control system. When using other external intelligent control systems to control the generator, please carefully read the manual provided with the equipment. Connect GM1600WH GM1600WH is connected to the generator and automatically starts the generator to charge it when the power station's electricity level is below 30%;... -
Page 26: Service And Maintenance
SERVICE AND MAINTENANCE Good maintenance and service is the best guarantee for safe, economical and zero-failure operation. It also contributes to environmental protection. In order to keep the generator in good condition, you must inspect and maintain it regularly. The maintenance schedule is as follows: Then every three Maintenance cycle... -
Page 27: Checking And Filling Fuel
SERVICE AND MAINTENANCE Please shut down the engine first before performing any maintenance. The engine shall be placed in a horizontal position. In order to prevent the engine from starting up, separate spark plug cap shall be separated from spark plug. -
Page 28: Engine Oil Change
SERVICE AND MAINTENANCE Turn off the generator and wait for the generator to completely cool down. 1. There is a spark plug on each of the left and right sides of the Spark Plug generator. Pull out the spark plug cap. Spark Plug Cap 2. -
Page 29: Cleaning/Replacing The Air Filter
SERVICE AND MAINTENANCE NOTE: Change the oil while the engine is warm but not hot. Warm engine oil drains more quickly and thoroughly than cool lubricant. Contact with hot lubricant will cause serious burns. 1. The oil dipstick is on the right side of the generator. 2. -
Page 30: Clean The Fuel Filter
SERVICE AND MAINTENANCE 3. Clean the components with cleaning agent. After cleaning, wrap the components in a cloth and screw them dry. NOTE: If the air filter element is damaged, replace it with a new one. 4. Drip a few drops of oil to foam filter element and squeeze off excess oil. -
Page 31: Storage And Transport
STORAGE AND TRANSPORT GENERATOR STORAGE If it is stored long-term, in order to prevent aging, you shall take some storage measures. 1. Turn off the generator and let it cool completely. 2. Open fuel tank cap, to take out fuel filter screen. Pump all fuel in fuel tank into special fuel tank, and then reassemble fuel tank cap back. -
Page 32: Troubleshooting
TROUBLESHOOTING... - Page 33 TROUBLESHOOTING...
-
Page 34: Technical Parameters
TECHNICAL PARAMETERS Item GM17000iE Rated Power (kW) 14.5 Max. Power (kW) 17.0 2V82F Engine Model Input valve:0.10~0.15 mm, Output valve:0.15~0.20 mm Valve Clearance 92×69 Stroke × Bore (mm) Engine Type 4-stroke Displacement (cc) Gas Distribution Mode Cooling Mode Forced cooling wind... -
Page 35: Circuit Diagram
CIRCUIT DIAGRAM... -
Page 36: Choosinga Generator
CHOOSING A GENERATOR... - Page 37 In production management, based on orderly, efficient, scientific principles. trying to do as better as possible in product design, development, production, inspection, etc. to make our production can keep orderly. And will continue to make improvement to make sure that keep the competitiveness.
Need help?
Do you have a question about the GM17000iE and is the answer not in the manual?
Questions and answers