Table of Contents
Advertisement
Quick Links
Advertisement
Table of Contents

Subscribe to Our Youtube Channel
Related Manuals for Pfeiffer Vacuum SmartTest Cart


Summary of Contents for Pfeiffer Vacuum SmartTest Cart
- Page 1 Betriebsanleitung • Operating Instructions Leak Detector With Cart SmartTest Cart...
- Page 2 Information on leak detectors → IG 0100 BE. Product identification The data specified on the rating plate are necessary in correspondence with Pfeiffer Vacuum. Therefore transfer the data to the copy, in Fig. 1. Helium leak detector SmartTest For Information on the leak detector see Operating Instructions → IG 0100 BE Cart for SmartTest Abb.
- Page 3 Validity This document is valid for products with the following part numbers: PT 445 415 Cart without SmartTest 230 V PT 445 416 Cart without SmartTest 100 - 120 V PT L02 050 SmartTest HLT 565 - Cart with HLT 550 and UNO 3011 (230 V) 051 SmartTest HLT 565 - Cart with HLT 550 and UNO30M (100 - 120 V) PT L02 060 SmartTest HLT 572 - Cart with HLT 550 and XtraDry (230 V)
-
Page 4: Table Of Contents
Product identification Validity Content Safety Conventional use Personnel qualifications Symbols used Responsibility and guarantee General Observations Transporting the SmartTest helium leak detector with cart Overview Scope of delivery Versions Structure and function Technical data Start-up Preparing the mains connection Loosen the transport locks Connect the cart Operation Maintenance... -
Page 5: Safety
Safety Conventional use • The SmartTest helium leak detector cart is designed exclusively for the storage and transport of a SmartTest leak detector (component) and an approved backing pump. • Use for the intended purpose includes complying with the installation, commissioning, operating and maintenance instructions prescribed by the manufacturer. -
Page 6: Symbols Used
Note Specifications for handling or use Failure to observe these can lead to faults or minor material damage. Responsibility and guarantee Pfeiffer Vacuum will accept no responsibility and liability if the user or third persons • ignore this document, •... -
Page 7: General Observations
General Observations The following regulations must be observed in addition to the safety-relevant notes in the appropriate chapters: • The SmartTest helium leak detector with cart has been built according to the state-of-the-art and is safe to operate. However, the system may be dangerous when used improperly by untrained personnel or when it is used for purpose for which it was not intended. -
Page 8: Transporting The Smarttest Helium Leak Detector With Cart
Transporting the SmartTest helium leak detector with cart Warning Caution: jerky movements Jerky movements during operation of may cause damage at the turbo pump. Avoid jerky movements and vibrations during operation as well as 4 minutes after switching off the leak detector. I.e. pulling and pushing over cables, high thresholds. -
Page 9: Overview
Overview Scope of delivery The scope of delivery differs according to the order. It may include the following parts: • cart with handle • SmartTest leak detector (component) • backing pump (in three versions) • power cable • Allen key #5 Versions Designation Component... -
Page 10: Structure And Function
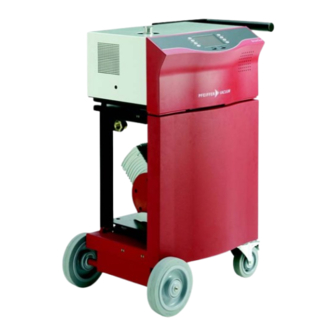
Structure and function The SmartTest leak detectors - series HLT 565, 572 and 575 - serve for measurement and localisation of small and very small leaks both on components and modules and on fittings and systems. They are suitable both for underpressure leak testing (with or without partial current operation) and for overpressure leak testing (sniffing method). - Page 11 HLT572 Fig. 3 SmartTest HLT 550 Dry backing pump XtraDry 150-2 Power switch HLT 550 Transportation lock Main switch with motor Cart wheel with brake protection switch Power switch XtraDry 150-2 Main power connection...
- Page 12 HLT 575 Fig. 4 SmartTest HLT 550 Dry backing pump TS 620 Power switch HLT 550 Cart wheel with brake Main switch with motor Sound absorber protection switch Transportation lock Main power connection...
- Page 13 Cart Mounting of the handle: insert the handle and secure it with the added screws. Fig. 5 Cart empty with handle Main switch with motor Main power connection protection switch Cart wheel with brake Power socket for backing pump...
-
Page 14: Technical Data
Technical data Dimensions Fig. 6 Wheels • 4 wheels, of which 2 wheels are steerable and with brakes • Ø 200 mm, or 120 mm • antistatic Weight without backing pump, approx. 50 kg without leak detector Mains connection Cart without backing pump, without SmartTest HLT 550 PT 445 415 Voltage 230V~, 50 Hz PT 445 416... - Page 15 HLT572: Cart with XtraDry and SmartTest HLT 550 PT L02 060 Voltage 230 V~, 50 Hz, power <700 VA PT L02 061 Voltage 120 V~, 60 Hz, power <700 VA PT L02 062 Voltage 100 V~, 50/60 Hz, power <700 VA HLT575: Cart with dry pump and SmartTest HLT 550 PT L02 065 Voltage 230 V~, 50 Hz, power <900 VA...
-
Page 16: Start-Up
Start-up Preparing the mains connection Warning Caution: Mains voltage Connecting to a different mains voltage/frequency can lead to defects. The local mains voltage/frequency must match that of the product. Compare the voltage specified on the rating plate with the local mains voltage/ frequency. -
Page 17: Connect The Cart
Connect the cart Motor protection switch Before connecting the SmartTest electrically, check that the voltage and frequency specified on the rating plate match the mains supply. Check the adjustment of the current value at the yellow preselection switch. Abb. 7 Motor protection switch with current preselection The correct setting of the motor protection switch can be taken from the following table. - Page 18 Exhaust gas connection If necessary, remove the silencer and connect the exhaust pipe to the exhaust gas connection (Ø 20 mm) and feed to the discharge pipe. Fig. 8 Fig. 9 Exhaust gas connection without silencer Mains connection Connect the power cable. Danger S TOP Caution: Mains voltage...
- Page 19 Wiring diagram Fig. 10...
-
Page 20: Operation
Operation Switch on the power switch of the HLT 550 and the backing pump (UNO 30 M and XtraDry 150-2). Fig. 11 Start the SmartTest by actuating the motor protection switch Fig. 12 Observe the operating instructions of the SmartTest leak detector (component) and the installed backing pump. -
Page 21: Maintenance
Maintenance See operating instructions of the individual components. For the HLT 575 it is also recommended to change the silencer cartridge every 1,000 operating hours. -
Page 22: Troubleshooting
Troubleshooting Problem Possible cause Remedy No mains voltage Plug in power cable SmartTest and backing Motor protection switch Switch on motor protection pump do not react switch Plug in power cable SmartTest display No mains voltage stays dark Check mains fuse Switch on power switch (if available) Backing pump does... -
Page 23: Return Product
• Fill in the RMA form and send it to your service address by fax or e-mail • Enclose the RMA confirmation from Pfeiffer Vacuum with the transmission • Fill in the contamination declaration and enclose it with the transmission (obligatory!). -
Page 24: Disposing Of The Product
Disposing of the product Warning Caution: Materials which are harmful to the environment Products, materials etc. have to be disposed of specially. Dispose of such harmful materials according to local regulations. Danger S TOP Caution: Contaminated parts Contaminated parts may be damaging to the health. Find out about possible contamination before starting work. -
Page 25: Spare Parts / Accessories
Spare Parts / Accessories Spare parts Order number Silencer cartridge B 8199 999 XD Screw fitting nozzle G ¾’’ P 4169 142 M Screw fitting nozzle G ¾’’ P 4169 144 M Accessories Order number Remote control Remote control unit PT 445 400 Connecting cable for remote control, 4 m PT 445 401... -
Page 26: Appendix
Appendix Literature list Document No Designation Content IG 0100 BE Operating Instructions SmartTest Description of leak detector IG 0105 BE Communication Protocol SmartTest Interface Description IG 0108 BE Maintenance Instructions SmartTest Maintenance description leak detector PD 0006 BE Operating Instructions UNO 30 M Description of rotary vane pump PU 0031 BE Operating Instructions XtraDry... -
Page 27: B Contamination Declaration
Declaration of Contamination The service, repair, and/or disposal of vacuum equipment and components will only be carried out if a correctly completed declaration has been submitted. Non-completion will result in delay. This declaration may only be completed (in block letters) and signed by authorized and qualified staff. Description of product Reason for return Type... -
Page 28: C Declaration Of Conformity
Guidelines, harmonised standards, national standards in languages and specifications which have been applied: DIN EN ISO 12100-1,2 DIN EN 60204-1 DIN EN 61000-6-2 DIN EN 61000-6-4 Unterschriften/Signatures: Pfeiffer Vacuum GmbH Berliner Str. 43 Unterschriften: 35614 Asslar Germany (M. Bender) (Dr. M. Wiemer) Geschäftsführer... - Page 29 Roots pumps Dry compressing pumps Leak detectors Valves Components and feedthroughs Vacuum measurement Gas analysis System engineering Service Pfeiffer Vacuum Technology AG · Headquarters/Germany Tel. +49-(0) 64 41-8 02-0 · Fax +49-(0) 64 41-8 02-2 02 · info@pfeiffer-vacuum.de · www.pfeiffer-vacuum.net...
Need help?
Do you have a question about the SmartTest Cart and is the answer not in the manual?
Questions and answers