
Related Manuals for Hisense R652


Summary of Contents for Hisense R652
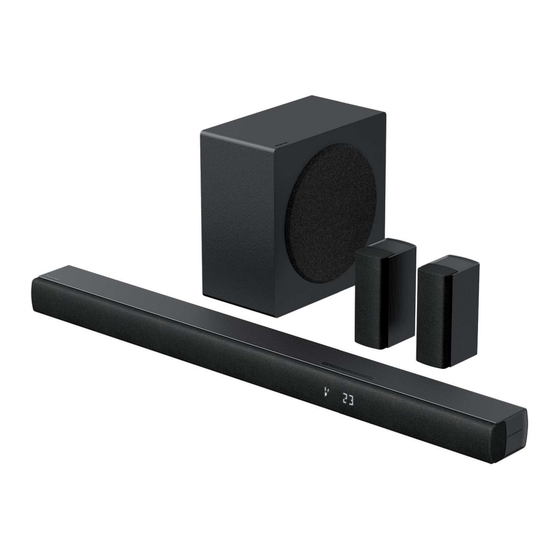
- Page 1 5.1CH Soundbar with Wireless Subwoofer Model: R652 USER MANUAL Before using the soundbar, please read this manual thoroughly and retain it for future reference.
-
Page 2: Table Of Contents
Contents Important Safety Instructions ......................3 Safety .........................................3 Caution ........................................4 Warning ........................................4 What’s in the Box ..........................5 Identifying the Parts ........................6 Soundbar ........................................6 Wireless Subwoofer ....................................6 Surround Speakers ....................................6 Remote Control .....................................7 Preparations ............................. 7 Prepare the Remote Control ................................7 Replace the Remote Control Battery .............................7 Placement and Mounting ........................ -
Page 3: Important Safety Instructions
1. Important Safety Instructions If the provided plug does not fit into your C AUTION outlet, consult an electrician for replacement RISK OF ELECTRIC SHOCK of the obsolete outlet. DO NOT OPEN Protect the power cord from being walked on or pinched particularly at plugs, convenience AV IS receptacles, and the point where they exit... -
Page 4: Caution
Battery usage CAUTION 1.2 Caution To prevent battery leakage which may result in Use of controls or adjustments or performance bodily injury, property damage, or damage to the of procedures other than those described apparatus: herein, may result in hazardous radiation Install all batteries correctly, + and - as exposure or other unsafe operation. -
Page 5: What's In The Box
2. What’s in the Box Soundbar Wireless Subwoofer Surround Speakers x 2 Remote Control / Surround Speaker AC Power Cord x 2 AAA Batteries x 2 Cable x 1 User Manual/Warranty card HDMI Cable Wall Bracket /Quick start guide AC Adapter •... -
Page 6: Identifying The Parts
3. Identifying the Parts 3.1 Soundbar BACK 3.2 Wireless Subwoofer Pairing Indicator Remote Control Sensor Light stops blinking once the subwoofer is Receive signal from the remote control. paired with the soundbar. Display Window PAIR button Show the current status. Activate the pairing function between (ON/OFF) button the soundbar and subwoofer. -
Page 7: Remote Control
3.4 Remote Control Switch the soundbar between ON and STANDBY mode. 2 SURR Switch the surround PURE/PRO/OFF. Press and hold to adjust surround sound level. 3 VOL + /VOL − Increase/decrease the volume level. 4 BASS + / − Adjust bass level. (MUTE) Mute or resume the sound. -
Page 8: Placement And Mounting
5. Placement and Mounting 5.1 Placement If your TV is placed on a table, you can place the soundbar on the table directly in front of the TV stand, centered with the TV screen. If your TV is attached to a wall, you can mount the soundbar on the wall directly below the TV screen. -
Page 9: Wall Mounting The Surround
For Hisense EzPlay, when the Soundbar connects The eARC/ARC (Enhance Audio Return Channel) with a Hisense TV via HDMI eARC/ARC, there will be function allows you to send audio from your ARC- a Soundbar Setting menu on the TV, and you can... -
Page 10: Use The Optical Socket
AUX socket on the soundbar. Note: • This function is available only when both Soundbar and TV support Hisense Ezplay. • This function requires Soundbar and TV connected via HDMI eARC/ARC, and the CEC of the TV must be trned ON. -
Page 11: Connect Power
6.5 Connect Power Manual Pairing Risk of product damage! Ensure that all cables are well connected and the main unit is in Standby mode. • Risk of product damage! Ensure that the power supply voltage corresponds to the Press the button on the unit or remote voltage printed on the back or the underside control to switch the main unit on. -
Page 12: Basic Operation
8. Basic Operation Bluetooth BT IN • Connected NO BT • Not Connected 8.1 Standby/ON It will automatically turn on when the power cord is connected. NO U5B No USB connected • Press the button to switch the soundbar STANDBY mode. 8.4 Adjust the Volume •... -
Page 13: Factory Reset
In this case, the Soundbar will mute. This is NOT a defect. Select “Hisense R652” in the pairing list. Ensure that the audio setting of the input source The system is successfully connected and (e.g. -
Page 14: Setup Menu
Listen to music from Bluetooth Device 12. Setup Menu If the connected Bluetooth device supports During ON mode, press and hold the Advanced Audio Distribution Profile (A2DP), button for 3 seconds to open the menu. you can listen to the music stored on the Select the content with the buttons. -
Page 15: Troubleshooting
13. Troubleshooting To keep the warranty valid, never try to repair the system yourself. If you encounter problems when using this soundbar, check the following points before requesting service. Problem Solution No power • Ensure that the AC cord of the apparatus is properly connected . •... -
Page 16: Specifications
14. Specifications Brand Hisense Model R652 Soundbar Power Supply 100-240V~ 50/60Hz 50 W Power Consumption < 0.5 W (StandBy) 500mA Hi-Speed USB (2.0) / FAT32 / FAT16 32G (max) , WAV / WMA / MP3 / FLAC. Dimension (WxHxD) 902 x 62.3 x 91 mm / 35.5" x 2.4" x 3.6"... - Page 17 WARNING: This product can expose you to chemicals including Lead, which is known to the State of California to cause cancer. For more information go to: www.P65Warnings.ca.gov. Réglement de la FCC (pour les clients américains) REMARQUE : FCC INFORMATION (for US customers) •...
- Page 18 The Bluetooth® word mark and logos are registered trademarks owned by Bluetooth SIG, Inc. and any use of such marks by The HISENSE International Industries, Incorporated is under license. Other trademarks and trade names are those of their respective owners.
-
Page 19: Manuel D'utilisation
Barre de son 5.1CH avec caisson de basse sans fil Modèle : R652 MANUEL D'UTILISATION Avant d'utiliser la barre de son, veuillez lire attentivement ce manuel et le conserver pour référence ultérieure. - Page 20 Table des matières Consignes de sécurité ........................3 Sécurité ........................................3 Attention ........................................4 Avertissement ......................................4 Contenu de la boîte .......................... 5 Identification des pièces ........................6 Barre de son ......................................6 Caisson de basse sans fil ..................................6 Enceintes Surround ....................................6 Télécommande ......................................7 Préparatifs............................
-
Page 21: Consignes De Sécurité
1. Consignes de sécurité deux lames et une troisième broche pour la masse. La lame plus large et la troisième broche sont là pour votre sécurité. Si la prise fournie ne rentre pas dans votre prise murale, prenez contact avec un électricien pour le AVIS remplacement de la prise. -
Page 22: Attention
1.2 Attention MISE EN GARDE relative aux piles L’utilisation de dispositifs de commande ou de Pour éviter les fuites des piles qui pourraient réglage ou l’exécution de procédures autres entraîner des blessures corporelles, des dommages que celles décrites dans le présent document matériels ou endommager l’appareil : −... -
Page 23: Contenu De La Boîte
2. Contenu de la boîte Barre de son Caisson de basse sans fil Enceinte Surround × 2 Pour le Royaume-Uni Pour l’Australie Pour l’UE Pour les États-Unis Télécommande / Piles AAA × 2 Câble d’enceinte Surround Cordon d'alimentation CA × 2 ×... -
Page 24: Identification Des Pièces
3. Identification des pièces 3.1 Barre de son PARTEA DE SUS BACK PARTEA DIN SPATE 1 Capteur de télécommande 3.2 Caisson de basse sans fil Permet de recevoir le signal de la télécommande. 1 Indicateur d’appariement 2 Fenêtre d’affichage Le voyant cesse de clignoter une fois que le Affiche l’état actuel. -
Page 25: Télécommande
3.4 Télécommande Basculer la barre de son entre le mode ACTIVER et le mode VEILLE. SURR Basculez le Surround sur PURE/PRO/ARRÊT. Appuyez longuement pour régler le niveau du son surround. − VOL + /VOL Permettent d’augmenter/diminuer le volume. BASS + / −... -
Page 26: Placement Et Montage
5. Placement et montage 5.1 Position Si votre téléviseur est placé sur une table, vous pouvez placer la barre de son sur la table directement devant le support de téléviseur, au centre de l’écran du téléviseur. Si votre téléviseur est fixé à un mur, vous pouvez installer la barre de son sur le mur directement sous l’écran du téléviseur. -
Page 27: Montage Mural Des Enceintes Surround
Utiliser la fonction Hisense EzPlay vous permet d'envoyer le son de votre téléviseur Pour Hisense EzPlay, lorsque la barre de son se compatible ARC à votre barre de son via une seule connecte à un téléviseur Hisense via HDMI eARC/ connexion HDMI. -
Page 28: Utiliser La Prise Optical
• Cette fonction est uniquement disponible lorsque la barre de son et le téléviseur prennent Casque en charge Hisense Ezplay. • Cette fonction nécessite une barre de son et un téléviseur connectés via HDMI eARC/ARC, et l’activation du CEC sur le téléviseur. -
Page 29: Branchement Électrique
6.5 Branchement électrique Si l’association automatique échoue, associez manuellement le subwoofer à l’unité principale. Risque d'endommager le produit ! • Risque d'endommager le produit ! Assurez-vous que la tension d’alimentation correspond à la Association manuelle tension imprimée sur le dos ou sur le dessous Assurez-vous que tous les câbles sont bien de l’appareil. -
Page 30: Fonctionnement De Base
8. Fonctionnement de base Bluetooth • Connecté 8.1 Veille/MARCHE • Non connecté Il s’allume automatiquement lorsque le cordon d’alimentation est branché. • Appuyez sur le bouton pour mettre la barre Pas de connexion USB de son en mode VEILLE. • Débranchez la fiche secteur de la prise secteur si 8.4 Réglage du volume vous voulez ÉTEINDRE complètement la barre de... -
Page 31: Réinitialisation D'usine
Bluetooth®. • L’écran affichera NO BT. Activez votre appareil Bluetooth et sélectionnez le mode de recherche. Sélectionnez « Hisense R652 » dans la liste d’appariement. Le système est connecté avec succès et l'écran affiche BT IN. -
Page 32: Menu Paramétrage
• Si vous souhaitez connecter votre barre de 12. Menu Paramétrage son à un autre appareil Bluetooth, maintenez enfoncée la touche sur la télécommande pour En mode MARCHE, appuyez longuement sur le déconnecter l’appareil Bluetooth actuellement bouton pendant 3 secondes pour ouvrir le connecté. -
Page 33: Dépannage
13. Dépannage Pour garder la validité de la garantie, n’essayez jamais de réparer le système. Si vous rencontrez des problèmes lors de l’utilisation de cette barre de son, vérifiez les points suivants avant de faire appel au service après-vente. Problème Solution Pas d’alimentation •... -
Page 34: Spécifications
14. Spécifications Marque Hisense Modèle R652 Barre de son Alimentation électrique 100-240 V~ 50/60 Hz 50 W Consommation d’énergie < 0,5 W (Veille) 500 mA USB haute vitesse (2.0) / FAT32 / FAT16 32 Go (max) , WAV / WMA / MP3 / FLAC. - Page 35 Barra de sonido de 5.1 canales con subwoofer inalámbrico Modelo: R652 MANUAL DE USUARIO Antes de usar la barra de sonido, lea completamente este manual y consérvelo para futuras referencias.
- Page 36 Contenido Instrucciones importantes de seguridad ..................3 Seguridad ........................................3 Precaución .......................................4 Advertencia ......................................4 Contenido de la caja ......................... 5 Identificación de las piezas ......................6 Barra de sonido .....................................6 Subwoofer inalámbrico ..................................6 Altavoces envolventes ..................................6 Mando a distancia ....................................7 Preparaciones ........................... 7 Preparar el mando a distancia ................................7 Sustituir la batería del mando a distancia ............................7 Colocación y montaje ........................
-
Page 37: Instrucciones Importantes De Seguridad
1. Instrucciones importantes de seguridad tierra. El contacto más ancho o el tercero de PRECAUCIÓN puesta a tierra se proporciona para brindarle RIESGO DE DESCARGAS ELÉCTRICAS seguridad. Si la clavija proporcionada no NO ABRIR encaja en su toma de corriente, consulte a un electricista para cambiar la toma de corriente AVIS obsoleta. -
Page 38: Precaución
1.2 Precaución Uso de la batería PRECAUCIÓN Para evitar fugas de la batería que pueden provocar El uso de controles o ajustes o la realización de lesiones corporales, daños a la propiedad o daños al procedimientos distintos a los descritos en este aparato: documento, pueden provocar una exposición Instale todas las baterías correctamente, + y -... -
Page 39: Contenido De La Caja
2. Contenido de la caja Barra de sonido Subwoofer inalámbrico Altavoces envolventes × 2 Para el Reino Unido Para AUS Para la UE Para EE. UU. Mando a distancia / Cable de altavoz Cable de alimentación de CA × 2 envolvente ×... -
Page 40: Identificación De Las Piezas
3. Identificación de las piezas 3.1 Barra de sonido PARTE SUPERIOR PARTE POSTERIOR BACK 3.2 Subwoofer inalámbrico 1 Indicador de emparejamiento 1 Sensor del mando a distancia La luz deja de parpadear una vez que el subwoofer Recibir la señal del mando a distancia. se ha emparejado con la barra de sonido. -
Page 41: Mando A Distancia
3.4 Mando a distancia Cambie la barra de sonido entre el modo ENCENDIDO y EN ESPERA. SURR Alternar el modo envolvente entre PURE/PRO/DESACTIVADO. Mantenga presionado para ajustar el nivel de sonido envolvente. VOL + /VOL − Aumentar/disminuir el nivel de volumen. BASS + / −... -
Page 42: Colocación Y Montaje
5. Colocación y montaje 5.1 Colocación Si su TV está colocado sobre una mesa, puede colocar la barra de sonido en la mesa directamente frente al soporte del TV, centrada con la pantalla del TV. Si su TV está fijado a una pared, puede montar la barra de sonido en la pared directamente debajo de la pantalla del TV. -
Page 43: Montaje En Pared De Envolventes
Para Hisense EzPlay, cuando la barra de sonido le permite enviar audio desde su TV compatible se conecta con un TV Hisense a través de HDMI con ARC a su barra de sonido a través de una eARC/ARC, habrá un menú de ajustes de la barra única conexión HDMI. -
Page 44: Uso De La Toma Optical
• Esta función está disponible solo cuando la barra de sonido y el TV son compatibles con Audífonos Hisense Ezplay. • Esta función requiere que la barra de sonido y el TV estén conectados a través de HDMI eARC/ ARC, y el CEC del TV debe estar encendido. -
Page 45: Conexión De Alimentación
6.5 Conexión de alimentación Si falla el emparejamiento automático, empareje el subwoofer con la unidad principal ¡Riesgo de daños al producto! manualmente. • ¡Riesgo de daños al producto! Asegúrese de que el voltaje de la fuente de alimentación Emparejamiento manual corresponda al voltaje impreso en la parte Asegúrese de que todos los cables están bien posterior o inferior de la barra de sonido. -
Page 46: Operación Básica
8. Operación básica Bluetooth • Conectado 8.1 Espera/ENCENDIDO • No conectado Se encenderá automáticamente cuando el cable de alimentación esté conectado. • Presione el botón para cambiar el modo No hay ningún USB conectado ESPERA de la barra de sonido. •... -
Page 47: Restauración De Fábrica
HDMI eARC/ARC / OPTICAL entrada coaxial. Seleccione "Hisense R652" en la lista de emparejamiento. El sistema se conectó exitosamente y la pantalla mostrará BT IN. 10. Operación de USB •... -
Page 48: Menú De Configuración
Para desconectar la función Bluetooth, puede 12. Menú de configuración hacer lo siguiente: Durante el modo de ENCENDIDO, mantenga Cambie a otra función de la unidad. pulsado el botón durante 3 segundos para Desactive la función de su dispositivo abrir el menú. Bluetooth. -
Page 49: Solución De Problemas
13. Solución de problemas Para mantener la garantía válida, nunca intente reparar el sistema usted mismo. Si tiene problemas al utilizar esta barra de sonido, verifique los siguientes puntos antes de solicitar servicio. Problema Solución No hay alimentación • Asegúrese de que el cable de CA esté conectado correctamente. •... -
Page 50: Especificaciones
14. Especificaciones Marca Hisense Modelo R652 Barra de sonido Suministro de energía 100-240 V~ 50/60 Hz 50 W Consumo de energía < 0,5 W (En espera) 500 mA USB de alta velocidad (2.0) / FAT32 / FAT16 32 GB (máx), WAV / WMA / MP3 / FLAC. - Page 51 R652 203022733...
Need help?
Do you have a question about the R652 and is the answer not in the manual?
Questions and answers
How to pair rear speakers with sub, soindbar
To pair Hisense R652 rear speakers (Surround) with the subwoofer and soundbar:
1. Connect the mains cables of the soundbar, subwoofer, and surround speakers to AC power sockets.
2. Press and hold the button on the soundbar or its remote control for a few seconds until the display shows “SW PAIRING”.
3. Press and hold the PAIR button on the subwoofer or rear speakers for a few seconds. The Pair indicator will blink quickly.
4. When pairing is successful, the Pair indicators will stay lit and the soundbar display will show “SW IN”.
5. If the Pair indicator keeps blinking, unplug the subwoofer or surround speakers, wait 3 minutes, reconnect the power, and repeat steps 1–4.
This answer is automatically generated
How to pair speakers with subwoofer on R652
To pair the speakers with the subwoofer on the Hisense R652:
1. Ensure the subwoofer and surround speakers are within 6 meters of the soundbar in an open space.
2. Turn on the main soundbar unit.
3. The subwoofer and surround speakers should automatically pair with the soundbar on first use.
4. Check the indicator lights:
- Fast blinking: Pairing mode.
- Slow blinking: Connection failed.
- Always on: Successfully paired.
5. If pairing fails, follow these steps:
- Do not press the Pair button on the subwoofer or surround speakers unless manual pairing is needed.
- Eliminate strong interference sources and retry the pairing process.
If necessary, repeat the steps to ensure successful pairing.
This answer is automatically generated
Como emparejar el woofer a la barra de sonido
To pair the Hisense R652 subwoofer to the soundbar, follow these steps:
1. Ensure all power connections are completed.
2. Press and hold the pairing button on the soundbar or remote control for a few seconds until the display shows "SW PAIRING."
3. Press and hold the PAIR button on the subwoofer for a few seconds until its pairing indicator blinks quickly.
4. Once the wireless connection is successful, the Pair indicator on the subwoofer will light up, and the soundbar display will show "SW IN."
5. If the Pair indicator continues blinking, unplug the subwoofer's power cable, wait 3 minutes, reconnect it, and repeat the steps.
This answer is automatically generated