
Subscribe to Our Youtube Channel
Related Manuals for ZOSI C516


Summary of Contents for ZOSI C516
- Page 1 V6.I.01.Z Quick Start Guide Smart Baby Camera For more information, please visit https:// www.zositech.com Support Email: service@zositech.com...
- Page 2 Contents The electronic user manual can be viewed on your mobile devices by scanning the QR code using a browser or camera.
-
Page 3: What's In The Box
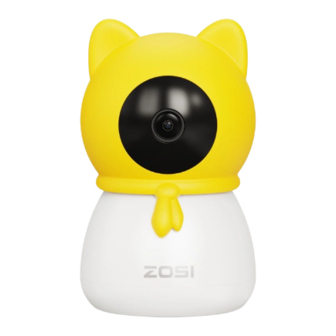
What’s in the Box Power Adapter Camera Quick Start Guide Quick Start Guide NOTE: The number of accessories varies with the camera model you purchased. English... - Page 4 Camera Structure Diagram IR-LEDs Lens Microphone Speaker Temperature & Humidity Sensor Type-C USB (Charging Port) NOTE: The actual product may vary in appearance. English...
- Page 5 Features Human Tracking Automatically follows person by adjusting its angle upon detecting human-fig- ures. Offers all-around, multi-angle surveillance. Ideal for keeping an eye on active little babies. Smart Temperature and Humidity Monitoring Real-time environmental monitoring for temperature and humidity, keeping you informed about your baby's surroundings at all times.
-
Page 6: Installing A Microsd Card
Installing a Micro SD Card Make sure the camera is powered off. Lift the camera head upward to access the SD card slot. Insert the Micro SD card with the contact side facing downward. NOTE: Always disconnect the camera's power when inserting or removing the card to prevent any damage. -
Page 7: Device Startup
Device Startup Connect the power cord to the Type-C charging port on the back of the camera, and the camera will automatically turn on. NOTE: The camera will rotate automatically during the boot process. Do not manually adjust the camera forcefully. Self-checking will take approximately half a minute. -
Page 8: App Installation
App Installation Scan the QR code below to download the free Zosi Smart App on your smartphone. (You can scan to download for both Android and iOS systems, or you can search for and download the App from App Store or the Google Play Store.) - Page 9 AVSS Download and install the Zosi AVSS client from the official website at https:/www.zositech.com/app/. Sign in with your Zosi Smart App account to prevents the need for multiple accounts. If there is no account or password prompt for local login, please scan the OR code below to watch the AVSS operation video.
-
Page 10: Installation Notes
Installation Notes 1. Ensure that the device has been added to the App before installation. 2. The camera can be installed on flat surface or using a bracket. It is recommended to place it in a location with a wide field of view. Install the Bracket: 1. - Page 11 Installation and Usage Precautions 1. Please use the provided power adapter to supply power to the device. Using a different power adapter or not following the provided instructions may cause damage to the device. 2. This product is intended for indoor use only and should not be placed outdoors, including areas like hallways, under eaves, or within covered courtyards.
- Page 12 A:Please check whether the App on your phone has been granted all the necessary permissions during installation. Q: Why is the mobile app not receiving push notifications? A:Please check whether the App's push notification settings are enabled and whether your phone allows notifications from this App. Q:Does the camera support motion detection and image capture? A:It captures images automatically when people, cars, are detected or when there is a change in detected images. Users can also manually capture images using our ZOSI Smart APP. English...
-
Page 13: Notification Of Compliance
(2) This device must accept any interference received, including inference that. may cause undesired operation. Simplified EU Declaration of Conformity ZOSI declares that the device is in compliance with the essential requirements and other relevant provisions if Directive 2014/53/EU. Correct Disposal of this Product This marking indicates that this product cannot be disposed with other household wastes throughout the EU. - Page 14 NOTE: This equipment has been tested and found to comply with the limits for a Class B digital device, pursuant to part 15 of the FCC Rules. These limits are designed to provide reasonable protection against harmful interference in a residential installation.
- Page 15 RF Exposure Warning Statements: This equipment complies with FCC radiation exposure limits set forth for an uncontrolled environment. This equipment shall be installed and operated with minimum distance 20cm between the radiator & body. This device contains licence-exempt transmitter(s)/receiver(s) that comply with Innovation, Science and Economic Development Canada’s licence-ex- empt RSS(s).
-
Page 16: Lista De Empaque
Lista de empaque Cámara Fuente de alimentación Quick Start Guide Manual de instrucciones Nota: Los accesorios varían por diferentes modelos, por favor consulte el producto específico. Español... - Page 17 Estructura de la cámara Luz infrarroja Lente Micrófono Altavoz Sensor de temperatura y humedad Type-C (puerto de alimentación) Nota: El aspecto del producto es para referencia, por favor consulte el producto real. Español...
- Page 18 Características Seguimiento del humanoide Ajuste el ángulo después de reconocer automáticamente el humanoide Cuidado multiángulo en todas las direcciones También puede presentar atención a los bebés activos. Detección de temperatura y humedad inteligente Detección inteligente de la temperatura y la humedad del entorno en tiempo real, conozca siempre la información del entorno que su bebé...
-
Page 19: Instalación De La Tarjeta Micro Sd
Instalación de la tarjeta Micro SD Primero asegúrese de que la cámara está apagada. Incline el cabezal de la cámara hacia arriba para acceder a la ranura para tarjeta SD. Inserte la tarjeta Micro SD con el lado de contacto hacia abajo en la ranura. NOTA: Cuando inserte o extraiga la tarjeta Micro SD, asegúrese de que la cámara está... - Page 20 Inicio del dispositivo Conecte el transformador al puerto de alimentación Type-C en la parte posterior de la cámara y se encenderá automáticamente la cámara. NOTA: La cámara girará automáticamente durante el proceso de arranque. No ajuste manualmente la cámara con fuerza. La autocomprobación tardará aproximadamente medio minuto.
-
Page 21: Descargar La Aplicación
Vídeo de operación de App Zosi Smart Añadir dispositivo 1. Abra la aplicación Zosi Smart, complete el registro de usuario e inicie sesión según las indicaciones; 2. Haga clic en "+" para añadir dispositivo, y complete la configuración de red y la adición de dispositivo según las indicaciones. - Page 22 Descargue e instale el programa AVSS y siga las instrucciones para completar la instalación. Enlace oficial de descarga: https:/www.zositech.com/app/ Por favor utilice la cuenta de la App Zosi Smart para evitar múltiples cuentas. Inicio de sesión local sin cuenta y aviso de contraseña, por favor escanee el código QR a continuación para ver el video de operación.
- Page 23 Instrucciones de la instalación 1. Por favor asegúrese de que el dispositivo se ha añadido a la aplicación antes de la instalación. 2. La cámara se puede montar en plano o en soporte, se recomienda colocarla en un lugar con un ángulo de visión amplio. Instalación del soporte 1.
-
Page 24: Precauciones De Instalación Y Uso
Precauciones de instalación y uso 1. Utilice el adaptador de corriente suministrado con este producto para alimentar el dispositivo. (El uso de un adaptador de corriente diferente o que no se utilice de acuerdo con las instrucciones puede causar daños en el dispositivo). - Page 25 Q: ¿Por qué no recibe las notificaciones Push en la App del teléfono móvil? A: Por favor compruebe que si las notificaciones de la aplicación están activadas o no, si las notificaciones de la aplicación están permitidas en el teléfono móvil. Q: ¿Soporta la detección de movimiento y la captura de imágenes la cámara? A: Capturará imágenes automáticamente cuando se detectan personas,ve- hículos o cuando el objetivo detectado mueve. Los usuarios también pueden capturar imágenes manualmente en la aplicación Zosi Smart. Español...
- Page 26 (2) Este dispositivo debe aceptar cualquier interferencia recibida, incluidas las inferencias que puedan provocar una operación no deseada. Declaración de Conformidad de UE Simplificada ZOSI declara que el dispositivo cumple con los requisitos esenciales y otras disposiciones relevantes de la Directiva 2014/53/UE. Eliminación Correcta de este Producto Esta marca indica que este producto no se puede desechar con otros residuos domésticos en toda la UE.
-
Page 27: Composants Inclus
Composants inclus Caméra Adaptateur secteur Quick Start Guide Notice Remarque: Les accessoires varient selon le modèle de produit, veuillez vous référer au produit réel. Français... -
Page 28: Présentation Du Produit
Présentation du produit LEDs infrarouges Objectif Microphone Haut-parleur Capteur d'humidité et de température Type-C (Port d'alimentation) Remarque : L'apparence du produit est fournie à titre indicatif seulement, veuillez vous référer à l'objet réel. Français... -
Page 29: Caractéristiques Du Produit
Caractéristiques du produit Suivi automatique Identifie automatiquement l'humaine et ajuste l'angle de vue. Surveillance sans aucun angle mort. Le bébé actif peut être également surveillé. Détection intelligente de la température et de l'humidité Détection intelligente en temps réel de la température et de l'humidité de l'environnement, pour connaître en permanence les informations relatives à... -
Page 30: Installation De La Carte Microsd
Installation de la carte MicroSD Assurez-vous que le caméra est hors tension, faites pivoter la tête du caméra vers le haut pour voir la fente de la carte SD, et insérez la carte MicroSD dans la fente avec la face de contact vers le bas. Remarque : Lors de l'installation ou du retrait de la carte MicroSD, vous devez couper l'alimentation du caméra avant l'opération afin d'éviter d'endommager la carte MicroSD. -
Page 31: Démarrage De L'appareil
Démarrage de l’appareil Connectez le câble d'alimentation au connecteur Type-C (port d'alimentation) situé à l'arrière de l'appareil, il s'allume automatiquement. Remarque : la caméra pivote automatiquement pendant le processus de mise sous tension, veuillez ne pas ajuster la caméra manuellement, l'auto-test dure environ une demi-minute. -
Page 32: Téléchargement De L'application
Vidéo d'opération Zosi Smart Ajouter l'appareil 1. Ouvrez l’APP « Zosi Smart » et vous vous inscrivez et vous connectez à l’APP en suivant les instructions. 2. Cliquez sur « + » pour choisir un appareil, puis procédez à la configuration du réseau et à... - Page 33 Téléchargez l’application AVSS et suivez ce guide pour terminer l'installation. Lien de téléchargement : https:/www.zositech.com/app/ . Utilisez le compte de Zosi Smart et évitez d’utiliser des comptes multiples. Connexion locale sans compte ni mot de passe. Veuillez scanner le code OR ci-dessous pour regarder la vidéo d'utilisation d'AVSS :...
- Page 34 L’installation de la caméra 1. Assurez-vous que l'appareil a été ajouté à l'application avant d’installation. 2. La caméra peut être montée à plat ou sur support, il est recommandé de la placer dans un endroit avec un grand angle de vue. Instructions pour l'installation du support 1.
-
Page 35: Précautions D'installation Et D'utilisation
Précautions d'installation et d'utilisation 1. Veuillez utiliser l'adaptateur d'alimentation fourni pour alimenter l'appareil. (L'utilisation d'un autre adaptateur ou d'un adaptateur qui n'est pas utilisé conformément aux instructions peut endommager l'appareil). 2. Ce produit ne peut pas être installé à l'extérieur. ( Par example : les porches, les avant-toits et les patios couverts etc ). - Page 36 Q : Pourquoi l'application du téléphone portable ne reçoit-elle pas le message d'alarme ? Veuillez vérifier si la notification push de l'APP est activé et si le téléphone portable autorise l'invite de notification de poussée de l'APP. Q : La caméra prend-t-elle en charge la détection de mouvement et la capture d'image ? R : Elle capture automatiquement des images lorsqu'elle détecte des personnes, des voitures ou un changement d'images détectées. Les utilisateurs peuvent également capturer manuellement des images à l'aide de notre application Zosi Smart. Français...
- Page 37 (2) Cet appareil doit accepter toute interférence reçue, y compris les inférences susceptibles de provoquer un fonctionnement indésirable. Déclaration de conformité CE ZOSI déclare que l'appareil est conforme aux exigences essentielles et aux autres dispositions pertinentes de la directive 2014/53/EU. Mise au rebut correcte de ce produit Cette marque signifie que le produit ne peut pas être jeté...
- Page 38 Lieferumfang Kamera Netzteil Quick Start Guide Kurzanleitung Hinweis: Kameras und Zubehör variieren je nach Produktmodell, bitte beziehen Sie sich auf das tatsächliche Produkt. Deutsch...
- Page 39 Kameraübersicht Infrarotlicht Linse Mikrofon Lautsprecher Temperatur- & Feuchtigkeitssensor Typ-C (Stromanschluss) Hinweis: Das Aussehen des Produkts dient nur als Referenz. Bitte orientieren Sie sich am tatsächlichen Produkt. Deutsch...
- Page 40 Produktfunktionen Personenverfolgung Automatische Anpassung des Blickwinkels nach Erkennung einer Person. Rundum-Betreuung aus verschiedenen Blickwinkeln. Auch für aktive Babys geeignet. Intelligente Temperatur- und Feuchtigkeitsmessung Intelligente Echtzeitmessung von Temperatur und Feuchtigkeit in der Umgebung, um jederzeit Informationen über die Umgebung des Babys zu erhalten.
- Page 41 Installation einer Micro-SD-Karte Stellen Sie sicher, dass die Kamera ausgeschaltet ist. Schieben Sie den Kamerakopf nach oben, um den SD-Kartensteckplatz zu sehen. Legen Sie die Micro-SD-Karte mit den Kontakten nach unten in den Steckplatz ein. Hinweis: Beim Einsetzen oder Entfernen der Micro-SD-Karte muss die Stromversorgung der Kamera ausgeschaltet sein, um Schäden an der Karte zu vermeiden.
-
Page 42: Einschalten Des Geräts
Einschalten des Geräts Schließen Sie das Netzkabel an den Typ-C-Anschluss (Stromanschluss) auf der Rückseite der Kamera an. Die Kamera schaltet sich automatisch ein. Hinweis: Während des Einschaltvorgangs dreht sich die Kamera automatisch. Stellen Sie die Kamera nicht gewaltsam manuell ein. Der Selbsttest dauert etwa eine halbe Minute. -
Page 43: Installation Der App
App-Bedienungsvideo Zosi Smart Hinzufügen des Geräts 1. Öffnen Sie die Zosi App und folgen Sie den Anweisungen der App, um sich zu registrieren und anzumelden. 2. Klicken Sie auf "+", um ein Gerät hinzuzufügen, und folgen Sie den Anweisungen der App, um die Netzwerkkonfiguration und das Hinzufügen des Geräts abzuschließen. - Page 44 Gerät hinzufügen Neue Benutzer sollten sich zunächst registrieren und dann anmelden. AVSS Laden Sie die Zosi AVSS Client herunter und installieren Sie den Client gemäß dieser Anleitung. Offizieller Download-Link: https:/www.zositech.com/app/ Verwenden Sie das Konto der Zosi-Smart-App, um mehrere Konten zu vermeiden.
- Page 45 Installationsanleitung 1. Stellen Sie vor der Installation sicher, dass das Gerät zur App hinzugefügt wurde. 2. Die Kamera kann flach aufgestellt oder mit einer Halterung installiert werden. Es wird empfohlen, sie an einem Ort mit weiter Sichtfläche zu platzieren. Anleitung zur Halterungsinstallation 1.
- Page 46 Hinweise zur Installation und Verwendung 1. Verwenden Sie nur das mitgelieferte Netzteil, um das Gerät mit Strom zu versorgen. (Die Verwendung eines anderen Netzadapters oder die Missachtung der Anweisungen kann das Gerät beschädigen.) 2. Das Produkt darf nicht im Freien installiert werden. (Dies schließt Gänge, Überhänge und überdachte Innenhöfe ein.) 3.
- Page 47 Handy die Benachrichtigungshinweise dieser App zulässt. Q: Unterstützt die Kamera Bewegungserkennung und Bildaufnahme? Sie nimmt automatisch Bilder auf, wenn eine Person oder ein Auto erkannt wird oder wenn sich das erkannte Bild ändert. Benutzer können Bilder auch manuell mit unserer ZOSI Smart APP aufnehmen. Deutsch...
- Page 48 (2) Dieses Gerät unterliegt externen Störungen, einschließlich Störungen, die zu einem unerwünschten Betrieb führen können. Vereinfachte EU-Konformitätserklärung ZOSI erklärt, dass das Gerät mit den grundlegenden Anforderungen und anderen relevanten Bestimmungen der Richtlinie 2014/53/EU übereinstimmt. Richtige Entsorgung dieses Produkts Diese Kennzeichnung weist darauf hin, dass dieses Produkt in der gesamten EU nicht mit anderen Haushaltsabfällen entsorgt werden darf.
- Page 49 Informationen zu Elektro- und Elektronik- geräten Der nachstehende Hinweis richtet sich an private Endnutzer, die Elektro- und/ oder Elektronikgeräte nutzen. 1. Getrennte Erfassung von Altgeräten Elektro- und Elektronikgeräte, die zu Abfall geworden sind, werden als Altgeräte bezeichnet. Besitzer von Altgeräten haben diese einer vom unsortierten Siedlungsabfall getrennten Erfassung zuzuführen.
- Page 50 3. Möglichkeiten der Rückgabe von Altgeräten Wenn Sie Altgeräten besitzen, können Sie an den durch öffentlich-rechtliche Entsorgungsträger eingerichteten und zur Verfügung stehenden Möglichkeiten der Rückgabe oder Sammlung von Altgeräten zum Zwecke der ordnungs- gemäßen Entsorgung der Altgeräte abgeben. Gegebenenfalls ist dort auch eine Abgabe von Elektro- und Elektronikgeräten zum Zwecke der Wiederverwendung der Geräte möglich.
- Page 51 Che cosa c’è nella scatola Telecamera Adattatore di Alimentazione Quick Start Guide Guida Rapida all’Uso NOTA: La quantità degli accessori varia a seconda del modello di telecamera acquistato. Italiano...
- Page 52 Schema della struttura della telecamera Luce a infrarossi Obiettivo Microfono Altoparlante Sensore di temperatura e umidità Tipo-C (porta di alimentazione) Nota: l'aspetto del prodotto è solo di riferimento, si prega di fare riferimento all'articolo reale. Italiano...
- Page 53 Caratteristiche Tracciamento degli umanoidi Regolazione dell’angolo dopo il riconoscimento automatico dell’umanoide. Assistenza multi-angolo in tutte le direzioni. Può prestare attenzione anche ai neonati attivi. Rilevamento intelligente di temperatura e umidità Rilevamento intelligente della temperatura e dell’umidità dell’ambiente in tempo reale, per conoscere sempre le informazioni sull’ambiente in cui si trova il bambino.
- Page 54 Installazione di una scheda Micro SD Assicurarsi innanzitutto che la telecamera sia spenta. Inclinare la testa della telecamera verso l’alto per accedere allo slot della scheda SD. Inserire la scheda Micro SD con il lato di contatto rivolto verso il basso nello slot. NOTA: quando si inserisce o si rimuove la scheda Micro SD, assicurarsi che la telecamera sia spenta prima di procedere per evitare di danneggiare la scheda Micro SD.
- Page 55 Avvio del dispositivo Collegare il trasformatore alla porta di alimentazione Tipo-C sul retro della telecamera e la telecamera si accenderà automaticamente. NOTA: durante il processo di avvio, la telecamera ruota automaticamente. Non regolare manualmente la telecamera con forza. Il controllo automatico durerà circa mezzo minuto.
- Page 56 Scaricare l’applicazione Scansionare il codice QR qui sotto per scaricare e installare l’applicazione Zosi Smart. Puoi anche cercarla nell’App Store o nell’App Market di Android. Video sul funzionamento Android/IOS Zosi Smart dell’ app Aggiungere Dispositivo 1. Aprire l’applicazione ZOSI Smart e seguire le istruzioni per registrarsi e accedere.
- Page 57 Scaricare e installare il software AVSS e seguire le istruzioni per completare l’installazione. Link ufficiale per il download: https:/www.zositech.com/app/ Utilizzare l’account dell’applicazione Zosi Smart per evitare account multipli. Per l’accesso locale senza richiesta di account e password, scansionare il codice QR qui sotto per vedere il video dell’operazione.
-
Page 58: Istruzioni Per L'installazione
Istruzioni per l’installazione 1. Prima dell’installazione, accertarsi che il dispositivo sia stato aggiunto all’applicazione. 2. La telecamera può essere montata in piano o su una staffa; si consiglia di collocarla in una posizione con un ampio angolo di visione. Installazione della staffa 1. -
Page 59: Precauzioni Per L'installazione E L'uso
Precauzioni per l’installazione e l’uso 1. Utilizzare l’adattatore di alimentazione fornito con il prodotto per alimentare il dispositivo (l’uso di un adattatore di alimentazione diverso o non conforme alle istruzioni può causare danni al dispositivo). 2. Questo prodotto non può essere installato all’esterno (ad esempio, portici, grondaie e terrazze coperte). -
Page 60: Domande Frequenti
Verificare se le autorizzazioni dell’applicazione sono consentite quando la si installa sul cellulare. D: Perché non ricevo le notifiche push sull’app del telefono cellulare? Verificare se le notifiche dell’applicazione sono abilitate o meno, se le notifiche dell’applicazione sono consentite sul cellulare. D: La telecamera supporta la rilevazione del movimento e la cattura di immagini? Cattura automaticamente le immagini quando vengono rilevate persone, veicoli o quando c'è un cambiamento nelle immagini rilevate. Gli utenti possono anche catturare manualmente le immagini utilizzando l'app ZOSI Smart. Italiano... - Page 61 (2) Questo dispositivo deve accettare qualsiasi interferenza ricevuta, comprese quelle che possono causare un funzionamento indesiderato. CE Dichiarazione di conformità UE Semplificata ZOSI dichiara che questo dispositivo è conforme ai requisiti essenziali e alle altre disposizioni pertinenti della direttiva 2014/30/UE. Corretto smaltimento di questo prodotto Questo marchio indica che questo prodotto non può...
- Page 62 Leveringsomvang Camera Voeding Quick Start Guide Snelstartgids Voorzichtig: Het aantal accessoires varieert afhankelijk van het cameramodel dat u koopt. Nederland...
- Page 63 Camera-overzicht Infrarood licht Lens Microfoon Luidspreker Temperatuur- en vochtigheidssensor Type-C (voedingsaansluiting) Opmerking: Het uiterlijk van het product is alleen ter referentie. Gelieve u te baseren op het daadwerkelijke product. Nederland...
- Page 64 Product functies Volgen van personen Automatische aanpassing van de kijkhoek na detectie van een persoon. All-round verzorging vanuit verschillende hoeken. Ook geschikt voor actieve baby's. Intelligente temperatuur- en vochtigheidsmeting Intelligente real-time meting van temperatuur en vochtigheid in de omgeving om altijd informatie te hebben over de omgeving van de baby. Hoge resolutie Veilig nachtzicht 910nm infrarood nachtzicht zonder zichtbaar rood licht, nachtzicht met hoge resolutie zonder de slaap en het zicht van de baby te beïnvloeden.
- Page 65 Een micro SD-kaart installeren Zorg dat de camera is uitgeschakeld. Schuif de camerakop omhoog om de sleuf voor de SD-kaart te zien. Plaats de micro SD-kaart in de sleuf met de contacten naar beneden. Opmerking: Bij het plaatsen of verwijderen van de micro SD-kaart moet de stroomtoevoer naar de camera worden uitgeschakeld om schade aan de kaart te voorkomen.
-
Page 66: Het Toestel Inschakelen
Het toestel inschakelen Sluit de voedingskabel aan op de Type-C aansluiting (voedingsaansluiting) aan de achterkant van de camera. De camera wordt automatisch ingeschakeld. Opmerking: Tijdens het inschakelen draait de camera automatisch. Forceer de camera niet handmatig. De zelftest duurt ongeveer een halve minuut. Nederland... - Page 67 Zosi Smart Het apparaat toevoegen 1. Open de Zosi app en volg de instructies in de app om te registreren en in te loggen. 2. Klik op "+" om een apparaat toe te voegen en volg de instructies van de app om de netwerkconfiguratie en het toevoegen van het apparaat te voltooien.
- Page 68 Download de Zosi AVSS Client en installeer de client volgens deze instructies. Officiële downloadlink: https:/www.zositech.com/app/ Gebruik het Zosi smart app account om meerdere accounts te vermijden. Als je geen instructies voor accountnamen en wachtwoord krijgt wanneer je lokaal inlogt, scan dan de QR-code hieronder om een AVSS-instructievideo te bekijken.
-
Page 69: Installatie-Instructies
Installatie-instructies 1. Controleer voor installatie of het apparaat is toegevoegd aan de app. 2. De camera kan plat worden geplaatst of met een beugel worden geïnstalleerd. Het wordt aanbevolen om hem te plaatsen op een locatie met een breed kijkgebied. Instructies voor installatie van de beugel 1. - Page 70 Opmerkingen over installatie en gebruik 1. Gebruik alleen de meegeleverde netadapter om het apparaat van stroom te voorzien. (Als u een andere netadapter gebruikt of de instructies negeert, kan het apparaat beschadigd raken). 2. Het product mag niet buiten geïnstalleerd worden. (Dit geldt ook voor loopbruggen, overstekken en overdekte terrassen).
-
Page 71: Veelgestelde Vragen
Q: Ondersteunt de camera bewegingsdetectie en beeldopname? A: Het legt automatisch beelden vast wanneer een persoon of auto wordt gedetecteerd of wanneer het gedetecteerde beeld verandert. Gebruikers kunnen ook handmatig foto's maken met behulp van onze ZOSI Smart APP. Nederland... - Page 72 (2) Dit apparaat is onderhevig aan externe interferentie, inclusief interferentie die een ongewenste werking kan veroorzaken. Vereenvoudigde EU-conformiteitsverklaring ZOSI verklaart dat het apparaat voldoet aan de essentiële vereisten en andere relevante bepalingen van Richtlijn 2014/53/EU. Correcte verwijdering van dit product Deze markering geeft aan dat dit product in de hele EU niet met ander huishoudelijk afval mag worden weggegooid.
- Page 73 Copyright © 2024 ZOSI Technology Co., Ltd. No part of this publication may be reproduced in any way without the written permission of ZOSI. The information in this publication is believed to be accurate in all respects. ZOSI assumes no responsibility for any consequenc-es resulting from their use.
Need help?
Do you have a question about the C516 and is the answer not in the manual?
Questions and answers