Advertisement
Quick Links
oh happy day
YO U' V E REC E I VE D T HE D RE A M STAT I O N !
It's already time for your first project. Let's get to work!
To make the process simple and easy to follow, we've broken down the product assembly
instructions into simple steps. All of the hardware you will need can be found in one bag.
If you have questions at any point of the assembly process, don't hesitate to reach out to our
customer service team. They are the friendliest bunch of furniture experts and will be happy
to help you.
C U STOM E RS E RV ICE@ C RE AT ERO O M .C O M
W WW.C R EAT ERO O M .CO M
U SA / CANADA : 8 01-2 26-26 8 6 ( M -F 9 A M -5 PM M ST )
U K / EU : + 49 4 0 6 9 6 3 2 9 55 O R + 4 4 7 75 9 3 3 5 8 6 8
We are excited for you to enjoy your inspiring new workspace and can't wait to see pictures!
Share your photos on Facebook and Instagram and don't forget to tag @createroomco.
Happy crafting!
(Proprietary patented product and instructions. Do not copy or distribute.)
DreamStation Assembly Instructions
UO824
Advertisement

Related Manuals for Create Room DREAMSTATION


Summary of Contents for Create Room DREAMSTATION
- Page 1 We are excited for you to enjoy your inspiring new workspace and can’t wait to see pictures! Share your photos on Facebook and Instagram and don’t forget to tag @createroomco. Happy crafting! DreamStation Assembly Instructions (Proprietary patented product and instructions. Do not copy or distribute.) UO824...
- Page 2 HAR DWARE YO U’ L L NE ED : Door Knob with Screws 8 x 5/8” Screw #7 x 3/4 Screws Euro Screws Cams Posts Grommet Locking Door Stopper Hinges Door Hinge Shelf Pegs Wheels (screws included) Medium Totes...
- Page 3 P I EC ES YOU ’ LL N E E D : Left Side 2 Right Side 3 Right Side 4 Left Side 1 Right Shaker Door Left Shaker Door Table Top Insert Side Table 1/4” Back Panel Left Base Right Base Small Side Shelves Platform Lift...
- Page 5 Install Cams and Posts into the panels shown below. Left Side 2 Left Side 1 Right Side 4 Right Side 3 Back Cams Posts Tip: Build on blanket or carpet to protect wood pieces.
- Page 6 Install Posts into Table Top. Table Top Posts...
- Page 7 Choose your configuration for your DreamStation. L EF T SI DE CO N F I G U RAT I O N: R IG H T S I D E C O N F I GU R ATI O N : Install Hinges on Table Top.
- Page 8 Add Door Hinges to Left Side 1 and Right Side 4. Left Side 1 Right Side 4 Door Hinge #7 x 3/4 Screws Install Posts to Right and Left Base. Right Base Left Base (Top View) (Top View) Posts N OW I T ’S T IM E FOR TH E FUN ! LET ’S PUT YOUR DR EAMSTATI ON TO GETHER!
- Page 9 Add Left Base. Tighten 4 Cams. Note: You can use Allen Wrench to tighten Cams. Left Base Add the left side build to the Back and tighten 5 Cams. Left Base Back...
- Page 10 Connect Right Base to Right Side 4. Tighten 2 Cams. Right Side 4 Right Base Connect Right Side 4 and Right Base to Back. Tighten Cams. Left Side 2 Left Base Right Side 4 Right Base Back...
- Page 11 Install Right Side 3 onto Right Base Posts. Tighten 2 Cams. Right Side 3 Right Base Back Left Side 1 Left Base Slide 1/4” Inch Back Panel into the groove on Right Side 3 and 4. 1/4” Back Panel Right Side 3 Right Base Left Side 1...
- Page 12 Install Locking Wheels to Left and Right Base. Right Side 3 Right Base Left Side 1 Left Base Locking 8 x 5/8 Cams Wheels Screw Locked Unlocked...
- Page 13 CAUT IO N: T H I S ST E P REQ U I RES T WO PEO PL E With two people, lift the DreamStation onto its wheels. Left Side 2 Left Base Back Right Side 4 Right Base With two people, lift and install table top. Tighten 12 cams.
- Page 14 TA B L E LEG O P ERATI O N :...
- Page 15 Depending on which configuration you choose, install Cams, Locking Posts, Hole Plugs, and Table Leg to Side Table as shown. LEF T S I DE C O N FIGURATION: R IGH T SI DE CO N FIGU RAT ION : Side Table Side Table Table Leg...
- Page 16 Install Table Leg to Back Table. Back Table Table Leg Table Leg Screws...
- Page 17 CAU T I ON: T H IS ST E P REQ U I RES T WO PEO PL E Using two people, flip DreamStation back on the Table Top. Install Side and Back Table. Back Table Side Table Euro Screws...
-
Page 18: To O Ls You' L L Need
next, you’ll assemble and install the machine electric lift. HA R DWA R E YOU’ L L NEED: Bearing Nuts Lift Screws Bolts 7/8“ Center Screws Washers (for lift control for metal center. switch) 1/2“ Screws Extra Rubber Power Cord Holder (6) for Lift Shelf Pads Cord... - Page 19 Place Metal Center and arms onto Lift. Install remaining 4 Bearings on other side of Center Bar. 13mm 13mm Attach the Metal Center to the Power Lifter using (2) 7/8” Center Screws. Install from the back of the lifter, ensuring the two metal lips align with the pre-drilled holes in the plastic. 7/8”...
- Page 20 CAU T I ON : T H IS ST E P REQ U I RES T WO PEO PLE Use two people and install the Electric Lift. 1 9.1 : Connect Electric Lift to Table Top. 1 9. 2 : Install Lift to Back 1/2”...
- Page 21 AS SE M BLY O F E L ECT RO N I C S : Switch up/down Assemble the electronics. Extension Cable Cord that is attached to Motor Power Adapter Power Cord Remote (View from front on) Install Remote. D OW N Lift Screws Remote...
- Page 22 Plug in the power cord and test to make sure the Electric Lift goes up and down smoothly. Raise Lift Arms to the TOP. Install Platform Lift Platform Lift 8 x 5/8” Screws...
- Page 23 Test Lifter up and down motion before adding your machine onto the Platform. D OW N TIP: The platform is INTENTIONALLY not centered to allow machine cords to go down on the right side.
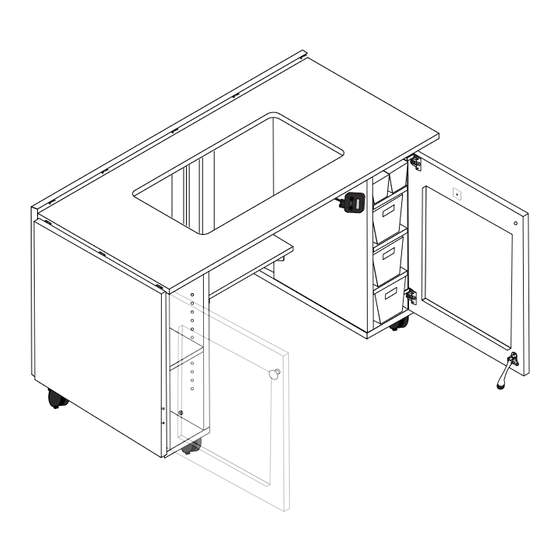
- Page 24 Install 2 Magnet Plates, 2 Door Catches, and 2 Magnets. Shaker Door Left Side 2 Right Side 4 Magnet Door Catch Door Stopper (screws (screws included) included) Install Left and Right Shaker Doors. Be careful to not over tighten. #7 x 3/4 Screws...
- Page 25 The center screw on the hinge is adjustable, allowing your door to close straight. Loosen screw and adjust accordingly. Install Door Knobs and Table Top Insert. Door Knob with Screws...
- Page 26 Install Shelf Pegs, Side Shelves, Long Side Shelf, Medium and Small Totes. Single Stack Spool Holder Double Stack Spool Holder Spool Holder Shelf Pegs Medium Tote Medium Tote Small Tote Small Tote Small Side Shelves Large Side Shelf Dividers Dividers...
- Page 27 YOU’ VE D O N E I T. Now it’s time to fill up your new DreamStation with all your crafting goodies. Remember to share pictures of your crafts and craft space with us on Facebook @CreateRoomFamily. Proprietary, patented product and assembly instructions. Do not copy or distribute.
Need help?
Do you have a question about the DREAMSTATION and is the answer not in the manual?
Questions and answers