Advertisement
Quick Links
oh happy day
YOU' VE REC EI VE D TH E CREATE ROOM CUBBY!
You are minutes away from home organization. Just a few simple steps and you'll
be ready to move in. Should you need any assistance, our customer service
team is the friendliest bunch and would be delighted to help you!
C UST O M ERS ERV I CE CR EA T E RO OM . CO M
W WW .C REA T ERO OM .COM
U S A
C AN AD A: 8 01 2 2 6 2 68 6
Remember to document your assembly experience with photos or video and let
us know how it goes. Take a "before" and "after" shot of your space to share with
us. We never get tired of seeing a good transformation!
Happy organizing!
Create Room Cubby Instructions
®
M F 9A M 5P M MS T
U082021
Advertisement

Subscribe to Our Youtube Channel
Related Manuals for Create Room Cubby


Summary of Contents for Create Room Cubby
- Page 1 ® oh happy day YOU’ VE REC EI VE D TH E CREATE ROOM CUBBY! You are minutes away from home organization. Just a few simple steps and you'll be ready to move in. Should you need any assistance, our customer service team is the friendliest bunch and would be delighted to help you! C UST O M ERS ERV I CE CR EA T E RO OM .
- Page 2 Hardware you’ll need: Tools you’ll need: Dowels 25mm Euro Posts Screws Connecting Cams Electric Drill with Anchors Bolts Phillips screw driver Phillips extension Screw Driver (not included) Connecting Hardware: Connecting Plate Our furniture is designed to be A Friend 5/8” self-tapping built with two people.
- Page 3 The Create Room Cubby utilizes a cam and post locking system. Please review these general instructions before you begin. H O W T O L O C K CA MS A ND P OS T S : 1. Place Posts into panel until 2.
- Page 4 Start by assembling your hardware in the Side 1, Side 2 and Base panels. Locate your posts and dowels and insert them into place by hand, as indicat- ed below. Posts Dowels Side 1 Side 2 Connecting Bolts Base...
- Page 5 Turn over your Base panel. With bottom side up, insert cams by hand, as indicated below. Do not attempt to tighten. Cams Base (underneath) Connect Side 1 and Side 2 with the Base, one at a time by lining up the posts and dowels with the corresponding holes Side 2 and tapping firmly into place.
- Page 6 Turn your Cubby upright and insert one back panel at a time into the channels. Back Panel Side 2 Back Panel Side 1 Base...
- Page 7 Locate your Lid. With bottom side up, push posts and cams into place, as indicated below. Cams (underneath) Connect the top piece to the left and right panel by lining up the posts and dowels with the corre- sponding holes and tapping firmly into place. Side 2 Back Panel Once connected, use your screw driver...
- Page 8 Slide the divider into the Cubby beside the connector bolts, then gently push it into place. Divider Use your screwdriver to tighten and lock the connector bolts in place by turning clockwise.
- Page 9 Use 25mm euro screws to fasten back panels. 25mm Back Panel self tapping screws Anchor Cubby to the wall. Anchors...
- Page 10 Drywall Anchor Instructions 1. Drill a pilot hole through the drywall. 2. Screw a drywall anchor into the pilot hole.
- Page 11 Open barrel lock and thread metal wire through connector hardware. Fasten barrel lock to secure.
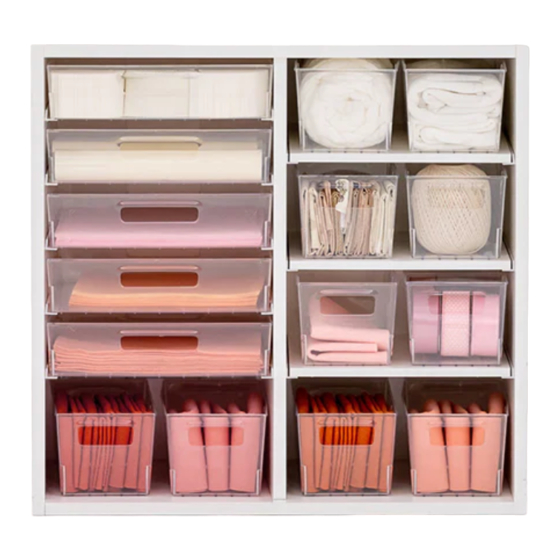
- Page 12 Insert tracks and shelves. See next page for our recommended DiviDrawer layout. It can also be used as an organizational planogram.
- Page 14 Optional: If you have multiple Cubbies and want to stack them on top of each other, use the connecting plate to fasten them together. Self tapping...
- Page 15 YOU’VE DONE IT. Now comes the fun part—moving in! For ideas and inspiration, join thousands of creators in the Create Room Family Facebook Group @CreateRoomFamily. Be sure to share a picture of your new setup. We can't wait to see how it turns out!
Need help?
Do you have a question about the Cubby and is the answer not in the manual?
Questions and answers