Advertisement
Quick Links
oh happy day
YO U' V E REC E I VE D T HE D RE A M CA RT 2 !
It's already time for your first project. Let's get to work!
We've broken down the assembly instructions into simple steps. If you have any questions,
don't hesitate to reach out to our customer service team. They are the friendliest bunch of
furniture experts and will be happy to help you!
C U STOM E RS E RV ICE@ C RE AT ERO O M .C O M
W WW.C R EAT ERO O M .CO M
U SA / CANADA : 8 01-2 26-26 8 6 ( M -F 9 AM -5PM M ST )
U K / EU :
+4 9 4 0 6 9 6 3 2 9 55 O R + 4 4 7 759 3 3 58 6 8
We are excited for you to enjoy your inspiring new workspace and can't wait to see pictures! Share
your photos on Facebook and Instagram and don't forget to tag @createroomco.
Happy crafting!
(Proprietary patented product and instructions. Do not copy or distribute.)
DreamCart 2 Assembly Instructions
U0424B
Advertisement

Related Manuals for Create Room DREAMCART 2


Summary of Contents for Create Room DREAMCART 2
- Page 1 We are excited for you to enjoy your inspiring new workspace and can’t wait to see pictures! Share your photos on Facebook and Instagram and don’t forget to tag @createroomco. Happy crafting! DreamCart 2 Assembly Instructions (Proprietary patented product and instructions. Do not copy or distribute.) U0424B...
-
Page 2: To Ols You' L L Ne Ed
2 HAR DWARE YO U’ L L NE ED : Euro Screws Tote Tracks Posts Dowel Hinges Cams Table Leg 8x5/8 Screws Angle Brackets Connecting Bolt Locking Wheels H AR DWAR E N E EDE D FOR C ON NECT I N G TO D R EAM CA RT 2 :... - Page 3 The DreamCart 2 utilizes a cam and post locking system. Please review these general instructions before you begin. HOW TO LO C K CAM S A N D P O STS : Place Posts into panel until Insert Cam with arrow plastic sleeve is touching wood.
- Page 4 Install Cams, Posts, and Dowels into Side Panels indicated below. Dowels go in inner most holes. Side Panel Side Panel Shelf Dowel Posts Cams TIP: Build on a soft carpet or blanket to protect your table top.
- Page 5 Install Posts into Table Top and Base. Install Hinges into Table Top indicated below. Table Top Base Posts Hinges Euro Screws TIP: Knuckle of table hinge should face up.
-
Page 6: Important Note
TA BL E OPE R AT I ON : IMPORTANT NOTE! To collapse table legs, pull joint in towards the middle. IMPORTANT NOTE! When Table Leg is collapsed, the hinge can extend out about 30 degrees to lock Leg against the Table. Push Hinge towards the table to unlock and to extend the table leg. - Page 7 TA BLE LEG AT TAC H M EN T: Please note: There are two placement options for your Table Leg. If you are NOT attaching to the DreamBox 2, follow option 1. If you ARE attaching to a DreamBox 2, follow option 2. OPTIO N 1: Use this option for maximum stability when NOT attached to a DreamBox.
- Page 8 OPTION 2 : Must be attached to your DreamBox 2. This option gives you better access to your totes in the Side Box of the DreamBox 2. Install Cams, Locking Posts, Hole Plugs, and Table Leg to your Table Extension. Tighten Cams. C H O O S E L E F T O R RIG HT CONF IG URATION LE F T CON FI GU R AT IO N S H OWN : RI G HT CO N FI G U RATI O N S HOW N :...
- Page 9 Install Table Extension to the Table Top by attaching the hinges together using Euro Screws. Table Extension Table Top Euro Screws TIP: Build on a soft carpet or blanket to protect your table top.
- Page 10 Align the Shelf to both Side Panels. Tighten Cams. Note: Cam that is off centered faces the table top side. Side Panel Shelf Side Panel...
- Page 11 Align Base to both Side Panels. Tighten Cams. Tip: Please ensure the Shelf bottom with 3 holes is facing towards the Base. Side Panel Shelf Side Panel Base HEY LO O K AT YOU, YO U’ R E HA L F WAY T H ERE !
- Page 12 Install Table Top, and screw in 4 Angle Brackets on both side pieces. Tighten Cams. Euro Screws Angle Brackets...
- Page 13 Install Locking Wheels to Base using 8x5/8 Screws. Install Connecting Bolts on Base, Shelf, and Table Top. 8x5/8 Wheels Connecting Bolt Screws...
- Page 14 Install the Dividers. Tighten 6 White Cams. Divider Side 2...
- Page 15 CAUTION: TH IS STE P REQ U IR ES TWO P EO PL E . With the help of a friend, carefully flip over the DreamCart 2. Keep fingers clear of the gap between the table and DreamCart 2 to avoid pinching.
- Page 16 Install 16 Tote Tracks into designated holes indicated below M A XI M UM OF L B S Tote Tracks...
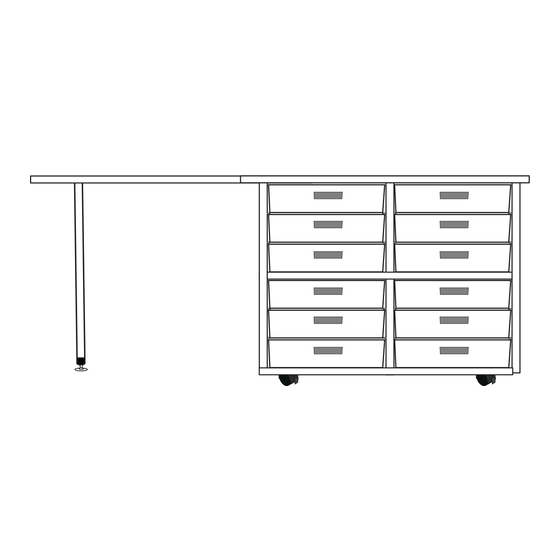
- Page 17 Insert the 12 Large InView Totes and fill with all your treasures. Adjustable Foot Lock all 4 wheels in this position for safety and stability.
- Page 18 Unlock wheels and fold down your table into this position when moving the DreamCart 2.
- Page 19 DreamBox 2 table. Slide forward to lock. L E F T S I D E CO N FI G U RATI O N : Once your DreamCart 2 is locked into your DreamBox 2 table, don’t forget to lock your wheels...
- Page 20 6 – “Can I customize the storage within my DreamCart 2?” Yes! The totes and tracks are vertically adjustable and other Create Room accessories can be integrated to custom- ize your storage space. The upper divider can also be removed for storing larger items.
- Page 21 YOU’ VE D O N E I T. Now it’s time to fill up your new DreamCart 2 with all your crafting goodies. Remember to share pictures of your crafts and craft space with us on Facebook @CreateRoomFamily. Proprietary, patented product and assembly instructions. Do not copy or distribute.
-
Page 22: Customer Service And Support
I M ME DI AT E I N S P ECT I O N R EQ UI RE D : Upon receiving your Create Room furniture, promptly inspect the package for any external or concealed dam- age. Report any visible damage to the delivery driver and contact our Customer Service for both freight and parcel deliveries.
Need help?
Do you have a question about the DREAMCART 2 and is the answer not in the manual?
Questions and answers