Table of Contents
Advertisement
Quick Links
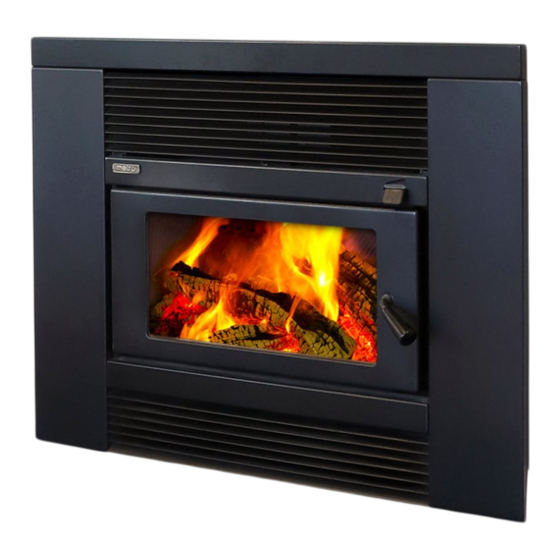
MEGA SMART BUILT-IN
INSTALLATION
Wood fire installation and operation manual
Installation Important information .................................................................... Page 2
Preparing the wall/opening cavity .................................................................... Page 3
Installing the Mega Smart Built-In .................................................................... Page 5
Installing the ECO Built-In flue kit ..................................................................... Page 6
Floor protector requirements ............................................................................... Page 8
Fitting the fascia ......................................................................................................... Page 10
Operation Important information ......................................................................Page 11
19 Oropuriri Road, New Plymouth 4312
info@metrofires.co.nz | www.metrofires.co.nz
Where to install a Metro in your home .........................................................Page 12
Getting to know your Metro .................................................................................Page 12
Operating your Metro ...............................................................................................Page 12
Cleaning and maintenance ................................................................................ Page 13
Replacement parts .................................................................................................. Page 14
Troubleshooting .......................................................................................................... Page 15
Metro warranty ............................................................................................................ Page 16
Advertisement
Table of Contents

Related Manuals for metrofires MEGA SMART BUILT-IN


Summary of Contents for metrofires MEGA SMART BUILT-IN
-
Page 1: Table Of Contents
Where to install a Metro in your home ............Page 12 Preparing the wall/opening cavity ..............Page 3 Getting to know your Metro .................Page 12 Installing the Mega Smart Built-In ..............Page 5 Operating your Metro ....................Page 12 Installing the ECO Built-In flue kit ..............Page 6 Cleaning and maintenance ................ -
Page 2: Important Installation Information
The Mega Smart Built-In The function of the Metro Mega Smart Built-In is to enable the fire to be installed into a timber framed wall replacing a masonry chimney at a fraction of the cost. -
Page 3: Preparing The Wall/Opening Cavity
STAGE 1 - CONSTRUCTION AND PREPARATION OF THE WALL OPENING/CAVITY WARNING! Important Information Diagram 1 • Access is required to fit the flue spigot adaptor to the Mega Smart firebox and for installation of the ECO Built-In flue kit. Pioneer Manufacturing recommend lining the walls of the enclosure after the fire and flue kit have been installed. - Page 4 Venting through the top of the enclosure using the ‘ECO Option Kit’ with As the Mega Smart Built-In is built into an enclosure, the enclosure must the Metro ECO Built-In flue kit. If you choose to vent the enclosure with be vented using one of the three options detailed below.
-
Page 5: Installing The Mega Smart Built-In
• If you are fitting the water heater to the Mega Smart built-in, please refer to the installation instructions included with the water heater. The Mega Smart booster is designed to fit externally to the firebox on either side and is best fitted prior to installing the fire into the enclosure. -
Page 6: Installing The Eco Built-In Flue Kit
Metro ECO Built-in flue kit. Only the Metro ECO Built-In flue kit can be used for installation with the Metro Mega Smart Built-In wood fire. • The top of the flue must terminate a minimum of 4.6 metres above the top of the floor protector. - Page 7 STAGE 3 - INSTALLATION OF THE METRO ECO BUILT-IN FLUE KIT Fit the ECO cowl top (B) into the ECO cowl housing (C). Push both sections together until the swage ring on (B) rests completely on the open end of the cowl housing (C). Drill through the two pre-punched holes in the ECO cowl housing and secure these two sections together with stainless steel rivets.
-
Page 8: Floor Protector Requirements
(behind the fascia) and must be a minimum width of 1057mm. This floor protector must be a minimum width of 1057mm and a minimum Note: You will need to raise the Mega Smart Built-In firebox by the same overall depth of 505mm. - Page 9 STAGE 4 - CONSTRUCTION AND INSTALLATION OF THE FLOOR PROTECTOR (HEARTH) ø250mm ø250mm Stud wall Stud wall ø200mm ø200mm Wall lining Wall lining ø150mm ø150mm Diagram 7 Diagram 8 Spigot adapter Mega Smart firebox Spigot adapter Mega Smart firebox Insulated floor Insulated floor protector protector VZCC...
-
Page 10: Fitting The Fascia
STAGE 5 - FASCIA FITMENT Mantel clearance DO NOT lift the fascia by the louvres as they can bend. On a flat surface, open the fascia carton and remove the door. Taking the A timber or combustible mantel must not project more than 150mm from door in both hands, with the spindle end in your right hand and the outer the finished wall lining and there must be a minimum distance of 500mm face of the door facing you, attach the door to the firebox as follows;... -
Page 11: Important Operation Information
WARNING! Important Information CAUTION! Important Information WE HIGHLY RECOMMEND YOU READ THIS ENTIRE MANUAL THIS APPLIANCE MUST BE MAINTAINED AND OPERATED AT AS INCORRECT OPERATION, MISUSE AND/OR LACK OF ALL TIMES IN ACCORDANCE WITH THIS MANUAL MAINTENANCE WILL VOID THE WARRANTY •... -
Page 12: Where To Install A Metro In Your Home
This is a safety feature that ensures the door cannot fall open if it is not latched securely. For the door to remain open, Mega Smart Built-In air control Mega Smart Built-In door opening you must open it fully. -
Page 13: Cleaning And Maintenance
CLEANING AND MAINTENANCE • DO NOT use any general household cleaners or solvents to clean the WARNING! Important Information glass on your Metro fire • If your door glass breaks it must be replaced with 5mm thick ceramic WE HIGHLY RECOMMEND YOU READ THIS ENTIRE SECTION AS glass which is available from your local Metro retailer LACK OF MAINTENANCE AND SERVICING PARTS AS REQUIRED •... -
Page 14: Replacement Parts
Note: Cracks in the promet are not uncommon and have no adverse effect on the operation of your Metro. These cracks are the result of Note: The Mega Smart Built-In features a two piece top baffle. intense heat coupled with expansion and contraction. Impact damage •... -
Page 15: Troubleshooting
TROUBLESHOOTING If your Metro is installed correctly, your fuel is dry and you operate your Air turbulence and/or negative air pressure influences around the flue fire correctly, you will find it to be a pleasure to use. Metro’s many years of termination can be caused by too close or overhanging trees or natural/ experience within the wood heating industry has shown that dissatisfaction artificial ridges etc. -
Page 16: Metro Warranty
WARRANTY • This warranty covers appliance like for like replacement or repair at CAUTION! Important Information the manufacturer’s discretion but excludes freight, travel, installation, labour and/or any other associated costs Your Metro fire must be regularly maintained and we recommend •...
Need help?
Do you have a question about the MEGA SMART BUILT-IN and is the answer not in the manual?
Questions and answers